2019 FORD F650/750 coolant reservoir
[x] Cancel search: coolant reservoirPage 60 of 387
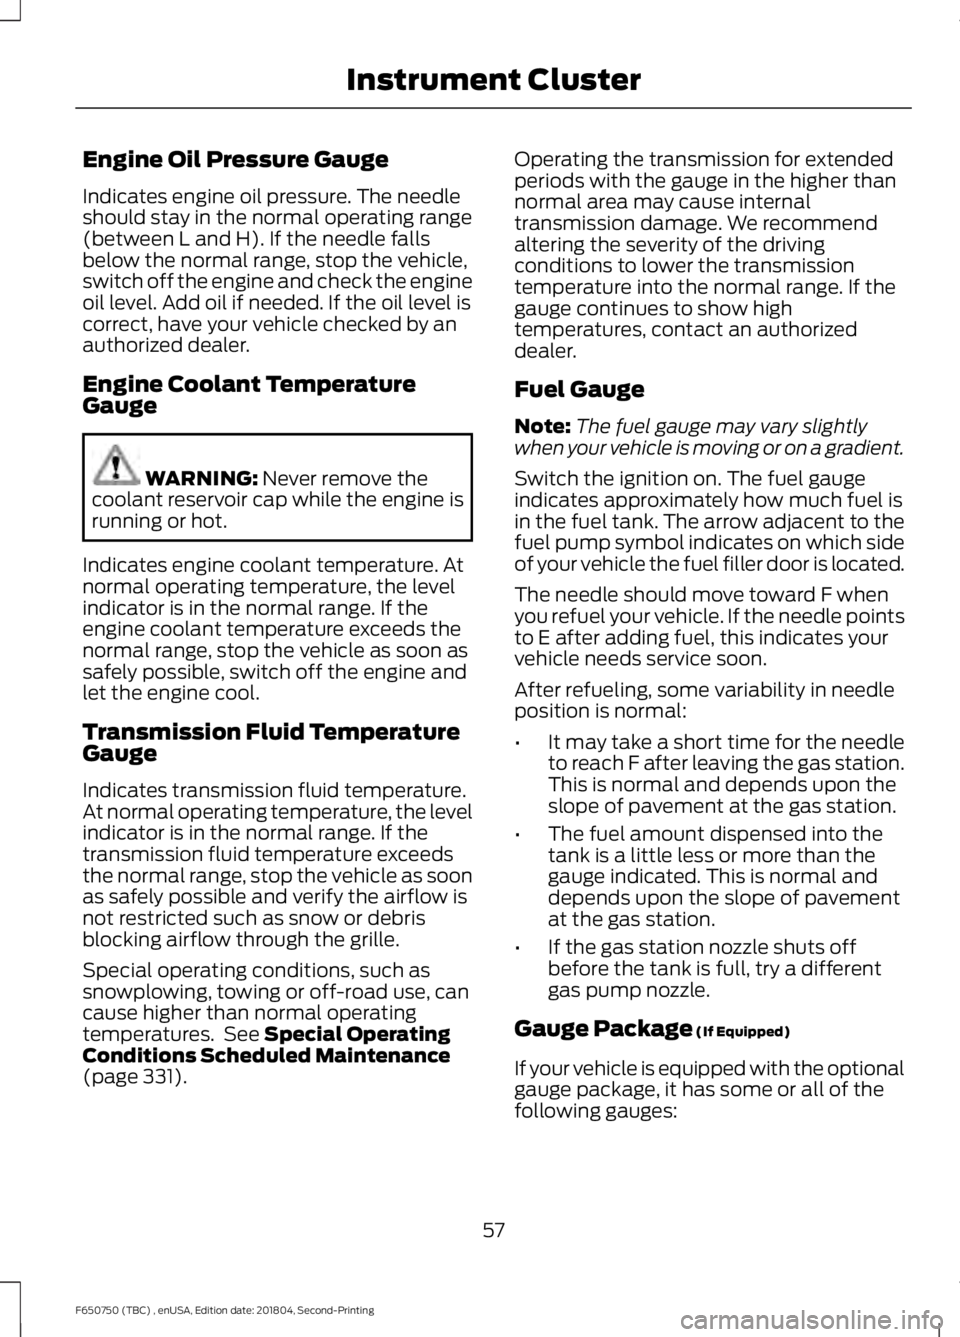
Engine Oil Pressure Gauge
Indicates engine oil pressure. The needle
should stay in the normal operating range
(between L and H). If the needle falls
below the normal range, stop the vehicle,
switch off the engine and check the engine
oil level. Add oil if needed. If the oil level is
correct, have your vehicle checked by an
authorized dealer.
Engine Coolant Temperature
Gauge
WARNING: Never remove the
coolant reservoir cap while the engine is
running or hot.
Indicates engine coolant temperature. At
normal operating temperature, the level
indicator is in the normal range. If the
engine coolant temperature exceeds the
normal range, stop the vehicle as soon as
safely possible, switch off the engine and
let the engine cool.
Transmission Fluid Temperature
Gauge
Indicates transmission fluid temperature.
At normal operating temperature, the level
indicator is in the normal range. If the
transmission fluid temperature exceeds
the normal range, stop the vehicle as soon
as safely possible and verify the airflow is
not restricted such as snow or debris
blocking airflow through the grille.
Special operating conditions, such as
snowplowing, towing or off-road use, can
cause higher than normal operating
temperatures. See
Special Operating
Conditions Scheduled Maintenance
(page
331). Operating the transmission for extended
periods with the gauge in the higher than
normal area may cause internal
transmission damage. We recommend
altering the severity of the driving
conditions to lower the transmission
temperature into the normal range. If the
gauge continues to show high
temperatures, contact an authorized
dealer.
Fuel Gauge
Note:
The fuel gauge may vary slightly
when your vehicle is moving or on a gradient.
Switch the ignition on. The fuel gauge
indicates approximately how much fuel is
in the fuel tank. The arrow adjacent to the
fuel pump symbol indicates on which side
of your vehicle the fuel filler door is located.
The needle should move toward F when
you refuel your vehicle. If the needle points
to E after adding fuel, this indicates your
vehicle needs service soon.
After refueling, some variability in needle
position is normal:
• It may take a short time for the needle
to reach F after leaving the gas station.
This is normal and depends upon the
slope of pavement at the gas station.
• The fuel amount dispensed into the
tank is a little less or more than the
gauge indicated. This is normal and
depends upon the slope of pavement
at the gas station.
• If the gas station nozzle shuts off
before the tank is full, try a different
gas pump nozzle.
Gauge Package
(If Equipped)
If your vehicle is equipped with the optional
gauge package, it has some or all of the
following gauges:
57
F650750 (TBC) , enUSA, Edition date: 201804, Second-Printing Instrument Cluster
Page 62 of 387
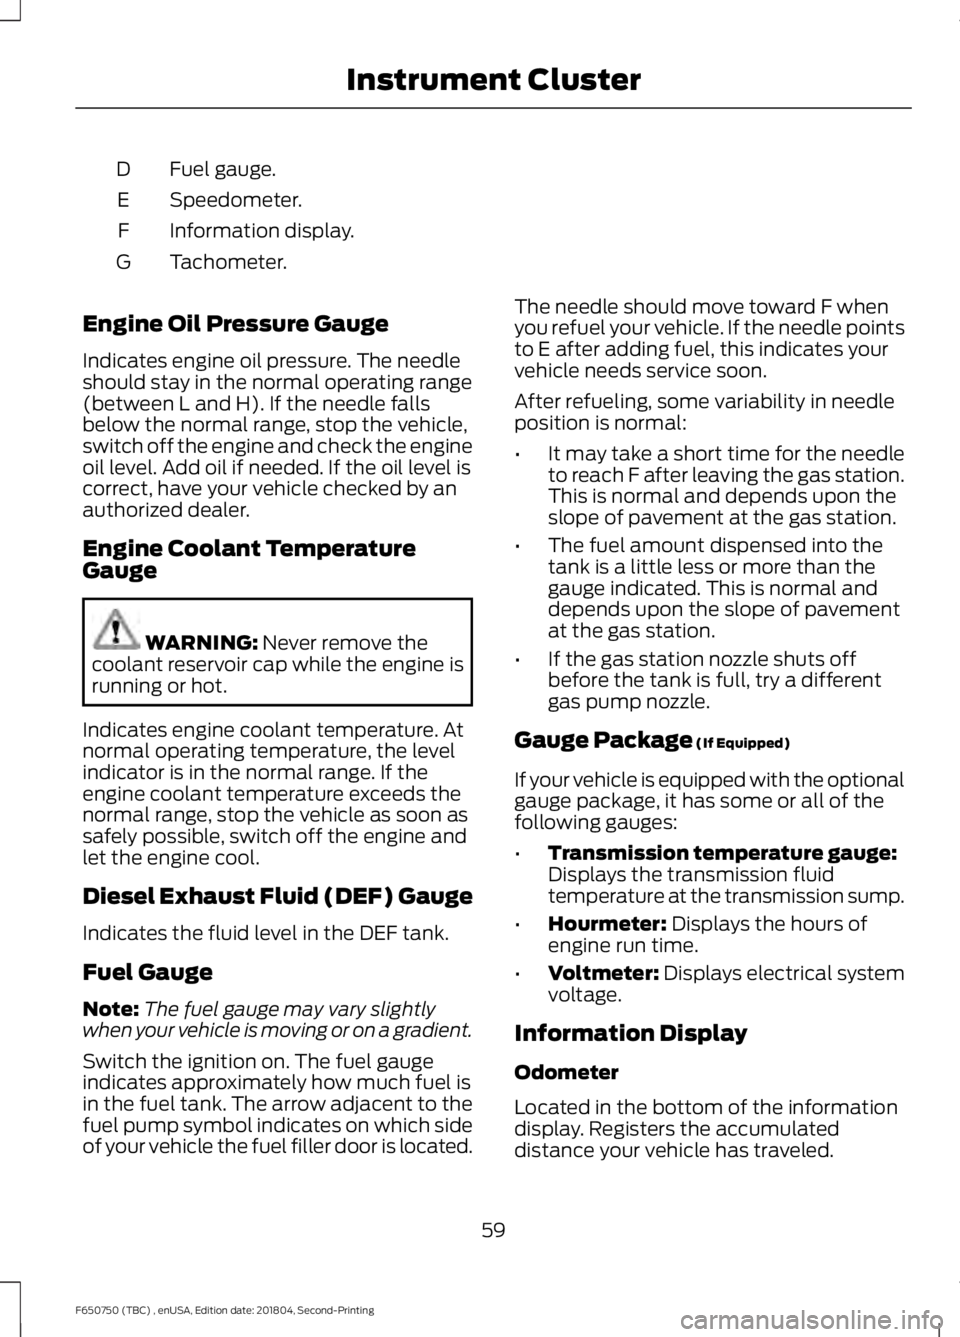
Fuel gauge.
D
Speedometer.
E
Information display.
F
Tachometer.
G
Engine Oil Pressure Gauge
Indicates engine oil pressure. The needle
should stay in the normal operating range
(between L and H). If the needle falls
below the normal range, stop the vehicle,
switch off the engine and check the engine
oil level. Add oil if needed. If the oil level is
correct, have your vehicle checked by an
authorized dealer.
Engine Coolant Temperature
Gauge WARNING: Never remove the
coolant reservoir cap while the engine is
running or hot.
Indicates engine coolant temperature. At
normal operating temperature, the level
indicator is in the normal range. If the
engine coolant temperature exceeds the
normal range, stop the vehicle as soon as
safely possible, switch off the engine and
let the engine cool.
Diesel Exhaust Fluid (DEF) Gauge
Indicates the fluid level in the DEF tank.
Fuel Gauge
Note: The fuel gauge may vary slightly
when your vehicle is moving or on a gradient.
Switch the ignition on. The fuel gauge
indicates approximately how much fuel is
in the fuel tank. The arrow adjacent to the
fuel pump symbol indicates on which side
of your vehicle the fuel filler door is located. The needle should move toward F when
you refuel your vehicle. If the needle points
to E after adding fuel, this indicates your
vehicle needs service soon.
After refueling, some variability in needle
position is normal:
•
It may take a short time for the needle
to reach F after leaving the gas station.
This is normal and depends upon the
slope of pavement at the gas station.
• The fuel amount dispensed into the
tank is a little less or more than the
gauge indicated. This is normal and
depends upon the slope of pavement
at the gas station.
• If the gas station nozzle shuts off
before the tank is full, try a different
gas pump nozzle.
Gauge Package
(If Equipped)
If your vehicle is equipped with the optional
gauge package, it has some or all of the
following gauges:
• Transmission temperature gauge:
Displays the transmission fluid
temperature at the transmission sump.
• Hourmeter:
Displays the hours of
engine run time.
• Voltmeter:
Displays electrical system
voltage.
Information Display
Odometer
Located in the bottom of the information
display. Registers the accumulated
distance your vehicle has traveled.
59
F650750 (TBC) , enUSA, Edition date: 201804, Second-Printing Instrument Cluster
Page 181 of 387
VEHICLE INSPECTION
INFORMATION
To make sure your vehicle is ready to
operate, conduct a pre-trip inspection at
the beginning of each work period. Follow
the steps listed in this section to verify a
proper vehicle inspection procedure.
WARNING: Exercise great caution
when working on a vehicle equipped with
an automatic fan clutch. The fan starts
in motion only after the engine coolant
reaches a predetermined temperature
or the refrigerant pressure (if equipped
with air conditioning) reaches a
predetermined setting. The fan starts at
this point with no advance warning.
Never reach near, or permit objects to
protrude into, the fan blade radius while
the engine is running as this could result
in vehicle damage, personal injury or
death. WARNING:
Do not operate the
vehicle if any suspension conditions
listed in the following charts are evident.
Loss of steering or suspension could
result in property damage, personal injury
or death. WARNING:
If a wheel must be
changed, obtain expert tire service help.
Mounting and un-mounting of tires
should only be performed by a qualified
technician using necessary safety
procedures and equipment, otherwise
the result could be property damage,
personal injury or death.
Note: Always make sure you apply the
parking brake before starting the engine. Engine compartment (with engine off)
Use the dipstick to verify the oil level is in the proper operating
range. See
Engine Oil Dipstick (page 192).
Engine oil
Look through the plastic reservoir and verify the coolant level
is within the proper operating range. Do not remove the
pressure cap until the coolant has cooled. See
Engine
Coolant Check (page 200).
Engine coolant
Verify that the fluid level is in the proper operating range. See
Power Steering Fluid Check
(page 206).
Power steering fluid
Remove the master cylinder caps and inspect the fluid level.
See
Brake Fluid Check (page 205).
Brake fluid
178
F650750 (TBC) , enUSA, Edition date: 201804, Second-Printing Vehicle Inspection Guide
Page 193 of 387
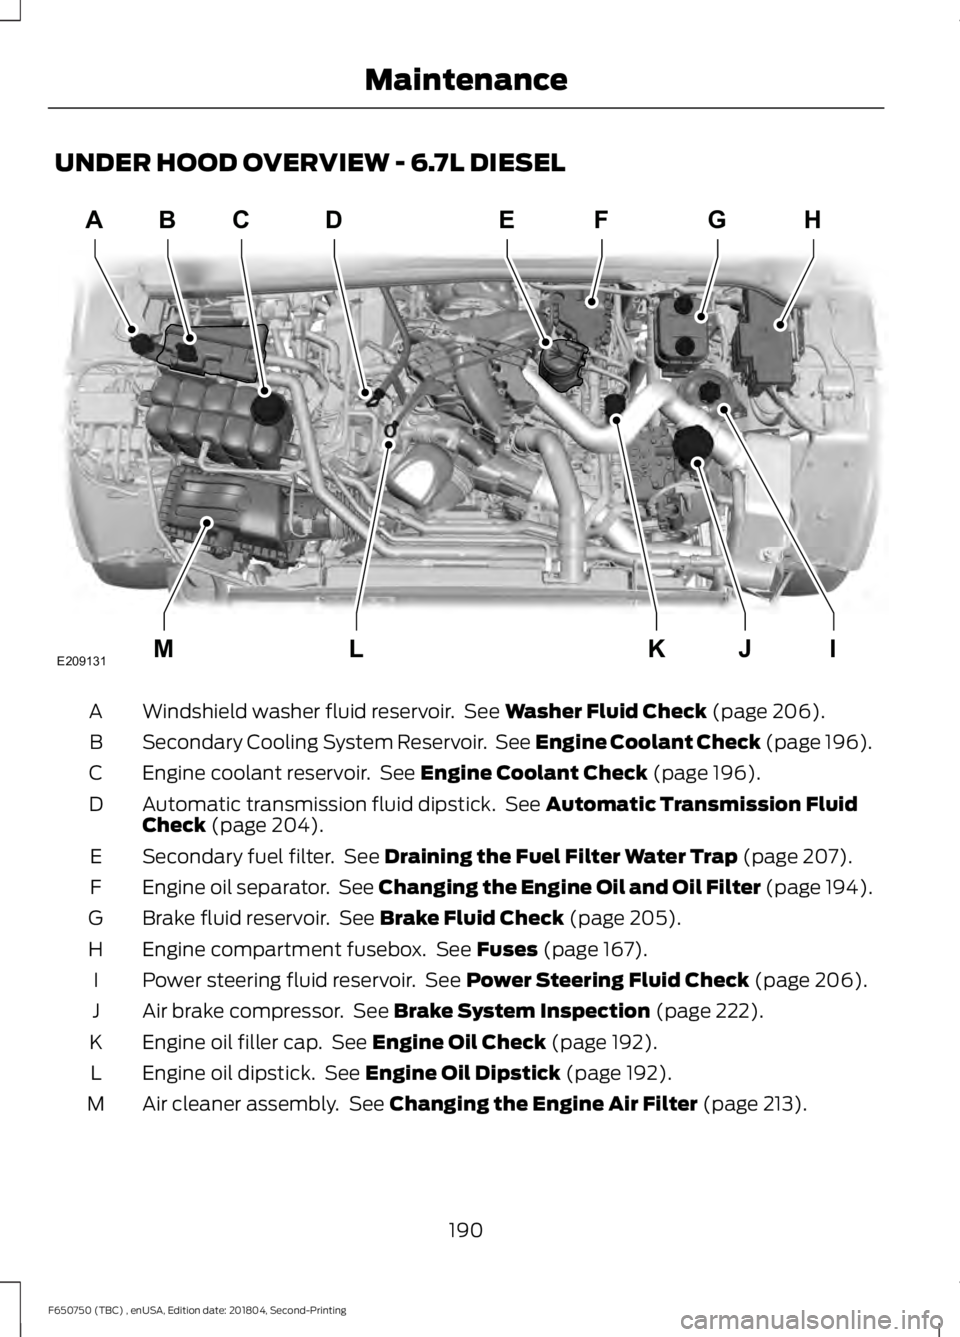
UNDER HOOD OVERVIEW - 6.7L DIESEL
Windshield washer fluid reservoir. See Washer Fluid Check (page 206).
A
Secondary Cooling System Reservoir. See Engine Coolant Check (page 196).
B
Engine coolant reservoir. See
Engine Coolant Check (page 196).
C
Automatic transmission fluid dipstick. See
Automatic Transmission Fluid
Check (page 204).
D
Secondary fuel filter. See
Draining the Fuel Filter Water Trap (page 207).
E
Engine oil separator. See
Changing the Engine Oil and Oil Filter (page 194).
F
Brake fluid reservoir. See
Brake Fluid Check (page 205).
G
Engine compartment fusebox. See
Fuses (page 167).
H
Power steering fluid reservoir. See
Power Steering Fluid Check (page 206).
I
Air brake compressor. See
Brake System Inspection (page 222).
J
Engine oil filler cap. See
Engine Oil Check (page 192).
K
Engine oil dipstick. See
Engine Oil Dipstick (page 192).
L
Air cleaner assembly. See
Changing the Engine Air Filter (page 213).
M
190
F650750 (TBC) , enUSA, Edition date: 201804, Second-Printing MaintenanceABD
IJKLM
FEGH
E209131C
Page 194 of 387
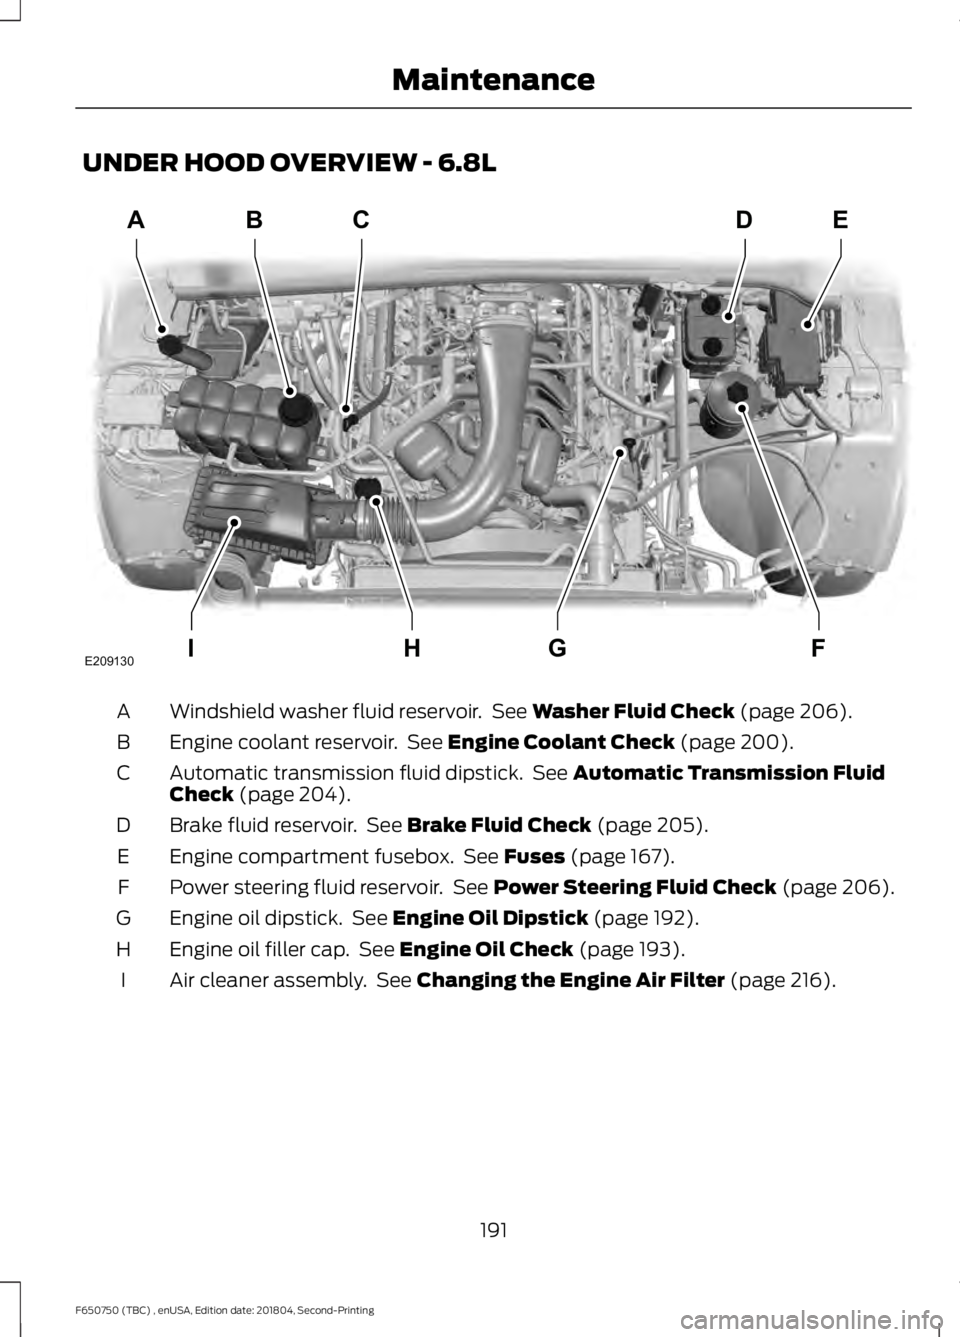
UNDER HOOD OVERVIEW - 6.8L
Windshield washer fluid reservoir. See Washer Fluid Check (page 206).
A
Engine coolant reservoir. See
Engine Coolant Check (page 200).
B
Automatic transmission fluid dipstick. See
Automatic Transmission Fluid
Check (page 204).
C
Brake fluid reservoir. See
Brake Fluid Check (page 205).
D
Engine compartment fusebox. See
Fuses (page 167).
E
Power steering fluid reservoir. See
Power Steering Fluid Check (page 206).
F
Engine oil dipstick. See
Engine Oil Dipstick (page 192).
G
Engine oil filler cap. See
Engine Oil Check (page 193).
H
Air cleaner assembly. See
Changing the Engine Air Filter (page 216).
I
191
F650750 (TBC) , enUSA, Edition date: 201804, Second-Printing MaintenanceABC
FGHI
DE
E209130
Page 199 of 387
4.
Make sure that the sealing surfaces on
the filter housing and cover are clean
and free of debris.
5. Install the new filter element.
6. Install the filter cover.
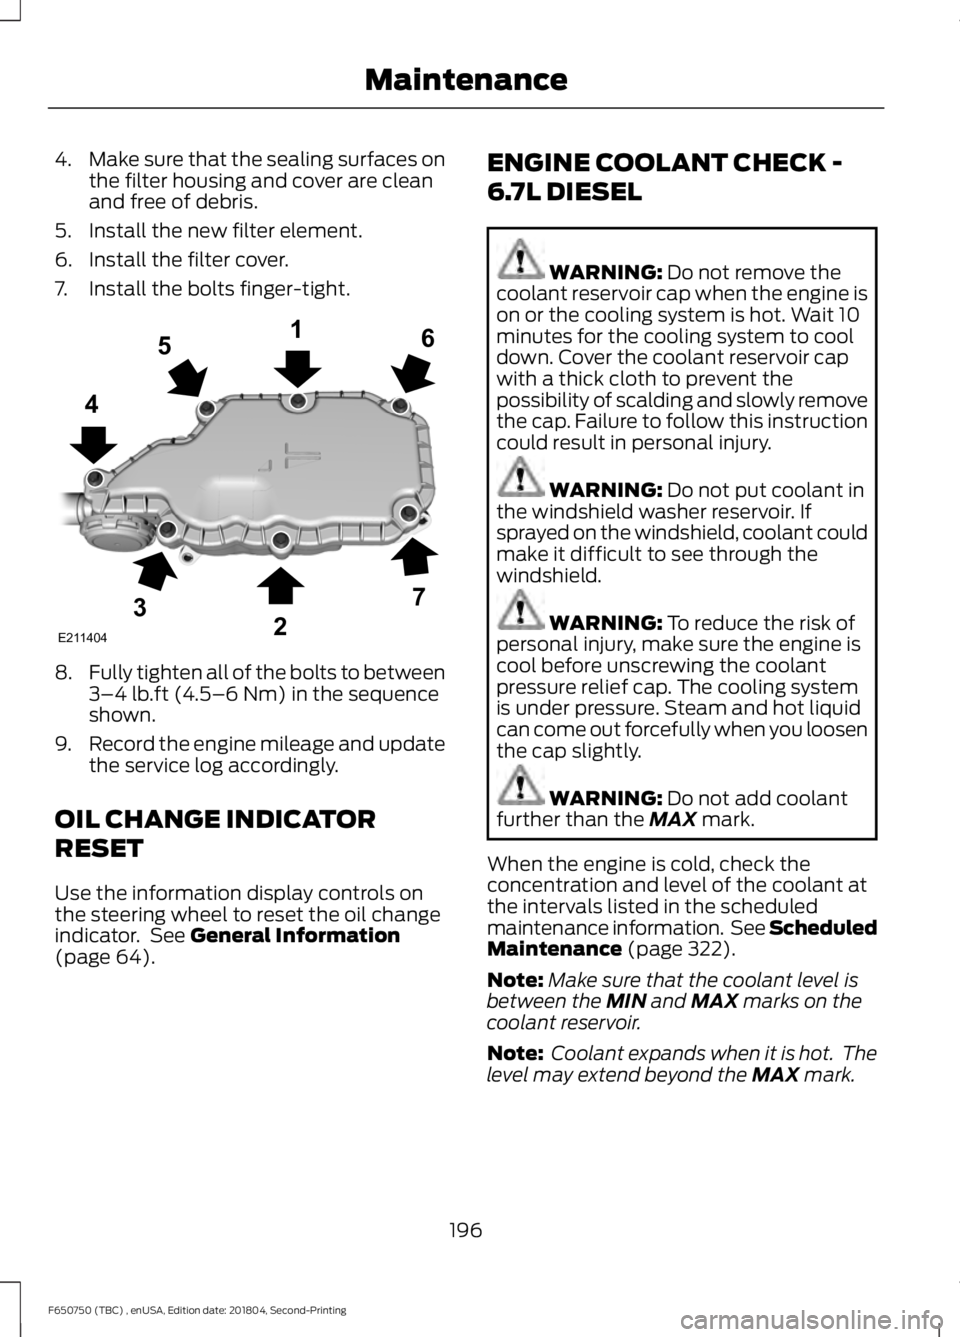
7. Install the bolts finger-tight. 8.
Fully tighten all of the bolts to between
3–4 lb.ft (4.5–6 Nm) in the sequence
shown.
9. Record the engine mileage and update
the service log accordingly.
OIL CHANGE INDICATOR
RESET
Use the information display controls on
the steering wheel to reset the oil change
indicator. See
General Information
(page 64). ENGINE COOLANT CHECK -
6.7L DIESEL WARNING:
Do not remove the
coolant reservoir cap when the engine is
on or the cooling system is hot. Wait 10
minutes for the cooling system to cool
down. Cover the coolant reservoir cap
with a thick cloth to prevent the
possibility of scalding and slowly remove
the cap. Failure to follow this instruction
could result in personal injury. WARNING:
Do not put coolant in
the windshield washer reservoir. If
sprayed on the windshield, coolant could
make it difficult to see through the
windshield. WARNING:
To reduce the risk of
personal injury, make sure the engine is
cool before unscrewing the coolant
pressure relief cap. The cooling system
is under pressure. Steam and hot liquid
can come out forcefully when you loosen
the cap slightly. WARNING:
Do not add coolant
further than the MAX mark.
When the engine is cold, check the
concentration and level of the coolant at
the intervals listed in the scheduled
maintenance information. See Scheduled
Maintenance
(page 322).
Note: Make sure that the coolant level is
between the
MIN and MAX marks on the
coolant reservoir.
Note: Coolant expands when it is hot. The
level may extend beyond the
MAX mark.
196
F650750 (TBC) , enUSA, Edition date: 201804, Second-Printing MaintenanceE211404
165
4
32
7
Page 200 of 387
Maintain coolant concentration within
48% to 50%, which equates to a freeze
point between -30°F (-34°C) and -34°F
(-37°C). Check the coolant concentration
using a refractometer. We do not
recommend the use of hydrometers or
coolant test strips for measuring coolant
concentration.
Adding Coolant
WARNING: Do not add engine
coolant when the engine is hot. Failure
to follow this instruction could result in
personal injury. WARNING:
Do not remove the
coolant reservoir cap when the engine is
on or the cooling system is hot. Wait 10
minutes for the cooling system to cool
down. Cover the coolant reservoir cap
with a thick cloth to prevent the
possibility of scalding and slowly remove
the cap. Failure to follow this instruction
could result in personal injury.
Note: Automotive fluids are not
interchangeable. Do not use coolant or
windshield washer fluid outside of its
specified function and vehicle location.
Note: Do not use stop leak pellets, cooling
system sealants, or additives as they can
cause damage to the engine cooling or
heating systems. Resulting component
damage may not be covered by the vehicle
Warranty. It is very important to use prediluted
coolant approved to the correct
specification to avoid plugging the small
passageways in the engine cooling system.
See
Capacities and Specifications
(page 261). Do not mix different colors or
types of coolant in your vehicle. Mixing of
engine coolants or using an incorrect
coolant may harm the engine or cooling
system components and may not be
covered by the vehicle Warranty.
Note: Coolants marketed for all makes and
models may not be approved to our
specifications and may cause damage to
the cooling system. Resulting component
damage may not be covered by the vehicle
Warranty.
If the coolant level is at or below the
minimum mark, immediately add
prediluted coolant.
For vehicles with overflow coolant systems
with a non-pressurized cap on the coolant
recovery system, add coolant to the
coolant recovery reservoir when the engine
is cool. Add prediluted coolant to the
maximum level. For all vehicles which have
a coolant degas system with a pressurized
cap, or if it is necessary to remove the
coolant pressure relief cap on the radiator,
follow these steps to add engine coolant:
1. Turn the engine off and let it cool.
2. Slowly unscrew the cap. Any pressure escapes as you unscrew the cap.
3. Slowly fill the coolant reservoir with prediluted engine coolant to within the
minimum and maximum range on the
engine coolant reservoir. If you
removed the radiator cap in an
overflow system, fill the radiator until
the coolant is visible and the radiator
is almost full. If you add coolant to
bring the level within the minimum and
maximum range when the engine is not
cold, the system may remain under
filled.
197
F650750 (TBC) , enUSA, Edition date: 201804, Second-Printing Maintenance
Page 201 of 387
4. Replace the coolant reservoir cap and
turn it clockwise until you feel a strong
resistance.
5. Check the coolant level in the coolant reservoir the next few times you drive
your vehicle. If necessary, add enough
prediluted engine coolant to bring the
coolant level to the proper level.
Note: If prediluted coolant is not available,
use the approved antifreeze concentrate
diluting it to 50/50 with distilled water. See
Capacities and Specifications (page 261).
Using water that has not been deionized
may contribute to deposit formation,
corrosion or plugging of the small cooling
system passageways.
If you have to add more than 1.1 qt (1 L) of
engine coolant per month, have your
vehicle checked as soon as possible.
Operating an engine with a low level of
coolant can result in engine overheating
and possible engine damage.
In case of emergency, you can add a large
amount of water without prediluted
coolant in order to reach a vehicle service
location. On arrival do the following:
1. Drain the cooling system.
2. Chemically clean the cooling system. We recommend Motorcraft Premium
Cooling System Flush.
3. Refill with prediluted coolant as soon as possible.
Water alone, without prediluted coolant,
can cause engine damage from corrosion,
overheating or freezing.
Do not use the following as a coolant
substitute:
• Alcohol.
• Methanol.
• Brine.
• Any coolant mixed with alcohol or
methanol antifreeze. Alcohol and other liquids can cause engine
damage from overheating or freezing.
Do not add extra inhibitors or non-specified
additives to the coolant. These can be
harmful and compromise the corrosion
protection of the coolant.
Engine and Secondary Cooling
System Refill Procedure
Perform this procedure when refilling the
engine or secondary cooling systems after
it has been drained or become extremely
low:
1. Before you remove the cap, turn the
engine off and let it cool.
2. When the engine is cool, wrap a thick cloth around the cap. Slowly turn cap
counterclockwise until pressure begins
to release.
3. Step back when the pressure releases.
4. When you are sure that all the pressure
has been released, use the cloth to turn
the cap counterclockwise and then
remove it.
5. Slowly add prediluted engine coolant to the coolant reservoir until the
coolant level is within the minimum
and maximum range as listed on the
reservoir.
6. Reinstall the pressure relief cap.
7. Start and run the engine at 2000 rpm for 2 minutes.
8. Shut the engine off, and remove the pressure relief cap as previously
outlined.
9. If required, add prediluted engine coolant to the coolant reservoir until
the coolant level is within the minimum
and maximum range as listed on the
reservoir.
198
F650750 (TBC) , enUSA, Edition date: 201804, Second-Printing Maintenance