2019 FORD F250 SUPER DUTY rear axle
[x] Cancel search: rear axlePage 6 of 666
Storage Compartments
Center Console
.............................................170
Overhead Console .......................................
170
Under Seat Storage ....................................
170
Starting and Stopping the Engine
General Information ....................................
173
Ignition Switch ...............................................
173
Keyless Starting ............................................
174
Starting a Gasoline Engine - 6.2L/6.8L ........................................................................\
.
174
Starting a Diesel Engine - 6.7L Diesel ........................................................................\
.
176
Switching Off the Engine - 6.7L Diesel ........................................................................\
..
181
Engine Idle Shutdown .................................
181
Engine Block Heater ....................................
181
Fuel and Refueling
Safety Precautions .....................................
183
Fuel Quality - E85 .......................................
184
Fuel Quality - Diesel ...................................
185
Fuel Quality - Gasoline ..............................
187
Running Out of Fuel ...................................
188
Refueling - Gasoline ...................................
188
Refueling - Diesel ........................................
189
Fuel Consumption .......................................
192
Engine Emission Control
Emission Law ................................................
193
Catalytic Converter .....................................
194
Selective Catalytic Reductant System - Diesel ...........................................................
196
Diesel Particulate Filter ............................
200
Transmission
Automatic Transmission .........................
206
Power Take-Off .............................................
211Four-Wheel Drive
Using Four-Wheel Drive
............................
212
Rear Axle
Limited Slip Differential .............................
221
Electronic Locking Differential ................
221
Brakes
General Information ...................................
223
Hints on Driving With Anti-Lock Brakes ........................................................................\
225
Parking Brake ................................................
225
Hill Start Assist ............................................
225
Traction Control
Principle of Operation ................................
227
Using Traction Control ...............................
227
Stability Control
Principle of Operation ...............................
228
Using Stability Control ..............................
229
Terrain Control
Principle of Operation ................................
231
Using Hill Descent Control .......................
231
Parking Aids
Principle of Operation ...............................
233
Rear Parking Aid ..........................................
233
Rear View Camera ......................................
234
360 Degree Camera ...................................
237
Cruise Control
Principle of Operation ................................
241
Using Cruise Control ...................................
241
Using Adaptive Cruise Control ...............
242
Driving Aids
Driver Alert ....................................................
249
3
Super Duty (TFE) Canada/United States of America, enUSA, Edition date: 201804, Fourth-Printing Table of Contents
Page 221 of 666
After driving through mud, clean off residue
stuck to rotating driveshafts and tires.
Excess mud stuck on tires and rotating
driveshafts can cause an imbalance that
could damage drive components.
Water
If you must drive through high water, drive
slowly. Traction or brake capability may
be limited.
When driving through water, determine the
depth and avoid water higher than the
bottom of the hubs. If the ignition system
gets wet, your vehicle may stall.
Once through water, always try the brakes.
Wet brakes do not stop your vehicle as
effectively as dry brakes. Drying can be
improved by applying light pressure to the
brake pedal while moving slowly.
Note:
Driving through deep water may
damage the transmission. If the front or rear
axle is submerged in water, the axle
lubricant and power transfer unit lubricant
should be checked and changed if
necessary.
Driving on Hilly or Sloping Terrain
Although natural obstacles may make it
necessary to travel diagonally up or down
a hill or steep incline, you should always
try to drive straight up or straight down.
Note: Avoid turning on steep slopes or hills.
A danger lies in losing traction, slipping
sideways and possible vehicle roll over.
Whenever driving on a hill, determine
beforehand the route you will use. Do not
drive over the crest of a hill without seeing
what conditions are on the other side. Do
not drive in reverse over a hill without the
aid of an observer.
When climbing a steep slope or hill, start
in a lower gear rather than downshifting to
a lower gear from a higher gear once the
ascent has started. This reduces strain on
the engine and the possibility of stalling. If your vehicle stalls, do not try to turn
around because this could cause vehicle
roll over. It is better to reverse back to a
safe location.
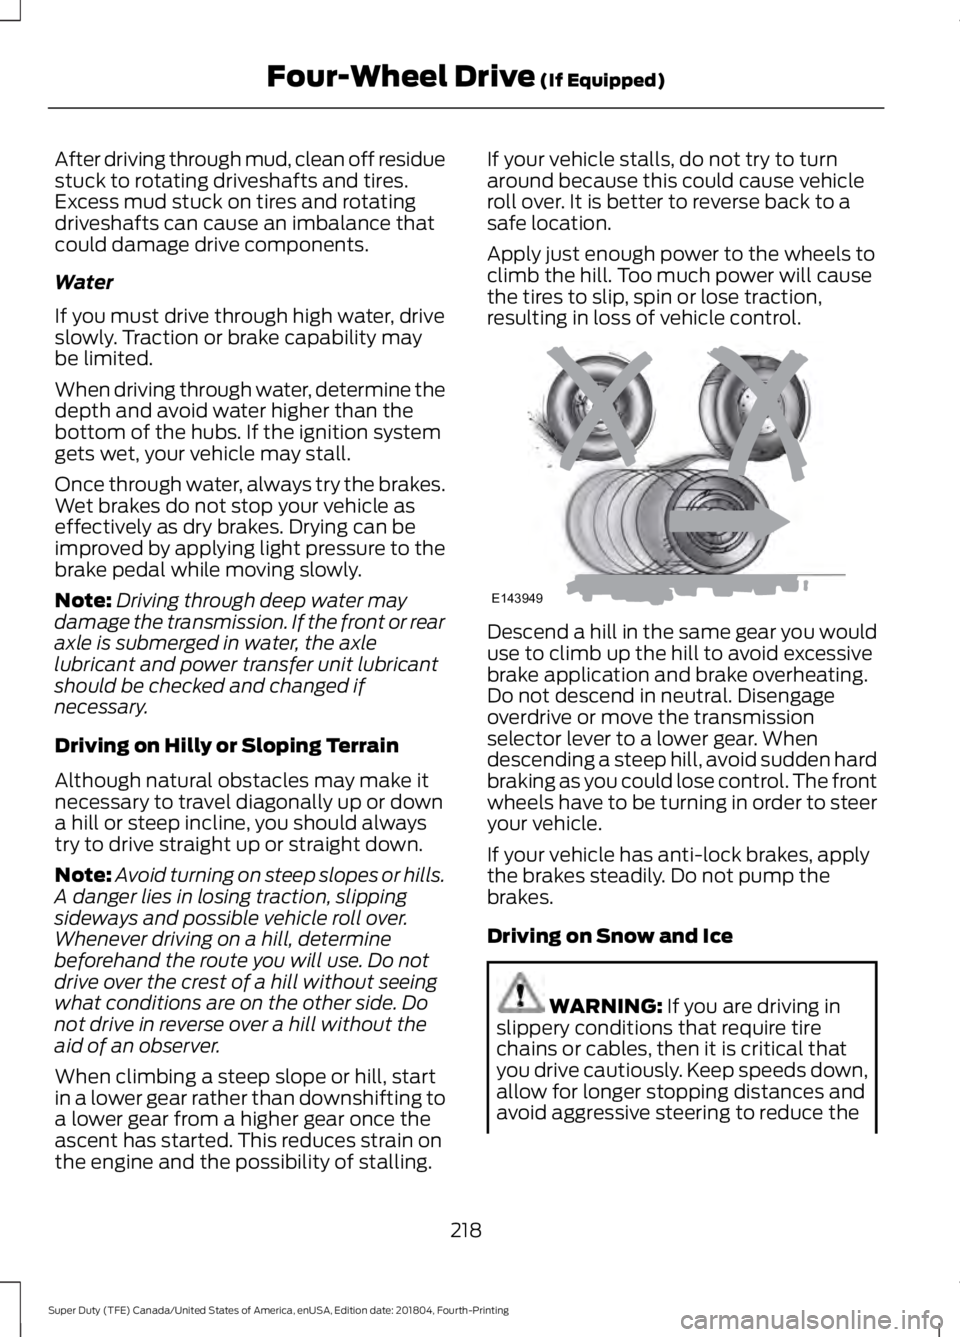
Apply just enough power to the wheels to
climb the hill. Too much power will cause
the tires to slip, spin or lose traction,
resulting in loss of vehicle control.
Descend a hill in the same gear you would
use to climb up the hill to avoid excessive
brake application and brake overheating.
Do not descend in neutral. Disengage
overdrive or move the transmission
selector lever to a lower gear. When
descending a steep hill, avoid sudden hard
braking as you could lose control. The front
wheels have to be turning in order to steer
your vehicle.
If your vehicle has anti-lock brakes, apply
the brakes steadily. Do not pump the
brakes.
Driving on Snow and Ice
WARNING: If you are driving in
slippery conditions that require tire
chains or cables, then it is critical that
you drive cautiously. Keep speeds down,
allow for longer stopping distances and
avoid aggressive steering to reduce the
218
Super Duty (TFE) Canada/United States of America, enUSA, Edition date: 201804, Fourth-Printing Four-Wheel Drive
(If Equipped)E143949
Page 224 of 666
LIMITED SLIP DIFFERENTIAL
This axle provides added traction on
slippery surfaces, particularly when one
wheel is on a poor traction surface. Under
normal conditions, the limited-slip axle
functions like a standard rear axle. The axle
may exhibit a slight noise or vibration
during tight turns with low vehicle speed.
This is normal behavior and indicates the
axle is working.
ELECTRONIC LOCKING
DIFFERENTIAL (IF EQUIPPED)
Note: The electronic locking differential is
for off-road use only and is not for use on
dry pavement. Using the electronic locking
differential on dry pavement will result in
increased tire wear, noise and vibration.
The electronic locking differential is a
device housed in the rear axle that allows
both rear wheels to turn at the same
speed. The electronic locking differential
can provide additional traction should your
vehicle become stuck. You can activate
the differential electronically and shift it
on the fly within the differential operating
speed range. The differential is for use in
mud, rocks, sand, or any off-road condition
where you need maximum traction. It is
not for use on dry pavement.
The following conditions will affect the
electronic locking differential:
• The electronic locking differential will
not engage if your vehicle speed is
above
20 mph (32 km/h) in 4x2 or 4x4
High modes.
• The electronic locking differential will
not engage if your vehicle speed is
above or
56 mph (90 km/h) in 4X4
Low. •
The electronic locking differential may
not engage if you press your
accelerator pedal during an
engagement attempt. A message may
display in the instrument display
guiding you to release the accelerator
pedal.
• In 4x2 or 4x4 High modes, the
electronic locking differential will
automatically disengage at speeds
above
25 mph (41 km/h) and will
automatically reengage at speeds
below
20 mph (32 km/h).
• In 4L (4X4 low), the electronic locking
differential will automatically
disengage at speeds above
62 mph
(100 km/h) and will automatically
reengage at speeds below 56 mph
(90 km/h).
• The AdvanceTrac system has the
ability to take over control of the
electronic locking differential and
disable it during driving maneuvers
when necessary.
When you switch the system on, if you do
not meet the required conditions for
electronic locking differential activation,
the instrument cluster will display the
appropriate information guiding you
through the proper activation process.
Activating the Electronic Locking
Differential
Note: Do not use electronic locking
differential on dry, hard surfaced roads.
Doing so will produce excessive noise,
vibration and increase tire wear.
Note: If the electronic locking differential
has difficulty disengaging, release the
accelerator pedal and turn the steering
wheel in the opposite direction while rolling.
221
Super Duty (TFE) Canada/United States of America, enUSA, Edition date: 201804, Fourth-Printing Rear Axle
Page 225 of 666
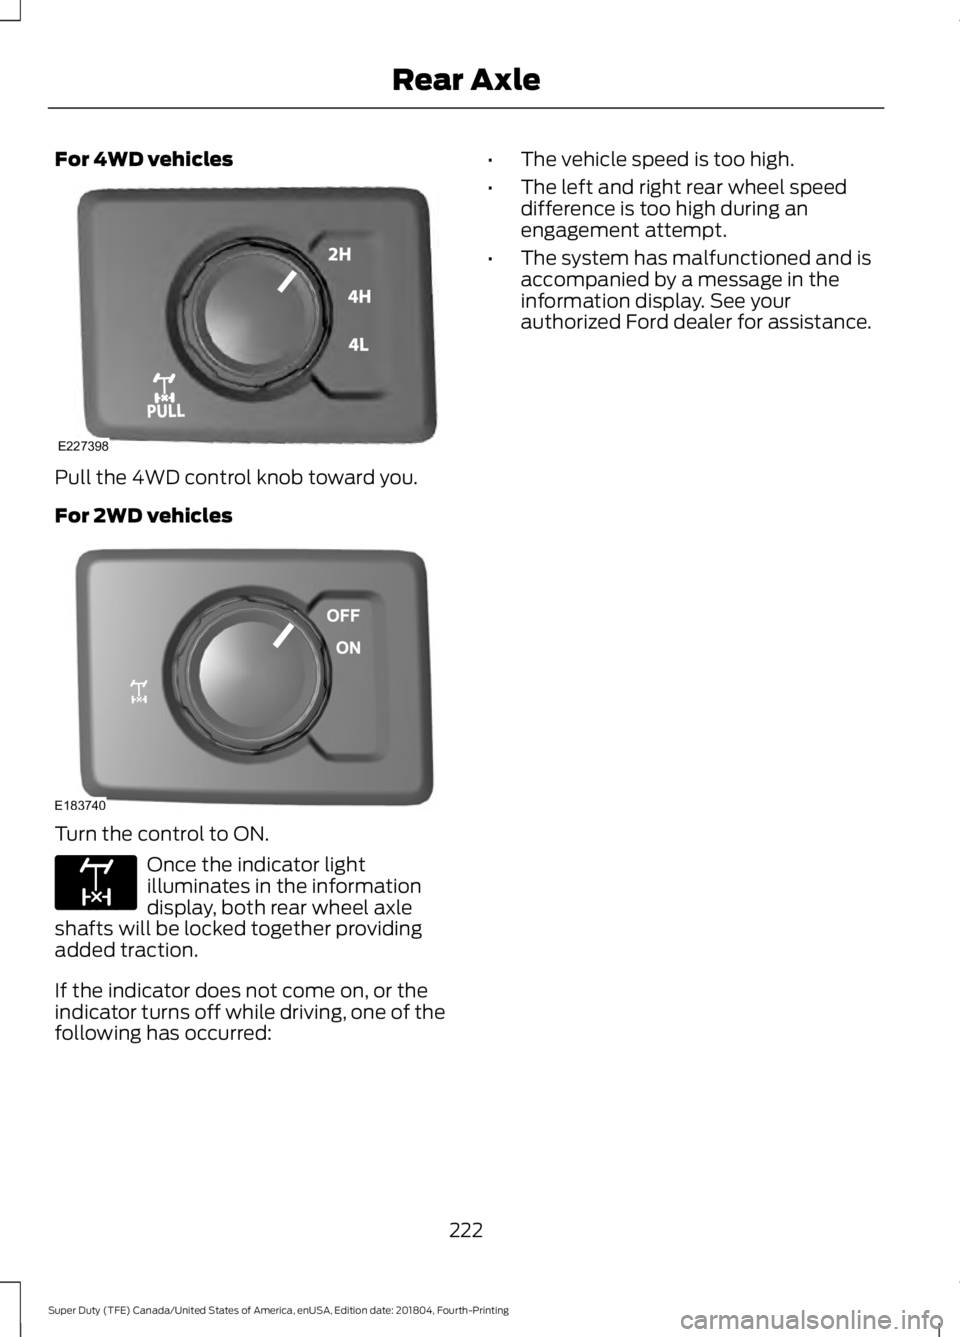
For 4WD vehicles
Pull the 4WD control knob toward you.
For 2WD vehicles
Turn the control to ON.
Once the indicator light
illuminates in the information
display, both rear wheel axle
shafts will be locked together providing
added traction.
If the indicator does not come on, or the
indicator turns off while driving, one of the
following has occurred: •
The vehicle speed is too high.
• The left and right rear wheel speed
difference is too high during an
engagement attempt.
• The system has malfunctioned and is
accompanied by a message in the
information display. See your
authorized Ford dealer for assistance.
222
Super Duty (TFE) Canada/United States of America, enUSA, Edition date: 201804, Fourth-Printing Rear AxleE227398 E183740 E163170
Page 270 of 666
is the maximum payload for your
vehicle as built by the assembly
plant. If you install any additional
equipment on your vehicle, you
must determine the new payload.
Subtract the weight of the
equipment from the payload listed
on the Tire and Loading label.
When towing, trailer tongue
weight or king pin weight is also
part of payload.
WARNING: The
appropriate loading capacity of
your vehicle can be limited either
by volume capacity (how much
space is available) or by payload
capacity (how much weight the
vehicle should carry). Once you
have reached the maximum
payload of your vehicle, do not
add more cargo, even if there is
space available. Overloading or
improperly loading your vehicle
can contribute to loss of vehicle
control and vehicle rollover.
GAWR (Gross Axle Weight
Rating)
GAWR is the maximum allowable
weight that a single axle (front or
rear) can carry. These numbers
are on the Safety Compliance
Certification label. The label is
located on the door hinge pillar,
door-latch post, or the door edge
that meets the door-latch post,
next to the driver seating position. The total load on each axle must
never exceed its Gross Axle
Weight Rating.
GVWR (Gross Vehicle Weight
Rating)
GVWR is the maximum allowable
weight of the fully loaded vehicle.
This includes all options,
equipment, passengers and cargo.
It appears on the Safety
Compliance Certification label.
The label is located on the door
hinge pillar, door-latch post, or the
door edge that meets the
door-latch post, next to the driver
seating position.
The gross vehicle weight must
never exceed the Gross Vehicle
Weight Rating.
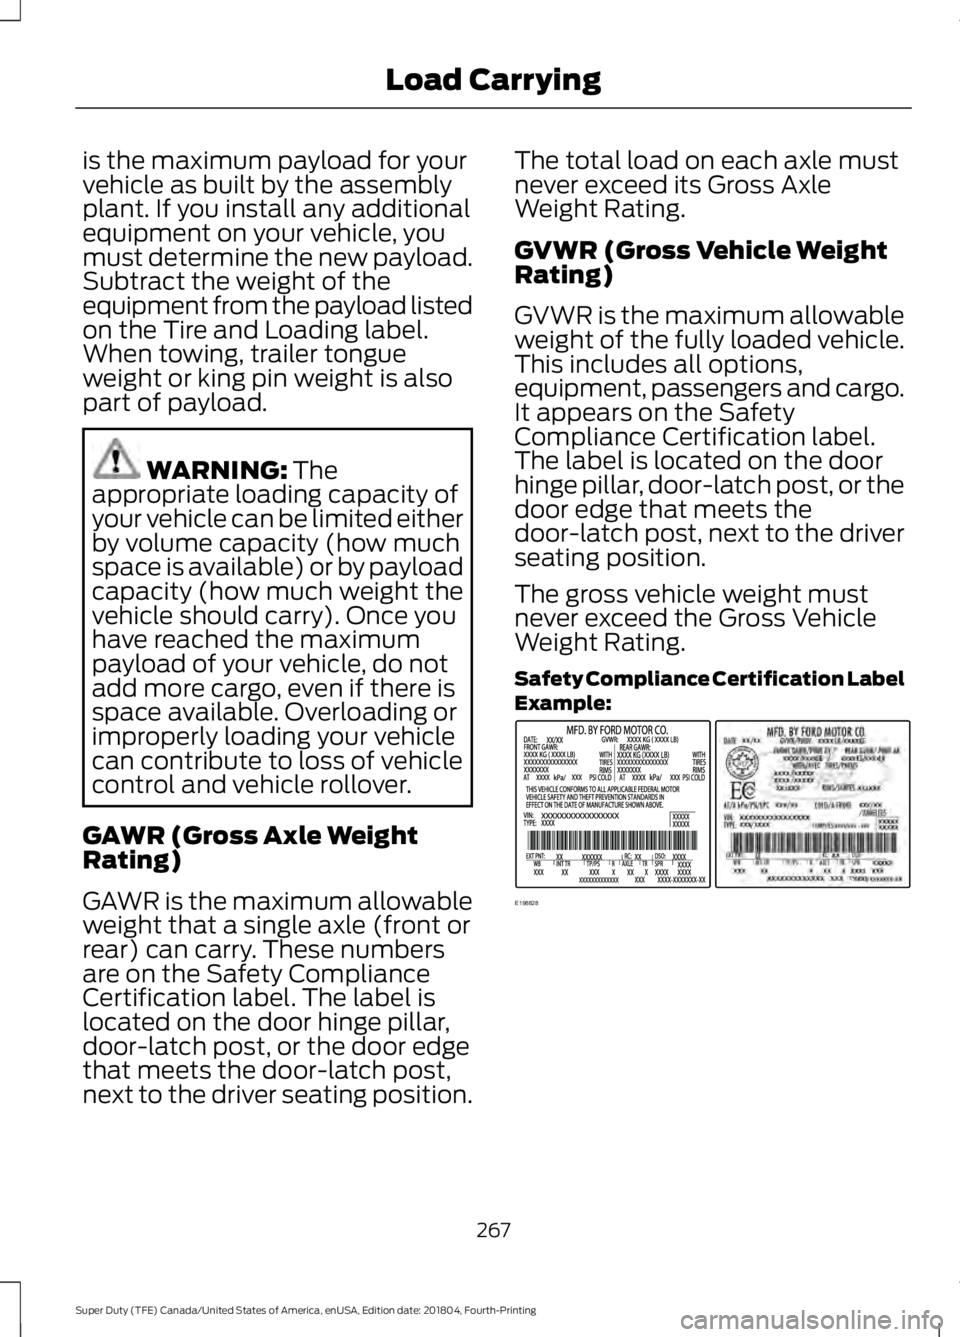
Safety Compliance Certification Label
Example:
267
Super Duty (TFE) Canada/United States of America, enUSA, Edition date: 201804, Fourth-Printing Load CarryingE198828
Page 273 of 666
- 1200 = - 240 pounds. No, you do
not have enough cargo capacity
to carry that much weight. In
metric units, the calculation would
be: 635 kilograms - (2 x 99
kilograms) - (12 x 45 kilograms) =
635 - 198 - 540 = -103 kilograms.
You will need to reduce the load
weight by at least 240 pounds
(104 kilograms). If you remove
three 100-pound (45-kilogram)
cement bags, then the load
calculation would be:1400 - (2 x
220) - (9 x 100) = 1400 - 440 -
900 = 60 pounds. Now you have
the load capacity to transport the
cement and your friend home. In
metric units, the calculation would
be: 635 kilograms - (2 x 99
kilograms) - (9 x 45 kilograms) =
635 - 198 - 405 = 32 kilograms.
The above calculations also
assume that the loads are
positioned in your vehicle in a
manner that does not overload
the front or the rear gross axle
weight rating specified for your
vehicle on the Safety Compliance
Certification label.
Special Loading Instructions
for Owners of Pick-up Trucks
and Utility-type Vehicles
WARNING: When loading
the roof racks, we recommend
you evenly distribute the load,
as well as maintain a low center
of gravity. Loaded vehicles, with
higher centers of gravity, may handle differently than unloaded
vehicles. Take extra precautions,
such as slower speeds and
increased stopping distance,
when driving a heavily loaded
vehicle.
BED RAMPS
(IF EQUIPPED) WARNING: When sliding the ramp
up or down, take care not to get your
fingers or hands caught in the
mechanism. Failure to follow this
instruction could result in personal injury. WARNING:
Make sure that you
correctly install the ramp to the tailgate
plate. Failure to follow this instruction
could result in personal injury. WARNING:
Do not step or sit on
the ramp when it is in the stowed
position. Failure to follow this instruction
could result in personal injury. WARNING:
Only install the ramp
within the prescribed ramp angles.
Failure to follow this instruction could
result in personal injury.
Note: The ramp maximum capacity is
800 lb (363 kg)
.
Note: Verify the ramp is on stable ground
before usage.
Note: For loading and unloading
equipment, your ramp should be set
between 10 degrees upward and 26 degrees
downward to avoid damage to the ramp
claw and tailgate plate.
270
Super Duty (TFE) Canada/United States of America, enUSA, Edition date: 201804, Fourth-Printing Load Carrying
Page 280 of 666
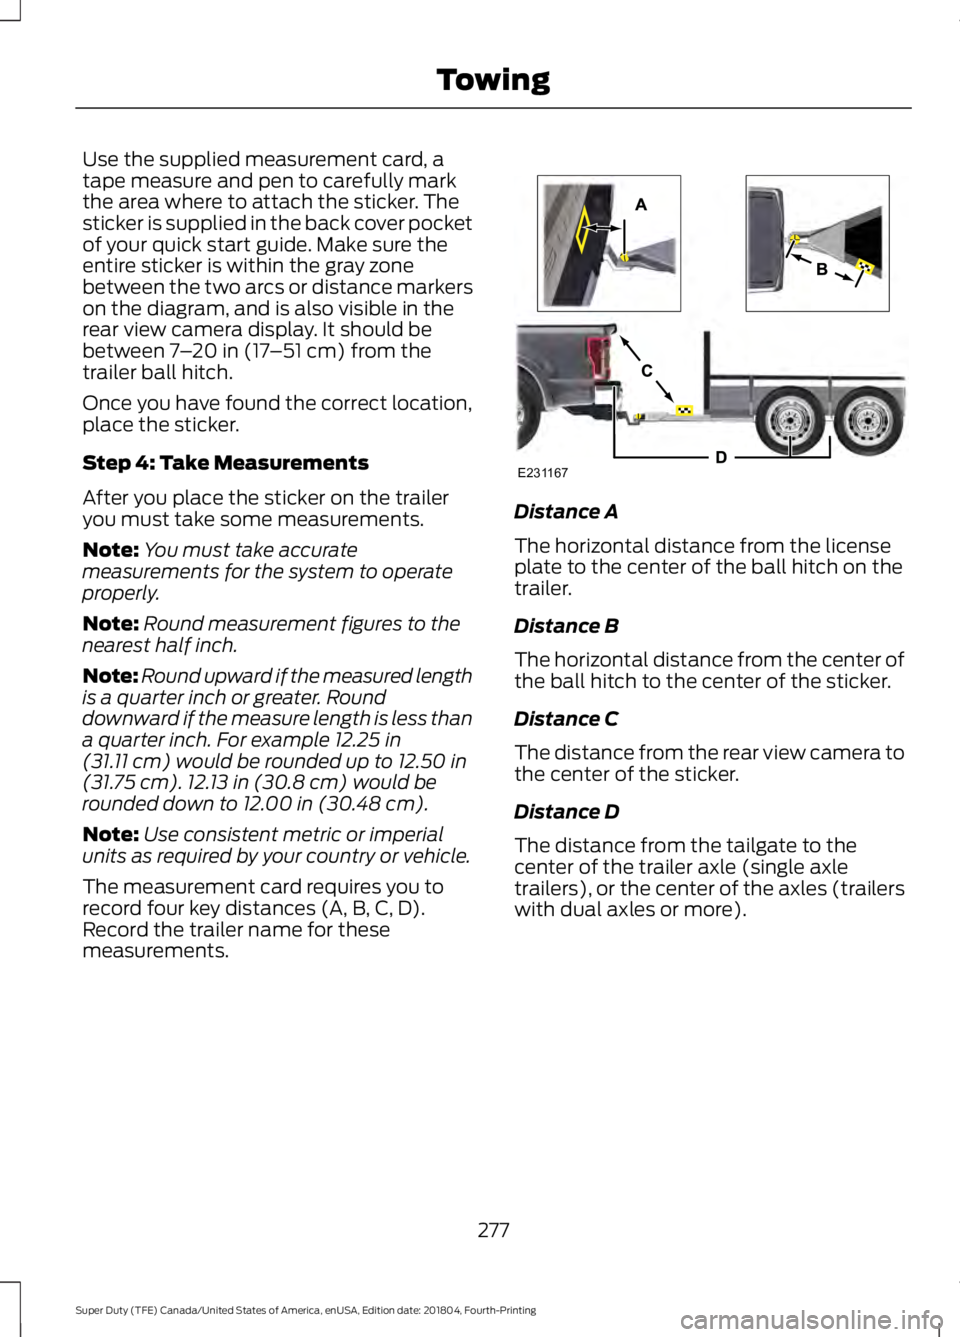
Use the supplied measurement card, a
tape measure and pen to carefully mark
the area where to attach the sticker. The
sticker is supplied in the back cover pocket
of your quick start guide. Make sure the
entire sticker is within the gray zone
between the two arcs or distance markers
on the diagram, and is also visible in the
rear view camera display. It should be
between 7
– 20 in (17 –51 cm) from the
trailer ball hitch.
Once you have found the correct location,
place the sticker.
Step 4: Take Measurements
After you place the sticker on the trailer
you must take some measurements.
Note: You must take accurate
measurements for the system to operate
properly.
Note: Round measurement figures to the
nearest half inch.
Note: Round upward if the measured length
is a quarter inch or greater. Round
downward if the measure length is less than
a quarter inch. For example
12.25 in
(31.11 cm) would be rounded up to 12.50 in
(31.75 cm). 12.13 in (30.8 cm) would be
rounded down to 12.00 in (30.48 cm).
Note: Use consistent metric or imperial
units as required by your country or vehicle.
The measurement card requires you to
record four key distances (A, B, C, D).
Record the trailer name for these
measurements. Distance A
The horizontal distance from the license
plate to the center of the ball hitch on the
trailer.
Distance B
The horizontal distance from the center of
the ball hitch to the center of the sticker.
Distance C
The distance from the rear view camera to
the center of the sticker.
Distance D
The distance from the tailgate to the
center of the trailer axle (single axle
trailers), or the center of the axles (trailers
with dual axles or more).
277
Super Duty (TFE) Canada/United States of America, enUSA, Edition date: 201804, Fourth-Printing TowingE231167
Page 287 of 666
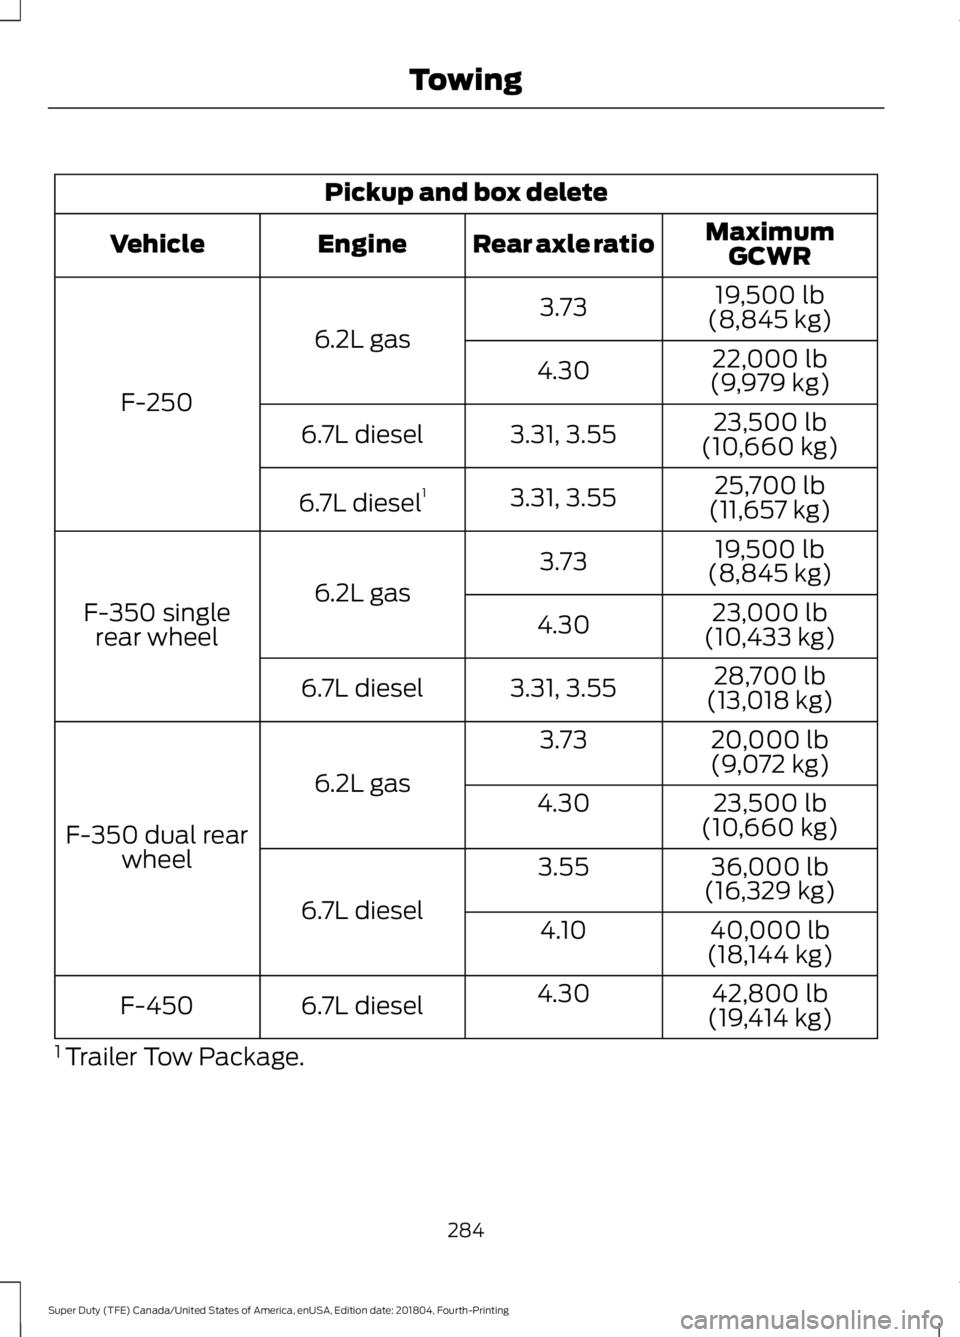
Pickup and box delete
MaximumGCWR
Rear axle ratio
Engine
Vehicle
19,500 lb
(8,845 kg)
3.73
6.2L gas
F-250 22,000 lb
(9,979 kg)
4.30
23,500 lb
(10,660 kg)
3.31, 3.55
6.7L diesel
25,700 lb
(11,657 kg)
3.31, 3.55
6.7L diesel 1
19,500 lb
(8,845 kg)
3.73
6.2L gas
F-350 single
rear wheel 23,000 lb
(10,433 kg)
4.30
28,700 lb
(13,018 kg)
3.31, 3.55
6.7L diesel
20,000 lb
(9,072 kg)
3.73
6.2L gas
F-350 dual rear wheel 23,500 lb
(10,660 kg)
4.30
36,000 lb
(16,329 kg)
3.55
6.7L diesel 40,000 lb
(18,144 kg)
4.10
42,800 lb
(19,414 kg)
4.30
6.7L diesel
F-450
1 Trailer Tow Package.
284
Super Duty (TFE) Canada/United States of America, enUSA, Edition date: 201804, Fourth-Printing Towing