2019 FORD F-550 steering wheel
[x] Cancel search: steering wheelPage 341 of 666
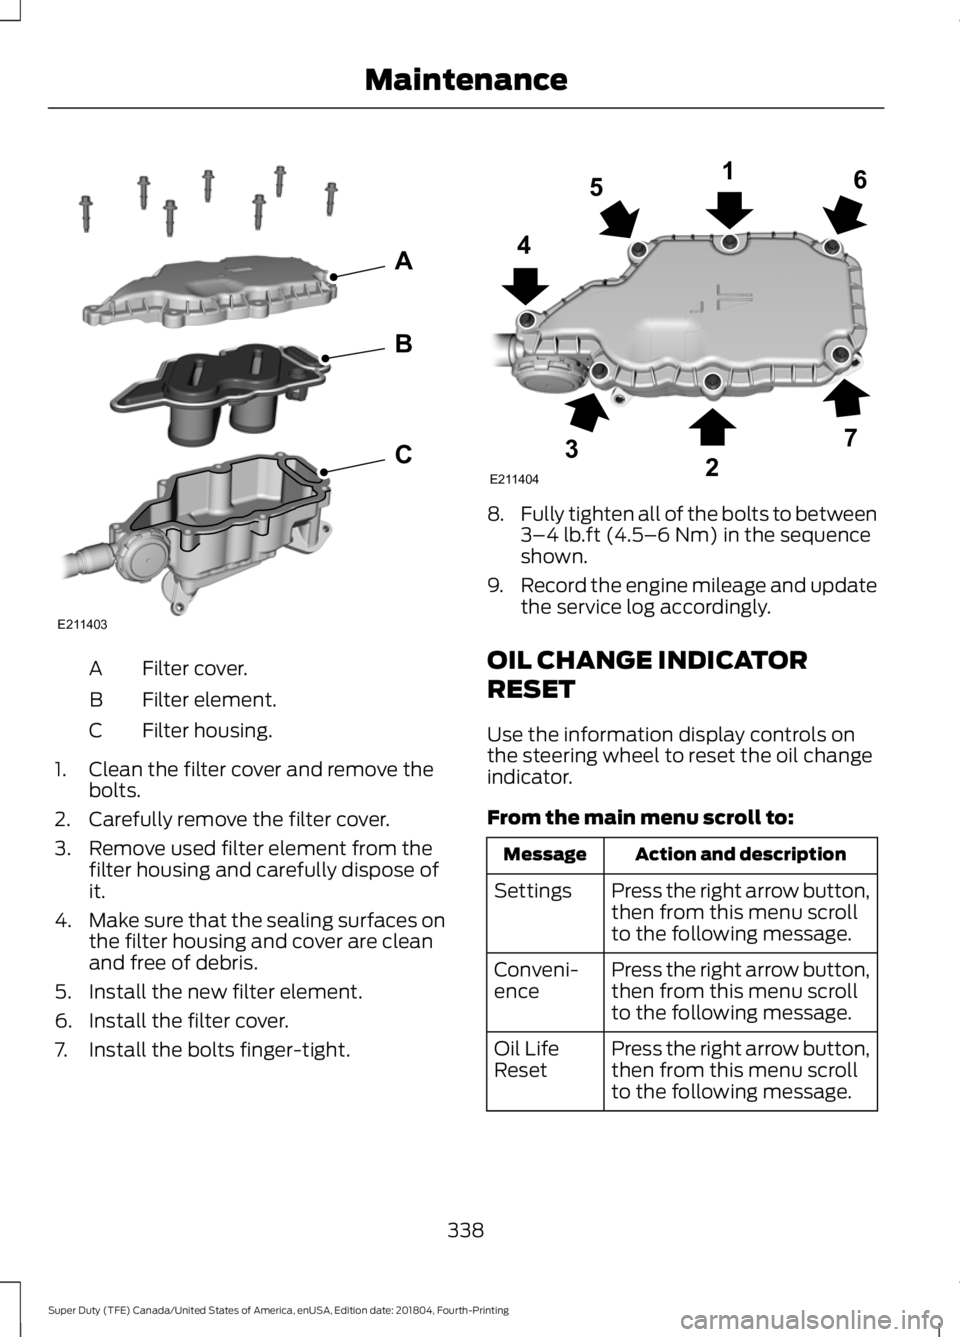
Filter cover.
A
Filter element.
B
Filter housing.
C
1. Clean the filter cover and remove the bolts.
2. Carefully remove the filter cover.
3. Remove used filter element from the filter housing and carefully dispose of
it.
4. Make sure that the sealing surfaces on
the filter housing and cover are clean
and free of debris.
5. Install the new filter element.
6. Install the filter cover.
7. Install the bolts finger-tight. 8.
Fully tighten all of the bolts to between
3–4 lb.ft (4.5–6 Nm) in the sequence
shown.
9. Record the engine mileage and update
the service log accordingly.
OIL CHANGE INDICATOR
RESET
Use the information display controls on
the steering wheel to reset the oil change
indicator.
From the main menu scroll to: Action and description
Message
Press the right arrow button,
then from this menu scroll
to the following message.
Settings
Press the right arrow button,
then from this menu scroll
to the following message.
Conveni-
ence
Press the right arrow button,
then from this menu scroll
to the following message.
Oil Life
Reset
338
Super Duty (TFE) Canada/United States of America, enUSA, Edition date: 201804, Fourth-Printing MaintenanceE211403
A
B
C E211404
165
4
32
7
Page 354 of 666

4.
While the engine idles, turn the steering
wheel left and right several times.
5. Switch the engine off.
6. Recheck the fluid level in the reservoir. Do not add fluid if the level is between
the MIN and MAX range.
7. If the fluid is low, add fluid in small amounts, continuously checking the
level until it is between the MIN and
MAX range. For proper fluid type, See
Capacities and Specifications (page
419). Be sure to put the cap back on the
reservoir.
WASHER FLUID CHECK WARNING:
If you operate your
vehicle in temperatures below 40°F
(5°C), use washer fluid with antifreeze
protection. Failure to use washer fluid
with antifreeze protection in cold
weather could result in impaired
windshield vision and increase the risk
of injury or accident.
Add fluid to fill the reservoir if the level is
low. Only use a washer fluid that meets
Ford specifications. See
Capacities and
Specifications (page 419).
State or local regulations on volatile
organic compounds may restrict the use
of methanol, a common windshield washer
antifreeze additive. Washer fluids
containing non-methanol antifreeze
agents should be used only if they provide
cold weather protection without damaging
the vehicle ’s paint finish, wiper blades or
washer system. DRAINING THE FUEL FILTER
WATER TRAP - 6.7L DIESEL WARNING:
Do not dispose of fuel
in the household refuse or the public
sewage system. Use an authorized waste
disposal facility.
Your vehicle has a diesel fuel conditioner
module. The module is mounted between
the outboard side of the fuel tank and the
frame rail.
Note: The module is at the front of the fuel
tank or at the front of the aft-axle fuel tank
on some models. You should drain water from the
module assembly whenever the
warning light illuminates or a
message appears in the information
display advising you to drain the water
separator. This occurs when approximately
6.76 fl oz (200 ml)
of water accumulates
in the module. If you allow the water level
to exceed this level, the water may pass
through to the engine and may cause fuel
injection equipment damage.
Filter Location
Use the tables below to find the location
of your filter.
351
Super Duty (TFE) Canada/United States of America, enUSA, Edition date: 201804, Fourth-Printing Maintenance
Page 358 of 666

4. Press the brake pedal and start your
vehicle.
5. Run the engine until it reaches normal operating temperature. While the
engine is warming up, complete the
following: Reset the clock. Reset the
power windows bounce-back feature.
See Windows and Mirrors (page 97).
Reset the radio station presets. See
Audio System
(page 444).
6. Allow the engine to idle for at least one
minute.
7. Drive the vehicle at least 10 mi (16 km)
to completely relearn the idle trim and
fuel trim strategy.
Note: If you do not allow the engine to
relearn the idle and fuel trim strategy, the
idle quality of your vehicle may be adversely
affected until the engine computer
eventually relearns the idle trim and fuel
trim strategy.
Note: For flexible fuel vehicles, if you are
operating on E85, you may experience poor
starts or an inability to start the engine and
driveability problems until the fuel trim and
ethanol content have been relearned.
Make sure that you dispose of old batteries
in an environmentally friendly way. Seek
advice from your local authority about
recycling old batteries.
If storing your vehicle for more than 30
days without recharging the battery, we
recommend that you disconnect the
negative battery cable to maintain battery
charge for quick starting.
Battery Management System
(If
Equipped)
The battery management system monitors
battery conditions and takes actions to
extend battery life. If excessive battery
drain is detected, the system temporarily
disables some electrical systems to
protect the battery. Systems included are:
•
Heated rear window.
• Heated seats.
• Climate control.
• Heated steering wheel.
• Audio unit.
• Navigation system.
A message may appear in the information
displays to alert you that battery
protection actions are active. These
messages are only for notification that an
action is taking place, and not intended to
indicate an electrical problem or that the
battery requires replacement.
After battery replacement, or in some
cases after charging the battery with an
external charger, the battery management
system requires eight hours of vehicle sleep
time to relearn the battery state of charge.
During this time your vehicle must remain
fully locked with the ignition switched off.
Note: Prior to relearning the battery state
of charge, the battery management system
may temporarily disable some electrical
systems.
Electrical Accessory Installation
To make sure the battery management
system works correctly, do not connect an
electrical device ground connection
directly to the battery negative post. This
can cause inaccurate measurements of
the battery condition and potential
incorrect system operation.
Note: If you add electrical accessories or
components to the vehicle, it may adversely
affect battery performance and durability.
This may also affect the performance of
other electrical systems in the vehicle.
355
Super Duty (TFE) Canada/United States of America, enUSA, Edition date: 201804, Fourth-Printing Maintenance
Page 377 of 666
CLEANING THE INSTRUMENT
PANEL AND INSTRUMENT
CLUSTER LENS
WARNING: Do not use chemical
solvents or strong detergents when
cleaning the steering wheel or
instrument panel to avoid contamination
of the airbag system.
Note: Follow the same procedure as
cleaning leather seats for cleaning leather
instrument panels and leather interior trim
surfaces. See
Cleaning Leather Seats
(page 374).
Clean the instrument panel and cluster
lens with a clean, damp and soft cloth,
then use a clean, dry and soft cloth to dry
these areas.
• Avoid cleaners or polishes that increase
the gloss of the upper portion of the
instrument panel. The dull finish in this
area helps protect you from
undesirable windshield reflection.
• Do not use any household cleaning
products or glass cleaners as these
may damage the finish of the
instrument panel, interior trim and
cluster lens.
• Wash or wipe your hands clean if you
have been in contact with certain
products such as insect repellent and
suntan lotion to avoid possible damage
to the interior painted surfaces.
• Do not allow air fresheners and hand
sanitizers to spill onto interior surfaces.
If a spill occurs, wipe off immediately.
Your warranty may not cover these
damages.
If a staining liquid like coffee or juice has
been spilled on the instrument panel or on
interior trim surfaces: 1. Wipe up spilled liquid using a clean,
soft cloth as quickly as possible.
2. Use Motorcraft Premium Leather and Vinyl Cleaner or a commercially
available leather cleaning product for
automotive interiors. Test any cleaner
or stain remover on an inconspicuous
area.
3. Alternatively, wipe the surface with a clean, soft cloth and a mild soap and
water solution. Dry the area with a
clean, soft cloth.
4. If necessary, apply more soap and water solution or cleaning product to
a clean, soft cloth and press it onto the
soiled area. Allow this to set at room
temperature for 30 minutes.
5. Remove the soaked cloth, then with a clean, damp cloth, use a rubbing
motion for 60 seconds on the soiled
area.
6. Dry the area with a clean, soft cloth.
CLEANING LEATHER SEATS
(IF
EQUIPPED)
Without King Ranch Edition
Note: Follow the same procedure as
cleaning leather seats for cleaning leather
instrument panels and leather interior trim
surfaces.
For routine cleaning, wipe the surface with
a soft, damp cloth and a mild soap and
water solution. Dry the area with a clean,
soft cloth.
For cleaning and removing spots and stains
such as dye transfer, use Motorcraft
Premium Leather and Vinyl Cleaner or a
commercially available leather cleaning
product for automotive interiors.
Note: Test any cleaner or stain remover on
an inconspicuous area.
374
Super Duty (TFE) Canada/United States of America, enUSA, Edition date: 201804, Fourth-Printing Vehicle Care
Page 382 of 666
GENERAL INFORMATION
Use only approved wheel and tire sizes,
using other sizes could damage your
vehicle. If you change the diameter of the
tires from that fitted at the factory, the
speedometer may not display the correct
speed. If you intend to change the size of
the wheels from that fitted by the
manufacturer, you can check the suitability
with an authorized dealer.
Additional information related to the
functionality and maintenance of your tires
can be found later in this chapter. See Tire
Care (page 381).
You can find the recommended tire
inflation pressures can on the Tire Label,
which is on the B-pillar or the edge of the
driver door. You can also find this
information on the Safety Compliance
Certification Label, affixed to either the
door hinge pillar, door-latch post, or the
door edge that meets the door latch post;
next to the driver seating position.
We strongly recommend maintaining these
tire pressures at all times. Failure to follow
the tire pressure recommendations can
cause uneven treadwear patterns, reduced
fuel economy, and adversely affect the
way your vehicle handles.
Note: Check and set the tire pressure at the
ambient temperature in which you are
intending to drive your vehicle and when the
tires are cold.
Note: Check your tire pressures at least
once per month.
If your vehicle has a spare tire, set the
pressure to the highest value given for your
vehicle and tire size combination. Notice to utility vehicle and truck
owners WARNING:
Utility vehicles have a
significantly higher rollover rate than
other types of vehicles. WARNING: Vehicles with a higher
center of gravity (utility and four-wheel
drive vehicles) handle differently than
vehicles with a lower center of gravity
(passenger cars). Avoid sharp turns,
excessive speed and abrupt steering in
these vehicles. Failure to drive cautiously
increases the risk of losing control of your
vehicle, vehicle rollover, personal injury
and death. WARNING:
In a rollover crash, an
unbelted person is significantly more
likely to die than a person wearing a
seatbelt. WARNING:
Do not become
overconfident in the ability of four-wheel
drive vehicles. Although a four-wheel
drive vehicle may accelerate better than
a two-wheel drive vehicle in low traction
situations, it won't stop any faster than
two-wheel drive vehicles. Always drive
at a safe speed.
Utility vehicles and trucks handle
differently than passenger cars in the
various driving conditions that are
encountered on streets, highways and
off-road. Utility vehicles and trucks are not
designed for cornering at speeds as high
as passenger cars any more than low-slung
sports cars are designed to perform
satisfactorily under off-road conditions.
379
Super Duty (TFE) Canada/United States of America, enUSA, Edition date: 201804, Fourth-Printing Wheels and Tires
Page 383 of 666
Study your owner's manual and any
supplements for specific information about
equipment features, instructions for safe
driving and additional precautions to
reduce the risk of an accident or serious
injury.
Four-wheel drive system (If Equipped)
WARNING:
Do not become
overconfident in the ability of four-wheel
drive vehicles. Although a four-wheel
drive vehicle may accelerate better than
a two-wheel drive vehicle in low traction
situations, it won't stop any faster than
two-wheel drive vehicles. Always drive
at a safe speed.
A vehicle equipped with four-wheel drive,
when selected, has the ability to use all
four wheels to power itself. This increases
traction which may enable you to safely
drive over terrain and road conditions that
a conventional two-wheel drive vehicle
cannot.
Power is supplied to all four wheels
through a transfer case or power transfer
unit. Four-wheel drive vehicles allow you
to select different modes as necessary. For
information on transfer case operation and
shifting procedures, See
Four-Wheel
Drive (page 212). For information on
transfer case maintenance, See
Maintenance (page 329). You should
become thoroughly familiar with this
information before you operate your
vehicle.
On some four-wheel drive vehicles, the
initial shift from two-wheel to four-wheel
drive when the vehicle is moving can cause
a momentary clunk and ratcheting sound.
These sounds are normal and are not
cause for concern. In four-wheel drive vehicles, the size of the
spare tire relative to the remaining tires can
have an effect on the 4x4 system. If there
is a significant difference between the size
of a spare and the remaining tires,
four-wheel drive functionality may be
limited.
See Using Four-Wheel Drive
(page 212).
How your vehicle differs from
other vehicles
Sport utility vehicles and trucks can differ
from some other vehicles in a few
noticeable ways. Your vehicle may be:
• Higher - to allow higher load carrying
capacity and to allow it to travel over
rough terrain without getting hung up
or damaging underbody components.
• Shorter - to give it the capability to
approach inclines and drive over the
crest of a hill without getting hung up
or damaging underbody components.
All other things held equal, a shorter
wheelbase may make your vehicle
quicker to respond to steering inputs
than a vehicle with a longer wheelbase.
• Narrower - to provide greater
maneuverability in tight spaces,
particularly in off-road use.
As a result of the above dimensional
differences, Sport utility vehicles and
trucks often have a higher center of gravity
and a greater difference in center of gravity
between the loaded and unloaded
condition. These differences that make
your vehicle so versatile also make it
handle differently than an ordinary
passenger car.
380
Super Duty (TFE) Canada/United States of America, enUSA, Edition date: 201804, Fourth-Printing Wheels and Tires
Page 392 of 666
Note:
Do not reduce tire pressure
to change the ride characteristics
of the vehicle. If you do not
maintain the inflation pressure at
the levels specified by Ford, your
vehicle may experience a condition
known as shimmy. Shimmy is a
severe vibration and oscillation in
the steering wheel after the vehicle
travels over a bump or dip in the
road that does not dampen out by
itself. Shimmy may result from
significant under-inflation of the
tires, improper tires (load range,
size, or type), or vehicle
modifications such as lift-kits. In
the event that your vehicle
experiences shimmy, you should
slowly reduce speed by either lifting
off the accelerator pedal or lightly
applying the brakes. The shimmy
will cease as the vehicle speed
decreases.
Maximum Inflation Pressure is
the tire manufacturer's maximum
permissible pressure and the
pressure at which the maximum
load can be carried by the tire. This
pressure is normally higher than
the manufacturer ’s recommended
cold inflation pressure which can
be found on the Safety
Compliance Certification Label
(affixed to either the door hinge
pillar, door-latch post, or the door
edge that meets the door-latch
post, next to the driver's seating
position), or Tire Label located on the B-pillar or the edge of the
driver's door. The cold inflation
pressure should never be set lower
than the recommended pressure
on the Safety Compliance
Certification Label or Tire Label.
When weather temperature
changes occur, tire inflation
pressures also change. A 10°F
(6°C) temperature drop can
cause a corresponding drop of 1
psi (7 kPa) in inflation pressure.
Check your tire pressures
frequently and adjust them to the
proper pressure which can be
found on the Safety Compliance
Certification Label or Tire Label.
To check the pressure in your
tire(s):
1. Make sure the tires are cool,
meaning they are not hot from
driving even a mile.
Note:
If you are checking tire
pressure when the tire is hot, (for
example, driven more than 1 mile
[1.6 kilometers]), never bleed or
reduce air pressure. The tires are
hot from driving and it is normal for
pressures to increase above
recommended cold pressures. A
hot tire at or below recommended
cold inflation pressure could be
significantly under-inflated.
389
Super Duty (TFE) Canada/United States of America, enUSA, Edition date: 201804, Fourth-Printing Wheels and Tires
Page 401 of 666
vehicle control, vehicle rollover, personal
injury and death. Additionally, the use of
non-recommended tires and wheels
could cause steering, suspension, axle,
transfer case or power transfer unit
failure.
Note: Do not use snow chains on vehicles
with 20 inch wheels and tires.
The tires on your vehicle have all-weather
treads to provide traction in rain and snow.
However, in some climates, you may need
to use snow tires and cables. If you need
to use cables, it is recommended that steel
wheels (of the same size and
specifications) be used, as cables may chip
aluminum wheels.
Note: The suspension insulation and
bumpers will help prevent vehicle damage.
Do not remove these components from your
vehicle when using snow tires and chains.
Follow these guidelines when using snow
tires and chains:
• If possible, avoid fully loading your
vehicle
• Use only SAE Class S chains.
• Install chains securely, verifying that
the chains do not touch any wiring,
brake lines or fuel lines.
• Drive cautiously. If you hear the chains
rub or bang against your vehicle, stop
and retighten the chains. If this does
not work, remove the chains to prevent
damage to your vehicle.
• Remove the tire chains when they are
no longer needed. Do not use tire
chains on dry roads.
If you have any questions regarding snow
chains or cables, please contact your
authorized dealer. TIRE PRESSURE MONITORING
SYSTEM
Vehicle Tire Pressure Monitoring
System WARNING: The tire pressure
monitoring system is not a substitute for
manually checking tire pressures. You
should periodically check tire pressures
using a pressure gauge. Failure to
correctly maintain tire pressures could
increase the risk of tire failure, loss of
control, vehicle rollover and personal
injury. Check each tire, including the
spare, if provided, monthly when
cold and inflated to the inflation
pressure recommended by the vehicle
manufacturer on the vehicle placard or tire
inflation pressure label. If your vehicle has
tires of a different size than the size
indicated on the vehicle placard or tire
inflation pressure label, you should
determine the proper tire inflation pressure
for those tires.
As an added safety feature, your vehicle
has been equipped with a Tire Pressure
Monitoring System (TPMS) that
illuminates a low tire pressure telltale
when one or more of your tires is
significantly under-inflated. Accordingly,
when the low tire pressure telltale
illuminates, you should stop and check
your tires as soon as possible, and inflate
them to the proper pressure. Driving on a
significantly under-inflated tire causes the
tire to overheat and can lead to tire failure.
Under-inflation also reduces fuel efficiency
and tire tread life, and may affect the
vehicle ’s handling and stopping ability.
398
Super Duty (TFE) Canada/United States of America, enUSA, Edition date: 201804, Fourth-Printing Wheels and Tires