2019 FORD F-550 automatic transmission
[x] Cancel search: automatic transmissionPage 162 of 666
Note:
If more than one linked remote
control or intelligent access key is in range,
the memory function moves to the settings
of the first key to initiate a memory recall.
Easy Entry and Exit Feature (If
Equipped)
If you enable the easy entry and exit
feature, it automatically moves the driver
seat rearward up to
2 in (5 cm) when you
put the transmission in park (P) and
remove the key from the ignition.
The driver seat returns to the previous
position when you put the key in the
ignition.
You can enable or disable this feature
through the information display. See
Information Displays
(page 112).
REAR SEATS
(IF EQUIPPED)
Folding Up the Rear Seat Cushion
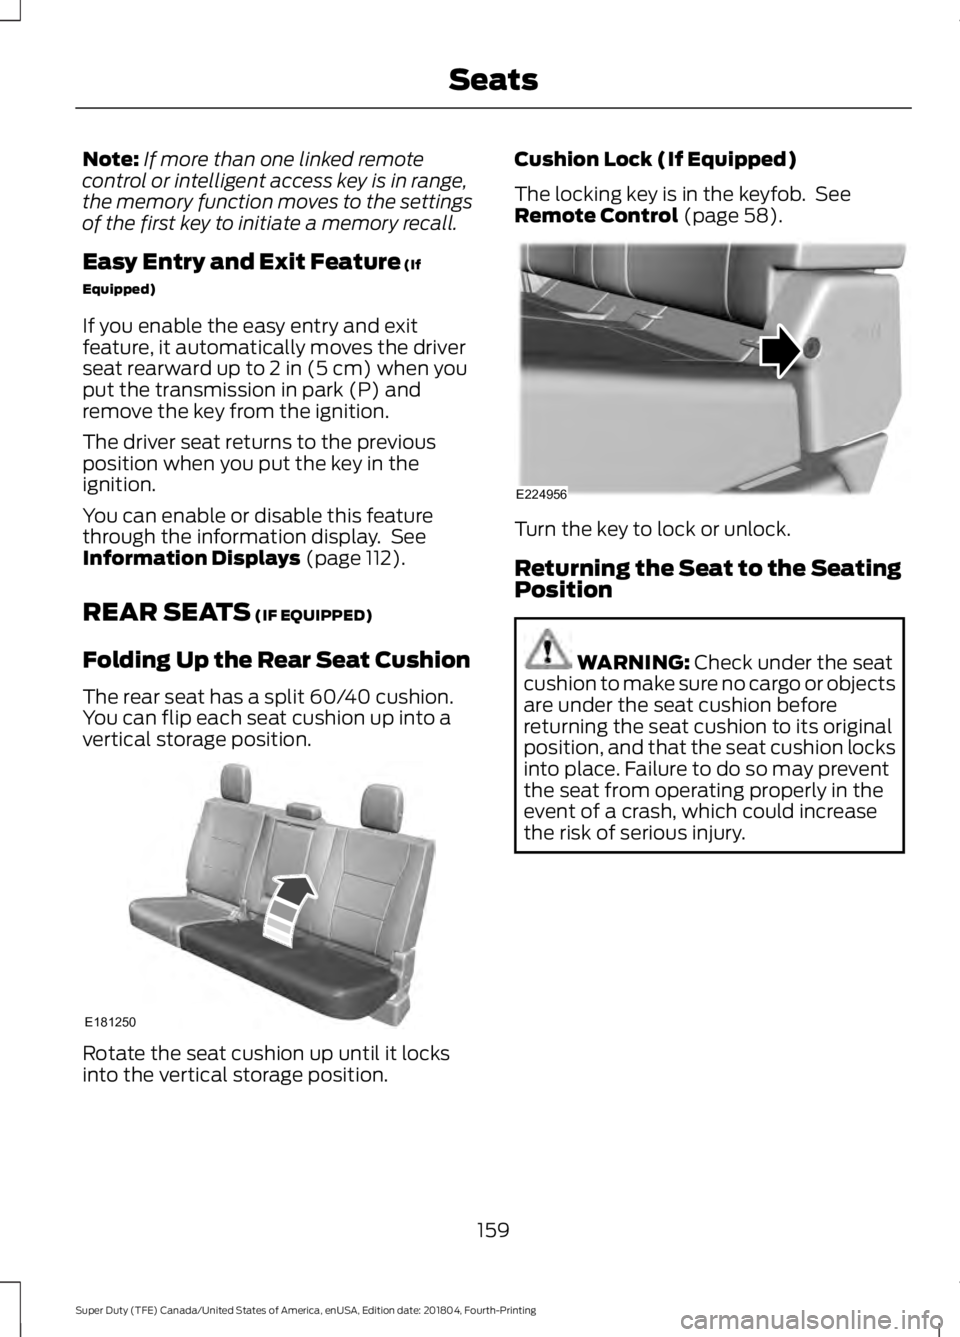
The rear seat has a split 60/40 cushion.
You can flip each seat cushion up into a
vertical storage position. Rotate the seat cushion up until it locks
into the vertical storage position. Cushion Lock (If Equipped)
The locking key is in the keyfob. See
Remote Control
(page 58).
Turn the key to lock or unlock.
Returning the Seat to the Seating
Position
WARNING:
Check under the seat
cushion to make sure no cargo or objects
are under the seat cushion before
returning the seat cushion to its original
position, and that the seat cushion locks
into place. Failure to do so may prevent
the seat from operating properly in the
event of a crash, which could increase
the risk of serious injury.
159
Super Duty (TFE) Canada/United States of America, enUSA, Edition date: 201804, Fourth-Printing SeatsE181250 E224956
Page 177 of 666

Note:
Do not leave the ignition key in this
position for too long. This could cause your
vehicle battery to lose charge.
II (on) - All electrical circuits are
operational and the warning lamps and
indicators illuminate.
III
(start) - Cranks the engine.
KEYLESS STARTING
Note: The keyless starting system may not
function if the key is close to metal objects
or electronic devices such as cellular
phones.
Note: A valid key must be located inside
your vehicle to switch the ignition on and
start the engine.
Ignition Modes The keyless starting system has three
modes:
Off:
Turns the ignition off.
• Without applying the clutch pedal
(manual transmission) or brake pedal
(automatic transmission), press and
release the button once when the
ignition is in the on mode, or when the
engine is running but the vehicle is not
moving. On:
All electrical circuits are operational
and the warning lamps and indicators
illuminate.
• Without applying the clutch pedal
(manual transmission) or brake pedal
(automatic transmission), press and
release the button once.
Start:
Starts the vehicle. The engine may
not start when the vehicle starts.
• Press the clutch pedal (manual
transmission) or brake pedal
(automatic transmission), and then
press the button for any length of time.
An indicator light on the button
illuminates when then ignition is on and
when the engine starts.
STARTING A GASOLINE
ENGINE - 6.2L/6.8L
When you start the engine, the idle speed
increases. This helps to warm up the
engine.
If the engine idle speed does not slow
down automatically, have your vehicle
checked by an authorized dealer.
Before starting the engine check the
following:
• Make sure all occupants have fastened
their safety belts.
• Make sure the headlamps and
electrical accessories are off.
• Make sure the parking brake is on.
• Move the transmission selector lever
to position P.
• Turn the ignition key to the on position.
Note: Do not touch the accelerator pedal.
1. Fully depress the brake pedal.
2. Turn the key to the start position to start your vehicle.
174
Super Duty (TFE) Canada/United States of America, enUSA, Edition date: 201804, Fourth-Printing Starting and Stopping the EngineE144447
Page 178 of 666
3.
When the engine starts, release the key
and then gradually release the brake
pedal as the engine speed increases.
Note: The engine may continue cranking
for up to 15 seconds or until it starts.
Note: If you cannot start the engine on the
first try, wait for a short period and try again.
Vehicles with an Ignition Key
Note: Do not touch the accelerator pedal.
1. Fully depress the brake pedal.
2. Turn the key to position D to start the
engine.
3. When the engine starts, release the brake pedal.
Do not crank the engine for more than 10
seconds as starter damage may occur. If
the engine does not start, switch the
ignition off and wait 30 seconds before
trying again.
Vehicles with Keyless Start
Note: Do not touch the accelerator pedal.
Note: If the push button ignition switch is
pressed again prior to the engine starting
the ignition will switch to accessory mode
and will not start.
Note: If the brake pedal is released before
the engine has started, follow the engine
start sequence again.
1. Fully depress the brake pedal.
2. Press the center of the push button ignition switch.
3. When the engine starts, release the brake pedal.
Failure to Start
If you cannot start the engine after three
attempts, wait 10 seconds and follow this
procedure:
1. Fully depress the brake pedal. 2. Fully press the accelerator pedal and
hold it there.
3. Start the engine.
Stopping the Engine When Your
Vehicle is Stationary
1. When your vehicle has stopped, shift into park (P) and switch the ignition
off.
2. Apply the parking brake.
Stopping the Engine When Your
Vehicle is Moving WARNING:
Switching off the
engine when your vehicle is still moving
results in a significant decrease in
braking assistance. Higher effort is
required to apply the brakes and to stop
your vehicle. A significant decrease in
steering assistance could also occur. The
steering does not lock, but higher effort
could be required to steer your vehicle.
When you switch the ignition off, some
electrical circuits, for example airbags,
also turn off. If you unintentionally switch
the ignition off, shift into neutral (N) and
restart the engine.
1. Put the transmission into neutral (N) and use the brakes to bring your vehicle
to a safe stop.
2. When your vehicle has stopped, shift into park (P) and switch the ignition
off.
3. Apply the parking brake.
Automatic Engine Shutdown
If your vehicle is equipped with a keyless
ignition, it has a feature that automatically
shuts down the engine if it has been idling
for an extended period of time. The ignition
also turns off in order to save battery
power. Before the engine shuts down, a
175
Super Duty (TFE) Canada/United States of America, enUSA, Edition date: 201804, Fourth-Printing Starting and Stopping the Engine
Page 199 of 666
Your vehicle may not pass the I/M test if
the service engine soon indicator is on or
not working properly (bulb is burned out),
or if the OBD-II system has determined
that some of the emission control systems
have not been properly checked. In this
case, the vehicle is not ready for I/M
testing.
If the vehicle
’s engine or transmission has
just been serviced, or the battery has
recently run down or been replaced, the
OBD-II system may indicate that the
vehicle is not ready for I/M testing. To
determine if the vehicle is ready for I/M
testing, turn the ignition key to the on
position for 15 seconds without cranking
the engine. If the service engine soon
indicator blinks eight times, it means that
the vehicle is not ready for I/M testing; if
the service engine soon indicator stays on
solid, it means that your vehicle is ready
for I/M testing.
The OBD-II system checks the emission
control system during normal driving. A
complete check may take several days.
If the vehicle is not ready for I/M testing,
you can perform the following driving cycle
consisting of mixed city and highway
driving:
1. 15 minutes of steady driving on an expressway or highway followed by 20
minutes of stop-and-go driving with at
least four 30-second idle periods.
2. Allow your vehicle to sit for at least eight hours with the ignition off. Then,
start the vehicle and complete the
above driving cycle. The vehicle must
warm up to its normal operating
temperature. Once started, do not turn
off the vehicle until the above driving
cycle is complete.
If the vehicle is still not ready for I/M
testing, you need to repeat the above
driving cycle. SELECTIVE CATALYTIC
REDUCTANT SYSTEM - DIESEL
Your vehicle may have a selective catalytic
reduction system. The system helps reduce
emission levels of oxides of nitrogen from
the exhaust system. The system
automatically injects diesel exhaust fluid
into the exhaust system to enable correct
selective catalytic reduction system
function.
Note:
Selective catalytic reduction systems
are not fitted to vehicles in markets where
only high-sulfur diesel fuel is available.
Diesel Exhaust Fluid Level
In order for the system to operate correctly
you must maintain the diesel exhaust fluid
level.
A warning message appears in the
information display when the diesel
exhaust fluid level is low. If a warning
message appears, refill the diesel exhaust
fluid tank as soon as possible. See
Information Messages (page 128).
Filling the Diesel Exhaust Fluid
Tank WARNING:
Keep diesel exhaust
fluid out of reach of children. Avoid
contact with skin, eyes or clothing. In
case of contact with your eyes, flush
immediately with water and get prompt
medical attention. In case of contact
with your skin, clean immediately with
soap and water. If you swallow any
diesel exhaust fluid, drink plenty of
water, call a physician immediately.
196
Super Duty (TFE) Canada/United States of America, enUSA, Edition date: 201804, Fourth-Printing Engine Emission Control
Page 209 of 666
AUTOMATIC TRANSMISSION
WARNING: Always fully apply the
parking brake. Make sure you shift into
park (P) for vehicles with an automatic
transmission. Switch the ignition off and
remove the key whenever you leave your
vehicle. WARNING:
When your vehicle is
stationary, keep the brake pedal fully
pressed when shifting gears. Failure to
follow this instruction could result in
personal injury, death or property
damage.
Note: You may not be able to shift out of
park (P) unless the intelligent access key is
inside your vehicle.
Understanding the Shift Positions
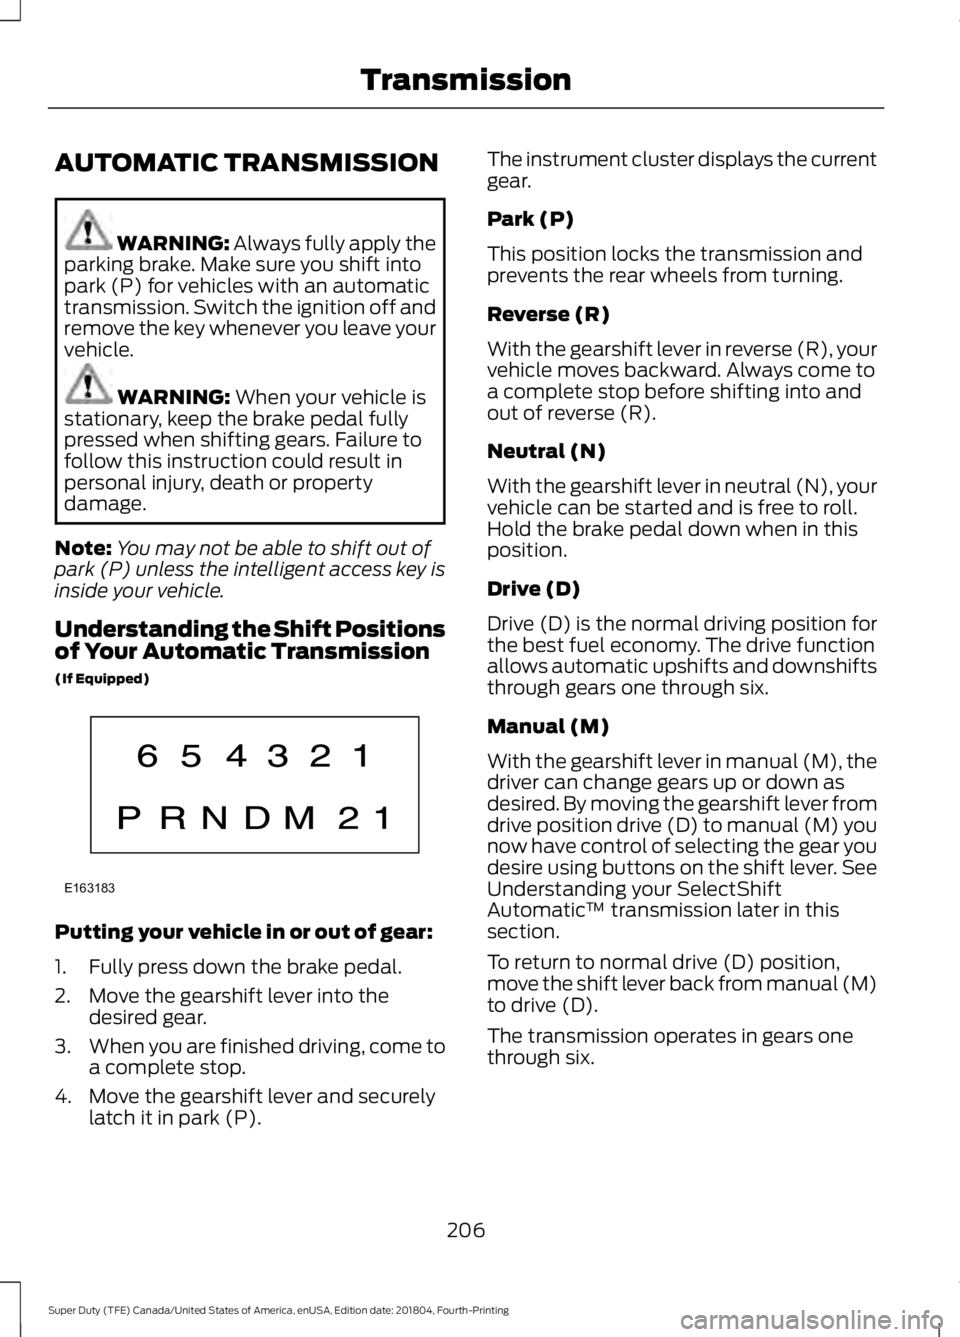
of Your Automatic Transmission
(If Equipped) Putting your vehicle in or out of gear:
1. Fully press down the brake pedal.
2. Move the gearshift lever into the
desired gear.
3. When you are finished driving, come to
a complete stop.
4. Move the gearshift lever and securely latch it in park (P). The instrument cluster displays the current
gear.
Park (P)
This position locks the transmission and
prevents the rear wheels from turning.
Reverse (R)
With the gearshift lever in reverse (R), your
vehicle moves backward. Always come to
a complete stop before shifting into and
out of reverse (R).
Neutral (N)
With the gearshift lever in neutral (N), your
vehicle can be started and is free to roll.
Hold the brake pedal down when in this
position.
Drive (D)
Drive (D) is the normal driving position for
the best fuel economy. The drive function
allows automatic upshifts and downshifts
through gears one through six.
Manual (M)
With the gearshift lever in manual (M), the
driver can change gears up or down as
desired. By moving the gearshift lever from
drive position drive (D) to manual (M) you
now have control of selecting the gear you
desire using buttons on the shift lever. See
Understanding your SelectShift
Automatic
™ transmission later in this
section.
To return to normal drive (D) position,
move the shift lever back from manual (M)
to drive (D).
The transmission operates in gears one
through six.
206
Super Duty (TFE) Canada/United States of America, enUSA, Edition date: 201804, Fourth-Printing TransmissionE163183
Page 211 of 666
Understanding your SelectShift
Automatic
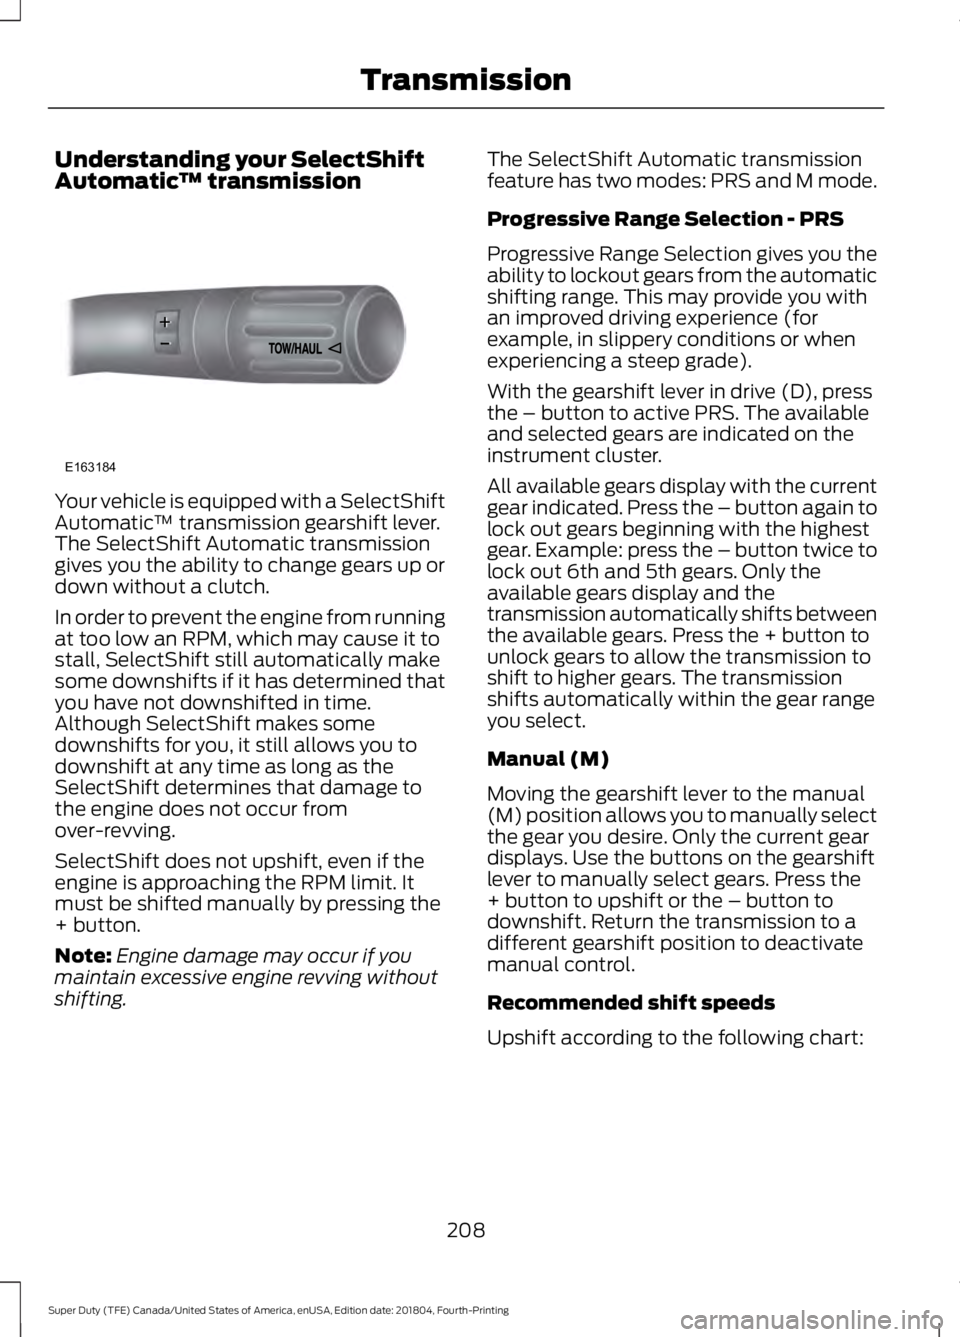
™ transmissionYour vehicle is equipped with a SelectShift
Automatic
™ transmission gearshift lever.
The SelectShift Automatic transmission
gives you the ability to change gears up or
down without a clutch.
In order to prevent the engine from running
at too low an RPM, which may cause it to
stall, SelectShift still automatically make
some downshifts if it has determined that
you have not downshifted in time.
Although SelectShift makes some
downshifts for you, it still allows you to
downshift at any time as long as the
SelectShift determines that damage to
the engine does not occur from
over-revving.
SelectShift does not upshift, even if the
engine is approaching the RPM limit. It
must be shifted manually by pressing the
+ button.
Note: Engine damage may occur if you
maintain excessive engine revving without
shifting. The SelectShift Automatic transmission
feature has two modes: PRS and M mode.
Progressive Range Selection - PRS
Progressive Range Selection gives you the
ability to lockout gears from the automatic
shifting range. This may provide you with
an improved driving experience (for
example, in slippery conditions or when
experiencing a steep grade).
With the gearshift lever in drive (D), press
the – button to active PRS. The available
and selected gears are indicated on the
instrument cluster.
All available gears display with the current
gear indicated. Press the – button again to
lock out gears beginning with the highest
gear. Example: press the – button twice to
lock out 6th and 5th gears. Only the
available gears display and the
transmission automatically shifts between
the available gears. Press the + button to
unlock gears to allow the transmission to
shift to higher gears. The transmission
shifts automatically within the gear range
you select.
Manual (M)
Moving the gearshift lever to the manual
(M) position allows you to manually select
the gear you desire. Only the current gear
displays. Use the buttons on the gearshift
lever to manually select gears. Press the
+ button to upshift or the – button to
downshift. Return the transmission to a
different gearshift position to deactivate
manual control.
Recommended shift speeds
Upshift according to the following chart:
208
Super Duty (TFE) Canada/United States of America, enUSA, Edition date: 201804, Fourth-Printing TransmissionE163184
Page 212 of 666

Upshifts When Accelerating (Recommended for Best Fuel Economy)
Diesel engines
Gasoline engines
Shift from:
12 mph (19 km/h)
15 mph (24 km/h)
1 – 2
19 mph (31 km/h)
25 mph (40 km/h)
2 – 3
26 mph (42 km/h)
40 mph (64 km/h)
3 – 4
34 mph (55 km/h)
45 mph (72 km/h)
4 – 5
46 mph (74 km/h)
50 mph (80 km/h)
5 – 6
Automatic Transmission Adaptive
Learning
This feature's design is to increase
durability and provide consistent shift feel
over the life of your vehicle. A new vehicle
or transmission may have firm shifts, soft
shifts or both. This operation is normal and
does not affect function or durability of the
transmission. Over time, the adaptive
learning process fully updates transmission
operation. Additionally, whenever you
disconnect the battery or install a new
battery, the system must relearn the
strategy.
Brake-Shift Interlock WARNING: When doing this
procedure, you need to take the
transmission out of park (P) which
means your vehicle can roll freely. To
avoid unwanted vehicle movement,
always fully apply the parking brake prior
to doing this procedure. Use wheels
chocks if appropriate. WARNING:
If the parking brake is
fully released, but the brake warning
lamp remains illuminated, the brakes
may not be working properly. Have your
vehicle checked as soon as possible. Note:
Do not drive your vehicle until you
verify that the brake lamps are working.
Your vehicle is equipped with a brake-shift
interlock feature that prevents the
gearshift lever from moving from park (P)
when the ignition is on and the brake pedal
is not pressed.
If you cannot move the gearshift lever out
of park (P) position with the ignition is on
and the brake pedal pressed, a malfunction
may have occurred. It is possible that a
fuse has blown or your vehicle ’s brake
lamps are not operating properly. See
Fuse Specification Chart
(page 318).
If the fuse is not blown and the brake
lamps are working properly, the following
procedure allows you to move the gearshift
lever from park (P):
1. Apply the parking brake. Switch the ignition key to 1 - off, then remove the
key.
2. Move the steering column to the full down and full rearward position,
toward the driver seat.
3. Remove the gearshift lever boot.
209
Super Duty (TFE) Canada/United States of America, enUSA, Edition date: 201804, Fourth-Printing Transmission
Page 219 of 666
If Shift Delayed Pull Forward appears in
the information display, transfer case gear
tooth blockage is present. To alleviate this
condition, place the transmission in a
forward gear, move the vehicle forward
approximately
5 ft (1.5 m), and shift the
transmission back to neutral to allow the
transfer case to complete the range shift.
How Your Vehicle Differs From
Other Vehicles WARNING: Vehicles with a higher
center of gravity (utility and four-wheel
drive vehicles) handle differently than
vehicles with a lower center of gravity
(passenger cars). Avoid sharp turns,
excessive speed and abrupt steering in
these vehicles. Failure to drive cautiously
increases the risk of losing control of your
vehicle, vehicle rollover, personal injury
and death.
Truck and utility vehicles can differ from
some other vehicles. Your vehicle may be
higher to allow it to travel over rough
terrain without getting hung up or
damaging underbody components.
The differences that make your vehicle so
versatile also make it handle differently
than an ordinary passenger car.
Maintain steering wheel control at all
times, especially in rough terrain. Since
sudden changes in terrain can result in
abrupt steering wheel motion, make sure
you grip the steering wheel from the
outside. Do not grip the spokes.
Drive cautiously to avoid vehicle damage
from concealed objects such as rocks and
stumps. You should either know the terrain or
examine maps of the area before driving.
Map out your route before driving in the
area. To maintain steering and braking
control of your vehicle, you must have all
four wheels on the ground and they must
be rolling, not sliding or spinning.
Driving Off-Road With Truck and
Utility Vehicles
Note:
On some models, the initial shift from
two-wheel drive to four-wheel drive while
the vehicle is moving can cause some
momentary clunk and ratcheting sounds.
This is the front drivetrain coming up to
speed and the automatic locking hubs
engaging and is not cause for concern.
Note: Your vehicle may be equipped with
a front air dam that can become damaged
(due to reduced ground clearance) when
taking your vehicle off-road. This air dam
can be taken off by removing 15 bolts.
Four-wheel drive vehicles are specially
equipped for driving on sand, snow, mud
and rough terrain and have operating
characteristics that are somewhat
different from conventional vehicles, both
on and off the road.
Power is supplied to all four wheels
through a transfer case. On four-wheel
drive vehicles, the transfer case allows you
to select 4WD when necessary.
Information on transfer case operation and
shifting procedures can be found in this
chapter. Information on transfer case
maintenance can be found in the
Maintenance chapter. You should become
thoroughly familiar with this information
before you operate your vehicle.
Four-wheel drive (when you select a 4WD
mode) uses all four wheels to power the
vehicle. This increases traction, enabling
you to drive over terrain and road
conditions that a conventional two-wheel
drive vehicle cannot.
216
Super Duty (TFE) Canada/United States of America, enUSA, Edition date: 201804, Fourth-Printing Four-Wheel Drive
(If Equipped)