2019 FORD F-53 transmission
[x] Cancel search: transmissionPage 39 of 176

Illumination of the service engine soonindicator, charging system warning light orthe temperature warning light, fluid leaks,strange odors, smoke or loss of enginepower could indicate that the emissioncontrol system is not working properly.
An improperly operating or damagedexhaust system may allow exhaust toenter the vehicle. Have a damaged orimproperly operating exhaust systeminspected and repaired immediately.
Do not make any unauthorized changes toyour vehicle or engine. By law, vehicleowners and anyone who manufactures,repairs, services, sells, leases, tradesvehicles, or supervises a fleet of vehiclesare not permitted to intentionally removean emission control device or prevent itfrom working. Information about yourvehicle’s emission system is on the VehicleEmission Control Information Decallocated on or near the engine. This decalalso lists engine displacement.
Please consult your warranty informationfor complete details.
On-Board Diagnostics (OBD-II)
Your vehicle has a computer known as theon-board diagnostics system (OBD-II) thatmonitors the engine’s emission controlsystem. The system protects theenvironment by making sure that yourvehicle continues to meet governmentemission standards. The OBD-II systemalso assists a service technician in properlyservicing your vehicle.
When the service engine soonindicator illuminates, the OBD-IIsystem has detected amalfunction. Temporary malfunctions maycause the service engine soon indicator toilluminate. Examples are:
1.Your vehicle has run out of fuel—theengine may misfire or run poorly.
2.Poor fuel quality or water in thefuel—the engine may misfire or runpoorly.
3.The fuel fill inlet may not have closedproperly. See Refueling (page 31).
4.Driving through deep water—theelectrical system may be wet.
You can correct these temporarymalfunctions by filling the fuel tank withgood quality fuel, properly closing the fuelfill inlet or letting the electrical system dryout. After three driving cycles without theseor any other temporary malfunctionspresent, the service engine soon indicatorshould stay off the next time you start theengine. A driving cycle consists of a coldengine startup followed by mixed city andhighway driving. No additional vehicleservice is required.
If the service engine soon indicator remainson, have your vehicle serviced at the firstavailable opportunity. Although somemalfunctions detected by the OBD-II maynot have symptoms that are apparent,continued driving with the service enginesoon indicator on can result in increasedemissions, lower fuel economy, reducedengine and transmission smoothness andlead to more costly repairs.
Readiness for Inspection andMaintenance (I/M) Testing
Some state and provincial and localgovernments may haveInspection/Maintenance (I/M) programsto inspect the emission control equipmenton your vehicle. Failure to pass thisinspection could prevent you from gettinga vehicle registration.
If the service engine soonindicator is on or the bulb doesnot work, your vehicle may needservice. See On-Board Diagnostics.
36
Motorhome (TY3) Canada/United States of America, enUSA, Edition date: 201803, Third-Printing-Engine Emission Control
Page 40 of 176

Your vehicle may not pass the I/M test ifthe service engine soon indicator is on ornot working properly (bulb is burned out),or if the OBD-II system has determinedthat some of the emission control systemshave not been properly checked. In thiscase, the vehicle is not ready for I/Mtesting.
If the vehicle’s engine or transmission hasjust been serviced, or the battery hasrecently run down or been replaced, theOBD-II system may indicate that thevehicle is not ready for I/M testing. Todetermine if the vehicle is ready for I/Mtesting, turn the ignition key to the onposition for 15 seconds without crankingthe engine. If the service engine soonindicator blinks eight times, it means thatthe vehicle is not ready for I/M testing; ifthe service engine soon indicator stays onsolid, it means that your vehicle is readyfor I/M testing.
The OBD-II system checks the emissioncontrol system during normal driving. Acomplete check may take several days.
If the vehicle is not ready for I/M testing,you can perform the following driving cycleconsisting of mixed city and highwaydriving:
1.15 minutes of steady driving on anexpressway or highway followed by 20minutes of stop-and-go driving with atleast four 30-second idle periods.
2.Allow your vehicle to sit for at leasteight hours with the ignition off. Then,start the vehicle and complete theabove driving cycle. The vehicle mustwarm up to its normal operatingtemperature. Once started, do not turnoff the vehicle until the above drivingcycle is complete.
If the vehicle is still not ready for I/Mtesting, you need to repeat the abovedriving cycle.
37
Motorhome (TY3) Canada/United States of America, enUSA, Edition date: 201803, Third-Printing-Engine Emission Control
Page 41 of 176

AUTOMATIC TRANSMISSION
WARNING: Always set the parkingbrake fully and make sure you shift thegearshift lever to first gear. Switch theignition off and remove the key wheneveryou leave your vehicle.
WARNING: Do not apply the brakepedal and accelerator pedalsimultaneously. Applying both pedalssimultaneously for more than a fewseconds will limit engine performance,which may result in difficulty maintainingspeed in traffic and could lead to seriousinjury.
Understanding the Positions ofYour Automatic Transmission
Putting your vehicle in or out of gear:
1.Fully press down the brake pedal.
2.Move the gearshift lever into thedesired gear.
3.Come to a complete stop.
4.Move the gearshift lever and securelylatch it in park (P)
The instrument cluster displays the currentgear.
Park (P)
This position locks the transmission andprevents the wheels from turning.
Reverse (R)
With the gearshift lever in reverse (R), yourvehicle moves backward. Always come toa complete stop before shifting into andout of reverse (R).
Neutral (N)
With the gearshift lever in neutral (N), yourvehicle can be started and is free to roll.Hold the brake pedal down when in thisposition.
Drive (D)
Drive (D) is the normal driving position forthe best fuel economy. The overdrivefunction allows automatic upshifts throughall available gears.
Third (3)
Transmission operates in third (3) gearonly. Use third (3) gear for improvedtraction on slippery roads.
Second (2)
Transmission operates in second (2) gearonly. Use second (2) gear to start-up onslippery roads.
First (1)
•Transmission operates in first (1) gearonly.
•Provides maximum engine braking.
•Allows upshifts by moving gearshiftlever.
•Does not downshift into first (1) gearat high speeds; allows for first (1) gearwhen vehicle reaches slower speeds.
38
Motorhome (TY3) Canada/United States of America, enUSA, Edition date: 201803, Third-Printing-TransmissionE161511PRND321
Page 42 of 176

Tow/Haul Mode
WARNING: Do not use tow/haulwhen the road surface is slippery. Failureto follow this instruction could result inthe loss of control of your vehicle.
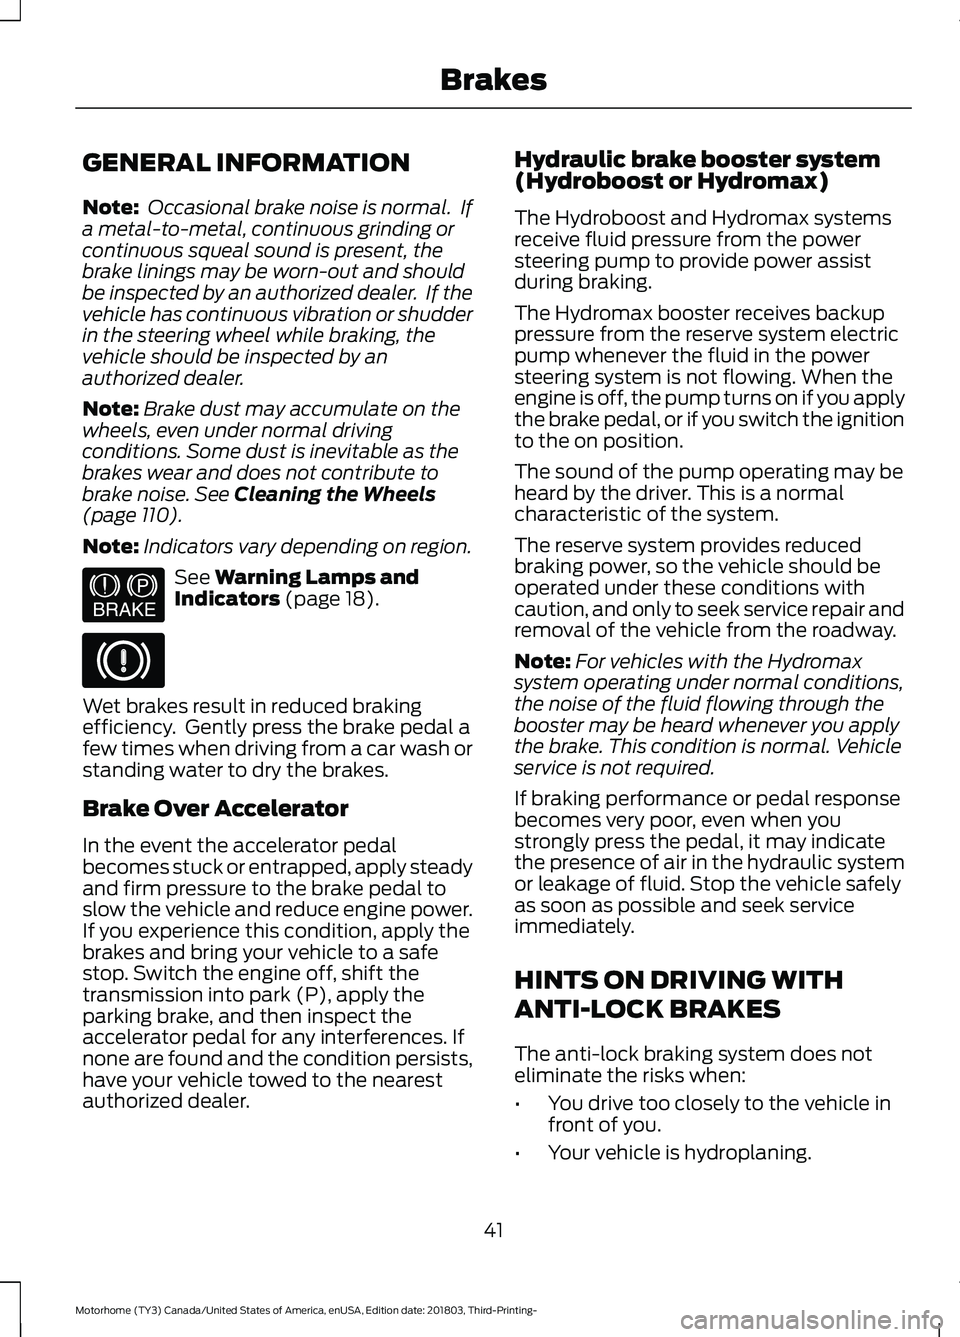
To activate tow/haul, press thebutton on the gearshift leveronce. The TOW HAUL indicatorlight illuminates in the instrument cluster.
To deactivate the tow/haul feature andreturn to normal driving mode, press thebutton on the gearshift lever again. TheTOW HAUL light deactivates. Tow/haulcan also deactivate when your powerdown your vehicle.
The tow/haul feature:
•Delays upshifts to reduce the frequencyof transmission shifting.
•Provides engine braking in all forwardgears, which can slow your vehicle andassist you in controlling your vehiclewhen descending a grade.
•Depending on driving conditions andload conditions, may downshift thetransmission, slow your vehicle andcontrol your vehicle speed whendescending a hill, without pressing theaccelerator pedal. The amount ofdownshift braking provided can varybased upon the amount the brakepedal is pressed.
The tow/haul feature improvestransmission operation when towing atrailer or a heavy load. All transmissiongear ranges are available when usingtow/haul.
Automatic Transmission AdaptiveLearning
This feature may increase durability andprovide consistent shift feel over the lifeof your vehicle. A new vehicle ortransmission may have firm shifts, softshifts or both. This operation is considerednormal and does not affect function ordurability of the transmission. Over time,the adaptive learning process fully updatestransmission operation.
Forced Downshifts
•Allowed in drive (D) with the tow/haulfeature on or off.
•Press the accelerator pedal to the floor.
•Allows transmission to select anappropriate gear.
39
Motorhome (TY3) Canada/United States of America, enUSA, Edition date: 201803, Third-Printing-TransmissionE161510 E161509
Page 43 of 176

Brake-Shift Interlock
WARNING: Do not drive yourvehicle until you verify that thestoplamps are working.
WARNING: When doing thisprocedure, you need to take thetransmission out of park (P) whichmeans your vehicle can roll freely. Toavoid unwanted vehicle movement,always fully apply the parking brake priorto doing this procedure. Use wheelschocks if appropriate.
WARNING: If the parking brake isfully released, but the brake warninglamp remains illuminated, the brakesmay not be working properly. Have yourvehicle checked as soon as possible.
Your vehicle is equipped with a brake-shiftinterlock feature that prevents moving thegearshift lever from park (P) when theignition is in the on position and the brakepedal is not pressed.
If you cannot move the gearshift lever outof park (P) position with the ignition in theon position and the brake pedal pressed,a malfunction may have occurred. It ispossible that a fuse has blown or yourvehicle’s brake lamps are not operatingproperly. See Fuse Specification Chart(page 71).
If the fuse is not blown and the brakelamps are working properly, the followingprocedure can allow you to move thegearshift lever from park (P):
1.Apply the parking brake. Turn key tothe lock position, and then remove thekey.
2.Disconnect the negative black batterycable from the battery.
3.Insert the key and turn to the offposition. Shift the transmission toneutral (N).
4.Reconnect the negative black batterycable to the battery.
5.Start the vehicle.
Note:See your authorized dealer as soonas possible if this procedure is used.
If Your Vehicle Gets Stuck In Mudor Snow
Note:Do not rock your vehicle if the engineis not at normal operating temperature ordamage to the transmission may occur.
Note:Do not rock your vehicle for morethan a minute or damage to thetransmission and tires may occur, or theengine may overheat.
If your vehicle gets stuck in mud or snow,you may rock it out by shifting betweenforward and reverse gears, stoppingbetween shifts in a steady pattern. Presslightly on the accelerator in each gear.
40
Motorhome (TY3) Canada/United States of America, enUSA, Edition date: 201803, Third-Printing-Transmission
Page 44 of 176

GENERAL INFORMATION
Note: Occasional brake noise is normal. Ifa metal-to-metal, continuous grinding orcontinuous squeal sound is present, thebrake linings may be worn-out and shouldbe inspected by an authorized dealer. If thevehicle has continuous vibration or shudderin the steering wheel while braking, thevehicle should be inspected by anauthorized dealer.
Note:Brake dust may accumulate on thewheels, even under normal drivingconditions. Some dust is inevitable as thebrakes wear and does not contribute tobrake noise. See Cleaning the Wheels(page 110).
Note:Indicators vary depending on region.
See Warning Lamps andIndicators (page 18).
Wet brakes result in reduced brakingefficiency. Gently press the brake pedal afew times when driving from a car wash orstanding water to dry the brakes.
Brake Over Accelerator
In the event the accelerator pedalbecomes stuck or entrapped, apply steadyand firm pressure to the brake pedal toslow the vehicle and reduce engine power.If you experience this condition, apply thebrakes and bring your vehicle to a safestop. Switch the engine off, shift thetransmission into park (P), apply theparking brake, and then inspect theaccelerator pedal for any interferences. Ifnone are found and the condition persists,have your vehicle towed to the nearestauthorized dealer.
Hydraulic brake booster system(Hydroboost or Hydromax)
The Hydroboost and Hydromax systemsreceive fluid pressure from the powersteering pump to provide power assistduring braking.
The Hydromax booster receives backuppressure from the reserve system electricpump whenever the fluid in the powersteering system is not flowing. When theengine is off, the pump turns on if you applythe brake pedal, or if you switch the ignitionto the on position.
The sound of the pump operating may beheard by the driver. This is a normalcharacteristic of the system.
The reserve system provides reducedbraking power, so the vehicle should beoperated under these conditions withcaution, and only to seek service repair andremoval of the vehicle from the roadway.
Note:For vehicles with the Hydromaxsystem operating under normal conditions,the noise of the fluid flowing through thebooster may be heard whenever you applythe brake. This condition is normal. Vehicleservice is not required.
If braking performance or pedal responsebecomes very poor, even when youstrongly press the pedal, it may indicatethe presence of air in the hydraulic systemor leakage of fluid. Stop the vehicle safelyas soon as possible and seek serviceimmediately.
HINTS ON DRIVING WITH
ANTI-LOCK BRAKES
The anti-lock braking system does noteliminate the risks when:
•You drive too closely to the vehicle infront of you.
•Your vehicle is hydroplaning.
41
Motorhome (TY3) Canada/United States of America, enUSA, Edition date: 201803, Third-Printing-BrakesE144522
Page 45 of 176

•You take corners too fast.
•The road surface is poor.
Note: If the system activates, the brakepedal may pulse and may travel further.Maintain pressure on the brake pedal. Youmay also hear a noise from the system. Thisis normal.
PARKING BRAKE
WARNING: Always fully apply theparking brake. Make sure you shift intopark (P) for vehicles with an automatictransmission. Switch the ignition off andremove the key whenever you leave yourvehicle.
Apply the parking brake whenever you parkyour vehicle.
•For vehicles with a foot operatedparking brake, press the pedal down.
•For vehicles with a hand operatedparking brake, pull the parking brakelever up.
It illuminates when you switchthe ignition on and apply theparking brake. It also illuminatesmomentarily when you switchthe ignition on to confirm thelamp is functional. if is does notilluminate when you switch the ignition onor begins to flash at any time, have thesystem checked by an authorized dealer.
If it illuminates when your vehicle ismoving, make sure you disengage theparking brake.
If the parking brake is disengaged, thisindicates a low brake fluid level or a brakesystem fault. Have your vehicle checkedas soon as possible.
To release the parking brake:
•For vehicles with a foot operatedparking brake, pull the parking brakerelease lever.
•For vehicles with a hand operatedparking brake, push the parking brakelever down.
42
Motorhome (TY3) Canada/United States of America, enUSA, Edition date: 201803, Third-Printing-BrakesE144522
Page 53 of 176

TOWING A TRAILER
WARNING: Towing trailersbeyond the maximumrecommended gross trailerweight exceeds the limit of yourvehicle and could result in enginedamage, transmission damage,structural damage, loss ofvehicle control, vehicle rolloverand personal injury.
WARNING: Do not exceedthe GVWR or the GAWRspecified on the certificationlabel.
Note: See RecommendedTowing Weights (page 51).
Your vehicle may have electricalitems, such as fuses or relays,related to towing. See Fuses(page 71).
Your vehicle's load capacitydesignation is by weight, not byvolume, so you cannot necessarilyuse all available space whenloading a vehicle or trailer.
Towing a trailer places an extraload on your vehicle's engine,transmission, axle, brakes, tiresand suspension. Inspect thesecomponents periodically during,and after, any towing operation.
Load Placement
To help minimize how trailermovement affects your vehiclewhen driving:
•Load the heaviest items closestto the trailer floor.
•Load the heaviest itemscentered between the left andright side trailer tires.
•Load the heaviest items abovethe trailer axles or just slightlyforward toward the trailertongue. Do not allow the finaltrailer tongue weight to goabove or below 10-15% of theloaded trailer weight.
•Select a ball mount with thecorrect rise or drop and loadcapacity. When both theloaded vehicle and trailer areconnected, the trailer frameshould be level, or slightlyangled down toward yourvehicle, when viewed from theside.
When driving with a trailer orpayload, a slight takeoff vibrationor shudder may be present due tothe increased payload weight.Additional information regardingproper trailer loading and settingyour vehicle up for towing islocated in another chapter of thismanual. See Load Limit (page45).
You can also find information inthe RV & Trailer Towing Guideavailable at your authorizeddealer, or online.
50
Motorhome (TY3) Canada/United States of America, enUSA, Edition date: 201803, Third-Printing-Towing