2019 FORD F-450 towing
[x] Cancel search: towingPage 312 of 666

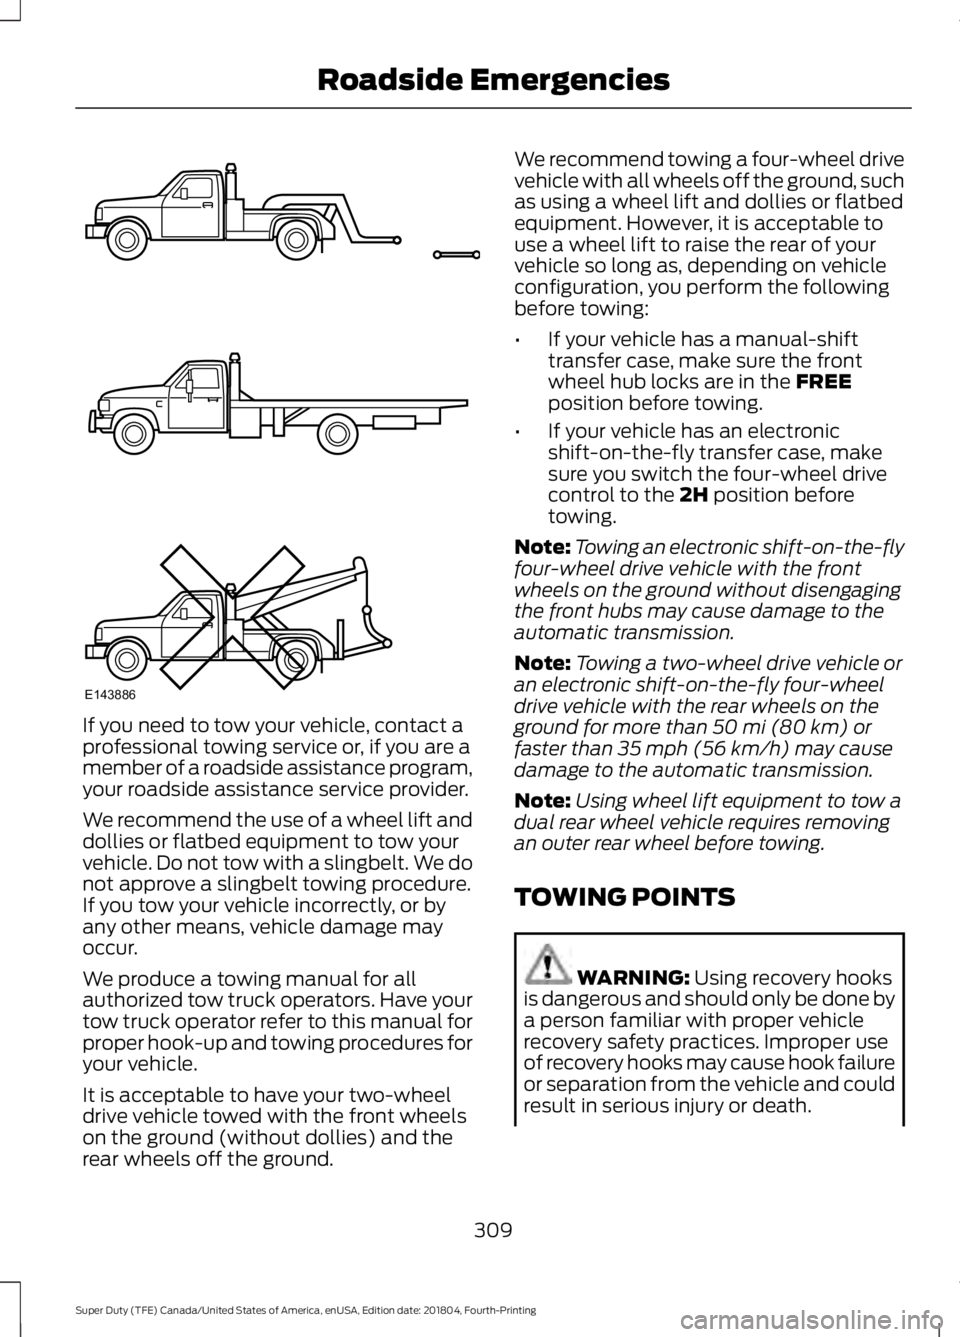
If you need to tow your vehicle, contact a
professional towing service or, if you are a
member of a roadside assistance program,
your roadside assistance service provider.
We recommend the use of a wheel lift and
dollies or flatbed equipment to tow your
vehicle. Do not tow with a slingbelt. We do
not approve a slingbelt towing procedure.
If you tow your vehicle incorrectly, or by
any other means, vehicle damage may
occur.
We produce a towing manual for all
authorized tow truck operators. Have your
tow truck operator refer to this manual for
proper hook-up and towing procedures for
your vehicle.
It is acceptable to have your two-wheel
drive vehicle towed with the front wheels
on the ground (without dollies) and the
rear wheels off the ground. We recommend towing a four-wheel drive
vehicle with all wheels off the ground, such
as using a wheel lift and dollies or flatbed
equipment. However, it is acceptable to
use a wheel lift to raise the rear of your
vehicle so long as, depending on vehicle
configuration, you perform the following
before towing:
•
If your vehicle has a manual-shift
transfer case, make sure the front
wheel hub locks are in the FREE
position before towing.
• If your vehicle has an electronic
shift-on-the-fly transfer case, make
sure you switch the four-wheel drive
control to the
2H position before
towing.
Note: Towing an electronic shift-on-the-fly
four-wheel drive vehicle with the front
wheels on the ground without disengaging
the front hubs may cause damage to the
automatic transmission.
Note: Towing a two-wheel drive vehicle or
an electronic shift-on-the-fly four-wheel
drive vehicle with the rear wheels on the
ground for more than
50 mi (80 km) or
faster than 35 mph (56 km/h) may cause
damage to the automatic transmission.
Note: Using wheel lift equipment to tow a
dual rear wheel vehicle requires removing
an outer rear wheel before towing.
TOWING POINTS WARNING:
Using recovery hooks
is dangerous and should only be done by
a person familiar with proper vehicle
recovery safety practices. Improper use
of recovery hooks may cause hook failure
or separation from the vehicle and could
result in serious injury or death.
309
Super Duty (TFE) Canada/United States of America, enUSA, Edition date: 201804, Fourth-Printing Roadside EmergenciesE143886
Page 340 of 666

4. Refill the engine with new oil. See
Capacities and Specifications (page
431).
5. For diesel engines, you need to reset the Intelligent Oil Life Monitor™. See
Information Displays
(page 112).
Engine lubrication for severe
service operation
The following conditions define severe
operation for which engine operation with
SAE 5W-40 API CJ-4 is recommended. Oil
and oil filter change intervals will be
determined by the Intelligent Oil Life
Monitor™ as noted previously.
• Frequent or extended idling (over 10
minutes per hour of normal driving).
• Low-speed operation/stationary use.
• If vehicle is operated in sustained
ambient temperatures below
-9°F
(-23°C) or above 100°F (38°C).
• Frequent low-speed operation,
consistent heavy traffic less than
25 mph (40 km/h)
.
• Operating in severe dust conditions.
• Operating the vehicle off road.
• Towing a trailer over
1,000 mi
(1,600 km).
• Sustained, high-speed driving at Gross
Vehicle Weight Rating (maximum
loaded weight for vehicle operation).
• Use of fuels with sulfur content other
than ultra-low sulfur diesel (ULSD).
• Use of high-sulfur diesel fuel. CHANGING THE CRANKCASE
VENT FILTER ELEMENT WARNING:
Do not dispose of
engine oil or oil filters in the household
refuse or the public sewage system. Use
an authorized waste disposal facility.
Do not clean or recondition the filter
element.
We recommend that you demand the use
of genuine Ford and Motorcraft® parts
whenever your vehicle requires scheduled
maintenance or repair. Use the correct
specification filter element. See
Motorcraft Parts
(page 422).
Note: Operating your vehicle without a filter
element or with an unapproved filter
element may result in damage to the turbo
charger or exchanger and could lead to
engine damage that may not be covered by
the vehicle Warranty.
337
Super Duty (TFE) Canada/United States of America, enUSA, Edition date: 201804, Fourth-Printing Maintenance
Page 349 of 666

Severe Climates
If you drive in extremely cold climates:
•
It may be necessary to increase the
coolant concentration above 50%.
• A coolant concentration of 60%
provides improved freeze point
protection. Coolant concentrations
above 60% decrease the overheat
protection characteristics of the
coolant and may cause engine
damage.
If you drive in extremely hot climates:
• You can decrease the coolant
concentration to 40%.
• Coolant concentrations below 40%
decrease the freeze and corrosion
protection characteristics of the
coolant and may cause engine
damage.
Vehicles driven year-round in non-extreme
climates should use prediluted engine
coolant for optimum cooling system and
engine protection.
Coolant Change
Follow the specific mileage intervals, as
listed in the scheduled maintenance
information, to change the coolant. The
information display may display a message
to change coolant at this time. Add
prediluted coolant approved to the correct
specification. See Capacities and
Specifications (page 419). Engine-driven Cooling Fan
Your vehicle may have an engine driven
cooling fan drive also called a fan clutch.
This fan drive changes the fan speed to
match the vehicle
’s changing cooling air
flow requirements. Fan speed, fan noise
level and fuel consumption all will increase
based on the driving conditions that
include trailer towing, hill climbing, heavy
loads, high speed and high ambient
temperature, individually or in combination.
The fan drive is designed to provide the
minimum fan speed and resulting
minimum fan noise and fuel consumption
required to meet the ever-changing vehicle
cooling air flow requirements. You can hear
the amount of fan noise increasing and
decreasing as the engine power
requirements and vehicle driving conditions
change as you drive. This is normal to the
operation of your vehicle. You may also
hear high levels of the fan when the engine
is first started and should normally
decrease after driving for a short time.
AUTOMATIC TRANSMISSION
FLUID CHECK
Have an authorized dealer check and
change the transmission fluid and filter at
the correct service interval. See
Scheduled Maintenance
(page 580).
Do not use supplemental transmission
fluid additives, treatments or cleaning
agents. The use of these materials may
affect transmission operation and result
in damage to internal transmission
components. See
Scheduled
Maintenance (page 580).
The automatic transmission does not have
a transmission fluid dipstick.
Note: Only applies to 6R100 transmission.
346
Super Duty (TFE) Canada/United States of America, enUSA, Edition date: 201804, Fourth-Printing Maintenance
Page 410 of 666

The usage of a full-size dissimilar spare
wheel and tire assembly can lead to
impairment of the following:
•
Handling, stability and braking
performance.
• Comfort and noise.
• Ground clearance and parking at curbs.
• Winter weather driving capability.
• Wet weather driving capability.
• Four-wheel drive capability. When driving with the full-size dissimilar
spare wheel and tire assembly additional
caution should be given to:
•
Towing a trailer.
• Driving vehicles equipped with a
camper body.
• Driving vehicles with a load on the
cargo rack.
Drive cautiously when using a full-size
dissimilar spare wheel and tire assembly
and seek service as soon as possible.
Location of the Spare Tire and
Tools
If your vehicle is equipped with a spare tire,
jack and associated tools, see the
following table for their locations: Location
Tool
Under the vehicle, just forward of the rearbumper.
Spare tire - pick-up trucks only
Fastened to the floor pan behind the rear-most seat on the passenger side.
Jack
Regular Cab: Fastened to floor behind thedriver seat.
Jack handle, lug wrench, lug wrench exten-
sion - only available on dual rear wheel
vehicles and wheel chock - only available
on single rear wheel vehicles equipped with a diesel engine. Super Cab and Crew Cab: Fastened to the
floor under the rear seat on the driver's side.
Removing the Spare Tire (With
Spare Tire Carrier Only)
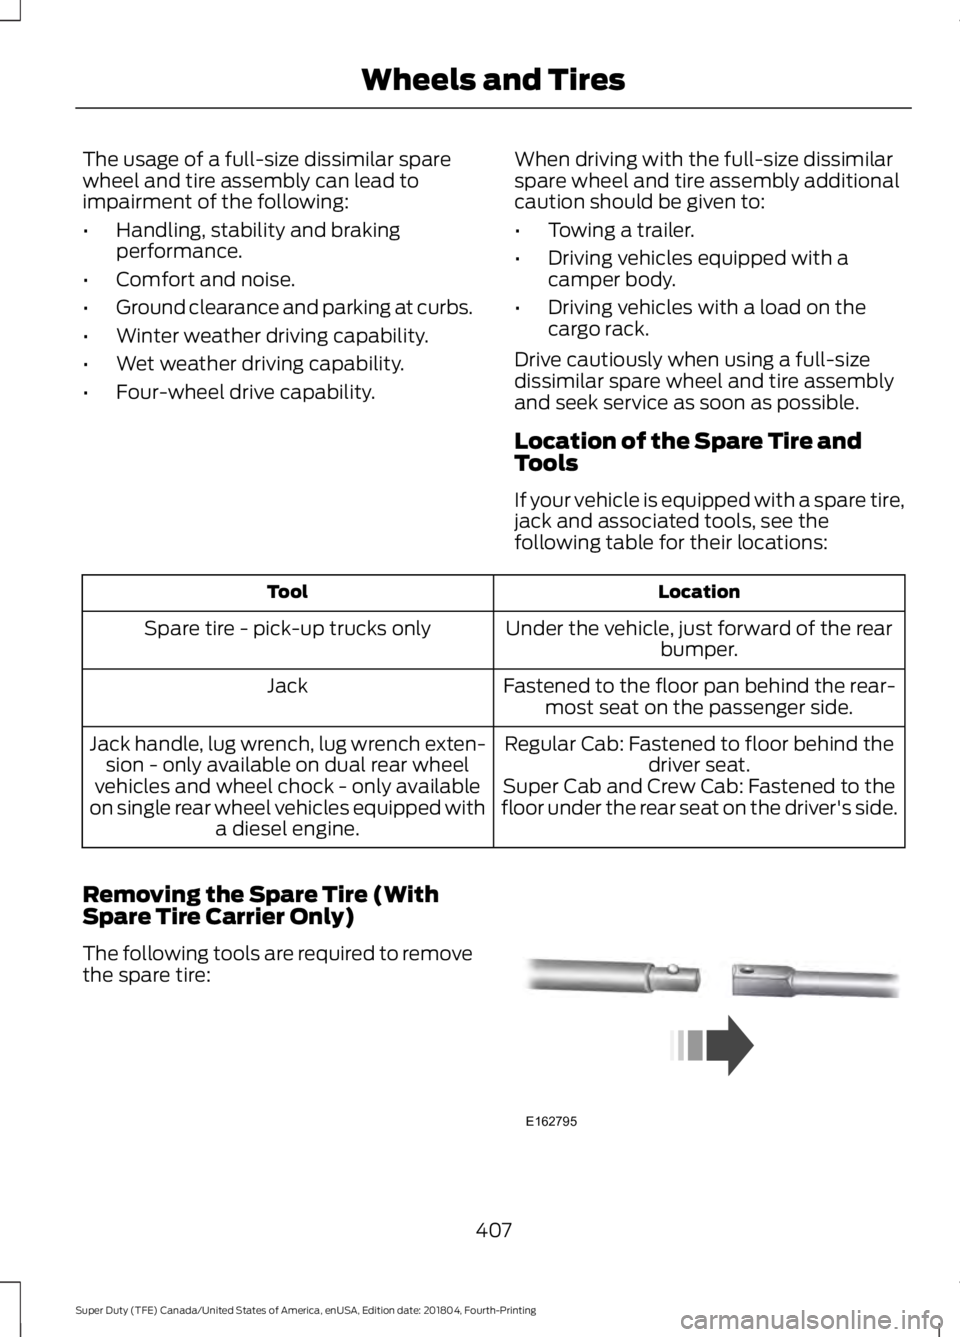
The following tools are required to remove
the spare tire: 407
Super Duty (TFE) Canada/United States of America, enUSA, Edition date: 201804, Fourth-Printing Wheels and TiresE162795
Page 414 of 666

Rear
Note:
Jack at the specified locations to
avoid damage to the vehicle.
Jacking the Vehicle 1. Insert the hooked end of the jack
handle into the jack and turn the
handle clockwise until the wheel is
completely off the ground and high
enough to install the spare tire.
2. Remove the lug nuts with the lug wrench.
3. Replace the flat tire with the spare, making sure the valve stem of the
spare is facing outward when replacing
a front wheel. For the rear wheel
position on vehicles with single rear
wheel fitments, install the spare with
the valve stem facing outward. For
vehicles with dual rear wheels, the
valve stem of the spare must face
outward when replacing an inner
wheel, but must face inward when
replacing an outboard wheel.
4. Reinstall the lug nuts until the wheel is
snug against the hub. Do not fully
tighten the lug nuts until the vehicle
has been lowered.
5. Lower the wheel by turning the jack handle counterclockwise. 6. Remove the jack and fully tighten the
lug nuts in the order shown. See
Technical Specifications (page 417).
7. Safely stow the flat tire. See Stowing the flat or spare tire if the vehicle is
equipped with a spare tire carrier.
8. Stow the jack, jack handle and lug wrench. Make sure the jack is securely
fastened so it does not rattle when
driving.
9. Unblock the wheels. 8-lug nut torque sequence
10-lug nut torque sequence
411
Super Duty (TFE) Canada/United States of America, enUSA, Edition date: 201804, Fourth-Printing Wheels and TiresE162811 E161441
13
4
27
6
5
8 1
2
3
4
5
6
7 8
9
10
E169375
Page 417 of 666

Jacking the Vehicle
1. Insert the jack handle into the pump
linkage.
2. Use an up-and-down motion with the jack handle to raise the wheel
completely off the ground.
Note: Hydraulic jacks are equipped with a
pressure relief valve that prevents lifting
loads which exceed the jack's rated
capacity.
3. Remove the lug nuts with the lug wrench.
4. Replace the flat tire with the spare, making sure the valve stem of the
spare is facing outward when replacing
a front wheel. For the rear wheel
positions, the valve stem of the spare
must face outward when replacing an
inner wheel, but must face inward
when replacing an outboard wheel.
5. Reinstall the lug nuts until the wheel is
snug against the hub. Do not fully
tighten the lug nuts until the vehicle
has been lowered.
6. Lower the wheel by slowly turning the release valve counterclockwise.
Opening the release valve slowly
provides a more controlled rate of
descent. 7. Remove the jack and fully tighten the
lug nuts in the order shown. See
Technical Specifications (page 417).
8. Stow the flat tire. See Stowing the flat or spare tire if the vehicle is equipped
with a spare tire carrier.
9. Stow the jack, jack handle and lug wrench. Make sure the jack is securely
fastened so it does not rattle when
driving.
10. Unblock the wheels. 8-lug nut torque sequence
10-lug nut torque sequence
414
Super Duty (TFE) Canada/United States of America, enUSA, Edition date: 201804, Fourth-Printing Wheels and TiresE162819 E161441
13
4
27
6
5
8 1
2
3
4
5
6
7 8
9
10
E169375
Page 418 of 666

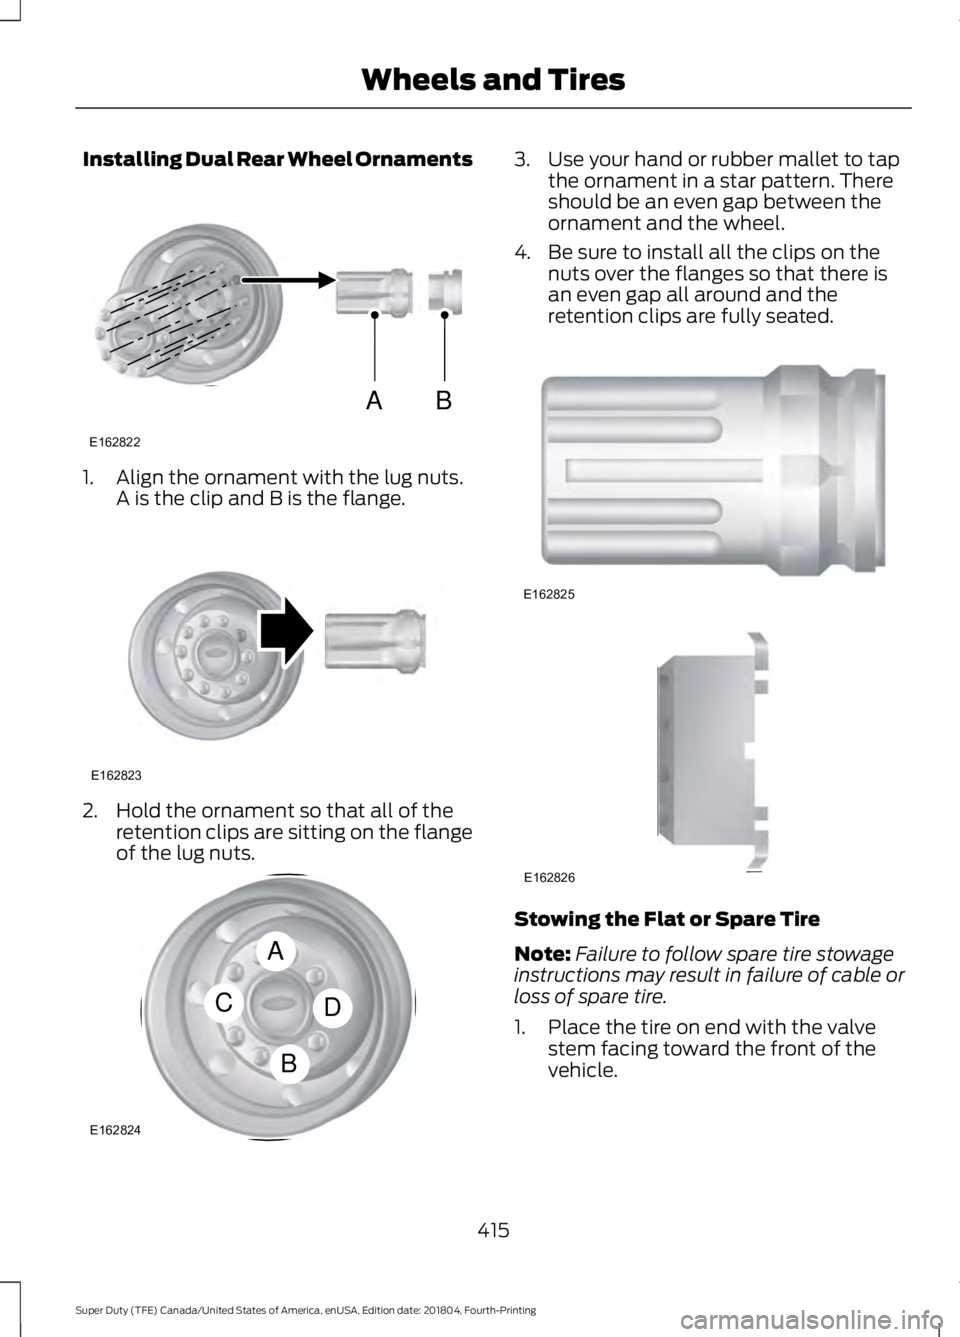
Installing Dual Rear Wheel Ornaments
1. Align the ornament with the lug nuts.
A is the clip and B is the flange. 2. Hold the ornament so that all of the
retention clips are sitting on the flange
of the lug nuts. 3. Use your hand or rubber mallet to tap
the ornament in a star pattern. There
should be an even gap between the
ornament and the wheel.
4. Be sure to install all the clips on the nuts over the flanges so that there is
an even gap all around and the
retention clips are fully seated. Stowing the Flat or Spare Tire
Note:
Failure to follow spare tire stowage
instructions may result in failure of cable or
loss of spare tire.
1. Place the tire on end with the valve stem facing toward the front of the
vehicle.
415
Super Duty (TFE) Canada/United States of America, enUSA, Edition date: 201804, Fourth-Printing Wheels and TiresAB
E162822 E162823 A
C
B
D
E162824 E162825 E162826
Page 575 of 666

For a complete listing of the accessories
that are available for your vehicle, please
contact your authorized dealer or visit the
online store web site:
Web Address (United States)
www.Accessories.Ford.com Web Address (Canada)
www.Accessories.Ford.ca
Ford Custom Accessories are available for
your vehicle through an authorized dealer.
Ford Motor Company will repair or replace
any properly authorized dealer-installed
Ford Original Accessory found to be
defective in factory-supplied materials or
workmanship during the warranty period,
as well as any component damaged by the
defective accessories.
Ford Motor Company will warrant your
Ford Original Accessory through the
warranty that provides the greatest
benefit.
• 24 months, unlimited mileage.
• The remainder of your new vehicle
limited warranty.
Contact an authorized dealer for details
and a copy of the warranty.
Exterior style
• Bed rails*.
• Commercial graphics*.
• Commercial LED warning strobe
lights*.
• Fender flares*.
• Hood deflectors.
• Exhaust tip.
• Exterior trim kits*.
• Fog lamps*.
• Running boards. •
Side window deflectors*.
• Splash guards.
• Stainless-steel wheel covers*.
• Step bars.
• Wheel well liners.
Interior style
• Ambient lighting.
• Cargo organizers.
• Custom seat covers*.
• Floor liners.
• Floor mats.
Lifestyle
• Ash cup/smoker's package.
• Bed cargo net, tie down plates and
cleats.
• Bed extender.
• Bedliners and bed mats.
• Bed ramps.
• Bluetooth speakers*.
• Hitches.
• Racks and carriers*.
• Rear seat entertainment*.
• Sportliner cargo liner*.
• Tonneau/bed cover*.
• Tow hooks.
• Towing accessories.
• Trailer back-up camera.
• Trailer brake control.
• Truck bed camping tent*.
• Trailer TPMS.
Peace of mind
• Back-up alarm*.
• Bed hooks*.
• Bumper and hitch-mounted parking
sensors*.
572
Super Duty (TFE) Canada/United States of America, enUSA, Edition date: 201804, Fourth-Printing Accessories