2019 FORD F-450 spare wheel
[x] Cancel search: spare wheelPage 411 of 666
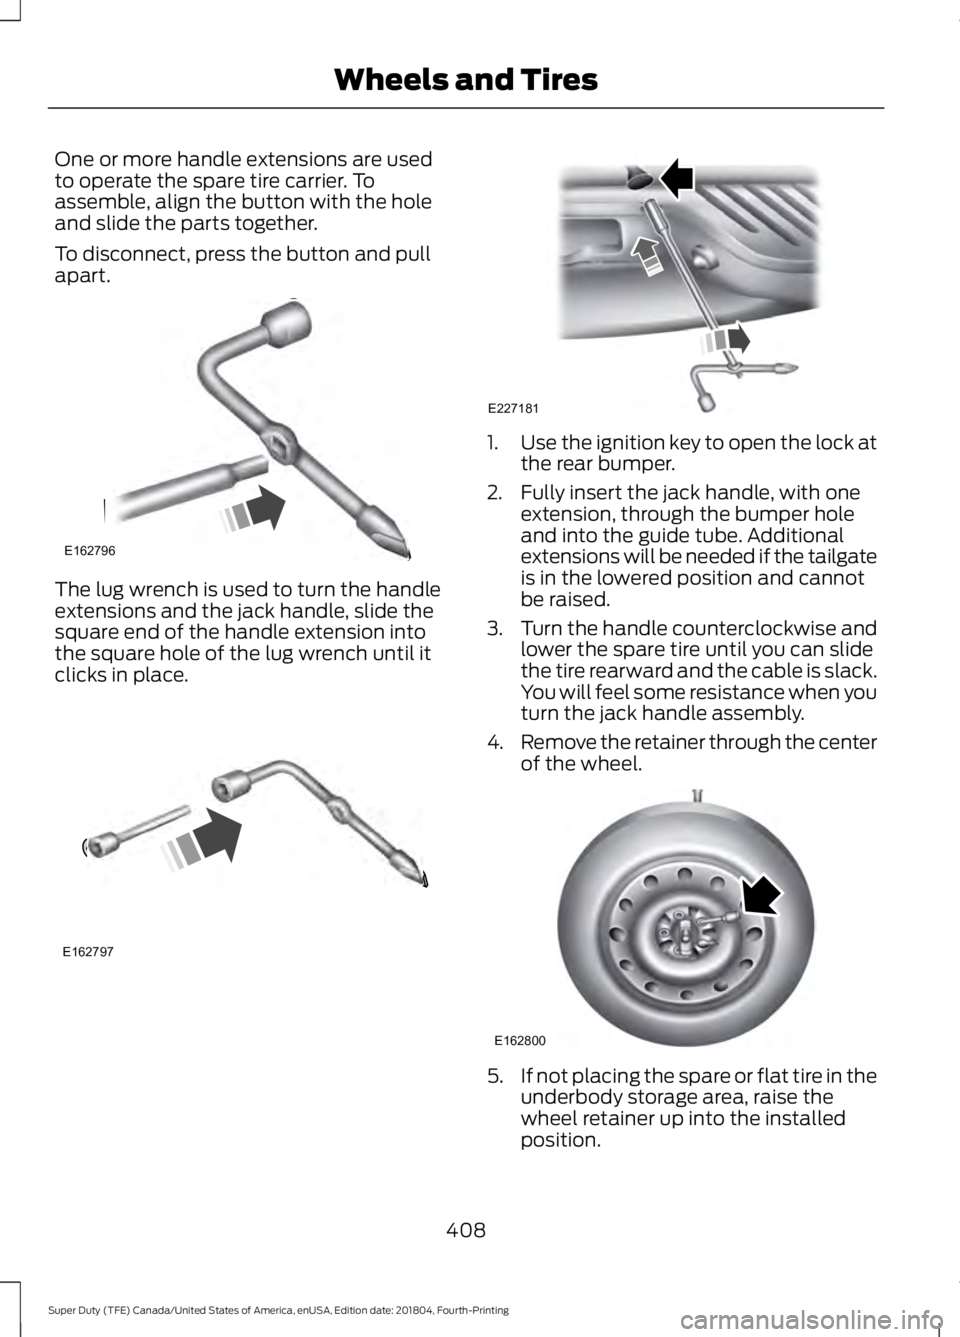
One or more handle extensions are used
to operate the spare tire carrier. To
assemble, align the button with the hole
and slide the parts together.
To disconnect, press the button and pull
apart.
The lug wrench is used to turn the handle
extensions and the jack handle, slide the
square end of the handle extension into
the square hole of the lug wrench until it
clicks in place. 1.
Use the ignition key to open the lock at
the rear bumper.
2. Fully insert the jack handle, with one extension, through the bumper hole
and into the guide tube. Additional
extensions will be needed if the tailgate
is in the lowered position and cannot
be raised.
3. Turn the handle counterclockwise and
lower the spare tire until you can slide
the tire rearward and the cable is slack.
You will feel some resistance when you
turn the jack handle assembly.
4. Remove the retainer through the center
of the wheel. 5.
If not placing the spare or flat tire in the
underbody storage area, raise the
wheel retainer up into the installed
position.
408
Super Duty (TFE) Canada/United States of America, enUSA, Edition date: 201804, Fourth-Printing Wheels and TiresE162796 E162797 E227181 E162800
Page 412 of 666
Tire Change Procedure
WARNING: When one of the front
wheels is off the ground, the
transmission alone will not prevent the
vehicle from moving or slipping off the
jack, even if the transmission is in park
(P). WARNING:
To help prevent your
vehicle from moving when changing a
wheel, shift the transmission into park
(P), set the parking brake and use an
appropriate block or wheel chock to
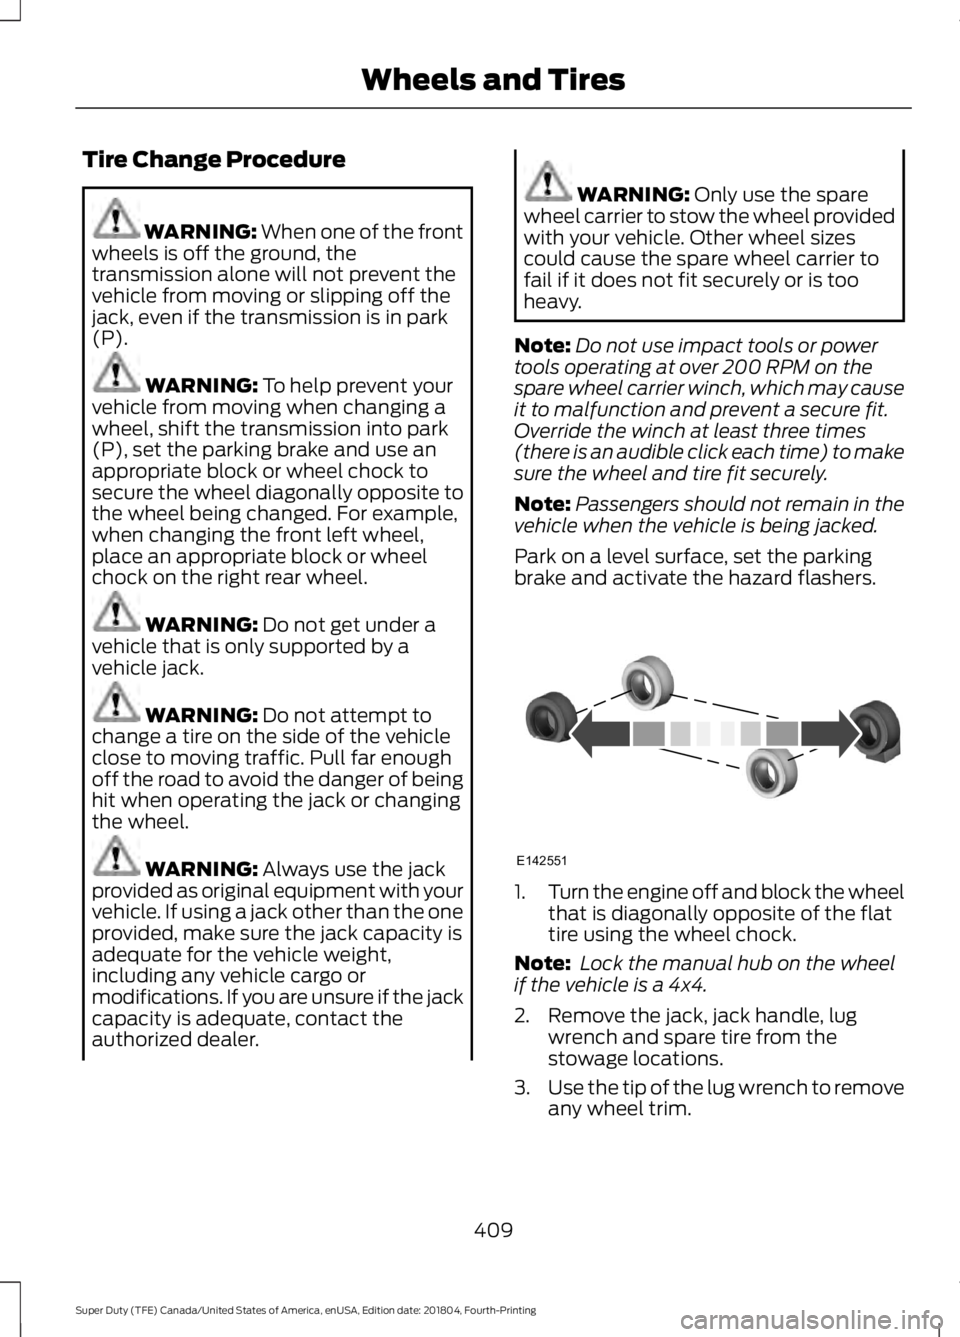
secure the wheel diagonally opposite to
the wheel being changed. For example,
when changing the front left wheel,
place an appropriate block or wheel
chock on the right rear wheel. WARNING:
Do not get under a
vehicle that is only supported by a
vehicle jack. WARNING:
Do not attempt to
change a tire on the side of the vehicle
close to moving traffic. Pull far enough
off the road to avoid the danger of being
hit when operating the jack or changing
the wheel. WARNING:
Always use the jack
provided as original equipment with your
vehicle. If using a jack other than the one
provided, make sure the jack capacity is
adequate for the vehicle weight,
including any vehicle cargo or
modifications. If you are unsure if the jack
capacity is adequate, contact the
authorized dealer. WARNING:
Only use the spare
wheel carrier to stow the wheel provided
with your vehicle. Other wheel sizes
could cause the spare wheel carrier to
fail if it does not fit securely or is too
heavy.
Note: Do not use impact tools or power
tools operating at over 200 RPM on the
spare wheel carrier winch, which may cause
it to malfunction and prevent a secure fit.
Override the winch at least three times
(there is an audible click each time) to make
sure the wheel and tire fit securely.
Note: Passengers should not remain in the
vehicle when the vehicle is being jacked.
Park on a level surface, set the parking
brake and activate the hazard flashers. 1.
Turn the engine off and block the wheel
that is diagonally opposite of the flat
tire using the wheel chock.
Note: Lock the manual hub on the wheel
if the vehicle is a 4x4.
2. Remove the jack, jack handle, lug wrench and spare tire from the
stowage locations.
3. Use the tip of the lug wrench to remove
any wheel trim.
409
Super Duty (TFE) Canada/United States of America, enUSA, Edition date: 201804, Fourth-Printing Wheels and TiresE142551
Page 413 of 666
4. Loosen each wheel lug nut ½ turn
counterclockwise, but do not remove
them until the wheel is raised off the
ground.
Note: For vehicles with dual rear wheels,
insert the lug wrench extension into the lug
wrench to reach the lug nuts.
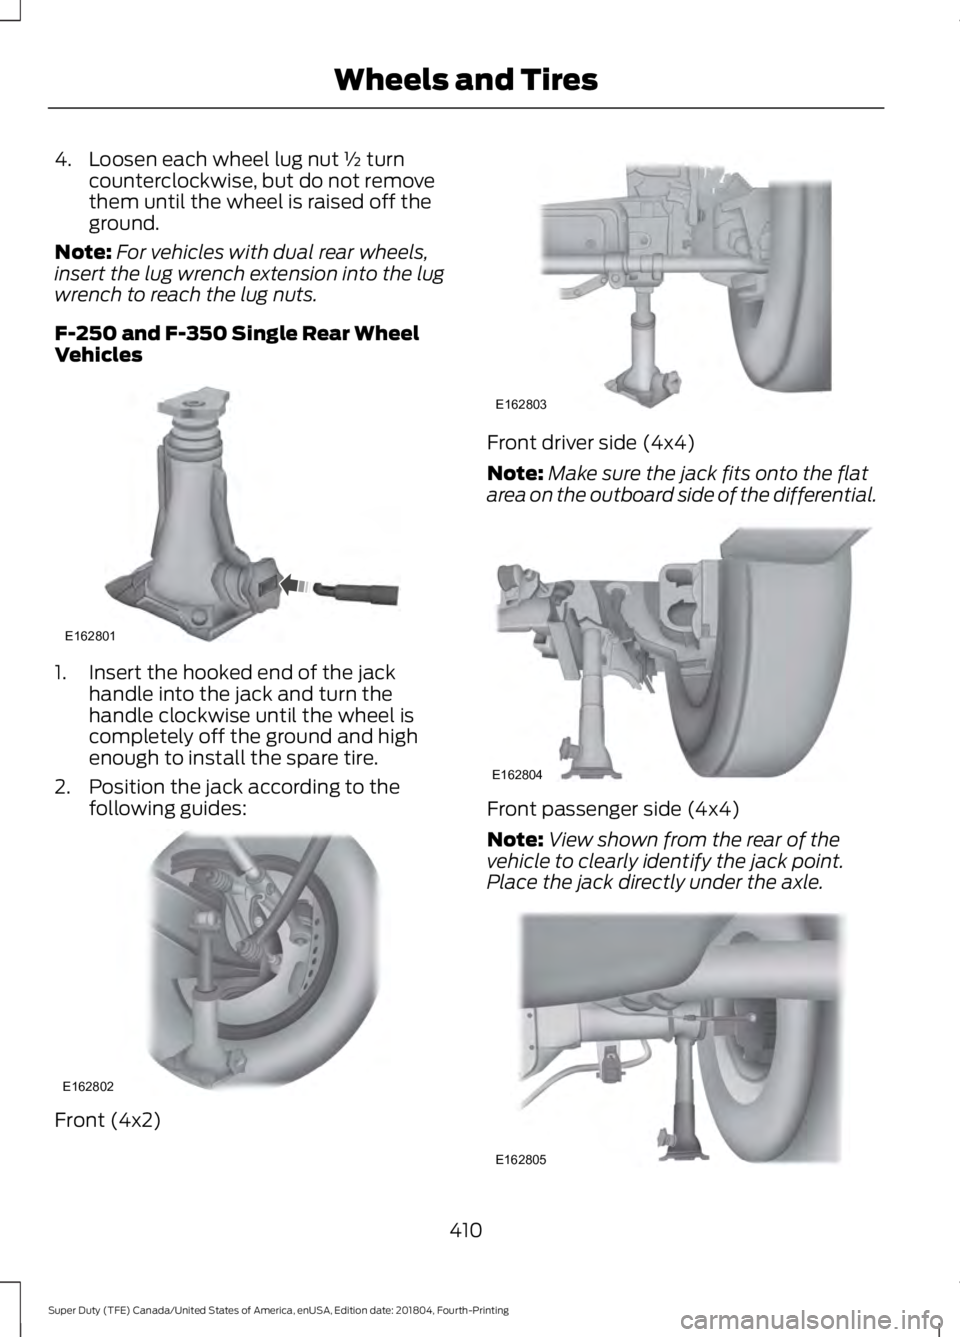
F-250 and F-350 Single Rear Wheel
Vehicles 1. Insert the hooked end of the jack
handle into the jack and turn the
handle clockwise until the wheel is
completely off the ground and high
enough to install the spare tire.
2. Position the jack according to the following guides: Front (4x2) Front driver side (4x4)
Note:
Make sure the jack fits onto the flat
area on the outboard side of the differential. Front passenger side (4x4)
Note:
View shown from the rear of the
vehicle to clearly identify the jack point.
Place the jack directly under the axle. 410
Super Duty (TFE) Canada/United States of America, enUSA, Edition date: 201804, Fourth-Printing Wheels and TiresE162801 E162802 E162803 E162804 E162805
Page 414 of 666

Rear
Note:
Jack at the specified locations to
avoid damage to the vehicle.
Jacking the Vehicle 1. Insert the hooked end of the jack
handle into the jack and turn the
handle clockwise until the wheel is
completely off the ground and high
enough to install the spare tire.
2. Remove the lug nuts with the lug wrench.
3. Replace the flat tire with the spare, making sure the valve stem of the
spare is facing outward when replacing
a front wheel. For the rear wheel
position on vehicles with single rear
wheel fitments, install the spare with
the valve stem facing outward. For
vehicles with dual rear wheels, the
valve stem of the spare must face
outward when replacing an inner
wheel, but must face inward when
replacing an outboard wheel.
4. Reinstall the lug nuts until the wheel is
snug against the hub. Do not fully
tighten the lug nuts until the vehicle
has been lowered.
5. Lower the wheel by turning the jack handle counterclockwise. 6. Remove the jack and fully tighten the
lug nuts in the order shown. See
Technical Specifications (page 417).
7. Safely stow the flat tire. See Stowing the flat or spare tire if the vehicle is
equipped with a spare tire carrier.
8. Stow the jack, jack handle and lug wrench. Make sure the jack is securely
fastened so it does not rattle when
driving.
9. Unblock the wheels. 8-lug nut torque sequence
10-lug nut torque sequence
411
Super Duty (TFE) Canada/United States of America, enUSA, Edition date: 201804, Fourth-Printing Wheels and TiresE162811 E161441
13
4
27
6
5
8 1
2
3
4
5
6
7 8
9
10
E169375
Page 417 of 666

Jacking the Vehicle
1. Insert the jack handle into the pump
linkage.
2. Use an up-and-down motion with the jack handle to raise the wheel
completely off the ground.
Note: Hydraulic jacks are equipped with a
pressure relief valve that prevents lifting
loads which exceed the jack's rated
capacity.
3. Remove the lug nuts with the lug wrench.
4. Replace the flat tire with the spare, making sure the valve stem of the
spare is facing outward when replacing
a front wheel. For the rear wheel
positions, the valve stem of the spare
must face outward when replacing an
inner wheel, but must face inward
when replacing an outboard wheel.
5. Reinstall the lug nuts until the wheel is
snug against the hub. Do not fully
tighten the lug nuts until the vehicle
has been lowered.
6. Lower the wheel by slowly turning the release valve counterclockwise.
Opening the release valve slowly
provides a more controlled rate of
descent. 7. Remove the jack and fully tighten the
lug nuts in the order shown. See
Technical Specifications (page 417).
8. Stow the flat tire. See Stowing the flat or spare tire if the vehicle is equipped
with a spare tire carrier.
9. Stow the jack, jack handle and lug wrench. Make sure the jack is securely
fastened so it does not rattle when
driving.
10. Unblock the wheels. 8-lug nut torque sequence
10-lug nut torque sequence
414
Super Duty (TFE) Canada/United States of America, enUSA, Edition date: 201804, Fourth-Printing Wheels and TiresE162819 E161441
13
4
27
6
5
8 1
2
3
4
5
6
7 8
9
10
E169375
Page 418 of 666
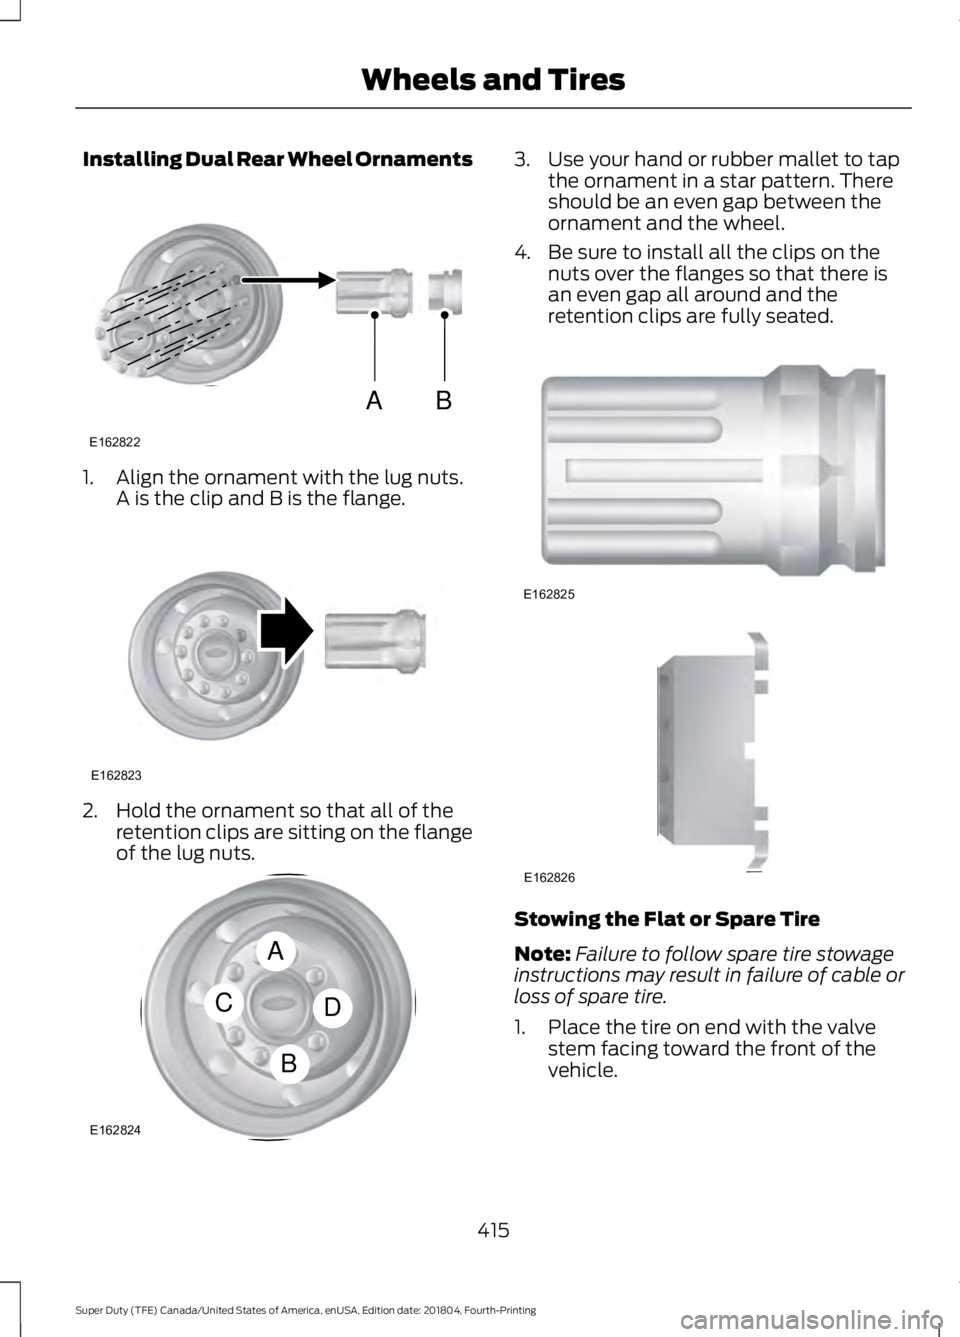
Installing Dual Rear Wheel Ornaments
1. Align the ornament with the lug nuts.
A is the clip and B is the flange. 2. Hold the ornament so that all of the
retention clips are sitting on the flange
of the lug nuts. 3. Use your hand or rubber mallet to tap
the ornament in a star pattern. There
should be an even gap between the
ornament and the wheel.
4. Be sure to install all the clips on the nuts over the flanges so that there is
an even gap all around and the
retention clips are fully seated. Stowing the Flat or Spare Tire
Note:
Failure to follow spare tire stowage
instructions may result in failure of cable or
loss of spare tire.
1. Place the tire on end with the valve stem facing toward the front of the
vehicle.
415
Super Duty (TFE) Canada/United States of America, enUSA, Edition date: 201804, Fourth-Printing Wheels and TiresAB
E162822 E162823 A
C
B
D
E162824 E162825 E162826
Page 419 of 666
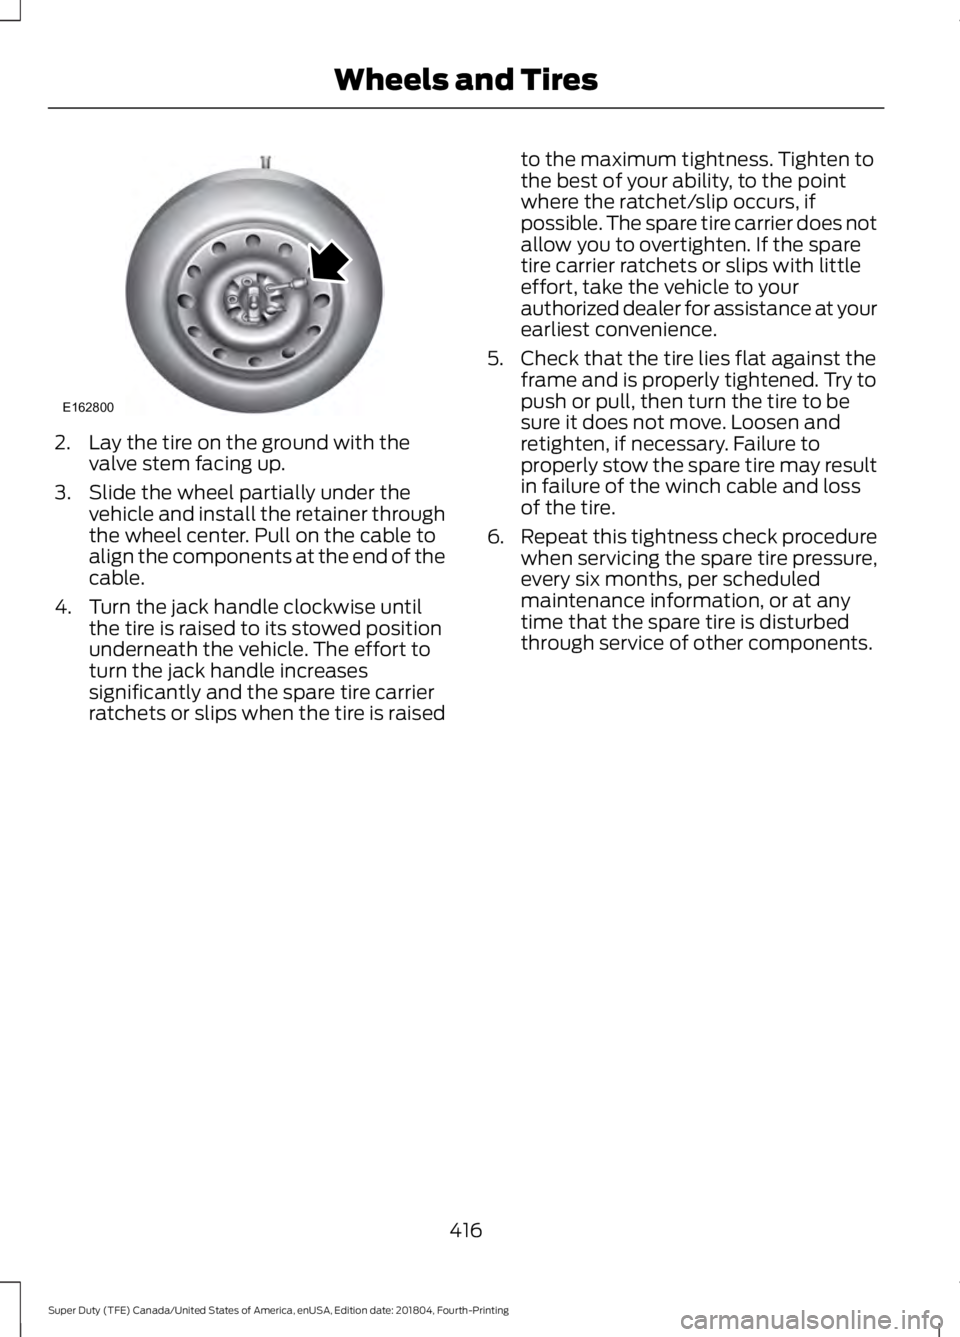
2. Lay the tire on the ground with the
valve stem facing up.
3. Slide the wheel partially under the vehicle and install the retainer through
the wheel center. Pull on the cable to
align the components at the end of the
cable.
4. Turn the jack handle clockwise until the tire is raised to its stowed position
underneath the vehicle. The effort to
turn the jack handle increases
significantly and the spare tire carrier
ratchets or slips when the tire is raised to the maximum tightness. Tighten to
the best of your ability, to the point
where the ratchet/slip occurs, if
possible. The spare tire carrier does not
allow you to overtighten. If the spare
tire carrier ratchets or slips with little
effort, take the vehicle to your
authorized dealer for assistance at your
earliest convenience.
5. Check that the tire lies flat against the frame and is properly tightened. Try to
push or pull, then turn the tire to be
sure it does not move. Loosen and
retighten, if necessary. Failure to
properly stow the spare tire may result
in failure of the winch cable and loss
of the tire.
6. Repeat this tightness check procedure
when servicing the spare tire pressure,
every six months, per scheduled
maintenance information, or at any
time that the spare tire is disturbed
through service of other components.
416
Super Duty (TFE) Canada/United States of America, enUSA, Edition date: 201804, Fourth-Printing Wheels and TiresE162800
Page 654 of 666

C
Cabin Air Filter.................................................151
Capacities and Specifications - 6.2L
................................................................426
Alternative Engine Oil for Extremely Cold
Climates........................................................... 430
Specifications...................................................... 427
Capacities and Specifications - 6.7L Diesel
..............................................................431
Engine Oil Specifications................................ 435
Specifications..................................................... 432
Capacities and Specifications - 6.8L
................................................................437
Alternative Engine Oil for Extremely Cold
Climates............................................................ 441
Specifications..................................................... 438
Capacities and Specifications.................419
Cargo Lamps
...................................................96
Car Wash See: Cleaning the Exterior.............................. 369
Catalytic Converter
......................................194
On-Board Diagnostics (OBD-II)................... 195
Readiness for Inspection and Maintenance (I/M) Testing................................................... 195
Center Console
..............................................170
Changing a Bulb..........................................358 Cargo Lamp and Central High Mounted
Brake Lamp Bulbs......................................... 361
Fog Lamp Bulbs................................................. 359
Front Park and Direction Indicator Lamp Bulbs................................................................. 358
Headlamp Bulbs................................................ 358
LED Bulb............................................................... 359
LED Lamps........................................................... 359
License Plate Lamp Bulb................................. 361
Rear Lamps, Brake Lamps, Rear Direction Indicator and Reversing Lamp
Bulbs................................................................. 360
Changing a Fuse...........................................327 Fuses....................................................................... 327
Changing a Road Wheel..........................406 Dissimilar Spare Wheel and Tire Assembly
Information.................................................... 406
Location of the Spare Tire and Tools.........407
Removing the Spare Tire (With Spare Tire Carrier Only)................................................... 407
Tire Change Procedure................................... 409Changing the 12V Battery.........................354
Battery Management System....................... 355
Changing the Crankcase Vent Filter Element.........................................................337
Changing the Engine Air Filter - 6.2L/ 6.8L.................................................................361
Changing the Engine Air Filter - 6.7L Diesel.............................................................362
Air Filter Restriction Gauge............................ 364
Changing the Engine-Mounted and Diesel Fuel Conditioner Module Fuel
Filters - 6.7L Diesel...................................364
Diesel Fuel Conditioner Module Filter................................................................... 365
Engine-mounted Fuel Filter........................... 367
Changing the Engine Oil and Oil Filter...............................................................336
Engine lubrication for severe service operation.......................................................... 337
Changing the Wiper Blades.....................356
Checking MyKey System Status...............67 MyKey Distance..................................................... 67
Number of Admin Keys...................................... 67
Number of MyKeys............................................... 67
Checking the Wiper Blades.....................356
Child Restraint and Seatbelt Maintenance.................................................45
Child Restraint Positioning.........................35
Child Safety......................................................20 General Information............................................ 20
Child Safety Locks..........................................37 Left-Hand Side...................................................... 37
Right-Hand Side................................................... 37
Cleaning Leather Seats..............................374 With King Ranch Edition.................................. 375
Without King Ranch Edition........................... 374
Cleaning Products
.......................................369
Materials............................................................... 369
Cleaning the Engine.....................................371
Cleaning the Exhaust - 6.7L Diesel.........371
Cleaning the Exterior
..................................369
Cleaning the Headlamps................................ 370
Exterior Chrome Parts...................................... 370
Exterior Plastic Parts........................................ 370
Stripes or Graphics............................................ 370
Underbody........................................................... 370
Under Hood.......................................................... 370
651
Super Duty (TFE) Canada/United States of America, enUSA, Edition date: 201804, Fourth-Printing Index