2019 FORD F-350 belt
[x] Cancel search: beltPage 142 of 666

MyKey
Action
Message
You did not program a MyKey.
MyKey not Created
MyKey is active.
MyKey Active Drive
Safely
When switching on your vehicle and MyKey is in use, displaysthat the MyKey speed limit is on.
Speed Limited to XX
MPH/km/h
MyKey is in use and the MyKey speed limit is on and the vehiclespeed is approaching 81 mph (130 km/h).
Near Vehicle Top Speed
You have reached the speed limit set for your MyKey.
Vehicle at Top Speed of
MyKey Setting
You have an active MyKey with a programmed set speed limit.
Check Speed Drive
Safely
Belt-Minder turns on with a MyKey in use.
Buckle Up to Unmute
Audio
With a MyKey in use, AdvanceTrac turns on.
AdvanceTrac On -
MyKey Setting
With a MyKey in use, traction control turns on.
Traction Control On -
MyKey Setting
With a MyKey in use, park aid is always on.
MyKey Park Aid Cannot
be Deactivated
With a MyKey in use, lane keeping alert turns on.
Lane Keeping Alert On
MyKey Setting
Off Road Action
Message
Hill descent control mode is active.
Hill Descent Control Active
Hill descent control mode is inactive.
Hill Descent Control OFF
Your vehicle speed requirement for off-road modeentry has not been met.
For Hill Descent Reduce Speed
XX MPH/km/h or Less
You need to select a transmission gear for hill descentmode.
For Hill Descent Select Gear
139
Super Duty (TFE) Canada/United States of America, enUSA, Edition date: 201804, Fourth-Printing Information Displays
Page 155 of 666

SITTING IN THE CORRECT
POSITION
WARNING: Sitting improperly, out
of position or with the seatback reclined
too far can take weight off the seat
cushion and affect the decision of the
passenger sensing system, resulting in
serious injury or death in the event of a
crash. Always sit upright against your
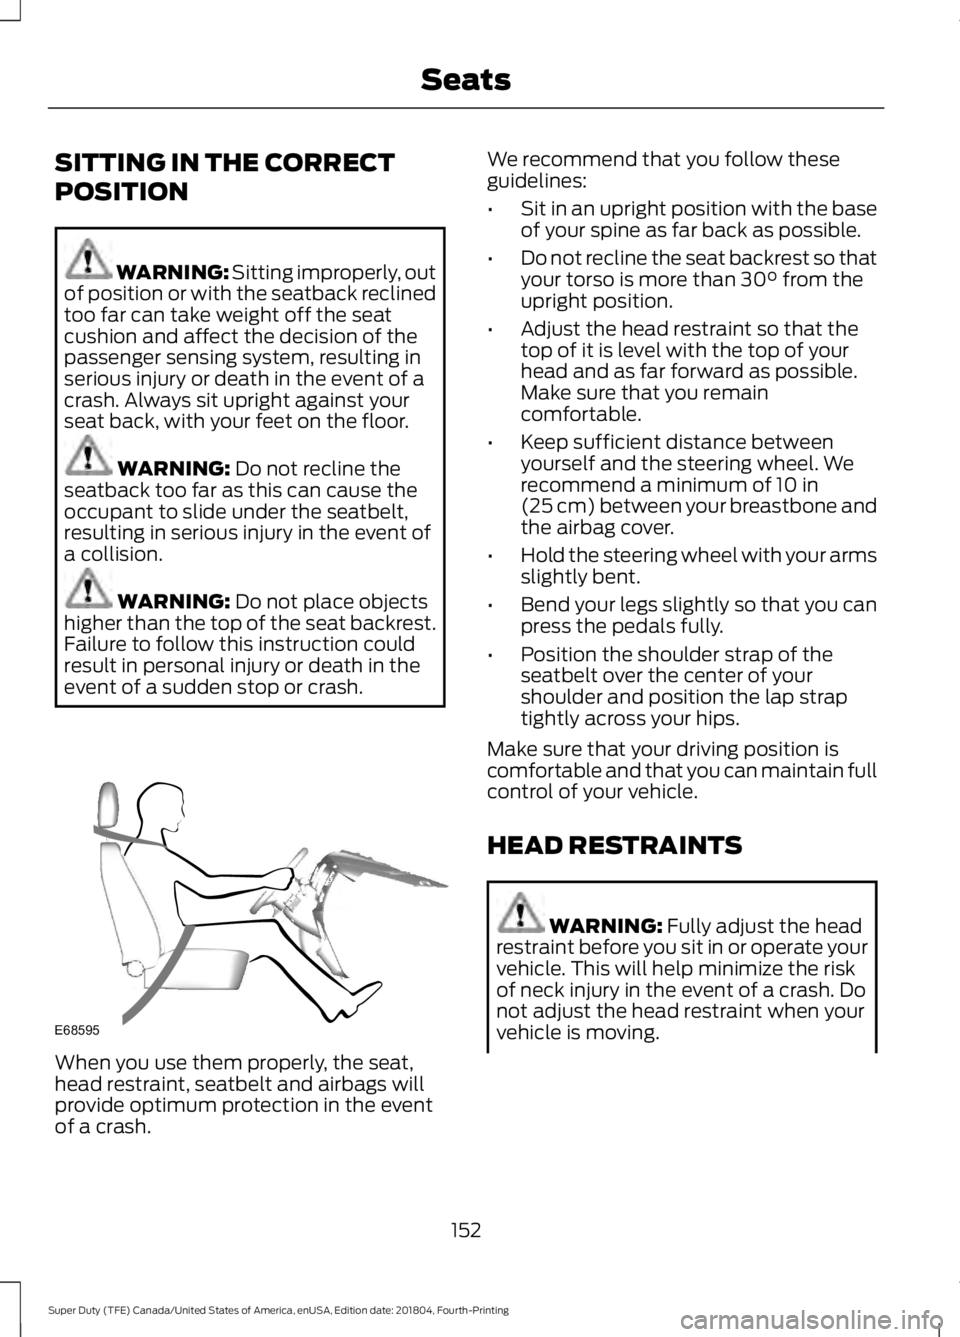
seat back, with your feet on the floor. WARNING:
Do not recline the
seatback too far as this can cause the
occupant to slide under the seatbelt,
resulting in serious injury in the event of
a collision. WARNING:
Do not place objects
higher than the top of the seat backrest.
Failure to follow this instruction could
result in personal injury or death in the
event of a sudden stop or crash. When you use them properly, the seat,
head restraint, seatbelt and airbags will
provide optimum protection in the event
of a crash. We recommend that you follow these
guidelines:
•
Sit in an upright position with the base
of your spine as far back as possible.
• Do not recline the seat backrest so that
your torso is more than
30° from the
upright position.
• Adjust the head restraint so that the
top of it is level with the top of your
head and as far forward as possible.
Make sure that you remain
comfortable.
• Keep sufficient distance between
yourself and the steering wheel. We
recommend a minimum of
10 in
(25 cm) between your breastbone and
the airbag cover.
• Hold the steering wheel with your arms
slightly bent.
• Bend your legs slightly so that you can
press the pedals fully.
• Position the shoulder strap of the
seatbelt over the center of your
shoulder and position the lap strap
tightly across your hips.
Make sure that your driving position is
comfortable and that you can maintain full
control of your vehicle.
HEAD RESTRAINTS WARNING:
Fully adjust the head
restraint before you sit in or operate your
vehicle. This will help minimize the risk
of neck injury in the event of a crash. Do
not adjust the head restraint when your
vehicle is moving.
152
Super Duty (TFE) Canada/United States of America, enUSA, Edition date: 201804, Fourth-Printing SeatsE68595
Page 177 of 666

Note:
Do not leave the ignition key in this
position for too long. This could cause your
vehicle battery to lose charge.
II (on) - All electrical circuits are
operational and the warning lamps and
indicators illuminate.
III
(start) - Cranks the engine.
KEYLESS STARTING
Note: The keyless starting system may not
function if the key is close to metal objects
or electronic devices such as cellular
phones.
Note: A valid key must be located inside
your vehicle to switch the ignition on and
start the engine.
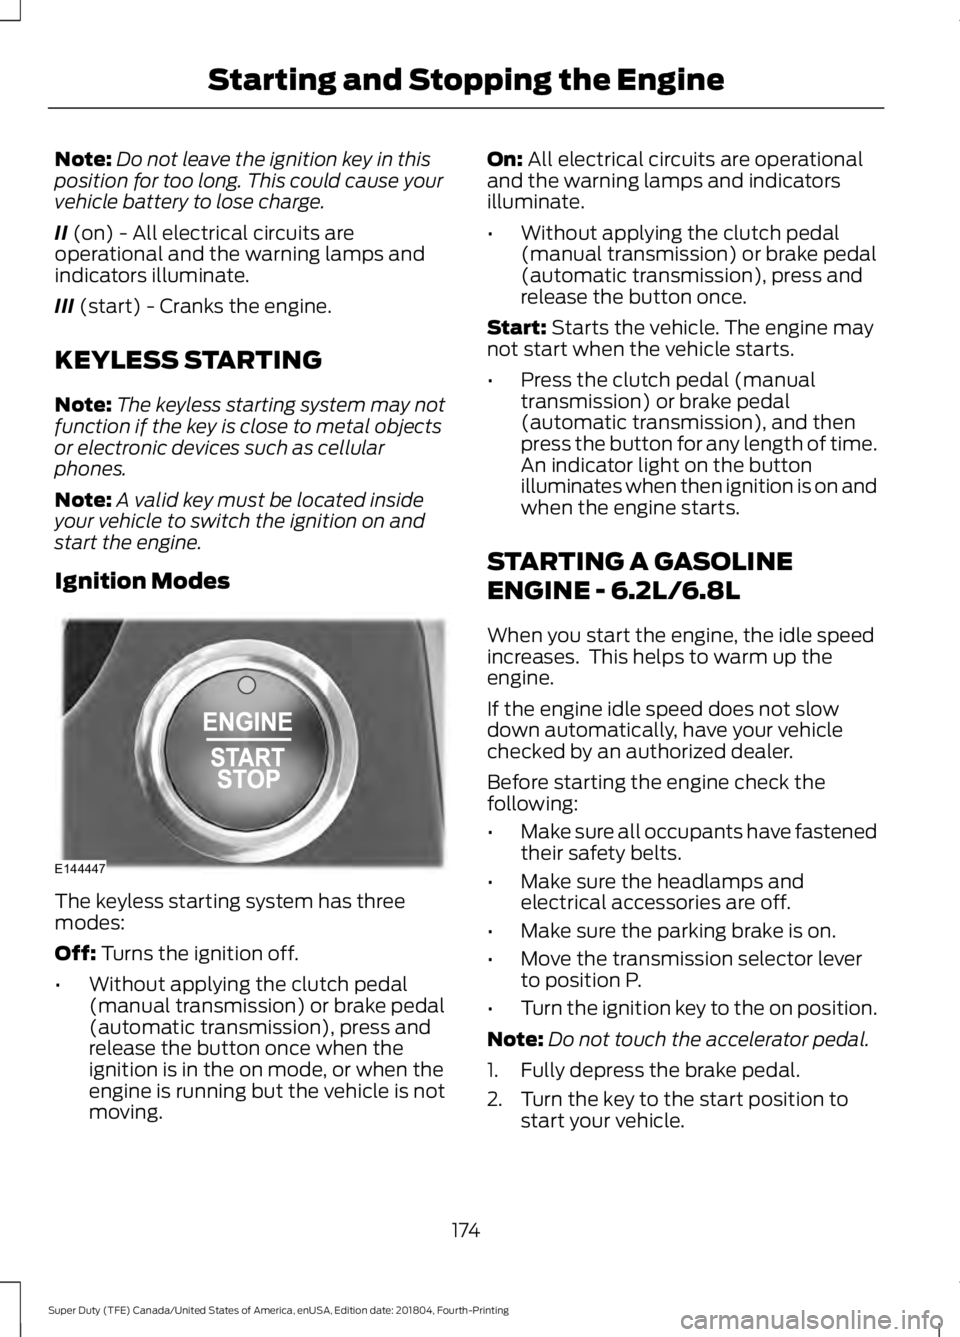
Ignition Modes The keyless starting system has three
modes:
Off:
Turns the ignition off.
• Without applying the clutch pedal
(manual transmission) or brake pedal
(automatic transmission), press and
release the button once when the
ignition is in the on mode, or when the
engine is running but the vehicle is not
moving. On:
All electrical circuits are operational
and the warning lamps and indicators
illuminate.
• Without applying the clutch pedal
(manual transmission) or brake pedal
(automatic transmission), press and
release the button once.
Start:
Starts the vehicle. The engine may
not start when the vehicle starts.
• Press the clutch pedal (manual
transmission) or brake pedal
(automatic transmission), and then
press the button for any length of time.
An indicator light on the button
illuminates when then ignition is on and
when the engine starts.
STARTING A GASOLINE
ENGINE - 6.2L/6.8L
When you start the engine, the idle speed
increases. This helps to warm up the
engine.
If the engine idle speed does not slow
down automatically, have your vehicle
checked by an authorized dealer.
Before starting the engine check the
following:
• Make sure all occupants have fastened
their safety belts.
• Make sure the headlamps and
electrical accessories are off.
• Make sure the parking brake is on.
• Move the transmission selector lever
to position P.
• Turn the ignition key to the on position.
Note: Do not touch the accelerator pedal.
1. Fully depress the brake pedal.
2. Turn the key to the start position to start your vehicle.
174
Super Duty (TFE) Canada/United States of America, enUSA, Edition date: 201804, Fourth-Printing Starting and Stopping the EngineE144447
Page 180 of 666

Your vehicle may have a cold weather
starting strategy that prevents severe
engine damage by assisting in engine
lubrication warm-up. In extremely cold
ambient temperatures, this strategy
activates and prevents the accelerator
pedal from being used for 30 seconds after
you start your vehicle. A message appears
in the information display as your vehicle
warms up. By not allowing the accelerator
pedal to be used, the engine oil is allowed
to properly lubricate the bearings
preventing engine damage due to lack of
proper lubrication. After the 30 second
warm-up period, the accelerator pedal will
be operational again and a message
appears informing you the vehicle is ok to
drive.
When you start the engine in extremely
cold temperatures -15°F (-26°C), we
recommend that you allow the engine to
idle for several minutes before you drive
the vehicle.
Before starting the engine check the
following:
• Make sure all occupants have fastened
their seatbelts.
• Make sure the headlamps and
electrical accessories are off.
• Make sure the parking brake is on.
• Make sure the transmission is in park
(P).
Note: Do not press the accelerator during
starting.
Vehicles with an Ignition Key
Note: Do not touch the accelerator pedal.
1. Fully depress the brake pedal.
2. Turn the key to position
C
Note: A message will appear Engine Start
Pending, Please Wait.
3. Wait until the engine glow-plug indicator turns off. 4. Turn the key to position
D to start the
engine.
5. When the engine starts, release the brake pedal.
Do not crank the engine for more than 10
seconds as starter damage may occur. If
the engine does not start, switch the
ignition off and wait 30 seconds before
trying again.
Vehicles with Keyless Start
Note: Do not touch the accelerator pedal.
Note: If the push button ignition switch is
pressed again prior to the engine starting
the ignition will switch to accessory mode
and will not start.
Note: If the brake pedal is released before
the engine has started, follow the engine
start sequence again.
1. Fully depress the brake pedal.
2. Press the center of the push button ignition switch.
Note: A message will appear Engine Start
Pending, Please Wait.
3. When the engine starts, release the brake pedal.
Diesel Engine Fast Start Glow Plug
System
The diesel engine glow system consists of:
• Eight glow plugs (one per cylinder)
• Glow Plug Control Module
• Engine Coolant Temperature sensor
• Barometric pressure sensor
• Environmental temperature sensor
The powertrain and glow plug control
modules electronically control the glow
plug system. After you switch the ignition
on, the glow plug control module
immediately energizes the glow plugs. The
glow plug control module uses the engine
177
Super Duty (TFE) Canada/United States of America, enUSA, Edition date: 201804, Fourth-Printing Starting and Stopping the Engine
Page 305 of 666

•
The tire air pressures recommended
for general driving are on the vehicle ’s
Safety Certification Label. The
maximum cold inflation pressure for
the tire and associated load rating is
on the tire sidewall. Tire air pressure
may require re-adjustment within these
pressure limits to accommodate the
additional weight of the snowplow
installation.
• Federal and some local regulations
require additional exterior lamps for
snowplow-equipped vehicles. Consult
your authorized dealer for additional
information.
Operating the Vehicle with the
Snowplow Attached
Note: Do not use your vehicle for snow
removal until you have driven at least
500 mi (800 km).
Ford recommends vehicle speed does not
exceed
45 mph (72 km/h) when
snowplowing.
The attached snowplow blade restricts
airflow to the radiator, and may cause the
engine to run at a higher temperature:
Attention to engine temperature is
especially important when outside
temperatures are above freezing. Angle
the blade to maximize airflow to the
radiator and monitor engine temperature
to determine whether a left or right angle
provides the best performance.
Follow the severe duty schedule in your
Scheduled Maintenance information for
engine oil and transmission fluid change
intervals. Snowplowing with your Airbag
Equipped Vehicle WARNING:
Do not attempt to
service, repair, or modify the airbag
supplemental restraint system (SRS) or
its fuses. Contact an authorized dealer. WARNING:
Additional equipment
for example snowplow equipment may
affect the performance of the airbag
sensors increasing the risk of injury.
Please refer to the Body Builders Layout
Book for instructions about the
appropriate installation of additional
equipment. WARNING:
All occupants of the
vehicle, including the driver, should
always properly wear their seatbelt, even
when provided with an airbag
supplemental restraint system (SRS).
Your vehicle is equipped with a driver and
passenger airbag supplemental restraint
system. The supplemental restraint system
will activate in certain frontal and offset
frontal collisions when the vehicle sustains
sufficient frontal deceleration.
Careless or high speed driving while
plowing snow that results in sufficient
vehicle decelerations can deploy the
airbags. Such driving also increases the risk
of accidents.
Never remove or defeat the tripping
mechanisms designed into the snow
removal equipment by its manufacturer.
Doing so may cause damage to the vehicle
and the snow removal equipment as well
as possible airbag deployment.
302
Super Duty (TFE) Canada/United States of America, enUSA, Edition date: 201804, Fourth-Printing Driving Hints
Page 311 of 666

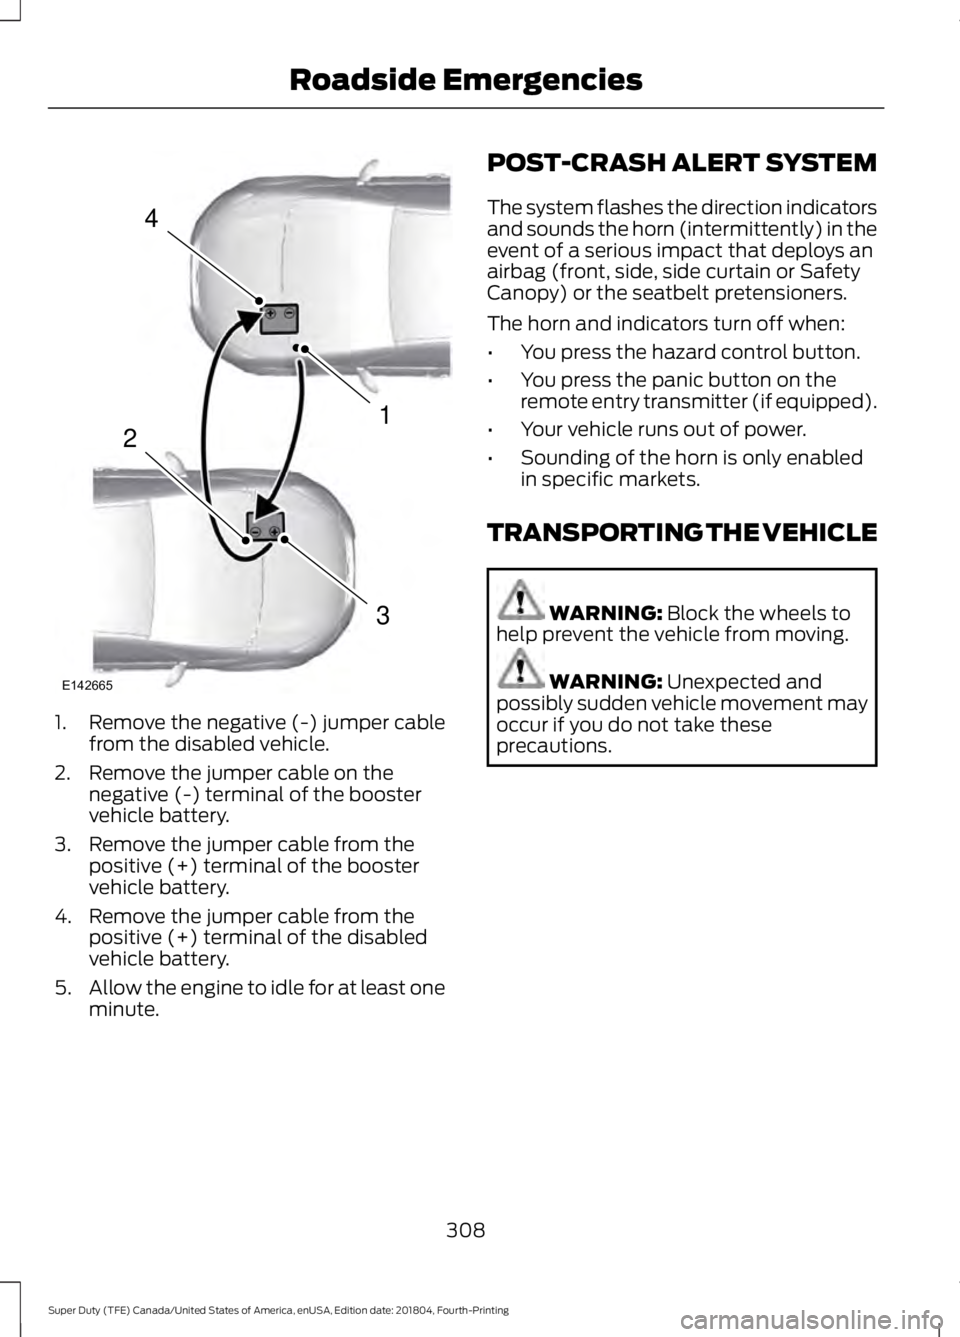
1. Remove the negative (-) jumper cable
from the disabled vehicle.
2. Remove the jumper cable on the negative (-) terminal of the booster
vehicle battery.
3. Remove the jumper cable from the positive (+) terminal of the booster
vehicle battery.
4. Remove the jumper cable from the positive (+) terminal of the disabled
vehicle battery.
5. Allow the engine to idle for at least one
minute. POST-CRASH ALERT SYSTEM
The system flashes the direction indicators
and sounds the horn (intermittently) in the
event of a serious impact that deploys an
airbag (front, side, side curtain or Safety
Canopy) or the seatbelt pretensioners.
The horn and indicators turn off when:
•
You press the hazard control button.
• You press the panic button on the
remote entry transmitter (if equipped).
• Your vehicle runs out of power.
• Sounding of the horn is only enabled
in specific markets.
TRANSPORTING THE VEHICLE WARNING: Block the wheels to
help prevent the vehicle from moving. WARNING:
Unexpected and
possibly sudden vehicle movement may
occur if you do not take these
precautions.
308
Super Duty (TFE) Canada/United States of America, enUSA, Edition date: 201804, Fourth-Printing Roadside Emergencies4
1
3
2
E142665
Page 312 of 666

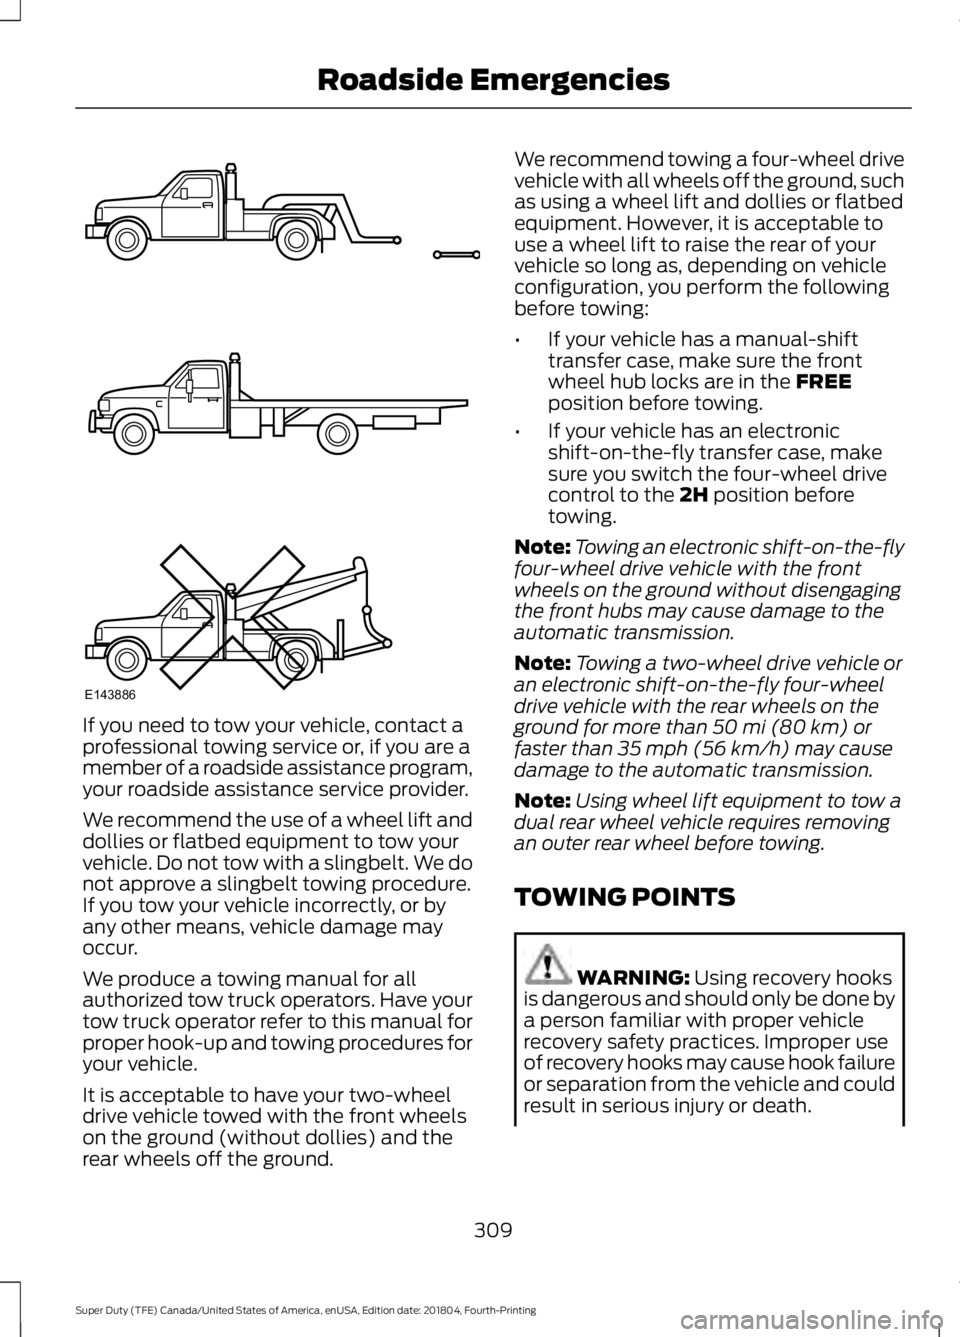
If you need to tow your vehicle, contact a
professional towing service or, if you are a
member of a roadside assistance program,
your roadside assistance service provider.
We recommend the use of a wheel lift and
dollies or flatbed equipment to tow your
vehicle. Do not tow with a slingbelt. We do
not approve a slingbelt towing procedure.
If you tow your vehicle incorrectly, or by
any other means, vehicle damage may
occur.
We produce a towing manual for all
authorized tow truck operators. Have your
tow truck operator refer to this manual for
proper hook-up and towing procedures for
your vehicle.
It is acceptable to have your two-wheel
drive vehicle towed with the front wheels
on the ground (without dollies) and the
rear wheels off the ground. We recommend towing a four-wheel drive
vehicle with all wheels off the ground, such
as using a wheel lift and dollies or flatbed
equipment. However, it is acceptable to
use a wheel lift to raise the rear of your
vehicle so long as, depending on vehicle
configuration, you perform the following
before towing:
•
If your vehicle has a manual-shift
transfer case, make sure the front
wheel hub locks are in the FREE
position before towing.
• If your vehicle has an electronic
shift-on-the-fly transfer case, make
sure you switch the four-wheel drive
control to the
2H position before
towing.
Note: Towing an electronic shift-on-the-fly
four-wheel drive vehicle with the front
wheels on the ground without disengaging
the front hubs may cause damage to the
automatic transmission.
Note: Towing a two-wheel drive vehicle or
an electronic shift-on-the-fly four-wheel
drive vehicle with the rear wheels on the
ground for more than
50 mi (80 km) or
faster than 35 mph (56 km/h) may cause
damage to the automatic transmission.
Note: Using wheel lift equipment to tow a
dual rear wheel vehicle requires removing
an outer rear wheel before towing.
TOWING POINTS WARNING:
Using recovery hooks
is dangerous and should only be done by
a person familiar with proper vehicle
recovery safety practices. Improper use
of recovery hooks may cause hook failure
or separation from the vehicle and could
result in serious injury or death.
309
Super Duty (TFE) Canada/United States of America, enUSA, Edition date: 201804, Fourth-Printing Roadside EmergenciesE143886
Page 375 of 666

section. Blocked or plugged holes or
removal/modification of the system
could result in elevated exhaust gas
temperatures which may result in
vehicle/property damage or personal
injury.
WARNING: The normal operating
temperature of the exhaust system is
very high. Never work around or attempt
to repair any part of the exhaust system
until it has cooled. Use special care when
working around the diesel oxidation
catalytic converter and/or the diesel
particulate filter (DPF). The diesel
oxidation catalytic converter and/or the
DPF heats up to a high temperature after
only a short period of engine operation
and can stay hot even after the engine
is turned off. Failure to follow these
instructions may result in personal injury. The visible holes in the exhaust tip and the
holes under the shield just inboard of the
right rear tire(s) are functional. The holes
need to be kept clear of mud/debris or
foreign material to maintain proper
function of the exhaust system. Clean and
remove debris or foreign material if present
as needed. Spraying with a hose during
regular washing of vehicle should help
keep holes clean and clear of debris or
foreign material. CLEANING THE WINDOWS AND
WIPER BLADES
Car wash chemicals and environmental
fallout can result in windshield and wiper
blade contamination. Dirty windshield and
wipers will result in poor windshield wiper
operation. Keep the windshield and wiper
blades clean to maintain windshield wiper
performance.
To clean the windshield and wiper blades:
•
Clean the windshield with a
non-abrasive glass cleaner. When
cleaning the interior of the windshield,
avoid getting any glass cleaner on the
instrument panel or door panels. Wipe
any glass cleaner off these surfaces
immediately.
• For windshields contaminated with
tree sap, chemicals, wax or bugs, clean
the entire windshield using steel wool
(no greater than 0000 grade) in a
circular motion and rinse with water.
• Clean the wiper blades with isopropyl
rubbing alcohol or windshield washer
concentrate.
Note: Do not use razor blades or other
sharp objects to clean or remove decals
from the inside of the heated rear window.
The vehicle warranty does not cover
damage caused to the heated rear window
grid lines.
CLEANING THE INTERIOR WARNING:
Do not use cleaning
solvents, bleach or dye on the vehicle's
seatbelts, as these actions may weaken
the belt webbing.
372
Super Duty (TFE) Canada/United States of America, enUSA, Edition date: 201804, Fourth-Printing Vehicle CareE163380