2019 FORD F-350 transmission fluid
[x] Cancel search: transmission fluidPage 214 of 666

POWER TAKE-OFF (IF EQUIPPED)
WARNING:
Use of auxiliary
equipment that exceeds the maximum
Power Take-Off (PTO) load specified in
the Ford Truck Body Builders Layout
Book can adversely affect the
performance of the powertrain system.
Refer to the Body Builders Layout Book
for instructions about the appropriate
installation of additional equipment.
Auxiliary equipment called power take-off,
or PTO, is often added to the engine or
transmission to operate utility equipment.
Examples include a wheel-lift for tow
trucks, cranes, tools for construction or tire
service, and pumping fluids. PTO
applications draw auxiliary horsepower
from the powertrain, often while the
vehicle is stationary. In this condition, there
is limited cooling air flow through the
radiator and around the vehicle that
normally occurs when a vehicle is moving.
The aftermarket PTO system installer,
having the most knowledge of the final
application, is responsible for determining
whether additional chassis heat protection
or powertrain cooling is required, and
alerting the user to the safe and proper
operation.
Ford Super Duty Vehicles are approved for
use as a stationary (including split shaft
capability) or mobile power source, within
limits and operating guidelines detailed in
the Ford Truck Body Builders Layout Book,
found at www.fleet.ford.com/truckbbas,
and through the Ford Truck Body Builders
Advisory Service.
211
Super Duty (TFE) Canada/United States of America, enUSA, Edition date: 201804, Fourth-Printing Transmission
Page 305 of 666

•
The tire air pressures recommended
for general driving are on the vehicle ’s
Safety Certification Label. The
maximum cold inflation pressure for
the tire and associated load rating is
on the tire sidewall. Tire air pressure
may require re-adjustment within these
pressure limits to accommodate the
additional weight of the snowplow
installation.
• Federal and some local regulations
require additional exterior lamps for
snowplow-equipped vehicles. Consult
your authorized dealer for additional
information.
Operating the Vehicle with the
Snowplow Attached
Note: Do not use your vehicle for snow
removal until you have driven at least
500 mi (800 km).
Ford recommends vehicle speed does not
exceed
45 mph (72 km/h) when
snowplowing.
The attached snowplow blade restricts
airflow to the radiator, and may cause the
engine to run at a higher temperature:
Attention to engine temperature is
especially important when outside
temperatures are above freezing. Angle
the blade to maximize airflow to the
radiator and monitor engine temperature
to determine whether a left or right angle
provides the best performance.
Follow the severe duty schedule in your
Scheduled Maintenance information for
engine oil and transmission fluid change
intervals. Snowplowing with your Airbag
Equipped Vehicle WARNING:
Do not attempt to
service, repair, or modify the airbag
supplemental restraint system (SRS) or
its fuses. Contact an authorized dealer. WARNING:
Additional equipment
for example snowplow equipment may
affect the performance of the airbag
sensors increasing the risk of injury.
Please refer to the Body Builders Layout
Book for instructions about the
appropriate installation of additional
equipment. WARNING:
All occupants of the
vehicle, including the driver, should
always properly wear their seatbelt, even
when provided with an airbag
supplemental restraint system (SRS).
Your vehicle is equipped with a driver and
passenger airbag supplemental restraint
system. The supplemental restraint system
will activate in certain frontal and offset
frontal collisions when the vehicle sustains
sufficient frontal deceleration.
Careless or high speed driving while
plowing snow that results in sufficient
vehicle decelerations can deploy the
airbags. Such driving also increases the risk
of accidents.
Never remove or defeat the tripping
mechanisms designed into the snow
removal equipment by its manufacturer.
Doing so may cause damage to the vehicle
and the snow removal equipment as well
as possible airbag deployment.
302
Super Duty (TFE) Canada/United States of America, enUSA, Edition date: 201804, Fourth-Printing Driving Hints
Page 332 of 666

GENERAL INFORMATION
Have your vehicle serviced regularly to help
maintain its roadworthiness and resale
value. There is a large network of
authorized dealers that are there to help
you with their professional servicing
expertise. We believe that their specially
trained technicians are best qualified to
service your vehicle properly and expertly.
They are supported by a wide range of
highly specialized tools developed
specifically for servicing your vehicle.
If your vehicle requires professional service,
an authorized dealer can provide the
necessary parts and service. Check your
warranty information to find out which
parts and services are covered.
Use only recommended fuels, lubricants,
fluids and service parts conforming to
specifications. Motorcraft® parts are
designed and built to provide the best
performance in your vehicle.
Precautions
•
Do not work on a hot engine.
• Make sure that nothing gets caught in
moving parts.
• Do not work on a vehicle with the
engine running in an enclosed space,
unless you are sure you have enough
ventilation.
• Keep all open flames and other burning
material (such as cigarettes) away
from the battery and all fuel related
parts.
Working with the Engine Off
1. Set the parking brake and shift the transmission to park (P).
2. Switch off the engine.
3. Block the wheels. Working with the Engine On WARNING: To reduce the risk of
vehicle damage and personal burn
injuries, do not start your engine with the
air cleaner removed and do not remove
it while the engine is running.
1. Set the parking brake and shift the transmission to park (P).
2. Block the wheels.
OPENING AND CLOSING THE
HOOD
1. Inside the vehicle, pull the hood release
handle located under the left hand side
of the instrument panel. 2. Go to the front of your vehicle and
locate the secondary release lever
under the front of the hood near the
center of your vehicle.
329
Super Duty (TFE) Canada/United States of America, enUSA, Edition date: 201804, Fourth-Printing MaintenanceE166491
Page 333 of 666

3. Raise the hood until the lift cylinders
hold it open.
4. To close, lower the hood and make sure that it is closed properly and fully
latched.
UNDER HOOD OVERVIEW - 6.2L Air filter. See Changing the Engine Air Filter (page 361).
A.
Engine compartment fuse box. See
Fuse Specification Chart (page 318).
B.
Automatic transmission fluid dipstick - vehicles with 6R140 transmission. See
Automatic Transmission Fluid Check
(page 346).
C.
Brake fluid reservoir. See
Brake Fluid Check (page 350).
D.
330
Super Duty (TFE) Canada/United States of America, enUSA, Edition date: 201804, Fourth-Printing MaintenanceE190266 ABC
JEFHI
D
E222143
G
Page 334 of 666

Windshield washer fluid reservoir. See Washer Fluid Check (page 351).
E.
Engine coolant reservoir. See
Engine Coolant Check (page 339).
F.
Power steering fluid reservoir. See
Power Steering Fluid Check (page 350).
G.
Engine oil fill cap. See
Engine Oil Check (page 334).
H.
Engine oil dipstick. See
Engine Oil Dipstick (page 334).
I.
Battery. See
Changing the 12V Battery (page 354).
J.
UNDER HOOD OVERVIEW - 6.7L DIESEL
F-Super Duty Air filter restriction gauge.
See Changing the Engine Air Filter (page 362).
A.
Engine compartment fuse box.
See Fuse Specification Chart (page 318).
B.
Engine oil dipstick.
See Engine Oil Dipstick (page 334).
C.
Automatic transmission fluid dipstick.
See Automatic Transmission Fluid
Check (page 346).
D.
Engine oil fill.
See Engine Oil Check (page 334).
E.
331
Super Duty (TFE) Canada/United States of America, enUSA, Edition date: 201804, Fourth-Printing MaintenanceE234258
Page 336 of 666

UNDER HOOD OVERVIEW - 6.8L
Air filter. See Changing the Engine Air Filter (page 361).
A.
Engine compartment fuse box. See
Fuse Specification Chart (page 318).
B.
Automatic transmission fluid dipstick. See
Automatic Transmission Fluid
Check (page 346).
C.
Engine oil dipstick. See
Engine Oil Dipstick (page 334).
D.
Brake fluid reservoir. See
Brake Fluid Check (page 350).
E.
Windshield washer fluid reservoir. See
Washer Fluid Check (page 351).
F.
Engine coolant reservoir. See
Engine Coolant Check (page 339).
G.
Power steering fluid reservoir. See
Power Steering Fluid Check (page 350).
H.
Engine oil filler cap. See
Engine Oil Check (page 334).
I.
Battery. See
Changing the 12V Battery (page 354).
J.
333
Super Duty (TFE) Canada/United States of America, enUSA, Edition date: 201804, Fourth-Printing MaintenanceABC
JFGI
ED
E222144
H
Page 349 of 666

Severe Climates
If you drive in extremely cold climates:
•
It may be necessary to increase the
coolant concentration above 50%.
• A coolant concentration of 60%
provides improved freeze point
protection. Coolant concentrations
above 60% decrease the overheat
protection characteristics of the
coolant and may cause engine
damage.
If you drive in extremely hot climates:
• You can decrease the coolant
concentration to 40%.
• Coolant concentrations below 40%
decrease the freeze and corrosion
protection characteristics of the
coolant and may cause engine
damage.
Vehicles driven year-round in non-extreme
climates should use prediluted engine
coolant for optimum cooling system and
engine protection.
Coolant Change
Follow the specific mileage intervals, as
listed in the scheduled maintenance
information, to change the coolant. The
information display may display a message
to change coolant at this time. Add
prediluted coolant approved to the correct
specification. See Capacities and
Specifications (page 419). Engine-driven Cooling Fan
Your vehicle may have an engine driven
cooling fan drive also called a fan clutch.
This fan drive changes the fan speed to
match the vehicle
’s changing cooling air
flow requirements. Fan speed, fan noise
level and fuel consumption all will increase
based on the driving conditions that
include trailer towing, hill climbing, heavy
loads, high speed and high ambient
temperature, individually or in combination.
The fan drive is designed to provide the
minimum fan speed and resulting
minimum fan noise and fuel consumption
required to meet the ever-changing vehicle
cooling air flow requirements. You can hear
the amount of fan noise increasing and
decreasing as the engine power
requirements and vehicle driving conditions
change as you drive. This is normal to the
operation of your vehicle. You may also
hear high levels of the fan when the engine
is first started and should normally
decrease after driving for a short time.
AUTOMATIC TRANSMISSION
FLUID CHECK
Have an authorized dealer check and
change the transmission fluid and filter at
the correct service interval. See
Scheduled Maintenance
(page 580).
Do not use supplemental transmission
fluid additives, treatments or cleaning
agents. The use of these materials may
affect transmission operation and result
in damage to internal transmission
components. See
Scheduled
Maintenance (page 580).
The automatic transmission does not have
a transmission fluid dipstick.
Note: Only applies to 6R100 transmission.
346
Super Duty (TFE) Canada/United States of America, enUSA, Edition date: 201804, Fourth-Printing Maintenance
Page 350 of 666

Refer to your scheduled maintenance
information for scheduled intervals for fluid
checks and changes. Your transmission
does not consume fluid. However, if the
transmission slips, slowly shifts or if you
notice a sign of leaking fluid, contact an
authorized dealer.
Checking Automatic Transmission
Fluid (If Equipped)
For scheduled intervals of the fluid checks
and changes, See
Scheduled
Maintenance (page 580). Your
transmission does not consume fluid.
However, the fluid level should be checked
if the transmission is not working properly,
i.e., if the transmission slips or shifts slowly
or if you notice some sign of fluid leakage.
Automatic transmission fluid expands
when warmed. To obtain an accurate fluid
check, drive the vehicle until it is at normal
operating temperature (approximately
19 mi (30 km)
). Verify that the
transmission fluid temperature gauge,
located on the instrument cluster, is within
normal range.
1. Drive the vehicle
19 mi (30 km) until it
reaches normal operating temperature.
2. Park the vehicle on a level surface and
engage the parking brake.
3. With the engine running, parking brake
engaged and your foot on the brake
pedal, move the gearshift lever through
all of the gear ranges. Allow sufficient
time for each gear to engage.
4. Latch the gearshift lever in park (P) and
leave the engine running.
5. Remove the dipstick, wiping it clean with a clean, dry lint free rag. If
necessary, refer to the Under Hood
Overview in this chapter for the
location of the dipstick. 6.
Install the dipstick making sure it is fully
seated in the filler tube.
7. Remove the dipstick and inspect the fluid level. The fluid should be in the
designated area for normal operating
temperature or ambient temperature.
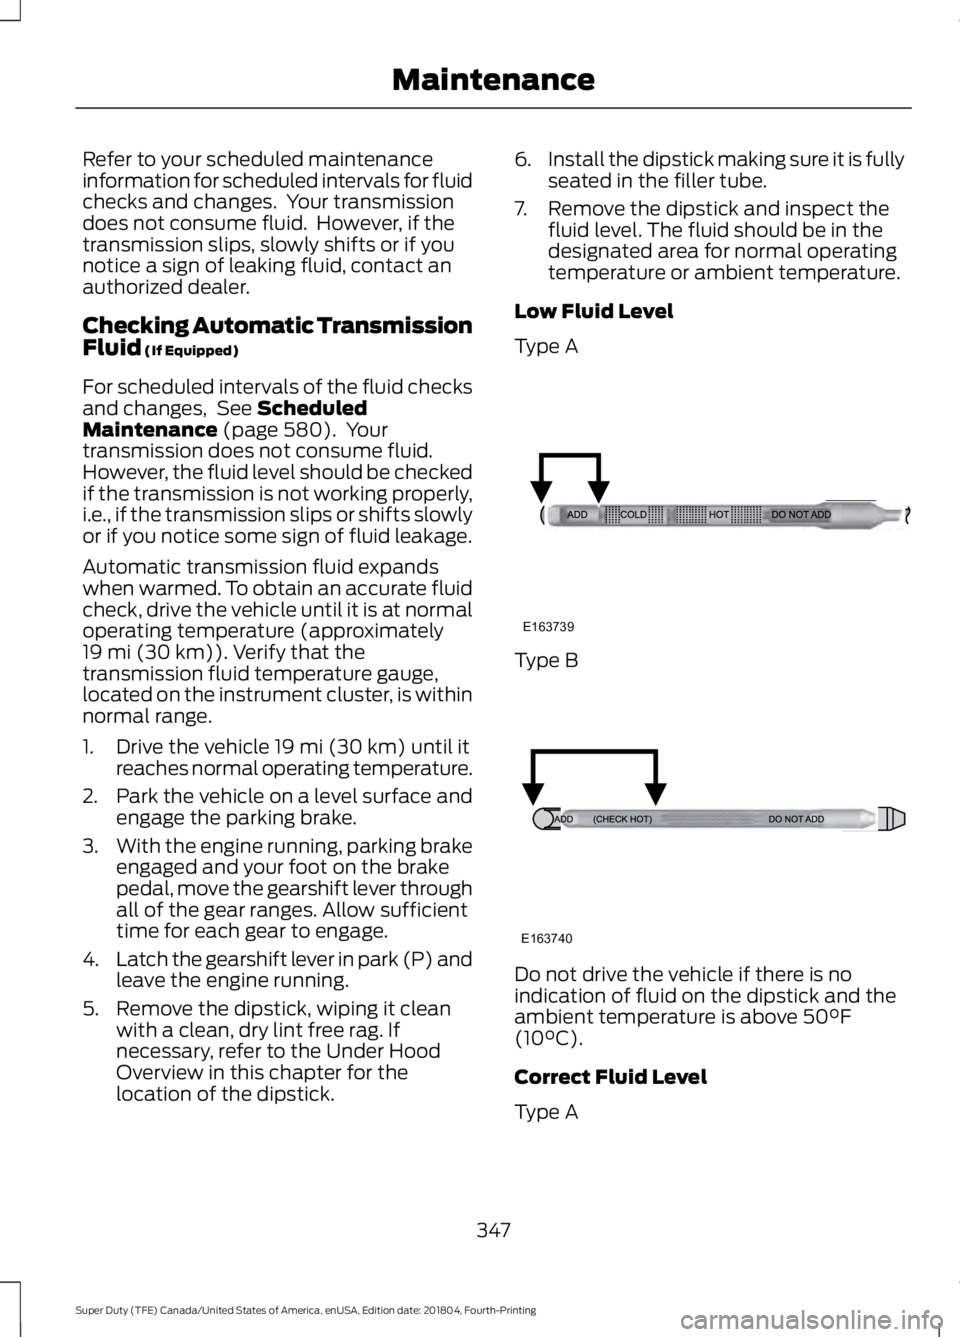
Low Fluid Level
Type A Type B
Do not drive the vehicle if there is no
indication of fluid on the dipstick and the
ambient temperature is above
50°F
(10°C).
Correct Fluid Level
Type A
347
Super Duty (TFE) Canada/United States of America, enUSA, Edition date: 201804, Fourth-Printing MaintenanceE163739 E163740