2019 FORD F-250 instrument cluster
[x] Cancel search: instrument clusterPage 260 of 666

System Operation
If you select a trailer in the display screen
prior to connecting the trailer, the system
will load that configuration and the
information cluster displays a message
when the trailer is connected. A second
message appears stating Cross Traffic
Alert has been turned off; the Blind Spot
Information System with Trailer Tow still
functions normally when driving forward.
If no trailer has been set up and a trailer is
connected, the instrument cluster provides
a message indicating a trailer is connected
followed by a message asking to select a
trailer from the existing list of trailers or to
add a trailer. In order for the Blind Spot
Information System with Trailer Tow to
function, an existing trailer must be
selected or a new trailer must be added. If
the request is ignored or if you exit the
screen, a message appears prompting you
that the system has been turned off due
to a trailer connect. This message may not
appear until your vehicle speed reaches
22 mph (35 km/h).
The Blind Spot Information System with
Trailer Tow activates when driving forward
for that particular trailer set up. If the
ignition is cycled, the Blind Spot
Information System with Trailer Tow
continues to function using the last trailer
selected.
Trailer Considerations
The Blind Spot Information System with
Trailer Tow is designed to work with any
trailer whose front width is
8.5 ft (2.6 m)
or less and total length from the trailer
hitch ball to the rear of the trailer is
33 ft
(10.1 m) or less. Different trailers may
cause a slight change in performance as
outlined below. Large box trailers may cause false alerts
to trigger when driving next to buildings or
near parking cars. A false alert may also
occur while making a 90-degree turn.
Trailers that are
8.5 ft (2.6 m) wide at the
front and have a total length greater than
20 ft (6 m)
may have delayed alerts from
passing vehicles when the vehicle is
passing at high speed.
A box trailer whose front width is
8.5 ft
(2.6 m) may cause early alerts when you
are over taking a vehicle.
When towing a clam shell or V-Nose box
trailer with a front width of
8.5 ft (2.6 m),
delayed alerts on merging vehicles that are
traveling the same speed as your vehicle
may occur.
System Errors
If the system senses a problem with the
left or right sensor, the telltale illuminates
and a message appears in the display
screen. See
Information Messages
(page 128).
Switching the System Off and On
You can temporarily switch the Blind Spot
Information System off in the display
screen. See
General Information (page
112). When the Blind Spot Information
System switches off, you do not receive
alerts and the display screen shows a
system off message. The telltale in the
cluster also illuminates. When you switch
the Blind Spot Information System on or
off, the alert indicators flash twice.
Note: The Blind Spot Information System
remembers the last selected on or off
setting.
You can also have the Blind Spot
Information System switched off
permanently at an authorized dealer. Once
switched off permanently, the system can
only be switched back on at an authorized
dealer.
257
Super Duty (TFE) Canada/United States of America, enUSA, Edition date: 201804, Fourth-Printing Driving Aids
Page 301 of 666

Note:
You can check four-wheel-down
towing status at any time by opening the
driver's door or turning the ignition to the
accessory or on position and verifying a
message displays in the cluster.
To exit four-wheel-down towing and return
the transfer case to its 2H position:
1. With your vehicle still properly secured
to the tow vehicle, put the ignition in
the on position, but do not start the
engine. If your vehicle has an ignition
key, switch the key to on. If your vehicle
has intelligent access, press the engine
START/STOP
button once without
pressing the brake pedal.
2. Press and hold the brake pedal.
3. Shift the transmission out of neutral (N) and into any other gear.
4. Release the brake pedal.
Note: If completed successfully, the
2H
indicator light illuminates and a
confirmation message displays in the
instrument cluster.
Note: If the indicator light and message do
not display, you must perform the procedure
again from the beginning.
Note: You may hear an audible noise as the
transfer case shifts out of its neutral
position. This is normal.
Note: If a message displays in the
instrument cluster stating there is a shift
delay, transfer case gear tooth blockage
may be present. See
Resolving the Shift
Delay Issue after this section.
5. Apply the parking brake and disconnect
the vehicle from the tow vehicle.
6. Release the parking brake, start the engine and shift the transmission to
drive (D) to make sure the transfer
case is out of neutral (N). 7. If the transfer case does not
successfully shift out of neutral (N),
set the parking brake until you can have
your vehicle serviced.
Resolving the Shift Delay Issue
If the instrument cluster displays a shift
delay message, See
Information
Messages (page 128). You need to
perform the following steps:
1. Press and hold the brake pedal.
2. Put the transmission into neutral (N), and then start the engine.
3. With the engine running, shift the transmission to drive (D) and let the
vehicle roll forward, up to
3 ft (1 m).
You may hear an audible noise as the
transfer case shifts out of its neutral
position. This is normal.
4. When the issue is resolved, the instrument cluster displays a message
stating neutral tow is disabled.
298
Super Duty (TFE) Canada/United States of America, enUSA, Edition date: 201804, Fourth-Printing Towing
Page 328 of 666

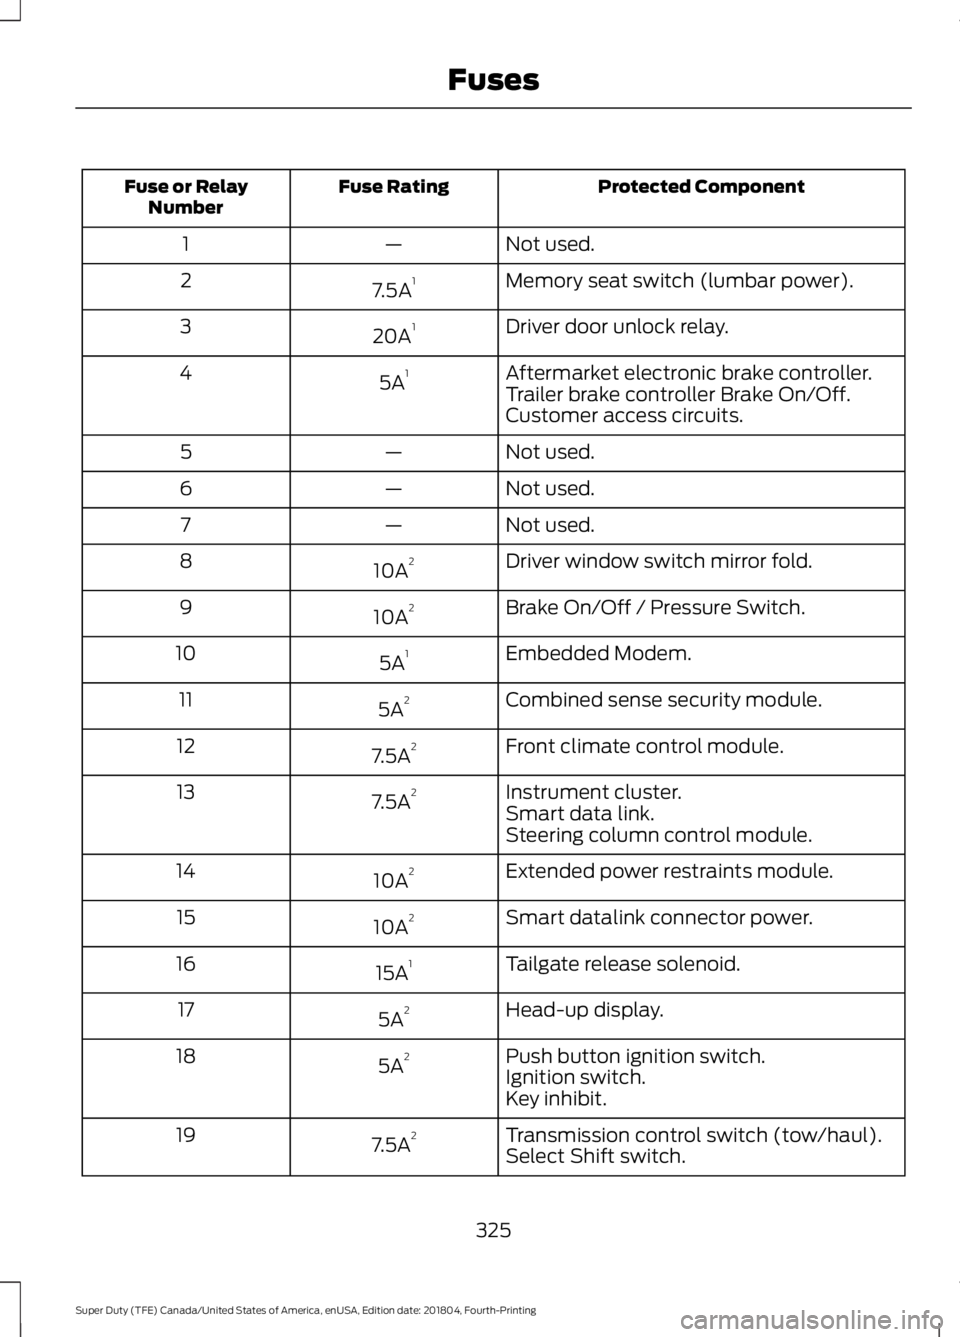
Protected Component
Fuse Rating
Fuse or Relay
Number
Not used.
—
1
Memory seat switch (lumbar power).
7.5A 1
2
Driver door unlock relay.
20A 1
3
Aftermarket electronic brake controller.
5A 1
4
Trailer brake controller Brake On/Off.
Customer access circuits.
Not used.
—
5
Not used.
—
6
Not used.
—
7
Driver window switch mirror fold.
10A 2
8
Brake On/Off / Pressure Switch.
10A 2
9
Embedded Modem.
5A 1
10
Combined sense security module.
5A 2
11
Front climate control module.
7.5A 2
12
Instrument cluster.
7.5A 2
13
Smart data link.
Steering column control module.
Extended power restraints module.
10A 2
14
Smart datalink connector power.
10A 2
15
Tailgate release solenoid.
15A 1
16
Head-up display.
5A 2
17
Push button ignition switch.
5A 2
18
Ignition switch.
Key inhibit.
Transmission control switch (tow/haul).
7.5A 2
19
Select Shift switch.
325
Super Duty (TFE) Canada/United States of America, enUSA, Edition date: 201804, Fourth-Printing Fuses
Page 342 of 666

Action and description
Message
Press and hold the OK
button until the instrument
cluster displays the
following message.
Hold OK to
Reset
Reset Successful
When the oil change indic-
ator resets the instrument
cluster displays 100%.
Remaining Life
{00}%
If the instrument cluster
displays one of the following
messages, repeat the
process.
Not Reset
Reset Cancelled
ENGINE COOLANT CHECK -
6.2L/6.8L WARNING:
Do not remove the
coolant reservoir cap when the engine is
on or the cooling system is hot. Wait 10
minutes for the cooling system to cool
down. Cover the coolant reservoir cap
with a thick cloth to prevent the
possibility of scalding and slowly remove
the cap. Failure to follow this instruction
could result in personal injury. WARNING:
Do not put coolant in
the windshield washer reservoir. If
sprayed on the windshield, coolant could
make it difficult to see through the
windshield. WARNING:
To reduce the risk of
personal injury, make sure the engine is
cool before unscrewing the coolant
pressure relief cap. The cooling system
is under pressure. Steam and hot liquid
can come out forcefully when you loosen
the cap slightly. WARNING:
Do not add coolant
further than the MAX mark.
When the engine is cold, check the
concentration and level of the coolant at
the intervals listed in the scheduled
maintenance information. See Scheduled
Maintenance
(page 580).
Note: Make sure that the coolant level is
between the
MIN and the MAX marks on
the coolant reservoir.
Note: Coolant expands when it is hot. The
level may extend beyond the
MAX mark.
Maintain coolant concentration within
48% to 50%, which equates to a freeze
point between -30°F (-34°C) and -34°F
(-37°C). Coolant concentration should be
checked using a refractometer. We
recommend Robinair® Coolant and
Battery Refractometer 75240 (Rotunda
tool part number: ROB75240). We do not
recommend the use of hydrometers or
coolant test strips for measuring coolant
concentration.
Note: Automotive fluids are not
interchangeable. Do not use coolant or
windshield washer fluid outside of its
specified function and vehicle location.
Note: Do not use stop leak pellets, cooling
system sealants, or additives as they can
cause damage to the engine cooling or
heating systems. Resulting component
damage may not be covered by the vehicle
Warranty.
339
Super Duty (TFE) Canada/United States of America, enUSA, Edition date: 201804, Fourth-Printing Maintenance
Page 350 of 666

Refer to your scheduled maintenance
information for scheduled intervals for fluid
checks and changes. Your transmission
does not consume fluid. However, if the
transmission slips, slowly shifts or if you
notice a sign of leaking fluid, contact an
authorized dealer.
Checking Automatic Transmission
Fluid (If Equipped)
For scheduled intervals of the fluid checks
and changes, See
Scheduled
Maintenance (page 580). Your
transmission does not consume fluid.
However, the fluid level should be checked
if the transmission is not working properly,
i.e., if the transmission slips or shifts slowly
or if you notice some sign of fluid leakage.
Automatic transmission fluid expands
when warmed. To obtain an accurate fluid
check, drive the vehicle until it is at normal
operating temperature (approximately
19 mi (30 km)
). Verify that the
transmission fluid temperature gauge,
located on the instrument cluster, is within
normal range.
1. Drive the vehicle
19 mi (30 km) until it
reaches normal operating temperature.
2. Park the vehicle on a level surface and
engage the parking brake.
3. With the engine running, parking brake
engaged and your foot on the brake
pedal, move the gearshift lever through
all of the gear ranges. Allow sufficient
time for each gear to engage.
4. Latch the gearshift lever in park (P) and
leave the engine running.
5. Remove the dipstick, wiping it clean with a clean, dry lint free rag. If
necessary, refer to the Under Hood
Overview in this chapter for the
location of the dipstick. 6.
Install the dipstick making sure it is fully
seated in the filler tube.
7. Remove the dipstick and inspect the fluid level. The fluid should be in the
designated area for normal operating
temperature or ambient temperature.
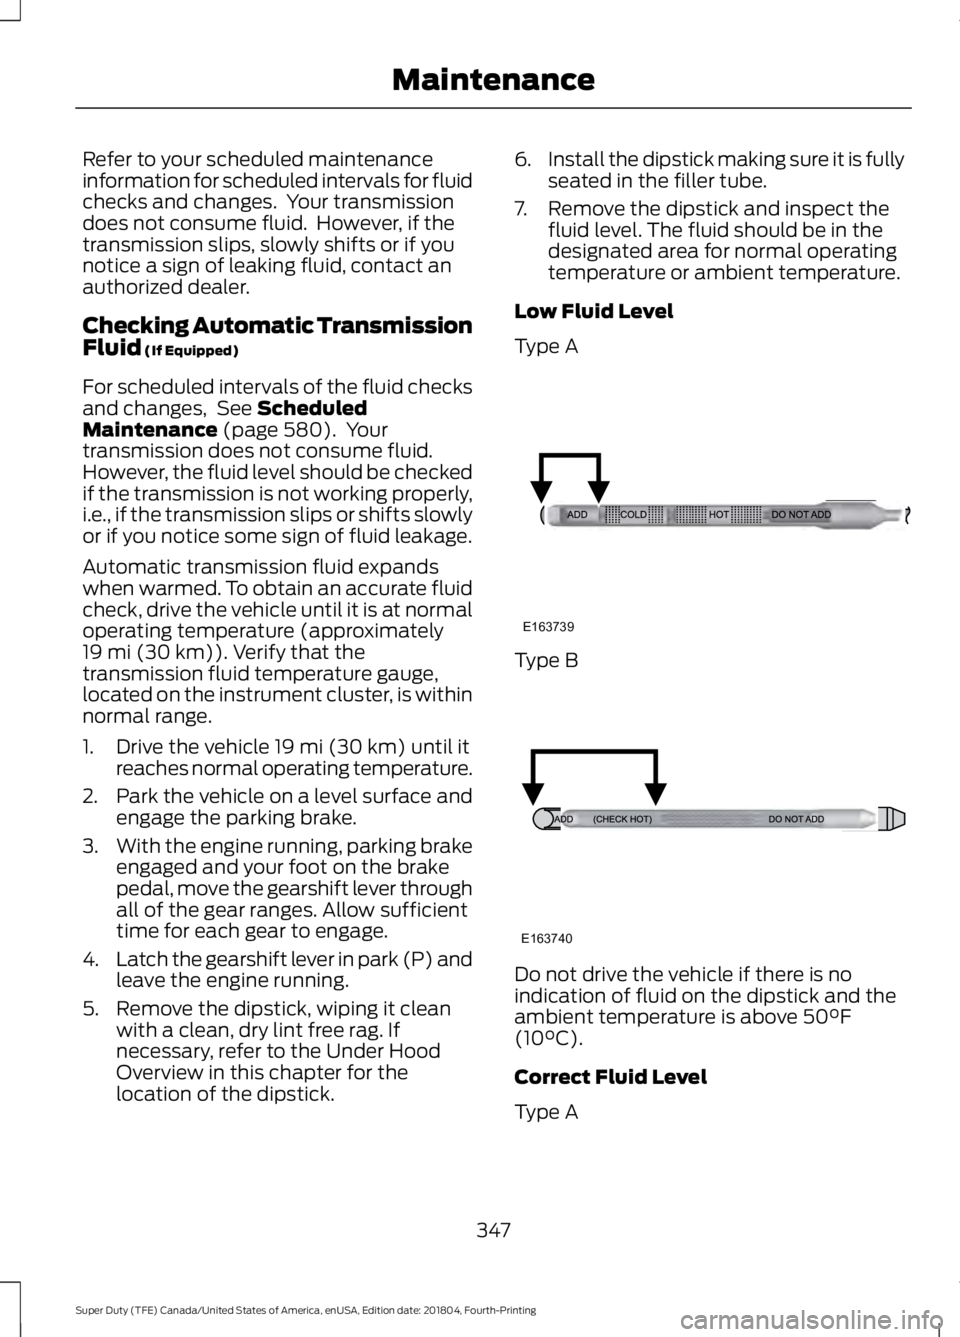
Low Fluid Level
Type A Type B
Do not drive the vehicle if there is no
indication of fluid on the dipstick and the
ambient temperature is above
50°F
(10°C).
Correct Fluid Level
Type A
347
Super Duty (TFE) Canada/United States of America, enUSA, Edition date: 201804, Fourth-Printing MaintenanceE163739 E163740
Page 377 of 666

CLEANING THE INSTRUMENT
PANEL AND INSTRUMENT
CLUSTER LENS
WARNING: Do not use chemical
solvents or strong detergents when
cleaning the steering wheel or
instrument panel to avoid contamination
of the airbag system.
Note: Follow the same procedure as
cleaning leather seats for cleaning leather
instrument panels and leather interior trim
surfaces. See
Cleaning Leather Seats
(page 374).
Clean the instrument panel and cluster
lens with a clean, damp and soft cloth,
then use a clean, dry and soft cloth to dry
these areas.
• Avoid cleaners or polishes that increase
the gloss of the upper portion of the
instrument panel. The dull finish in this
area helps protect you from
undesirable windshield reflection.
• Do not use any household cleaning
products or glass cleaners as these
may damage the finish of the
instrument panel, interior trim and
cluster lens.
• Wash or wipe your hands clean if you
have been in contact with certain
products such as insect repellent and
suntan lotion to avoid possible damage
to the interior painted surfaces.
• Do not allow air fresheners and hand
sanitizers to spill onto interior surfaces.
If a spill occurs, wipe off immediately.
Your warranty may not cover these
damages.
If a staining liquid like coffee or juice has
been spilled on the instrument panel or on
interior trim surfaces: 1. Wipe up spilled liquid using a clean,
soft cloth as quickly as possible.
2. Use Motorcraft Premium Leather and Vinyl Cleaner or a commercially
available leather cleaning product for
automotive interiors. Test any cleaner
or stain remover on an inconspicuous
area.
3. Alternatively, wipe the surface with a clean, soft cloth and a mild soap and
water solution. Dry the area with a
clean, soft cloth.
4. If necessary, apply more soap and water solution or cleaning product to
a clean, soft cloth and press it onto the
soiled area. Allow this to set at room
temperature for 30 minutes.
5. Remove the soaked cloth, then with a clean, damp cloth, use a rubbing
motion for 60 seconds on the soiled
area.
6. Dry the area with a clean, soft cloth.
CLEANING LEATHER SEATS
(IF
EQUIPPED)
Without King Ranch Edition
Note: Follow the same procedure as
cleaning leather seats for cleaning leather
instrument panels and leather interior trim
surfaces.
For routine cleaning, wipe the surface with
a soft, damp cloth and a mild soap and
water solution. Dry the area with a clean,
soft cloth.
For cleaning and removing spots and stains
such as dye transfer, use Motorcraft
Premium Leather and Vinyl Cleaner or a
commercially available leather cleaning
product for automotive interiors.
Note: Test any cleaner or stain remover on
an inconspicuous area.
374
Super Duty (TFE) Canada/United States of America, enUSA, Edition date: 201804, Fourth-Printing Vehicle Care
Page 574 of 666

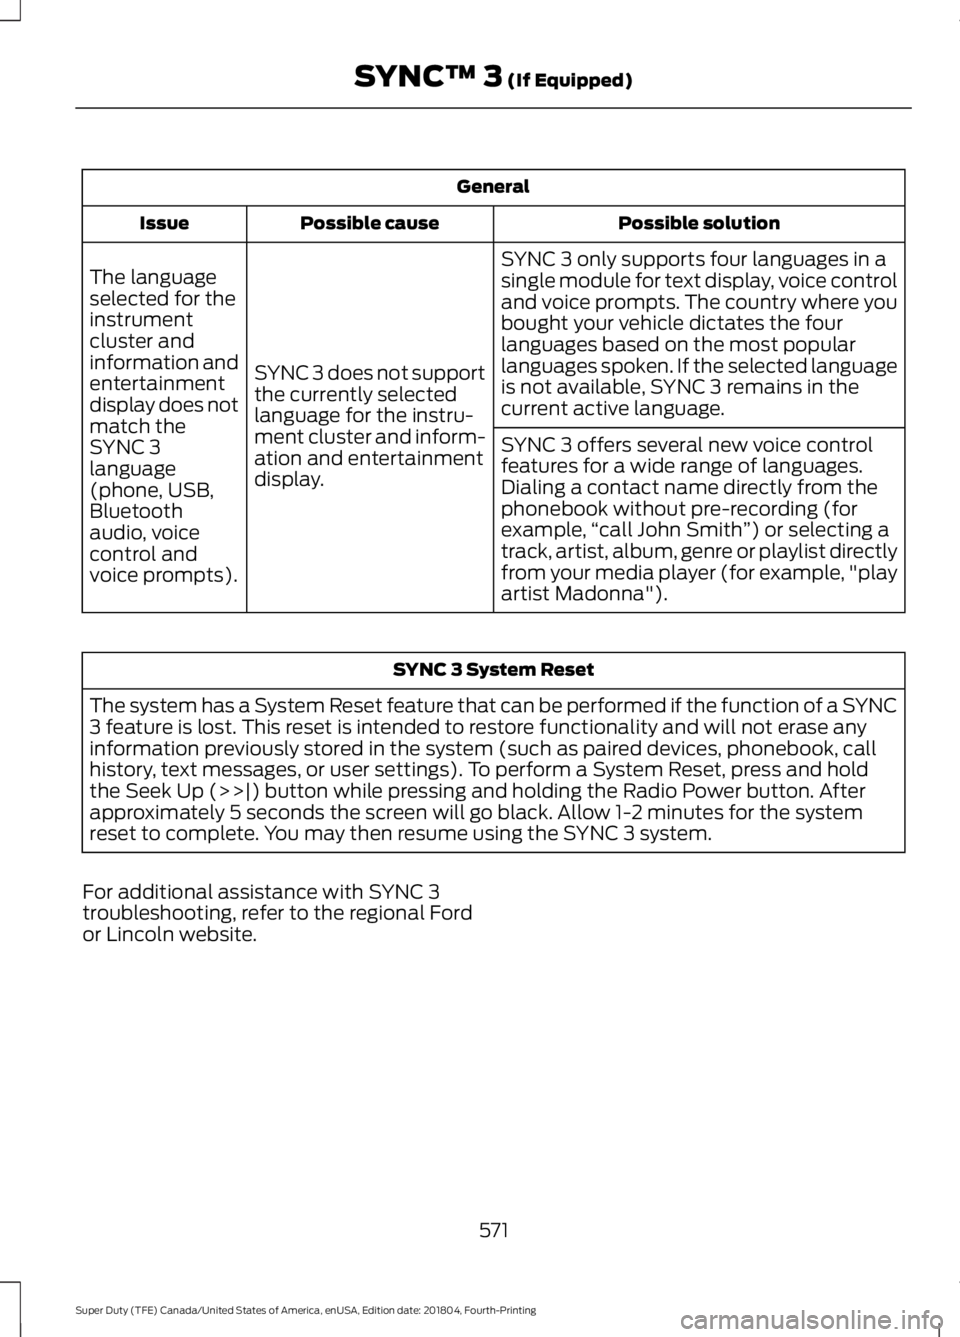
General
Possible solution
Possible cause
Issue
SYNC 3 only supports four languages in a
single module for text display, voice control
and voice prompts. The country where you
bought your vehicle dictates the four
languages based on the most popular
languages spoken. If the selected language
is not available, SYNC 3 remains in the
current active language.
SYNC 3 does not support
the currently selected
language for the instru-
ment cluster and inform-
ation and entertainment
display.
The language
selected for the
instrument
cluster and
information and
entertainment
display does not
match the
SYNC 3
SYNC 3 offers several new voice control
features for a wide range of languages.
Dialing a contact name directly from the
phonebook without pre-recording (for
example,
“call John Smith ”) or selecting a
track, artist, album, genre or playlist directly
from your media player (for example, "play
artist Madonna").
language
(phone, USB,
Bluetooth
audio, voice
control and
voice prompts). SYNC 3 System Reset
The system has a System Reset feature that can be performed if the function of a SYNC
3 feature is lost. This reset is intended to restore functionality and will not erase any
information previously stored in the system (such as paired devices, phonebook, call
history, text messages, or user settings). To perform a System Reset, press and hold
the Seek Up (>>|) button while pressing and holding the Radio Power button. After
approximately 5 seconds the screen will go black. Allow 1-2 minutes for the system
reset to complete. You may then resume using the SYNC 3 system.
For additional assistance with SYNC 3
troubleshooting, refer to the regional Ford
or Lincoln website.
571
Super Duty (TFE) Canada/United States of America, enUSA, Edition date: 201804, Fourth-Printing SYNC™ 3 (If Equipped)
Page 655 of 666

Cleaning the Instrument Panel and
Instrument Cluster Lens.........................374
Cleaning the Interior....................................372
Cleaning the Wheels...................................376
Cleaning the Windows and Wiper Blades............................................................372
Clearing All MyKeys.......................................67
Climate............................................................525 Accessing Rear Climate Controls.................527
Accessing the Climate Control Menu.........525
Directing the Airflow......................................... 525
Rear Climate Control Lock Indicator...........527
Setting the Blower Motor Speed.................525
Setting the Temperature................................. 525
Switching Auto Mode On and Off...............525
Switching Dual Zone Mode On and Off...................................................................... 526
Switching Maximum Air Conditioning On and Off.............................................................. 526
Switching Maximum Defrost On and Off...................................................................... 526
Switching Rear Auto Mode On and Off....................................................................... 527
Switching Recirculated Air On and Off....................................................................... 527
Switching the Air Conditioning On and Off....................................................................... 525
Switching the Climate Controlled Seats On and Off.............................................................. 526
Switching the Climate Control On and Off...................................................................... 526
Switching the Heated Exterior Mirrors On and Off.............................................................. 526
Switching the Heated Rear Window On and Off...................................................................... 526
Switching the Heated Seats On and Off...................................................................... 526
Switching the Heated Steering Wheel On and Off.............................................................. 526
Switching the Heated Windshield On and Off...................................................................... 526
Switching the Rear Climate Controlled Seats On and Off........................................... 527
Switching the Rear Heated Seats On and Off....................................................................... 527
Switching the Rear Ventilated Seats On and Off.............................................................. 527Switching the Ventilated Seats On and
Off....................................................................... 527
Climate Control.............................................145
Climate Controlled Seats..........................162 Cooled Seats........................................................ 162
Heated Seats........................................................ 162
Coolant Check See: Engine Coolant Check - 6.2L/6.8L.....339
See: Engine Coolant Check - 6.7L
Diesel................................................................. 343
Crash Sensors and Airbag Indicator
.......56
Creating a MyKey...........................................66
Programming or Changing Configurable
Settings.............................................................. 66
Cross Traffic Alert
........................................258
False Alerts.......................................................... 260
Switching the System Off and On..............260
System Errors..................................................... 260
System Lights, Messages and Audible Alerts................................................................. 259
System Limitations........................................... 260
Using the System.............................................. 258
Cruise Control.................................................86 Principle of Operation....................................... 241
Cruise control See: Using Cruise Control................................ 241
Customer Assistance...................................311
D
Data Recording
................................................10
Comfort, Convenience and Entertainment
Data....................................................................... 12
Event Data................................................................. 11
Service Data............................................................. 11
Services That Third Parties Provide...............12
Services That We Provide.................................. 12
Vehicles With a Modem...................................... 12
Vehicles With an Emergency Call System.................................................................. 13
Vehicles With SYNC............................................. 13
Daytime Running Lamps.............................93 Type One - Conventional
(Non-Configurable)....................................... 93
Type Two - Configurable................................... 93
Diesel Particulate Filter
.............................200
Oxidation Catalytic Converter and Diesel
Particulate Filter System............................ 201
652
Super Duty (TFE) Canada/United States of America, enUSA, Edition date: 201804, Fourth-Printing Index