2019 FORD EXPLORER mirror
[x] Cancel search: mirrorPage 110 of 571
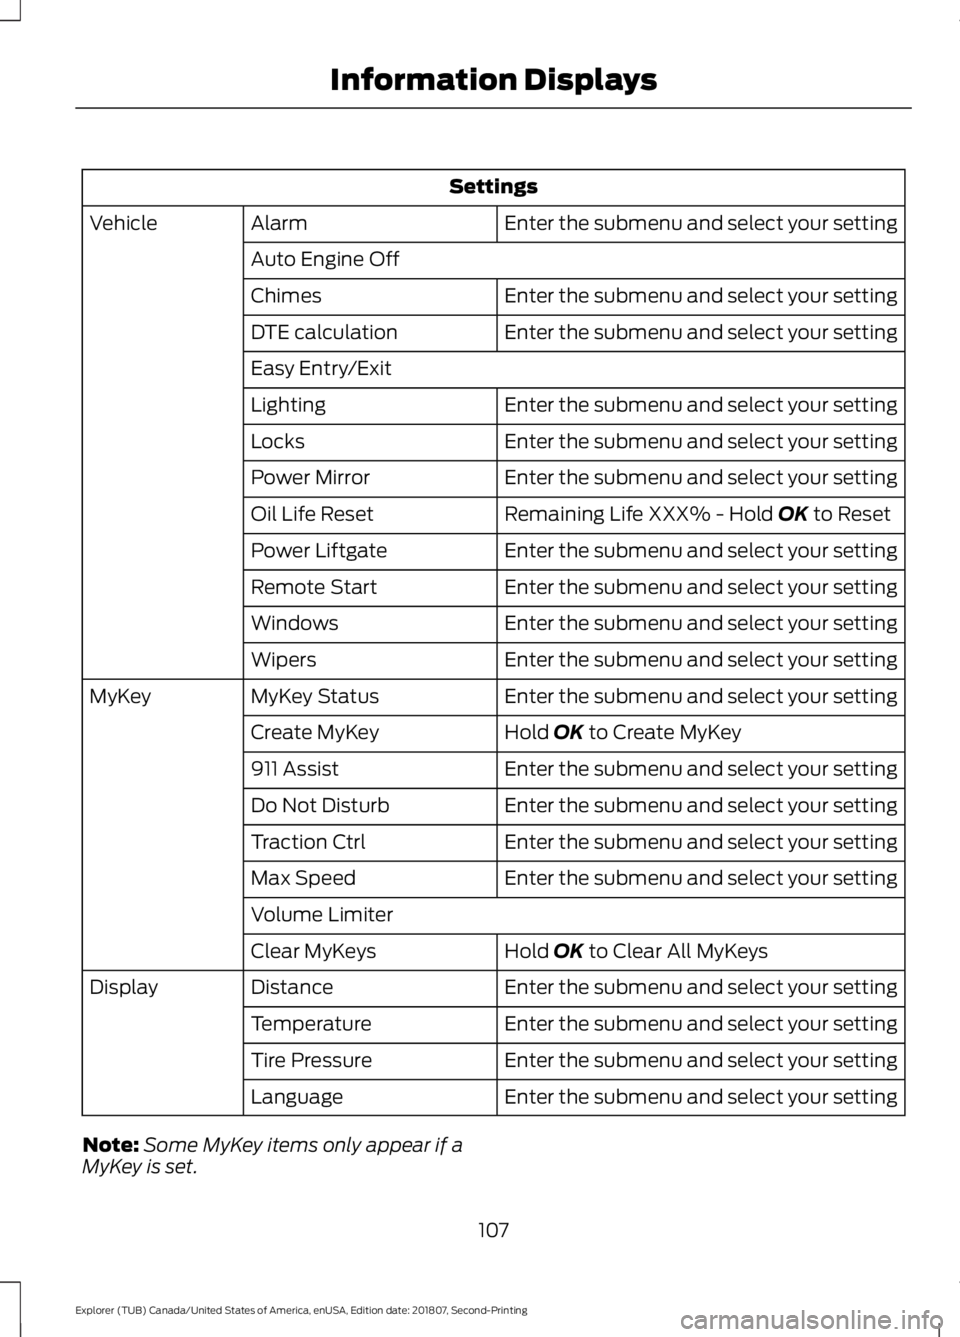
Settings
Enter the submenu and select your setting
Alarm
Vehicle
Auto Engine Off Enter the submenu and select your setting
Chimes
Enter the submenu and select your setting
DTE calculation
Easy Entry/Exit
Enter the submenu and select your setting
Lighting
Enter the submenu and select your setting
Locks
Enter the submenu and select your setting
Power Mirror
Remaining Life XXX% - Hold OK to Reset
Oil Life Reset
Enter the submenu and select your setting
Power Liftgate
Enter the submenu and select your setting
Remote Start
Enter the submenu and select your setting
Windows
Enter the submenu and select your setting
Wipers
Enter the submenu and select your setting
MyKey Status
MyKey
Hold
OK to Create MyKey
Create MyKey
Enter the submenu and select your setting
911 Assist
Enter the submenu and select your setting
Do Not Disturb
Enter the submenu and select your setting
Traction Ctrl
Enter the submenu and select your setting
Max Speed
Volume Limiter
Hold
OK to Clear All MyKeys
Clear MyKeys
Enter the submenu and select your setting
Distance
Display
Enter the submenu and select your setting
Temperature
Enter the submenu and select your setting
Tire Pressure
Enter the submenu and select your setting
Language
Note: Some MyKey items only appear if a
MyKey is set.
107
Explorer (TUB) Canada/United States of America, enUSA, Edition date: 201807, Second-Printing Information Displays
Page 114 of 571
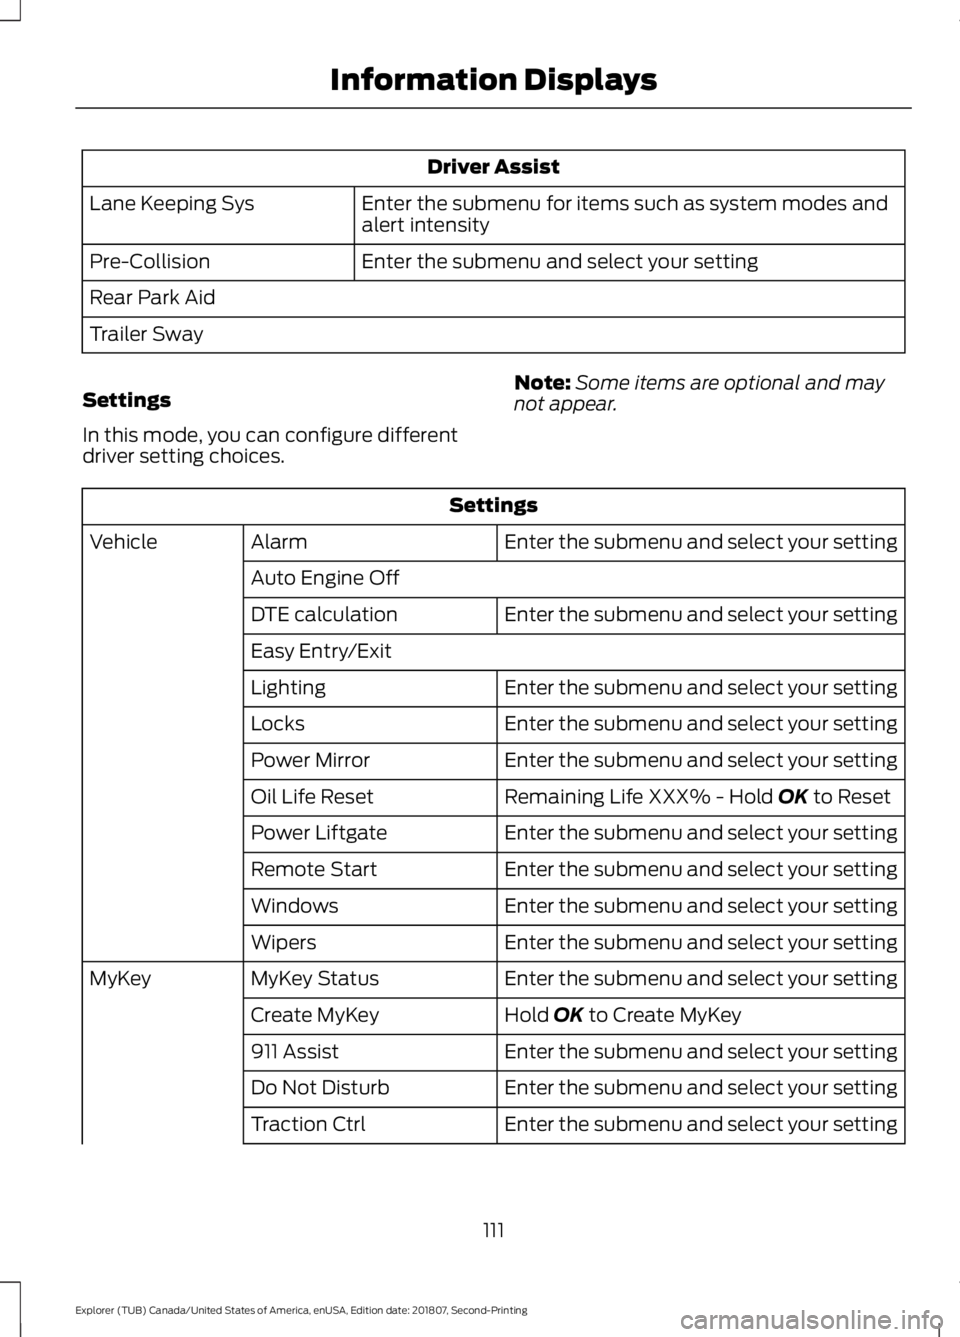
Driver Assist
Enter the submenu for items such as system modes and
alert intensity
Lane Keeping Sys
Enter the submenu and select your setting
Pre-Collision
Rear Park Aid
Trailer Sway
Settings
In this mode, you can configure different
driver setting choices. Note:
Some items are optional and may
not appear. Settings
Enter the submenu and select your setting
Alarm
Vehicle
Auto Engine Off Enter the submenu and select your setting
DTE calculation
Easy Entry/Exit
Enter the submenu and select your setting
Lighting
Enter the submenu and select your setting
Locks
Enter the submenu and select your setting
Power Mirror
Remaining Life XXX% - Hold OK to Reset
Oil Life Reset
Enter the submenu and select your setting
Power Liftgate
Enter the submenu and select your setting
Remote Start
Enter the submenu and select your setting
Windows
Enter the submenu and select your setting
Wipers
Enter the submenu and select your setting
MyKey Status
MyKey
Hold
OK to Create MyKey
Create MyKey
Enter the submenu and select your setting
911 Assist
Enter the submenu and select your setting
Do Not Disturb
Enter the submenu and select your setting
Traction Ctrl
111
Explorer (TUB) Canada/United States of America, enUSA, Edition date: 201807, Second-Printing Information Displays
Page 117 of 571
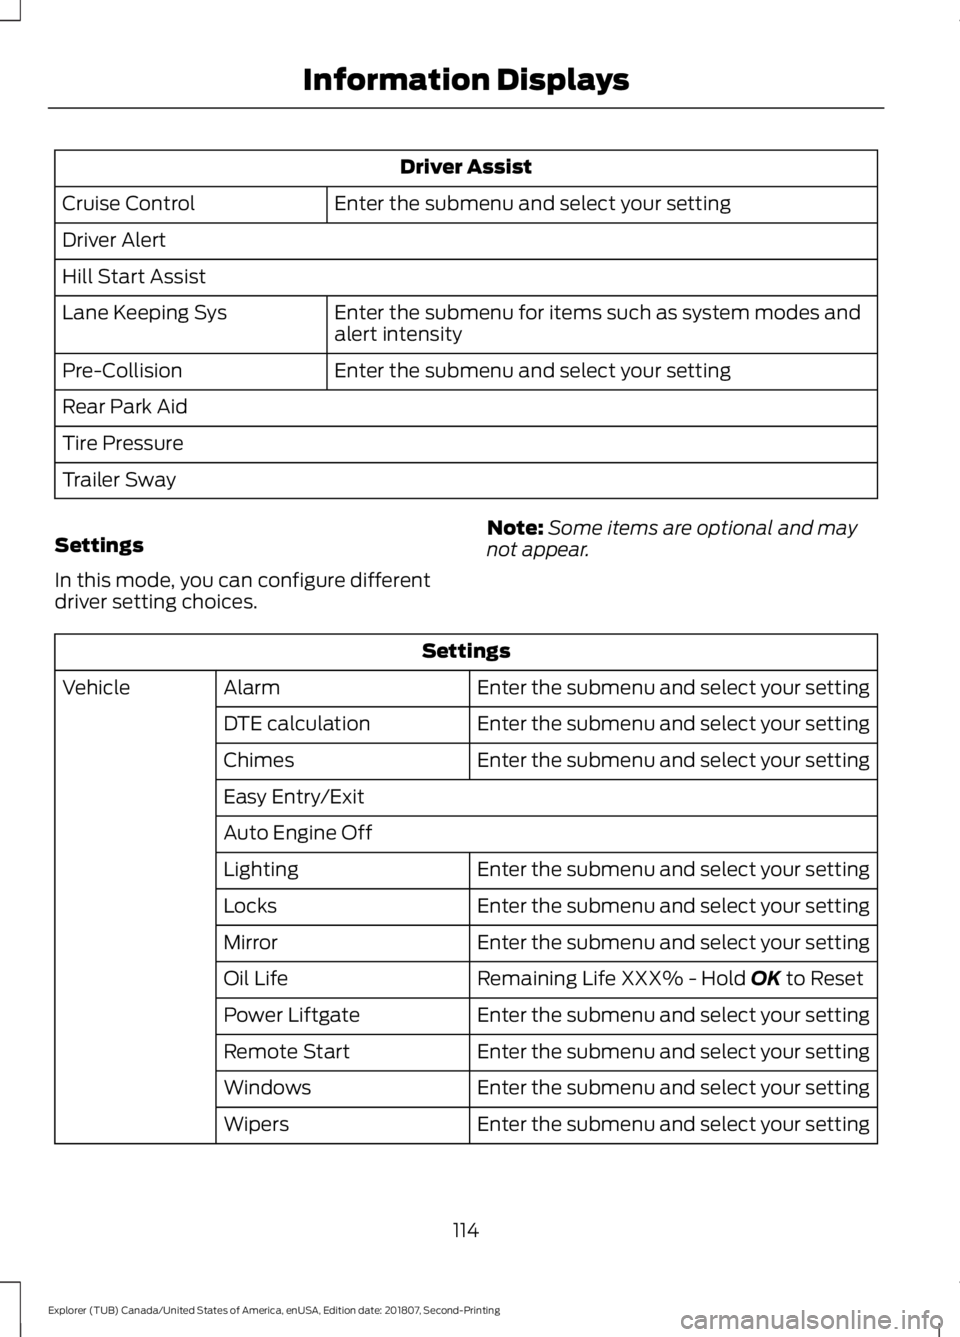
Driver Assist
Enter the submenu and select your setting
Cruise Control
Driver Alert
Hill Start Assist
Enter the submenu for items such as system modes and
alert intensity
Lane Keeping Sys
Enter the submenu and select your setting
Pre-Collision
Rear Park Aid
Tire Pressure
Trailer Sway
Settings
In this mode, you can configure different
driver setting choices. Note:
Some items are optional and may
not appear. Settings
Enter the submenu and select your setting
Alarm
Vehicle
Enter the submenu and select your setting
DTE calculation
Enter the submenu and select your setting
Chimes
Easy Entry/Exit
Auto Engine Off
Enter the submenu and select your setting
Lighting
Enter the submenu and select your setting
Locks
Enter the submenu and select your setting
Mirror
Remaining Life XXX% - Hold OK to Reset
Oil Life
Enter the submenu and select your setting
Power Liftgate
Enter the submenu and select your setting
Remote Start
Enter the submenu and select your setting
Windows
Enter the submenu and select your setting
Wipers
114
Explorer (TUB) Canada/United States of America, enUSA, Edition date: 201807, Second-Printing Information Displays
Page 140 of 571
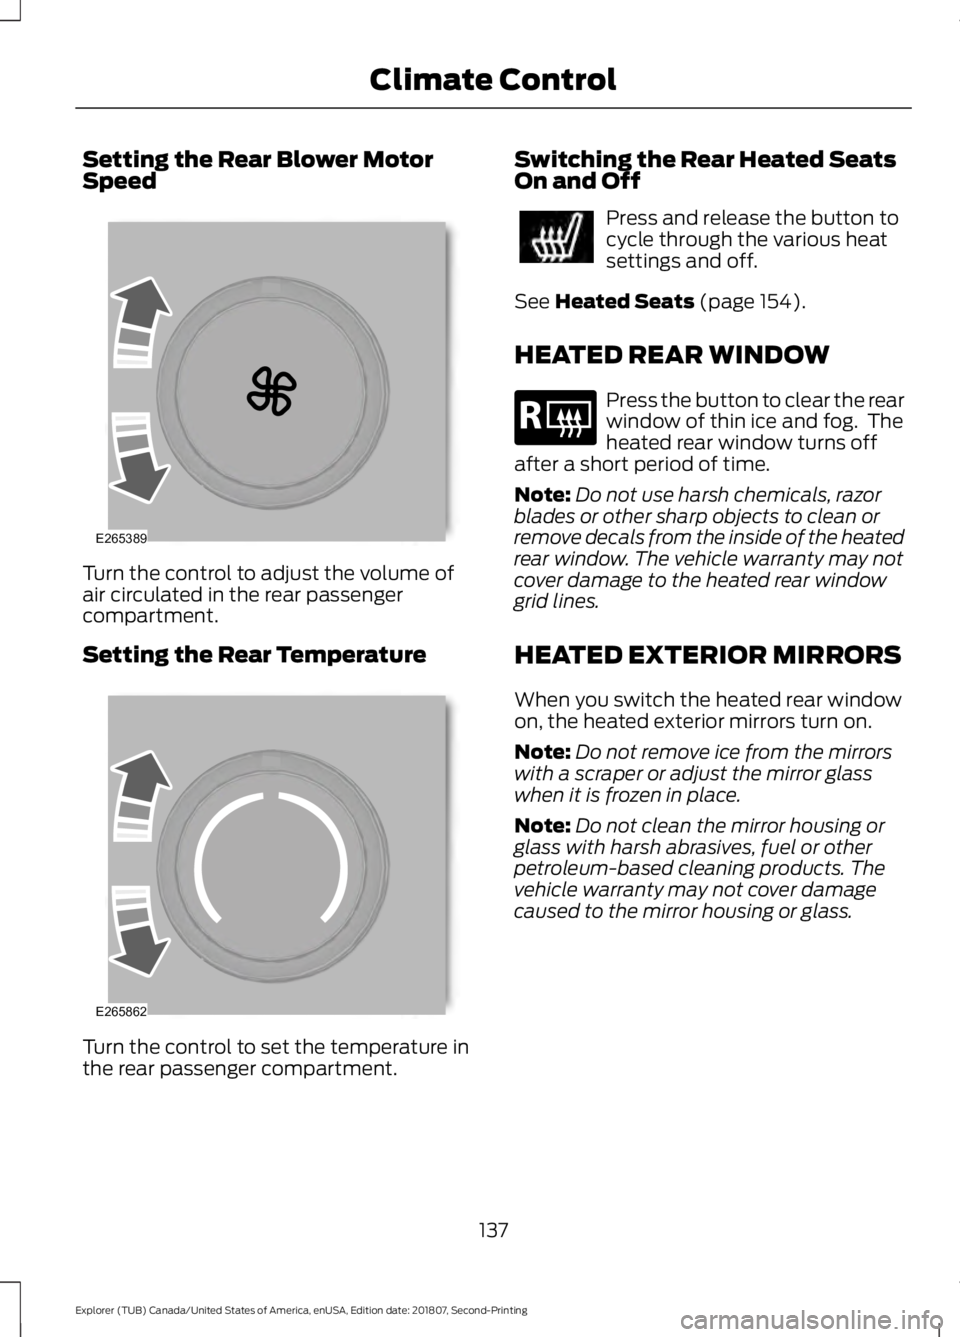
Setting the Rear Blower Motor
Speed
Turn the control to adjust the volume of
air circulated in the rear passenger
compartment.
Setting the Rear Temperature
Turn the control to set the temperature in
the rear passenger compartment. Switching the Rear Heated Seats
On and Off Press and release the button to
cycle through the various heat
settings and off.
See Heated Seats (page 154).
HEATED REAR WINDOW Press the button to clear the rear
window of thin ice and fog. The
heated rear window turns off
after a short period of time.
Note: Do not use harsh chemicals, razor
blades or other sharp objects to clean or
remove decals from the inside of the heated
rear window. The vehicle warranty may not
cover damage to the heated rear window
grid lines.
HEATED EXTERIOR MIRRORS
When you switch the heated rear window
on, the heated exterior mirrors turn on.
Note: Do not remove ice from the mirrors
with a scraper or adjust the mirror glass
when it is frozen in place.
Note: Do not clean the mirror housing or
glass with harsh abrasives, fuel or other
petroleum-based cleaning products. The
vehicle warranty may not cover damage
caused to the mirror housing or glass.
137
Explorer (TUB) Canada/United States of America, enUSA, Edition date: 201807, Second-Printing Climate ControlE265389 E265862 E184884
Page 141 of 571
CABIN AIR FILTER
Your vehicle is equipped with a cabin air
filter, which gives you and your passengers
the following benefits:
•
It improves your driving comfort by
reducing particle concentration.
• It improves the interior compartment
cleanliness.
• It protects the climate control
components from particle deposits.
You can locate the cabin air filter behind
the glove box.
Note: Make sure you have a cabin air filter
installed at all times. This prevents foreign
objects from entering the system. Running
the system without a filter in place could
result in degradation or damage to the
system.
Replace the filter at regular intervals. See
Scheduled Maintenance (page 495).
For additional cabin air filter information,
or to replace the filter, see an authorized
dealer.
REMOTE START
The climate control system adjusts the
interior temperature during remote start.
You can switch this feature on or off and
adjust the settings using the information
display controls. See
Information
Displays (page 104).
You cannot adjust the climate control
setting during remote start operation.
Switch the ignition on to make
adjustments. Based on your remote start settings, the
following vehicle-dependent features may
or may not remain on after remote starting
your vehicle:
•
Climate controlled seats.
• Heated steering wheel.
• Heated mirrors.
• Heated rear window.
• Windshield wiper de-icer.
Note: For dual zone climate controlled
seats, the passenger seat setting defaults
to match the driver seat during remote start.
Automatic Settings
If
Auto is on, the system sets the interior
temperature to 72°F (22°C) and heats or
cools the vehicle interior as required to
achieve comfort.
Note: In cold weather, the heated rear
window and heated mirrors turn on.
Last Settings
If
Last Settings is on, the system uses the
settings last selected before you turned
off the vehicle.
Heated and Cooled Features
In Auto mode, certain heated features may
switch on during cold weather, and cooled
features during hot weather.
138
Explorer (TUB) Canada/United States of America, enUSA, Edition date: 201807, Second-Printing Climate Control
Page 149 of 571
MEMORY FUNCTION (IF EQUIPPED)
WARNING:
Before activating the
memory seat, make sure that the area
immediately surrounding the seat is clear
of obstructions and that all occupants
are clear of moving parts. WARNING:
Do not use the
memory function when your vehicle is
moving.
This feature automatically recalls the
position of the following:
• Driver seat.
• Power mirrors.
• Optional power adjustable foot pedals.
• Optional power steering column.
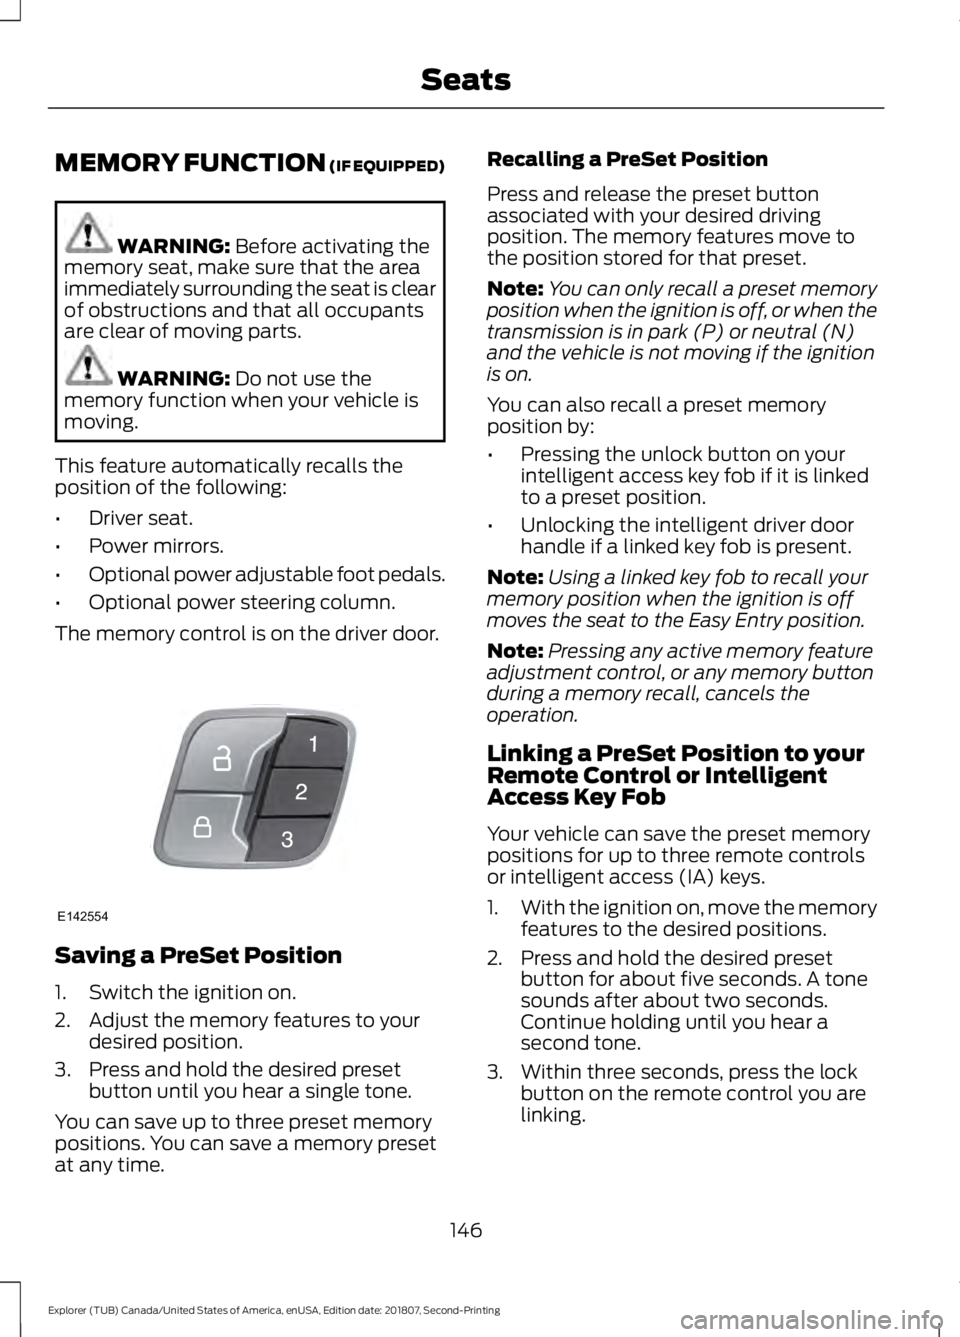
The memory control is on the driver door. Saving a PreSet Position
1. Switch the ignition on.
2. Adjust the memory features to your
desired position.
3. Press and hold the desired preset button until you hear a single tone.
You can save up to three preset memory
positions. You can save a memory preset
at any time. Recalling a PreSet Position
Press and release the preset button
associated with your desired driving
position. The memory features move to
the position stored for that preset.
Note:
You can only recall a preset memory
position when the ignition is off, or when the
transmission is in park (P) or neutral (N)
and the vehicle is not moving if the ignition
is on.
You can also recall a preset memory
position by:
• Pressing the unlock button on your
intelligent access key fob if it is linked
to a preset position.
• Unlocking the intelligent driver door
handle if a linked key fob is present.
Note: Using a linked key fob to recall your
memory position when the ignition is off
moves the seat to the Easy Entry position.
Note: Pressing any active memory feature
adjustment control, or any memory button
during a memory recall, cancels the
operation.
Linking a PreSet Position to your
Remote Control or Intelligent
Access Key Fob
Your vehicle can save the preset memory
positions for up to three remote controls
or intelligent access (IA) keys.
1. With the ignition on, move the memory
features to the desired positions.
2. Press and hold the desired preset button for about five seconds. A tone
sounds after about two seconds.
Continue holding until you hear a
second tone.
3. Within three seconds, press the lock button on the remote control you are
linking.
146
Explorer (TUB) Canada/United States of America, enUSA, Edition date: 201807, Second-Printing SeatsE142554
Page 215 of 571
Possible Cause
Symptom
Vehicles or objects bordering the space may not be
correctly parked.
Your vehicle stopped too far past the parking space.
The tires may not be correctly installed or maintained.
For example, not inflated correctly, improper size, or of
different sizes.
A repair or alteration changes the detection capabilities.
A parked vehicle has a high attachment. For example,
a salt sprayer, snowplow or moving truck bed.
The parking space length or position of parked objects
changes after your vehicle passes the space.
The temperature around your vehicle quickly changes.
For example, driving from a heated garage into the cold,
or after leaving a car wash.
REAR VIEW CAMERA WARNING: The rear view camera
system is a reverse aid supplement
device that still requires the driver to use
it in conjunction with the interior and
exterior mirrors for maximum coverage. WARNING: Objects that are close
to either corner of the bumper or under
the bumper, might not be seen on the
screen due to the limited coverage of the
camera system. WARNING: Reverse your vehicle
slowly. Failure to follow this instruction
could result in the loss of control of your
vehicle, personal injury or death. WARNING:
Use caution when the
rear cargo door is ajar. If the rear cargo
door is ajar, the camera will be out of
position and the video image may be
incorrect. All guidelines disappear when
the rear cargo door is ajar. Failure to
follow this instruction could result in
personal injury. WARNING:
Use caution when
turning camera features on or off when
the transmission is not in park (P). Make
sure your vehicle is not moving.
Note: Some vehicles may not come
equipped with guidelines.
The rear view camera system provides a
video image of the area behind your
vehicle.
During operation, lines appear in the
display which represent your vehicle ’s path
and proximity to objects behind your
vehicle.
212
Explorer (TUB) Canada/United States of America, enUSA, Edition date: 201807, Second-Printing Parking Aids
Page 217 of 571

Active guidelines (If equipped)
A
Centerline
B
Fixed guideline: Green zone
C
Fixed guideline: Yellow zone
D
Fixed guideline: Red zone
E
Rear bumper
F
Active guidelines are only shown with fixed
guidelines. To use active guidelines, turn
the steering wheel to point the guidelines
toward an intended path. If you change
the steering wheel position while reversing,
your vehicle might deviate from the original
intended path. The fixed and active guidelines fade in and
out depending on the steering wheel
position. The active guidelines do not
display when the steering wheel position
is straight.
Always use caution while reversing.
Objects in the red zone are closest to your
vehicle and objects in the green zone are
farther away. Objects are getting closer to
your vehicle as they move from the green
zone to the yellow or red zones. Use the
side view mirrors and rear view mirror to
get better coverage on both sides and rear
of the vehicle.
Obstacle Distance Indicator (If
Equipped) The system will provide an image of your
vehicle and the sensor zones. The zones
will highlight green, yellow and red when
the parking aid sensors detect an object in
the coverage area.
214
Explorer (TUB) Canada/United States of America, enUSA, Edition date: 201807, Second-Printing Parking AidsABCD
F
E
E142436 E190459