2019 FORD EXPEDITION bulb
[x] Cancel search: bulbPage 7 of 583

Driving Aids
Driver Alert
....................................................249
Lane Keeping System ...............................
250
Blind Spot Information System ............
254
Cross Traffic Alert .......................................
258
Steering ...........................................................
261
Pre-Collision Assist ....................................
262
Drive Control ................................................
266
Load Carrying
Rear Under Floor Storage ........................
269
Cargo Nets ......................................................
271
Roof Racks and Load Carriers ................
272
Load Limit ......................................................
273
Towing
Towing a Trailer ............................................
279
Trailer Reversing Aids ...............................
280
Trailer Sway Control ..................................
289
Recommended Towing Weights ..........
290
Essential Towing Checks .........................
293
Towing the Vehicle on Four Wheels ....
300
Driving Hints
Breaking-In ....................................................
303
Reduced Engine Performance ..............
303
Economical Driving ....................................
303
Driving Through Water .............................
304
Floor Mats .....................................................
304
Roadside Emergencies
Roadside Assistance ................................
306
Hazard Flashers ...........................................
307
Fuel Shutoff ..................................................
307
Jump Starting the Vehicle .......................
308
Post-Crash Alert System ..........................
310
Transporting the Vehicle ..........................
310
Towing Points .................................................
311Customer Assistance
Getting the Services You Need
...............
313
In California (U.S. Only) ............................
314
The Better Business Bureau (BBB) Auto Line Program (U.S. Only) ......................
315
Utilizing the Mediation/Arbitration Program (Canada Only) .......................
316
Getting Assistance Outside the U.S. and Canada ........................................................
316
Ordering Additional Owner's Literature ........................................................................\
.
318
Reporting Safety Defects (U.S. Only) ........................................................................\
.
318
Reporting Safety Defects (Canada Only) ........................................................................\
.
318
Fuses
Fuse Box Locations ....................................
320
Fuse Specification Chart .........................
320
Changing a Fuse .........................................
329
Maintenance
General Information ...................................
331
Opening and Closing the Hood ..............
331
Under Hood Overview ...............................
332
Engine Oil Dipstick ......................................
333
Engine Oil Check .........................................
333
Oil Change Indicator Reset .....................
334
Engine Coolant Check ...............................
335
Automatic Transmission Fluid Check ........................................................................\
339
Transfer Case Fluid Check .......................
339
Brake Fluid Check ......................................
340
Washer Fluid Check ...................................
340
Fuel Filter ........................................................
341
Changing the 12V Battery .........................
341
Checking the Wiper Blades .....................
343
Changing the Wiper Blades ....................
343
Adjusting the Headlamps .......................
344
Removing a Headlamp .............................
345
Changing a Bulb ..........................................
345
4
Expedition (TB8) Canada/United States of America, enUSA, Edition date: 201808, Second-Printing Table of Contents
Page 8 of 583

Changing the Engine Air Filter
................347
Vehicle Care
General Information ..................................
349
Cleaning Products ......................................
349
Cleaning the Exterior .................................
349
Waxing .............................................................
351
Cleaning the Engine ....................................
351
Cleaning the Windows and Wiper Blades ........................................................................\
.
351
Cleaning the Interior ..................................
352
Cleaning the Instrument Panel and Instrument Cluster Lens .......................
352
Cleaning Leather Seats ............................
353
Repairing Minor Paint Damage .............
354
Cleaning the Wheels .................................
354
Vehicle Storage ...........................................
354
Wheels and Tires
General Information ...................................
357
Tire Care .........................................................
359
Using Snow Chains ....................................
373
Tire Pressure Monitoring System ..........
374
Changing a Road Wheel ..........................
380
Technical Specifications .........................
386
Capacities and Specifications
Engine Specifications ................................
387
Motorcraft Parts ..........................................
387
Vehicle Identification Number ..............
389
Vehicle Certification Label .....................
390
Transmission Code Designation ...........
390
Capacities and Specifications ................
391
Bulb Specification Chart .........................
396
Audio System
General Information ..................................
398
Audio Unit - Vehicles Without: Touchscreen Display .............................
399Audio Unit - Vehicles With: Touchscreen
Display ........................................................
402
Digital Radio .................................................
403
Satellite Radio .............................................
405
USB Port ........................................................
408
Media Hub ....................................................
408
SYNC™
General Information .................................
409
Using Voice Recognition ...........................
410
Using SYNC™ With Your Phone ............
412
SYNC™ Applications and Services ......
413
Using SYNC™ With Your Media Player ........................................................................\
.
417
SYNC™ Troubleshooting .........................
418
SYNC™ 3
General Information ..................................
426
Home Screen ...............................................
438
Using Voice Recognition ..........................
439
Entertainment .............................................
446
Climate ...........................................................
456
Phone .............................................................
458
Navigation .....................................................
464
Apps .................................................................
472
Settings ..........................................................
475
SYNC™ 3 Troubleshooting ....................
489
Accessories
Accessories ...................................................
503
Ford Protect
Ford Protect .................................................
505
Scheduled Maintenance
General Maintenance Information .......
507
Normal Scheduled Maintenance ..........
510
Special Operating Conditions Scheduled Maintenance .............................................
513
Scheduled Maintenance Record ...........
515
5
Expedition (TB8) Canada/United States of America, enUSA, Edition date: 201808, Second-Printing Table of Contents
Page 113 of 583

It illuminates when you engage
the parking brake and the
ignition is on.
If it illuminates when your vehicle is
moving, make sure the parking brake is
disengaged. If the parking brake is
disengaged, this indicates low brake fluid
level or a brake system fault. Have your
vehicle checked as soon as possible.
Check Fuel Cap (If Equipped) Illuminates when the fuel cap
may not be properly installed.
Continued driving with this light
on may cause the service engine soon
warning indicator to come on.
Cruise Control Indicator
(If Equipped) It illuminates when you switch
the system on.
See
Using Cruise Control
(page 241).
Direction Indicator Illuminates when you switch on
the left or right direction
indicator or the hazard flashers.
Flashes during operation. An increase in
the rate of flashing warns of a failed
indicator bulb.
Door Ajar Warning Lamp Displays when the ignition is on
and any door is not completely
closed.
Electric Park Brake Illuminates or flashes when the
electric parking brake has a
malfunction. See
Electric
Parking Brake (page 216). Electronic Limited Slip Differential
(If Equipped) Illuminates when using the
electronic limited slip
differential.
Engine Coolant Temperature
Warning Lamp If it illuminates when your vehicle
is moving, this indicates that the
engine is overheating. Stop your
vehicle as soon as it is safe to do so and
switch the engine off. Have your vehicle
checked as soon as possible.
Fasten Seatbelt Warning Lamp It illuminates and a chime
sounds until you fasten the
seatbelts.
Four-Wheel Drive Indicators
(If
Equipped)
Note: Some indicators will appear different
depending on vehicle options. Illuminates momentarily when
you select two-wheel drive high.
Illuminates when the automatic
four-wheel drive system is
engaged.
Illuminates when four-wheel
drive low is engaged.
Illuminates when four-wheel
drive high is engaged.
Front Fog Lamp Indicator It illuminates when you switch
the front fog lamps on.
110
Expedition (TB8) Canada/United States of America, enUSA, Edition date: 201808, Second-Printing Instrument ClusterE138644 E71340 E146190 E163170 E71880 E181778 E181781 E181780 E181779
Page 114 of 583

Headlamp High Beam Indicator
It illuminates when you switch
the headlamp high beam on.
Hill Descent (If Equipped) Illuminates when hill descent is
switched on.
Hood Ajar Displays when the ignition is on
and the hood is not completely
closed.
Liftgate Ajar Warning Lamp It illuminates when you switch
the ignition on and remains on if
the liftgate is open.
Low Fuel Level Warning Lamp If it illuminates when you are
driving, refuel as soon as
possible.
Low Tire Pressure Warning Lamp Illuminates when your tire
pressure is low. If the lamp
remains on with the engine
running or when driving, check your tire
pressure as soon as possible.
It also illuminates momentarily when you
switch the ignition on to confirm the lamp
is functional. If it does not illuminate when
you switch the ignition on, or begins to
flash at any time, have the system checked
by your authorized dealer.
Oil Pressure Warning Lamp It illuminates when you switch
the ignition on. If it illuminates when the engine is running
this indicates a malfunction. Stop your
vehicle as soon as it is safe to do so and
switch the engine off. Check the engine oil
level. If the oil level is sufficient, this
indicates a system malfunction. Have your
vehicle checked as soon as possible.
See
Engine Oil Check (page 333).
Powertrain Malfunction/Reduced
Power/Electronic Throttle Control Illuminates when a powertrain
or a 4WD fault has been
detected. Have your vehicle
checked as soon as possible.
Service Engine Soon If it illuminates when the engine
is running this indicates a
malfunction. The On Board
Diagnostics system has detected a
malfunction of the vehicle emission control
system.
If it flashes, engine misfire may be
occurring. Increased exhaust gas
temperatures could damage the catalytic
converter or other vehicle components.
Drive in a moderate fashion (avoid heavy
acceleration and deceleration) and have
your vehicle immediately serviced.
It illuminates when you switch the ignition
on prior to engine start to check the bulb
and to indicate whether your vehicle is
ready for Inspection and Maintenance
(I/M) testing.
Normally, it illuminates until the engine is
cranked and automatically turns off if no
malfunctions are present. However, if after
15 seconds it flashes eight times, this
indicates that your vehicle is not ready for
Inspection and Maintenance (I/M) testing.
See
Catalytic Converter (page 196).
111
Expedition (TB8) Canada/United States of America, enUSA, Edition date: 201808, Second-Printing Instrument Cluster E246598 E162453
Page 200 of 583

Illumination of the service engine soon
indicator, charging system warning light or
the temperature warning light, fluid leaks,
strange odors, smoke or loss of engine
power could indicate that the emission
control system is not working properly.
An improperly operating or damaged
exhaust system may allow exhaust to
enter the vehicle. Have a damaged or
improperly operating exhaust system
inspected and repaired immediately.
Do not make any unauthorized changes to
your vehicle or engine. By law, vehicle
owners and anyone who manufactures,
repairs, services, sells, leases, trades
vehicles, or supervises a fleet of vehicles
are not permitted to intentionally remove
an emission control device or prevent it
from working. Information about your
vehicle
’s emission system is on the Vehicle
Emission Control Information Decal
located on or near the engine. This decal
also lists engine displacement.
Please consult your warranty information
for complete details.
On-Board Diagnostics (OBD-II)
Your vehicle has a computer known as the
on-board diagnostics system (OBD-II) that
monitors the engine ’s emission control
system. The system protects the
environment by making sure that your
vehicle continues to meet government
emission standards. The OBD-II system
also assists a service technician in properly
servicing your vehicle. When the service engine soon
indicator illuminates, the OBD-II
system has detected a
malfunction. Temporary malfunctions may
cause the service engine soon indicator to
illuminate. Examples are: 1. Your vehicle has run out of fuel
—the
engine may misfire or run poorly.
2. Poor fuel quality or water in the fuel —the engine may misfire or run
poorly.
3. The fuel fill inlet may not have closed properly. See Refueling (page 191).
4. Driving through deep water —the
electrical system may be wet.
You can correct these temporary
malfunctions by filling the fuel tank with
good quality fuel, properly closing the fuel
fill inlet or letting the electrical system dry
out. After three driving cycles without these
or any other temporary malfunctions
present, the service engine soon indicator
should stay off the next time you start the
engine. A driving cycle consists of a cold
engine startup followed by mixed city and
highway driving. No additional vehicle
service is required.
If the service engine soon indicator remains
on, have your vehicle serviced at the first
available opportunity. Although some
malfunctions detected by the OBD-II may
not have symptoms that are apparent,
continued driving with the service engine
soon indicator on can result in increased
emissions, lower fuel economy, reduced
engine and transmission smoothness and
lead to more costly repairs.
Readiness for Inspection and
Maintenance (I/M) Testing
Some state and provincial and local
governments may have
Inspection/Maintenance (I/M) programs
to inspect the emission control equipment
on your vehicle. Failure to pass this
inspection could prevent you from getting
a vehicle registration. If the service engine soon
indicator is on or the bulb does
not work, your vehicle may need
service. See On-Board Diagnostics.
197
Expedition (TB8) Canada/United States of America, enUSA, Edition date: 201808, Second-Printing Engine Emission Control
Page 201 of 583

Your vehicle may not pass the I/M test if
the service engine soon indicator is on or
not working properly (bulb is burned out),
or if the OBD-II system has determined
that some of the emission control systems
have not been properly checked. In this
case, the vehicle is not ready for I/M
testing.
If the vehicle
’s engine or transmission has
just been serviced, or the battery has
recently run down or been replaced, the
OBD-II system may indicate that the
vehicle is not ready for I/M testing. To
determine if the vehicle is ready for I/M
testing, turn the ignition key to the on
position for 15 seconds without cranking
the engine. If the service engine soon
indicator blinks eight times, it means that
the vehicle is not ready for I/M testing; if
the service engine soon indicator stays on
solid, it means that your vehicle is ready
for I/M testing.
The OBD-II system checks the emission
control system during normal driving. A
complete check may take several days.
If the vehicle is not ready for I/M testing,
you can perform the following driving cycle
consisting of mixed city and highway
driving:
1. 15 minutes of steady driving on an expressway or highway followed by 20
minutes of stop-and-go driving with at
least four 30-second idle periods.
2. Allow your vehicle to sit for at least eight hours with the ignition off. Then,
start the vehicle and complete the
above driving cycle. The vehicle must
warm up to its normal operating
temperature. Once started, do not turn
off the vehicle until the above driving
cycle is complete.
If the vehicle is still not ready for I/M
testing, you need to repeat the above
driving cycle.
198
Expedition (TB8) Canada/United States of America, enUSA, Edition date: 201808, Second-Printing Engine Emission Control
Page 224 of 583

Traction Control
The system enhances your vehicle
’s ability
to maintain traction of the wheels by
detecting and controlling wheel spin. See
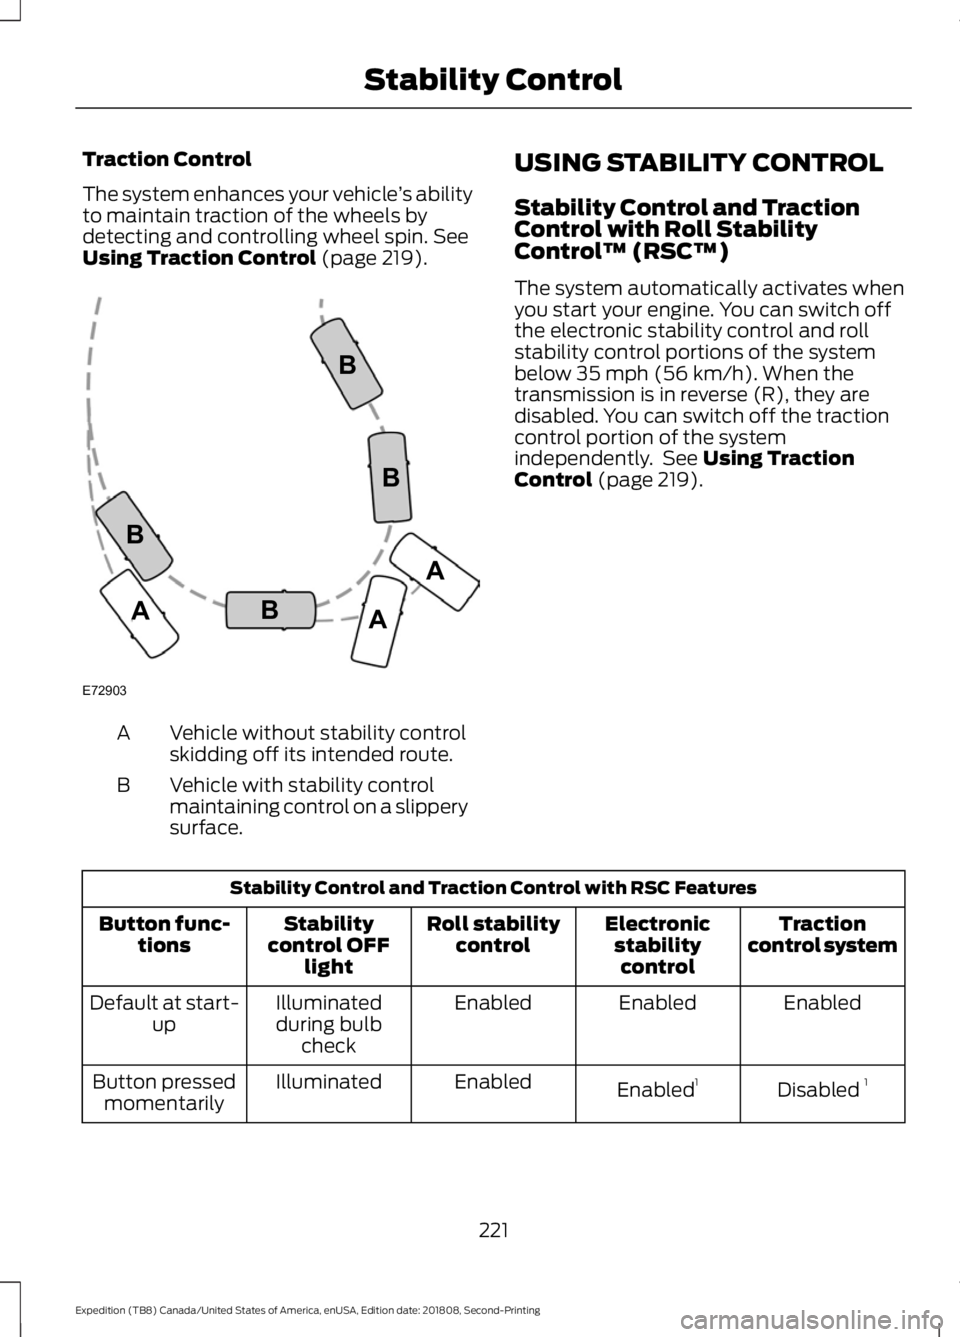
Using Traction Control (page 219). Vehicle without stability control
skidding off its intended route.
A
Vehicle with stability control
maintaining control on a slippery
surface.
B USING STABILITY CONTROL
Stability Control and Traction
Control with Roll Stability
Control
™ (RSC™)
The system automatically activates when
you start your engine. You can switch off
the electronic stability control and roll
stability control portions of the system
below 35 mph (56 km/h). When the
transmission is in reverse (R), they are
disabled. You can switch off the traction
control portion of the system
independently. See
Using Traction
Control (page 219). Stability Control and Traction Control with RSC Features
Traction
control system
Electronic
stabilitycontrol
Roll stability
control
Stability
control OFF light
Button func-
tions
Enabled
Enabled
Enabled
Illuminated
during bulb check
Default at start-
up
Disabled 1
Enabled 1
Enabled
Illuminated
Button pressed
momentarily
221
Expedition (TB8) Canada/United States of America, enUSA, Edition date: 201808, Second-Printing Stability ControlE72903A
AA
B
BB
B
Page 348 of 583

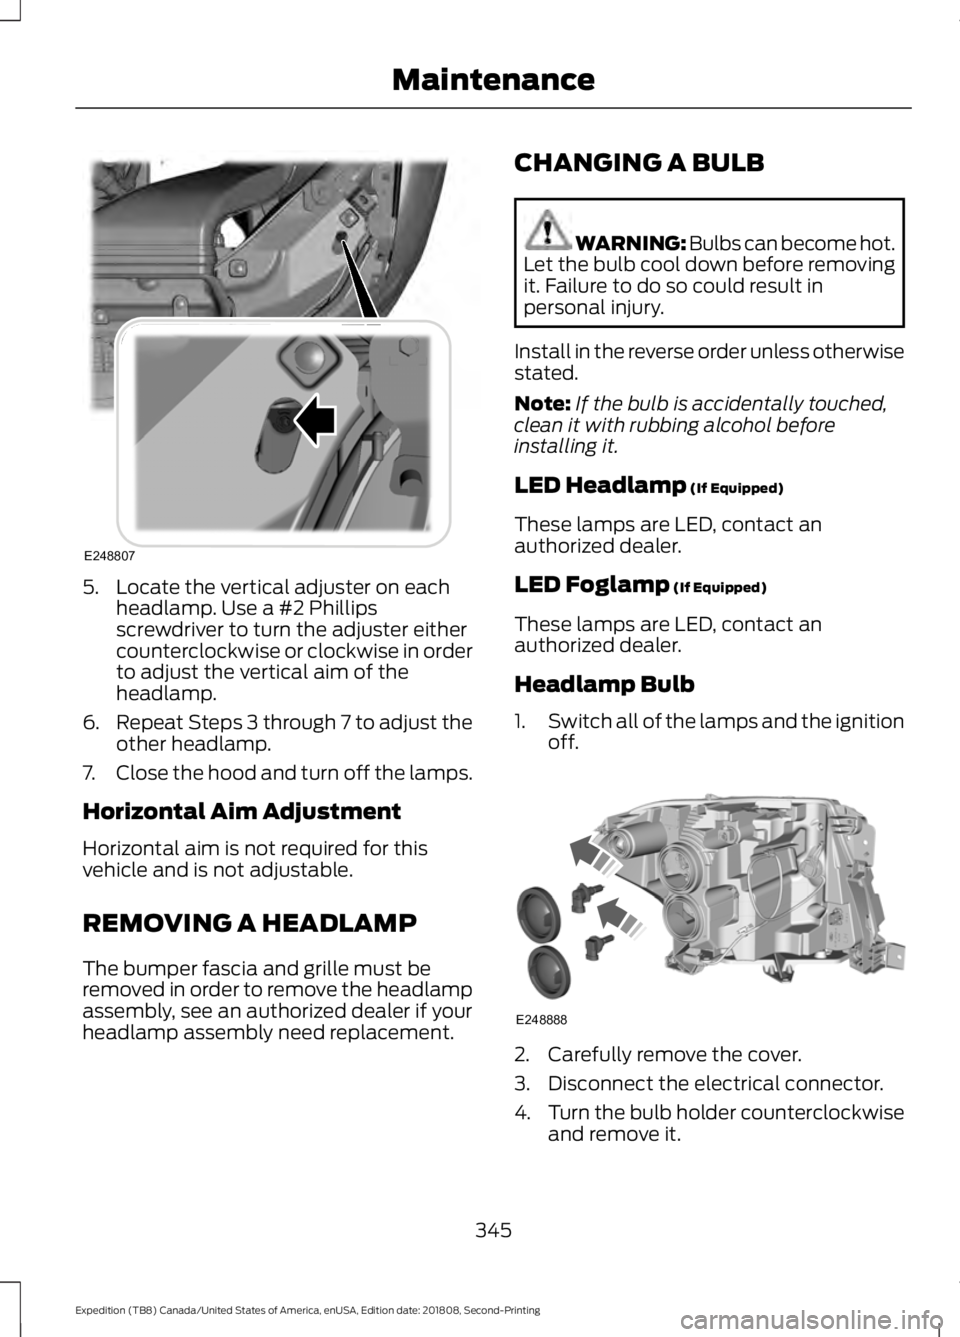
5. Locate the vertical adjuster on each
headlamp. Use a #2 Phillips
screwdriver to turn the adjuster either
counterclockwise or clockwise in order
to adjust the vertical aim of the
headlamp.
6. Repeat Steps 3 through 7 to adjust the
other headlamp.
7. Close the hood and turn off the lamps.
Horizontal Aim Adjustment
Horizontal aim is not required for this
vehicle and is not adjustable.
REMOVING A HEADLAMP
The bumper fascia and grille must be
removed in order to remove the headlamp
assembly, see an authorized dealer if your
headlamp assembly need replacement. CHANGING A BULB WARNING: Bulbs can become hot.
Let the bulb cool down before removing
it. Failure to do so could result in
personal injury.
Install in the reverse order unless otherwise
stated.
Note: If the bulb is accidentally touched,
clean it with rubbing alcohol before
installing it.
LED Headlamp (If Equipped)
These lamps are LED, contact an
authorized dealer.
LED Foglamp
(If Equipped)
These lamps are LED, contact an
authorized dealer.
Headlamp Bulb
1. Switch all of the lamps and the ignition
off. 2. Carefully remove the cover.
3. Disconnect the electrical connector.
4.
Turn the bulb holder counterclockwise
and remove it.
345
Expedition (TB8) Canada/United States of America, enUSA, Edition date: 201808, Second-Printing MaintenanceE248807 E248888