2019 FORD EXPEDITION tires
[x] Cancel search: tiresPage 386 of 583
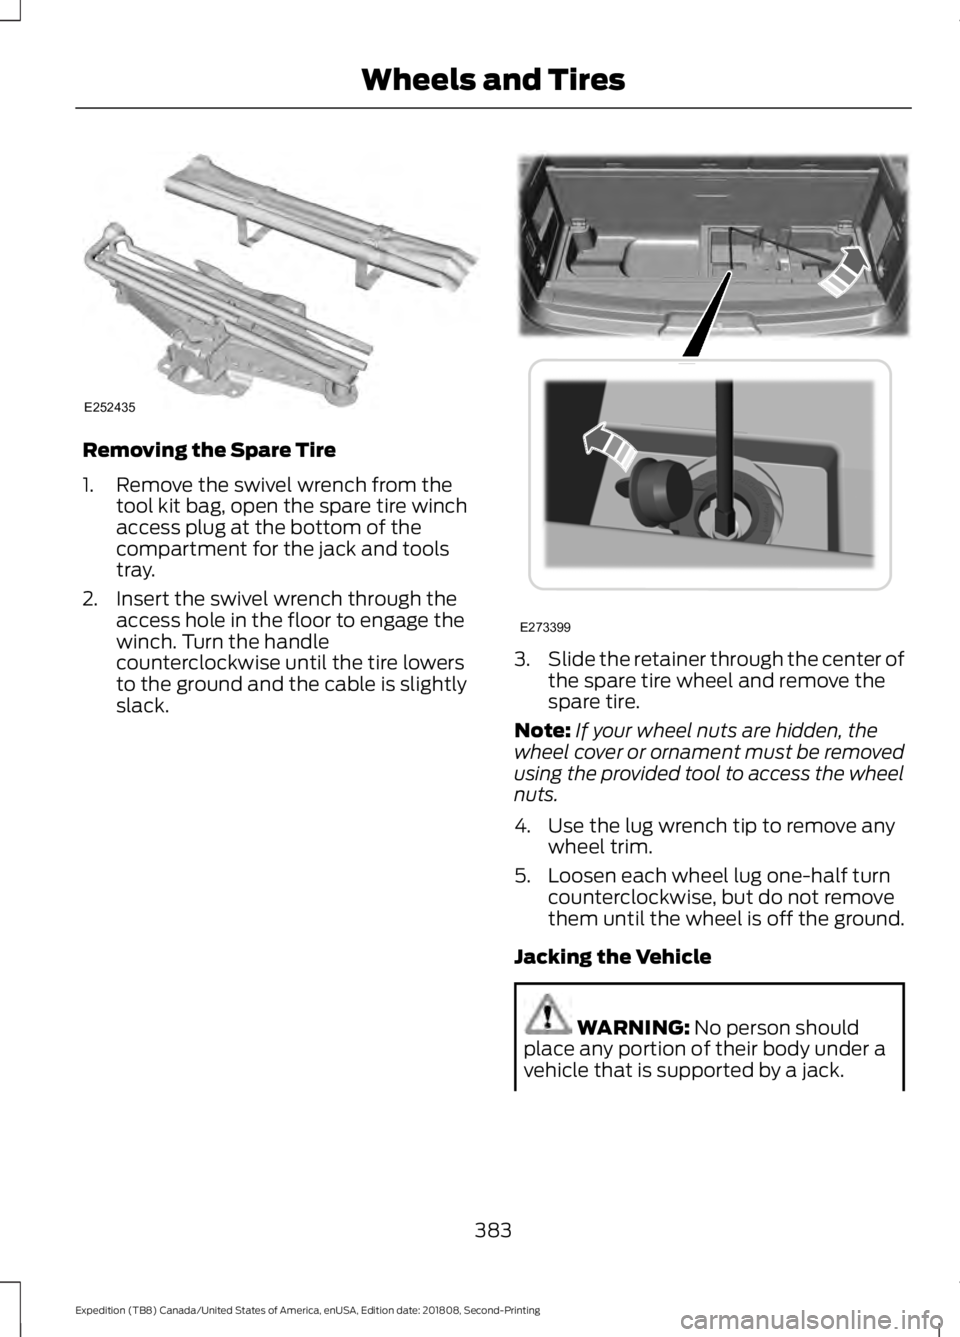
Removing the Spare Tire
1. Remove the swivel wrench from the
tool kit bag, open the spare tire winch
access plug at the bottom of the
compartment for the jack and tools
tray.
2. Insert the swivel wrench through the access hole in the floor to engage the
winch. Turn the handle
counterclockwise until the tire lowers
to the ground and the cable is slightly
slack. 3.
Slide the retainer through the center of
the spare tire wheel and remove the
spare tire.
Note: If your wheel nuts are hidden, the
wheel cover or ornament must be removed
using the provided tool to access the wheel
nuts.
4. Use the lug wrench tip to remove any wheel trim.
5. Loosen each wheel lug one-half turn counterclockwise, but do not remove
them until the wheel is off the ground.
Jacking the Vehicle WARNING: No person should
place any portion of their body under a
vehicle that is supported by a jack.
383
Expedition (TB8) Canada/United States of America, enUSA, Edition date: 201808, Second-Printing Wheels and TiresE252435 E273399
Page 387 of 583
WARNING: Do not get under a
vehicle that is only supported by a
vehicle jack. WARNING:
Check that the vehicle
jack is not damaged or deformed and
the thread is lubricated and clean. WARNING: The jack supplied with
this vehicle is only intended for changing
wheels. Do not use the vehicle jack other
than when you are changing a wheel in
an emergency. WARNING:
The jack should be
used on level firm ground wherever
possible. WARNING:
Never place anything
between the vehicle jack and the ground. WARNING:
Never place anything
between the vehicle jack and your
vehicle. WARNING:
It is recommended
that the wheels of the vehicle be
chocked, and that no person should
remain in a vehicle that is being jacked. WARNING:
Failure to follow these
guidelines could result in an increased
risk of loss of vehicle control, injury or
death.
Note: The jack does not require
maintenance or additional lubrication over
the service life of your vehicle.
Note: Jack at the specified locations to
avoid damaging your vehicle.
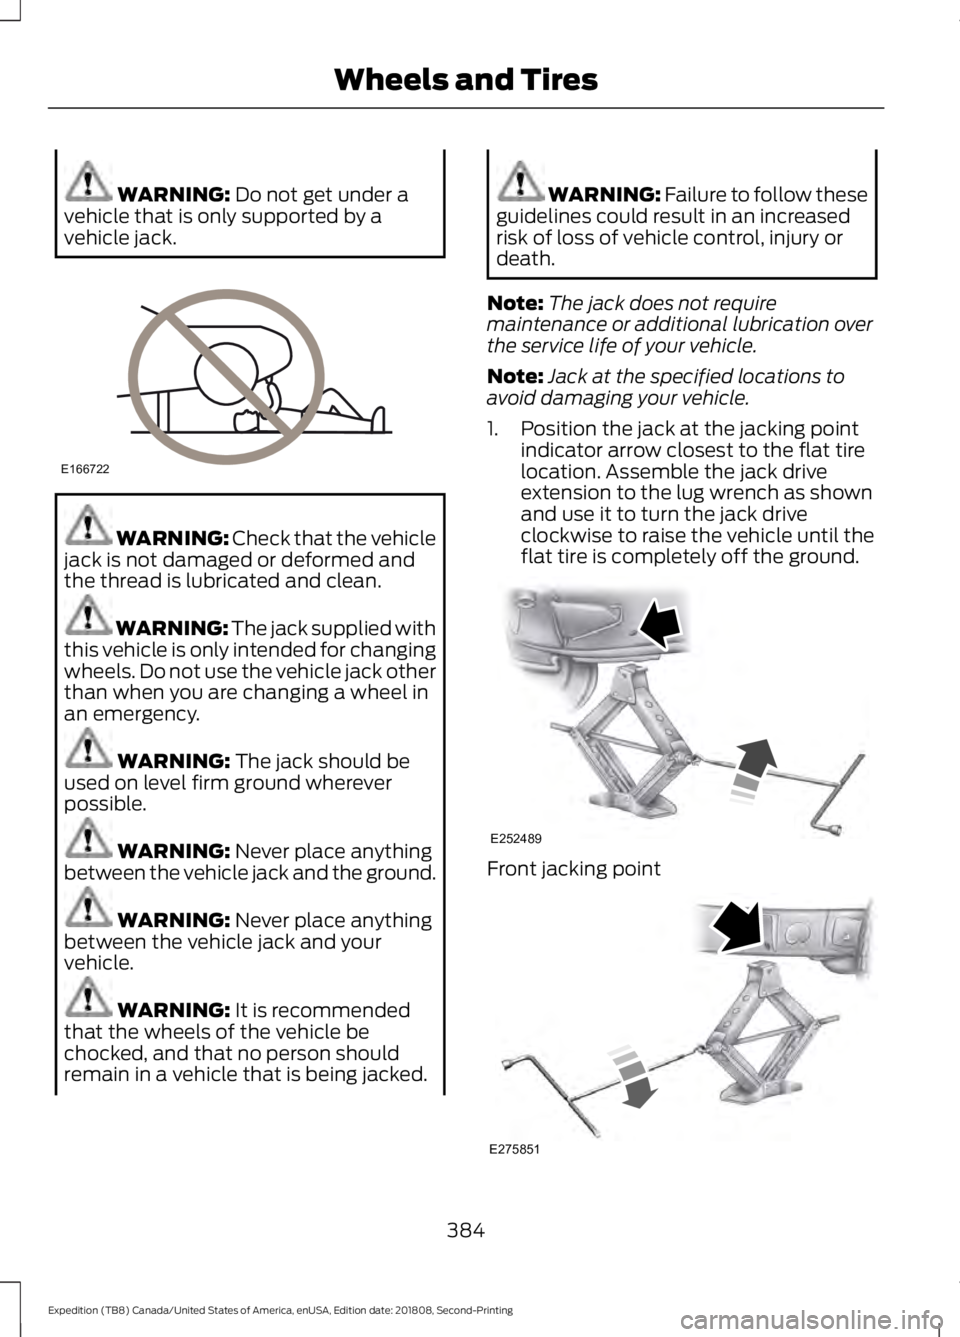
1. Position the jack at the jacking point indicator arrow closest to the flat tire
location. Assemble the jack drive
extension to the lug wrench as shown
and use it to turn the jack drive
clockwise to raise the vehicle until the
flat tire is completely off the ground. Front jacking point
384
Expedition (TB8) Canada/United States of America, enUSA, Edition date: 201808, Second-Printing Wheels and TiresE166722 E252489 E275851
Page 388 of 583
Rear jacking point
1. Remove the lug nuts with the lug
wrench. Replace the flat tire with the
spare tire, making sure the valve stem
is facing outward.
2. Reinstall the lug nuts until the wheel is
snug against the hub. Do not fully
tighten the lug nuts until the wheel has
been lowered.
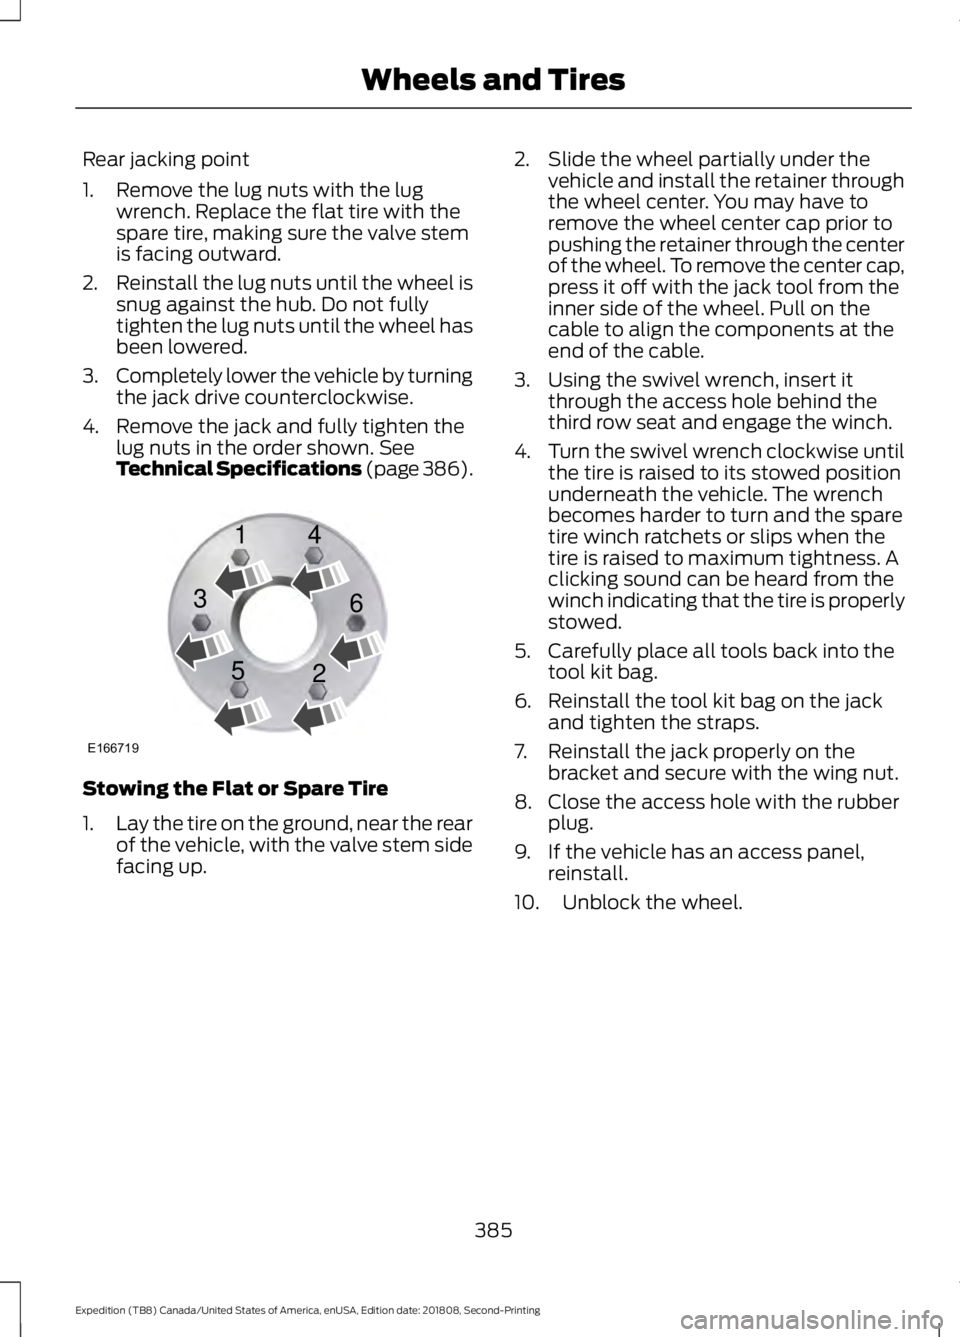
3. Completely lower the vehicle by turning
the jack drive counterclockwise.
4. Remove the jack and fully tighten the lug nuts in the order shown. See
Technical Specifications (page 386). Stowing the Flat or Spare Tire
1.
Lay the tire on the ground, near the rear
of the vehicle, with the valve stem side
facing up. 2. Slide the wheel partially under the
vehicle and install the retainer through
the wheel center. You may have to
remove the wheel center cap prior to
pushing the retainer through the center
of the wheel. To remove the center cap,
press it off with the jack tool from the
inner side of the wheel. Pull on the
cable to align the components at the
end of the cable.
3. Using the swivel wrench, insert it through the access hole behind the
third row seat and engage the winch.
4. Turn the swivel wrench clockwise until
the tire is raised to its stowed position
underneath the vehicle. The wrench
becomes harder to turn and the spare
tire winch ratchets or slips when the
tire is raised to maximum tightness. A
clicking sound can be heard from the
winch indicating that the tire is properly
stowed.
5. Carefully place all tools back into the tool kit bag.
6. Reinstall the tool kit bag on the jack and tighten the straps.
7. Reinstall the jack properly on the bracket and secure with the wing nut.
8. Close the access hole with the rubber plug.
9. If the vehicle has an access panel, reinstall.
10. Unblock the wheel.
385
Expedition (TB8) Canada/United States of America, enUSA, Edition date: 201808, Second-Printing Wheels and TiresE166719
1
3
5 4
6
2
Page 389 of 583
TECHNICAL SPECIFICATIONS
Wheel Lug Nut Torque Specifications
WARNING: When you install a wheel, always remove any corrosion, dirt or foreign
materials present on the mounting surfaces of the wheel or the surface of the wheel
hub, brake drum or brake disc that contacts the wheel. Make sure to secure any fasteners
that attach the rotor to the hub so they do not interfere with the mounting surfaces of
the wheel. Installing wheels without correct metal-to-metal contact at the wheel
mounting surfaces can cause the wheel nuts to loosen and the wheel to come off while
your vehicle is in motion, resulting in loss of vehicle control, personal injury or death. lb.ft (Nm)
1
Bolt Size
150 lb.ft (204 Nm)
M14 x 1.5
1 Torque specifications are for nut and bolt threads free of dirt and rust. Use only our
recommended replacement fasteners.
Retighten the lug nuts to the specified torque within 100 miles (160 kilometers) after any
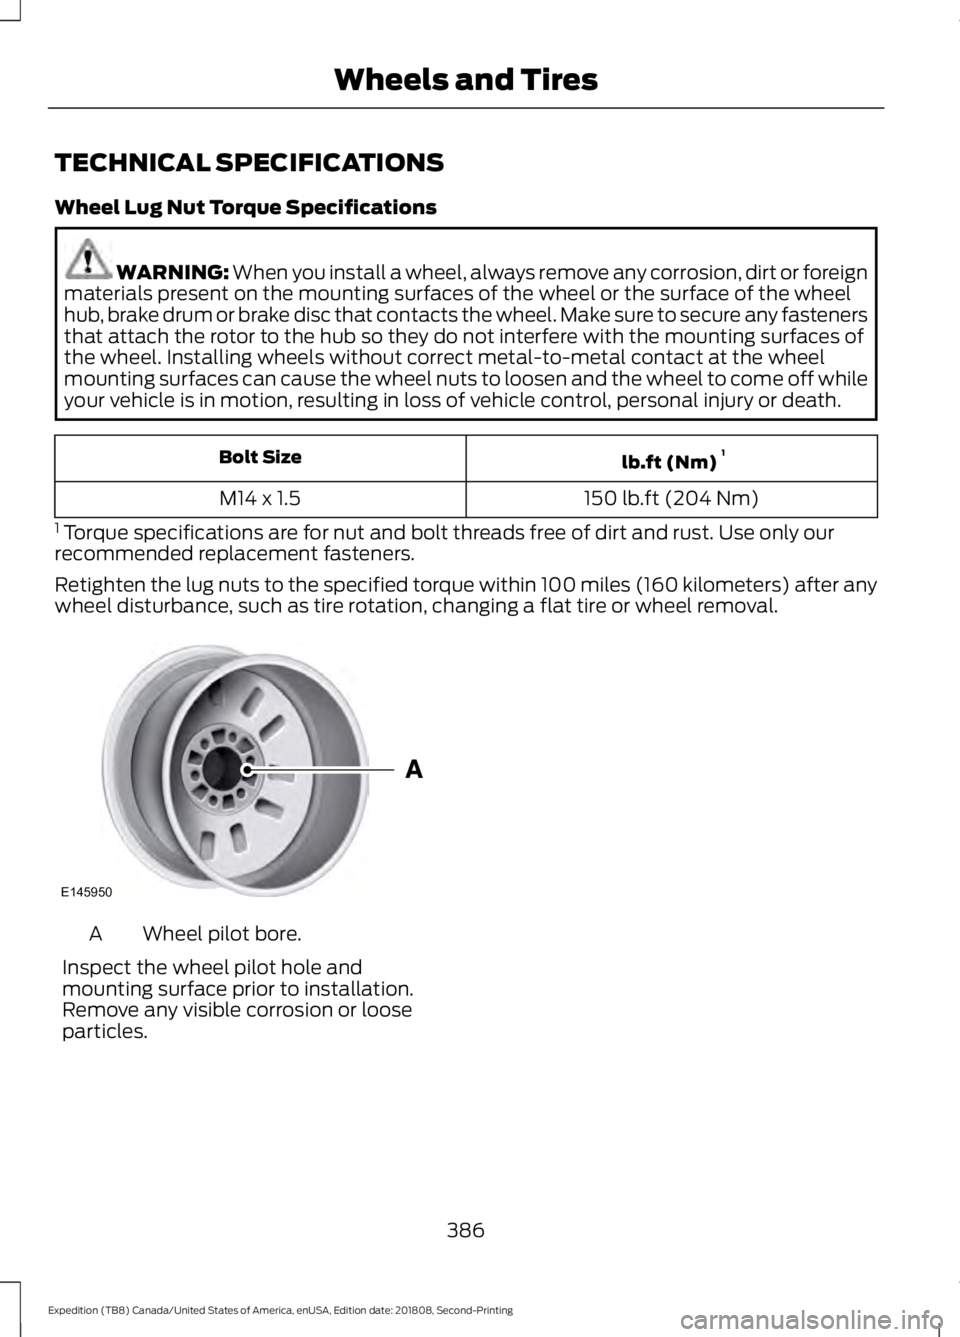
wheel disturbance, such as tire rotation, changing a flat tire or wheel removal. Wheel pilot bore.
A
Inspect the wheel pilot hole and
mounting surface prior to installation.
Remove any visible corrosion or loose
particles.
386
Expedition (TB8) Canada/United States of America, enUSA, Edition date: 201808, Second-Printing Wheels and TiresE145950
Page 511 of 583
When the oil change message appears in
the information display, it is time for an oil
change. Make sure you perform the oil
change within two weeks or 500 mi
(800 km) of the message appearing. Make
sure you reset the Intelligent Oil-Life
Monitor after each oil change. See
Oil
Change Indicator Reset (page 334).
If your information display resets
prematurely or becomes inoperative, you
should perform the oil change interval at
six months or
5,000 mi (8,000 km) from
your last oil change. Never exceed one year
or
10,000 mi (16,000 km) between oil
change intervals,
Your vehicle is very sophisticated and built
with multiple, complex, performance
systems. Every manufacturer develops
these systems using different
specifications and performance features.
That is why it is important to rely upon your
dealership to properly diagnose and repair
your vehicle.
We have recommended maintenance
intervals for various parts and component
systems based upon engineering testing.
We rely upon this testing to determine the
most appropriate mileage for replacement
of oils and fluids to protect your vehicle at
the lowest overall cost to you and
recommends against maintenance
schedules that deviate from the scheduled
maintenance information.
We strongly recommend the use of only
genuine Ford, Motorcraft or
Ford-authorized re-manufactured
replacement parts engineered for your
vehicle. Additives and Chemicals
This owner's manual and the our
Workshop Manual list the recommended
additives and chemicals for your vehicle.
We do not recommend using chemicals or
additives not approved by us as part of
your vehicle
’s normal maintenance. Please
consult your warranty information.
Oils, Fluids and Flushing
In many cases, fluid discoloration is a
normal operating characteristic and, by
itself, does not necessarily indicate a
concern or that the fluid needs to be
changed. However, a qualified expert, such
as the factory-trained technicians at your
dealership, should inspect discolored fluids
that also show signs of overheating or
foreign material contamination
immediately.
Make sure to change your vehicle ’s oils and
fluids at the specified intervals or in
conjunction with a repair. Flushing is a
viable way to change fluid for many vehicle
sub-systems during scheduled
maintenance. It is critical that systems are
flushed only with new fluid that is the same
as that required to fill and operate the
system or using a Ford-approved flushing
chemical.
Owner Checks and Services
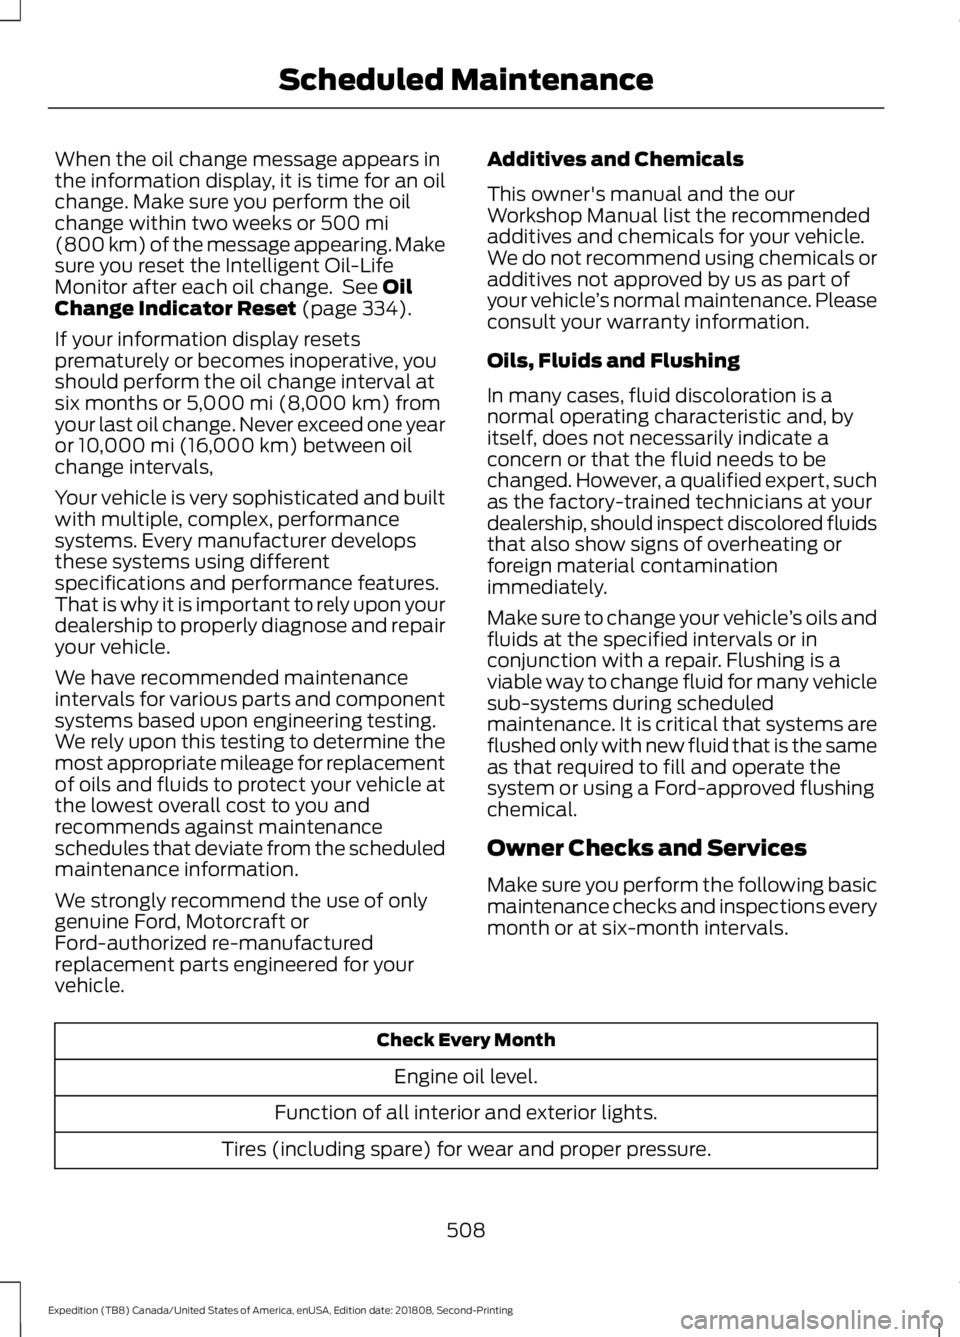
Make sure you perform the following basic
maintenance checks and inspections every
month or at six-month intervals. Check Every Month
Engine oil level.
Function of all interior and exterior lights.
Tires (including spare) for wear and proper pressure.
508
Expedition (TB8) Canada/United States of America, enUSA, Edition date: 201808, Second-Printing Scheduled Maintenance
Page 513 of 583
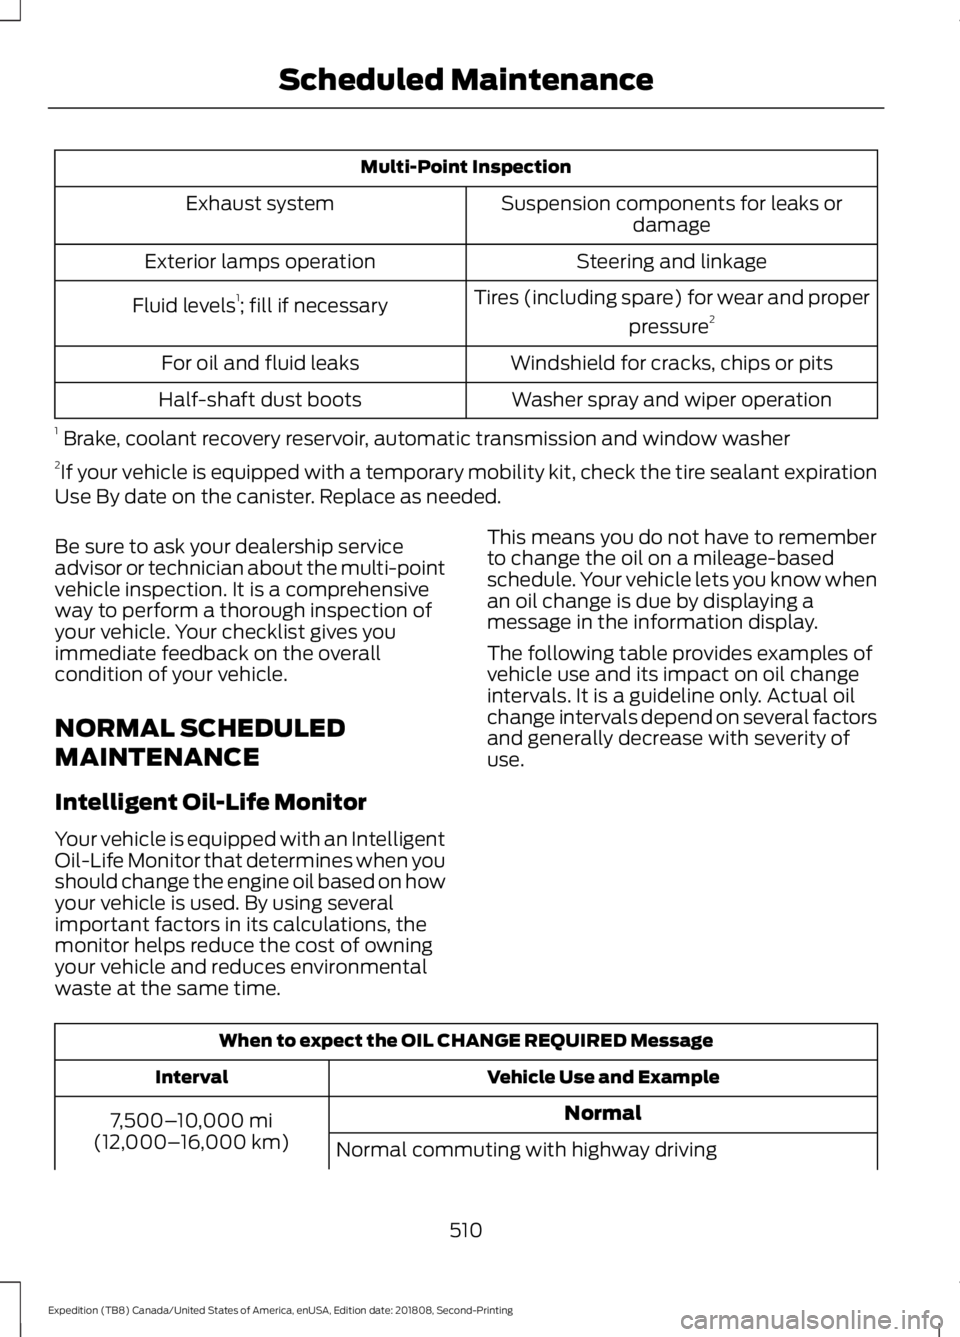
Multi-Point Inspection
Suspension components for leaks ordamage
Exhaust system
Steering and linkage
Exterior lamps operation
Tires (including spare) for wear and properpressure2
Fluid levels 1
; fill if necessary
Windshield for cracks, chips or pits
For oil and fluid leaks
Washer spray and wiper operation
Half-shaft dust boots
1 Brake, coolant recovery reservoir, automatic transmission and window washer
2 If your vehicle is equipped with a temporary mobility kit, check the tire sealant expiration
Use By date on the canister. Replace as needed.
Be sure to ask your dealership service
advisor or technician about the multi-point
vehicle inspection. It is a comprehensive
way to perform a thorough inspection of
your vehicle. Your checklist gives you
immediate feedback on the overall
condition of your vehicle.
NORMAL SCHEDULED
MAINTENANCE
Intelligent Oil-Life Monitor
Your vehicle is equipped with an Intelligent
Oil-Life Monitor that determines when you
should change the engine oil based on how
your vehicle is used. By using several
important factors in its calculations, the
monitor helps reduce the cost of owning
your vehicle and reduces environmental
waste at the same time. This means you do not have to remember
to change the oil on a mileage-based
schedule. Your vehicle lets you know when
an oil change is due by displaying a
message in the information display.
The following table provides examples of
vehicle use and its impact on oil change
intervals. It is a guideline only. Actual oil
change intervals depend on several factors
and generally decrease with severity of
use.
When to expect the OIL CHANGE REQUIRED Message
Vehicle Use and Example
Interval
Normal
7,500– 10,000 mi
(12,000– 16,000 km)
Normal commuting with highway driving
510
Expedition (TB8) Canada/United States of America, enUSA, Edition date: 201808, Second-Printing Scheduled Maintenance
Page 514 of 583
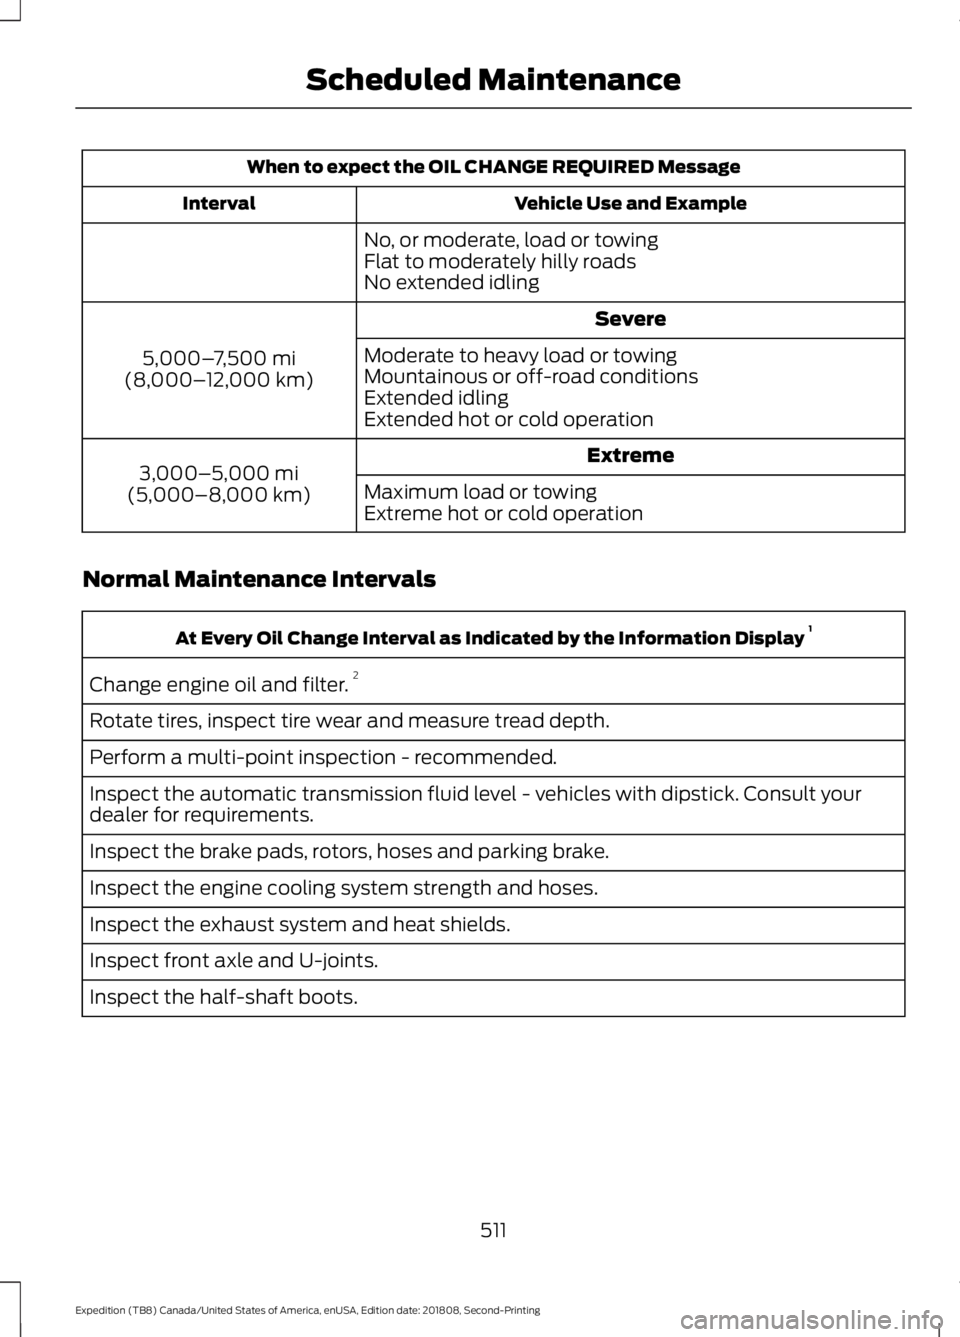
When to expect the OIL CHANGE REQUIRED Message
Vehicle Use and Example
Interval
No, or moderate, load or towing
Flat to moderately hilly roads
No extended idling Severe
5,000– 7,500 mi
(8,000– 12,000 km) Moderate to heavy load or towing
Mountainous or off-road conditions
Extended idling
Extended hot or cold operation
Extreme
3,000–5,000 mi
(5,000–8,000 km) Maximum load or towing
Extreme hot or cold operation
Normal Maintenance Intervals At Every Oil Change Interval as Indicated by the Information Display
1
Change engine oil and filter. 2
Rotate tires, inspect tire wear and measure tread depth.
Perform a multi-point inspection - recommended.
Inspect the automatic transmission fluid level - vehicles with dipstick. Consult your
dealer for requirements.
Inspect the brake pads, rotors, hoses and parking brake.
Inspect the engine cooling system strength and hoses.
Inspect the exhaust system and heat shields.
Inspect front axle and U-joints.
Inspect the half-shaft boots.
511
Expedition (TB8) Canada/United States of America, enUSA, Edition date: 201808, Second-Printing Scheduled Maintenance
Page 517 of 583
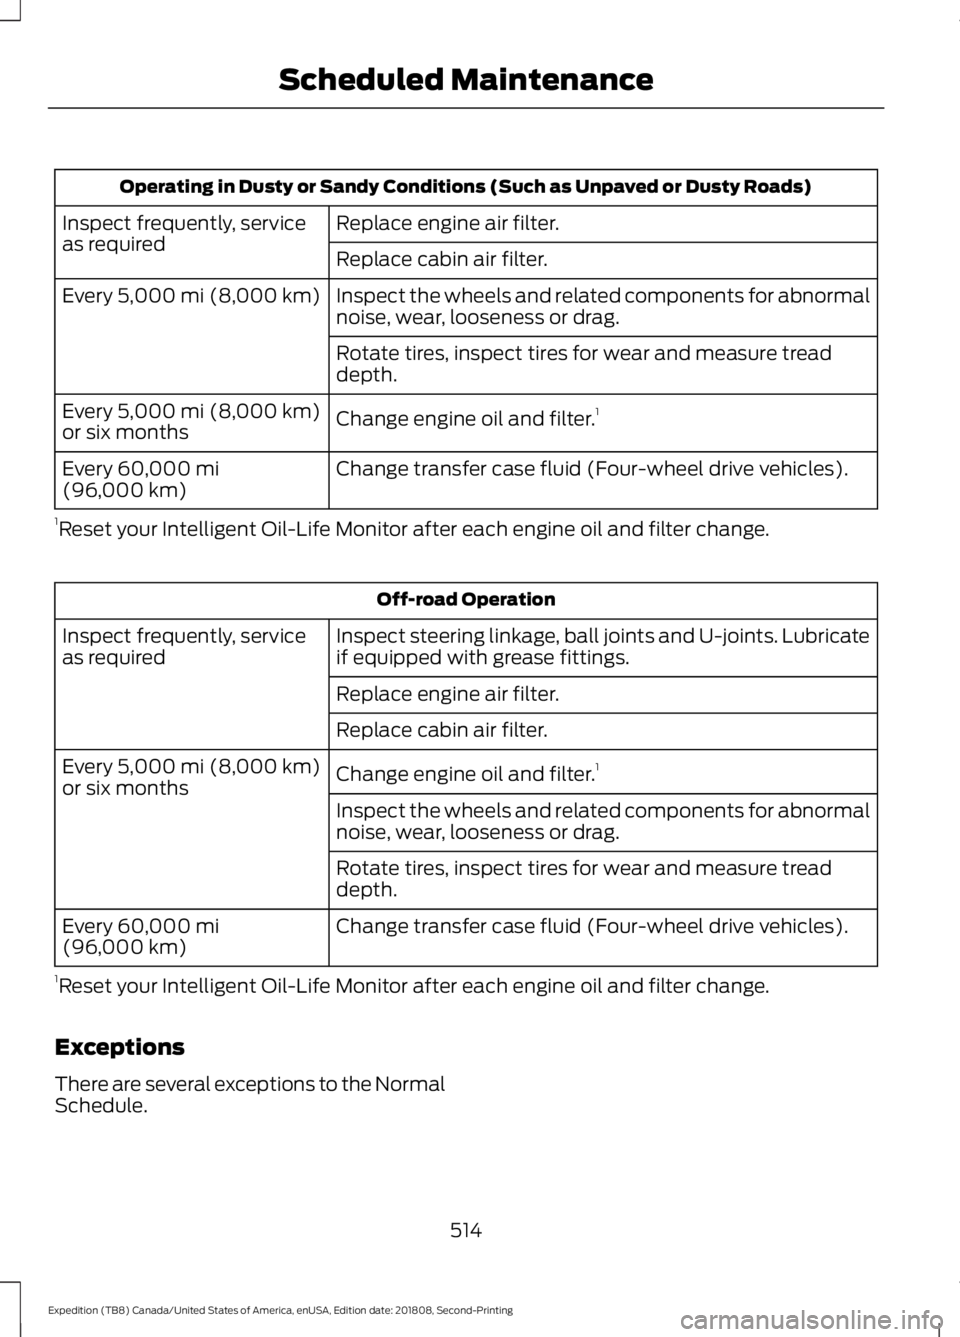
Operating in Dusty or Sandy Conditions (Such as Unpaved or Dusty Roads)
Replace engine air filter.
Inspect frequently, service
as required
Replace cabin air filter.
Inspect the wheels and related components for abnormal
noise, wear, looseness or drag.
Every 5,000 mi (8,000 km)
Rotate tires, inspect tires for wear and measure tread
depth.
Change engine oil and filter. 1
Every
5,000 mi (8,000 km)
or six months
Change transfer case fluid (Four-wheel drive vehicles).
Every
60,000 mi
(96,000 km)
1 Reset your Intelligent Oil-Life Monitor after each engine oil and filter change. Off-road Operation
Inspect steering linkage, ball joints and U-joints. Lubricate
if equipped with grease fittings.
Inspect frequently, service
as required
Replace engine air filter.
Replace cabin air filter.
Change engine oil and filter.1
Every
5,000 mi (8,000 km)
or six months
Inspect the wheels and related components for abnormal
noise, wear, looseness or drag.
Rotate tires, inspect tires for wear and measure tread
depth.
Change transfer case fluid (Four-wheel drive vehicles).
Every
60,000 mi
(96,000 km)
1 Reset your Intelligent Oil-Life Monitor after each engine oil and filter change.
Exceptions
There are several exceptions to the Normal
Schedule.
514
Expedition (TB8) Canada/United States of America, enUSA, Edition date: 201808, Second-Printing Scheduled Maintenance