2019 FORD EXPEDITION lock
[x] Cancel search: lockPage 135 of 583
Action
Message
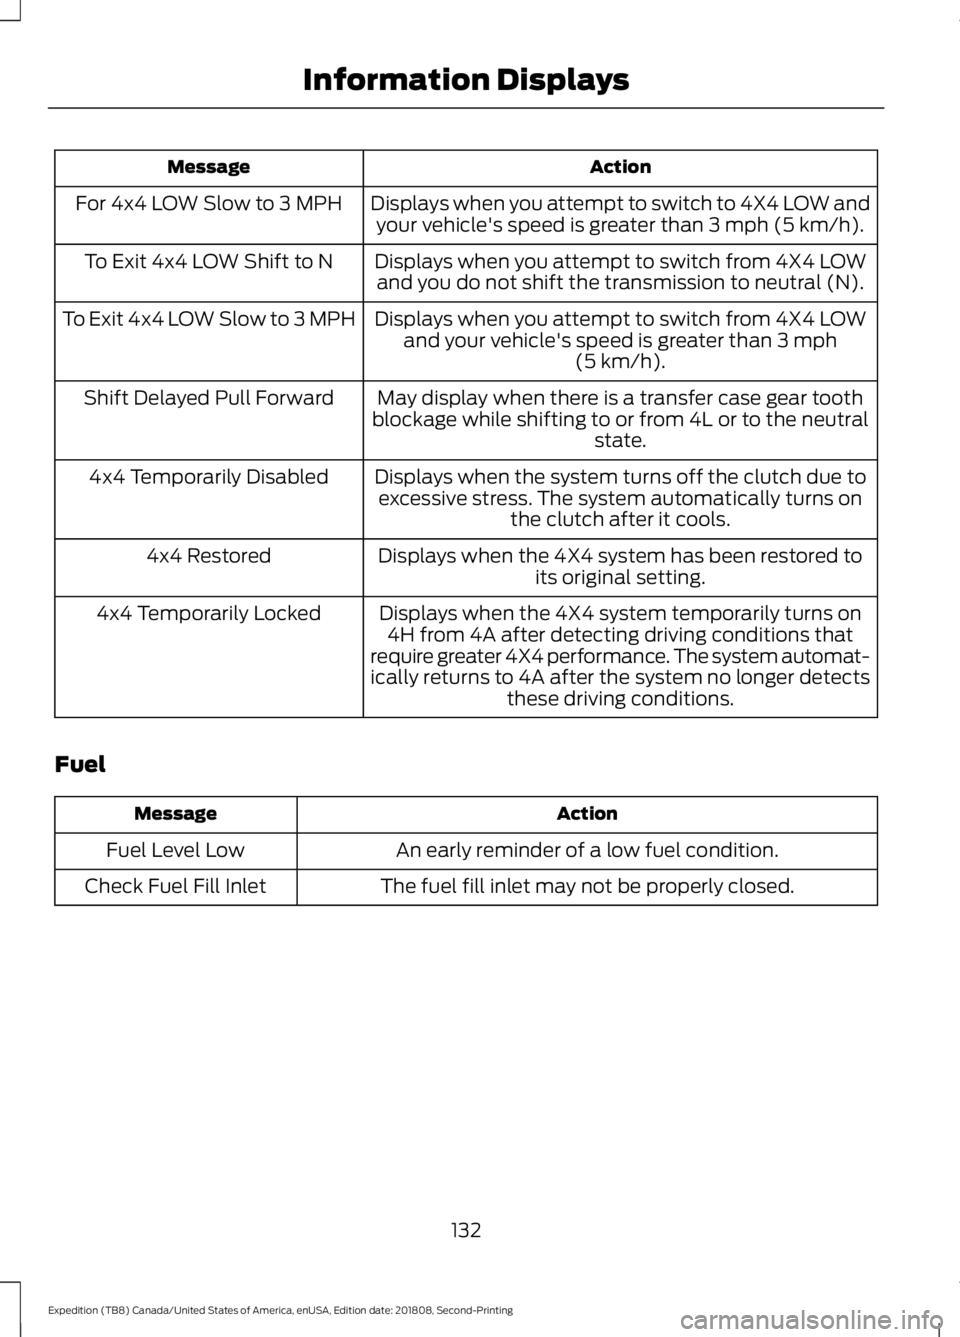
Displays when you attempt to switch to 4X4 LOW andyour vehicle's speed is greater than 3 mph (5 km/h).
For 4x4 LOW Slow to 3 MPH
Displays when you attempt to switch from 4X4 LOWand you do not shift the transmission to neutral (N).
To Exit 4x4 LOW Shift to N
Displays when you attempt to switch from 4X4 LOWand your vehicle's speed is greater than
3 mph
(5 km/h).
To Exit 4x4 LOW Slow to 3 MPH
May display when there is a transfer case gear tooth
blockage while shifting to or from 4L or to the neutral state.
Shift Delayed Pull Forward
Displays when the system turns off the clutch due toexcessive stress. The system automatically turns on the clutch after it cools.
4x4 Temporarily Disabled
Displays when the 4X4 system has been restored toits original setting.
4x4 Restored
Displays when the 4X4 system temporarily turns on4H from 4A after detecting driving conditions that
require greater 4X4 performance. The system automat-
ically returns to 4A after the system no longer detects these driving conditions.
4x4 Temporarily Locked
Fuel Action
Message
An early reminder of a low fuel condition.
Fuel Level Low
The fuel fill inlet may not be properly closed.
Check Fuel Fill Inlet
132
Expedition (TB8) Canada/United States of America, enUSA, Edition date: 201808, Second-Printing Information Displays
Page 139 of 583
Action
Message
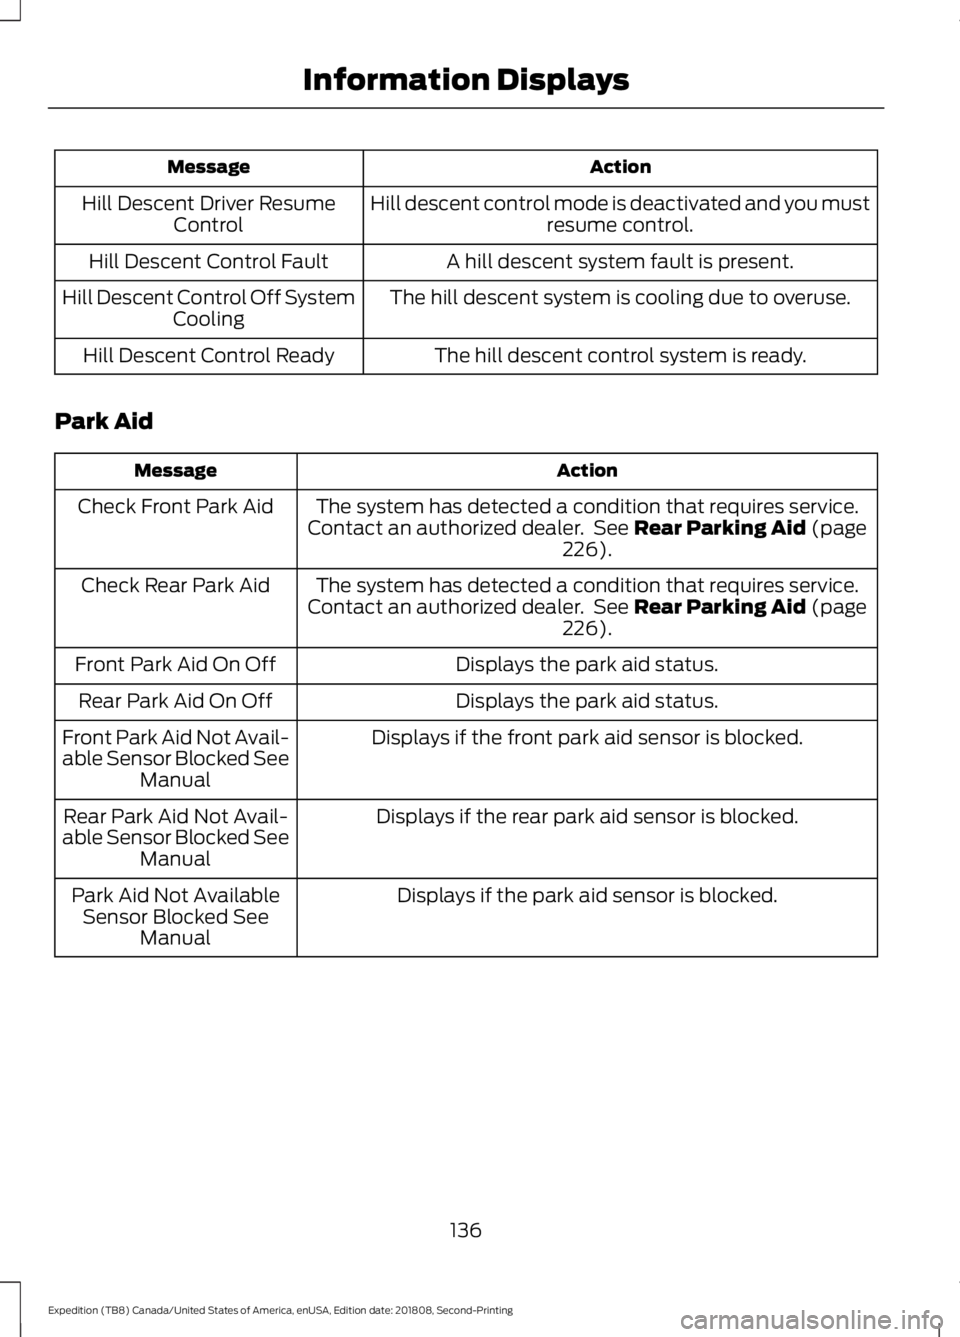
Hill descent control mode is deactivated and you mustresume control.
Hill Descent Driver Resume
Control
A hill descent system fault is present.
Hill Descent Control Fault
The hill descent system is cooling due to overuse.
Hill Descent Control Off System
Cooling
The hill descent control system is ready.
Hill Descent Control Ready
Park Aid Action
Message
The system has detected a condition that requires service.
Contact an authorized dealer. See Rear Parking Aid (page
226).
Check Front Park Aid
The system has detected a condition that requires service.
Contact an authorized dealer. See
Rear Parking Aid (page
226).
Check Rear Park Aid
Displays the park aid status.
Front Park Aid On Off
Displays the park aid status.
Rear Park Aid On Off
Displays if the front park aid sensor is blocked.
Front Park Aid Not Avail-
able Sensor Blocked See
Manual
Displays if the rear park aid sensor is blocked.
Rear Park Aid Not Avail-
able Sensor Blocked See Manual
Displays if the park aid sensor is blocked.
Park Aid Not Available
Sensor Blocked See Manual
136
Expedition (TB8) Canada/United States of America, enUSA, Edition date: 201808, Second-Printing Information Displays
Page 140 of 583
Park Brake
Action
Message
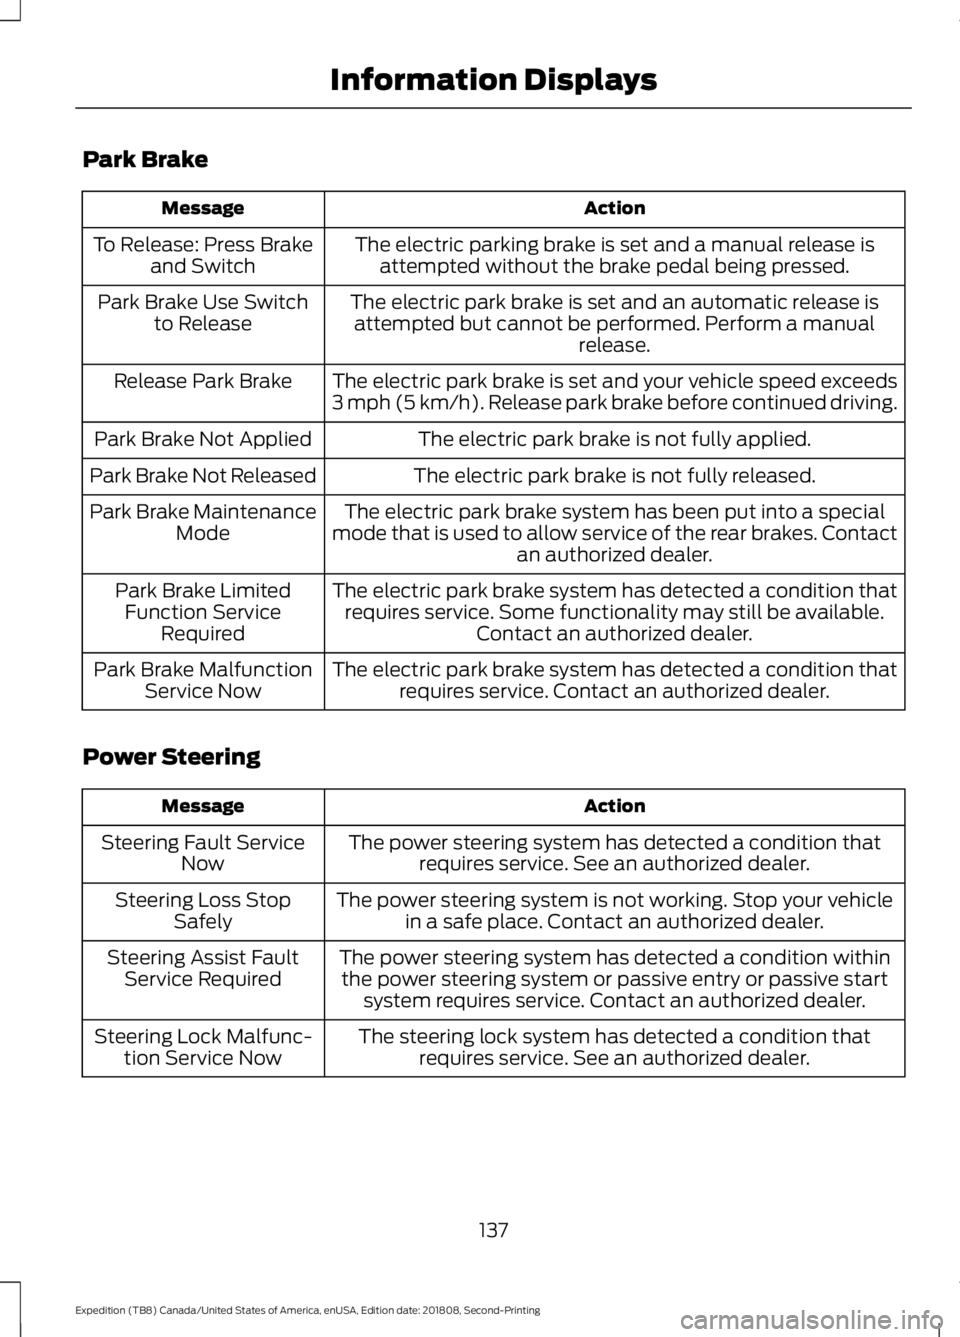
The electric parking brake is set and a manual release isattempted without the brake pedal being pressed.
To Release: Press Brake
and Switch
The electric park brake is set and an automatic release isattempted but cannot be performed. Perform a manual release.
Park Brake Use Switch
to Release
The electric park brake is set and your vehicle speed exceeds
3 mph (5 km/h). Release park brake before continued driving.
Release Park Brake
The electric park brake is not fully applied.
Park Brake Not Applied
The electric park brake is not fully released.
Park Brake Not Released
The electric park brake system has been put into a special
mode that is used to allow service of the rear brakes. Contact an authorized dealer.
Park Brake Maintenance
Mode
The electric park brake system has detected a condition thatrequires service. Some functionality may still be available. Contact an authorized dealer.
Park Brake Limited
Function Service Required
The electric park brake system has detected a condition thatrequires service. Contact an authorized dealer.
Park Brake Malfunction
Service Now
Power Steering Action
Message
The power steering system has detected a condition thatrequires service. See an authorized dealer.
Steering Fault Service
Now
The power steering system is not working. Stop your vehiclein a safe place. Contact an authorized dealer.
Steering Loss Stop
Safely
The power steering system has detected a condition withinthe power steering system or passive entry or passive start system requires service. Contact an authorized dealer.
Steering Assist Fault
Service Required
The steering lock system has detected a condition thatrequires service. See an authorized dealer.
Steering Lock Malfunc-
tion Service Now
137
Expedition (TB8) Canada/United States of America, enUSA, Edition date: 201808, Second-Printing Information Displays
Page 146 of 583
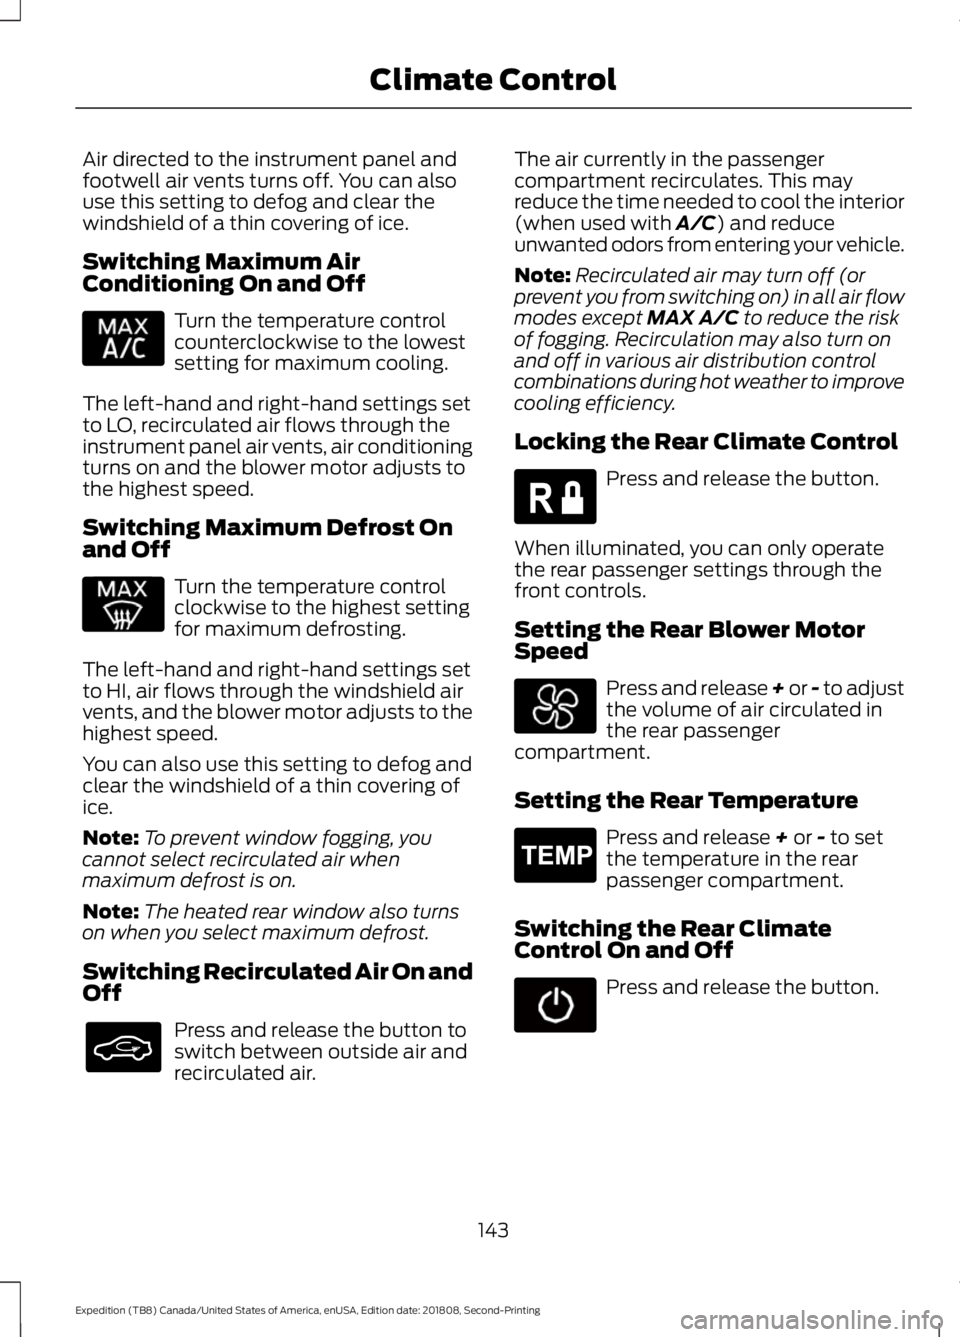
Air directed to the instrument panel and
footwell air vents turns off. You can also
use this setting to defog and clear the
windshield of a thin covering of ice.
Switching Maximum Air
Conditioning On and Off
Turn the temperature control
counterclockwise to the lowest
setting for maximum cooling.
The left-hand and right-hand settings set
to LO, recirculated air flows through the
instrument panel air vents, air conditioning
turns on and the blower motor adjusts to
the highest speed.
Switching Maximum Defrost On
and Off Turn the temperature control
clockwise to the highest setting
for maximum defrosting.
The left-hand and right-hand settings set
to HI, air flows through the windshield air
vents, and the blower motor adjusts to the
highest speed.
You can also use this setting to defog and
clear the windshield of a thin covering of
ice.
Note: To prevent window fogging, you
cannot select recirculated air when
maximum defrost is on.
Note: The heated rear window also turns
on when you select maximum defrost.
Switching Recirculated Air On and
Off Press and release the button to
switch between outside air and
recirculated air. The air currently in the passenger
compartment recirculates. This may
reduce the time needed to cool the interior
(when used with A/C) and reduce
unwanted odors from entering your vehicle.
Note: Recirculated air may turn off (or
prevent you from switching on) in all air flow
modes except
MAX A/C to reduce the risk
of fogging. Recirculation may also turn on
and off in various air distribution control
combinations during hot weather to improve
cooling efficiency.
Locking the Rear Climate Control Press and release the button.
When illuminated, you can only operate
the rear passenger settings through the
front controls.
Setting the Rear Blower Motor
Speed Press and release + or - to adjust
the volume of air circulated in
the rear passenger
compartment.
Setting the Rear Temperature Press and release
+ or - to set
the temperature in the rear
passenger compartment.
Switching the Rear Climate
Control On and Off Press and release the button.
143
Expedition (TB8) Canada/United States of America, enUSA, Edition date: 201808, Second-Printing Climate Control E266664 E265400
Page 151 of 583
Recommended Settings for Cooling
Automatic climate control
Manual climate control
Press AUTO.
Adjust the fan speed to the center
setting.
1
Adjust the temperature control to the
desired setting. Use
72°F (22°C) as a
starting point, then adjust the setting as
necessary.
Adjust the temperature control to the
midway point of the cold settings.
2
Direct air to the instrument panel using
the air distribution buttons.
3
Defogging the Side Windows in Cold Weather Automatic climate control
Manual climate control
Press the defrost button.
Direct air to the windshield using the air
distribution buttons.
1
Adjust the temperature control to the
desired setting. Use
72°F (22°C) as a
starting point, then adjust the setting as
necessary.
Press A/C.
2
Adjust the temperature control to the
desired setting.
3
Adjust the fan speed to the highest
setting.
4
REAR PASSENGER CLIMATE
CONTROLS - VEHICLES WITH:
AUTOMATIC TEMPERATURE
CONTROL
Directing Air to the Overhead Air
Vents Press and release the button to
direct airflow to the overhead air
vents. Directing Air to the Rear Footwell
Air Vents Press and release the button to
direct airflow to rear footwell air
vents.
Rear Climate Control Lock
Indicator When illuminated, you can only
operate the rear passenger
settings through the front
controls.
148
Expedition (TB8) Canada/United States of America, enUSA, Edition date: 201808, Second-Printing Climate Control
Page 153 of 583
Directing Air to the Overhead Air
Vents
Press and release the button to
direct airflow to the overhead air
vents.
Directing Air to the Rear Footwell
Air Vents Press and release the button to
direct airflow to rear footwell air
vents.
Rear Climate Control Lock
Indicator When illuminated, you can only
operate the rear passenger
settings through the front
controls.
Setting the Rear Blower Motor
Speed Turn the control to adjust the volume of
air circulated in the rear passenger
compartment. Setting the Rear Temperature
Turn the control to set the temperature in
the rear passenger compartment.
Switching the Rear Climate
Control On and Off
Press and release the button.
Switching the Rear Heated Seats
On and Off (If Equipped) See
Heated Seats (page 166).
HEATED WINDSHIELD
(IF
EQUIPPED)
Windshield Wiper De-Icer
The windshield wiper de-icer turns on in
low temperatures.
150
Expedition (TB8) Canada/United States of America, enUSA, Edition date: 201808, Second-Printing Climate Control E265389 E265862
Page 157 of 583
WARNING: The head restraint is
a safety device. Whenever possible it
should be installed and properly
adjusted when the seat is occupied.
Failure to adjust the head restraint
properly could reduce its effectiveness
during certain impacts.
Note: Adjust the seat backrest to an upright
driving position before adjusting the head
restraint. Adjust the head restraint so that
the top of it is level with the top of your head
and as far forward as possible. Make sure
that you remain comfortable. If you are
extremely tall, adjust the head restraint to
its highest position.
Front Seat Manual Head
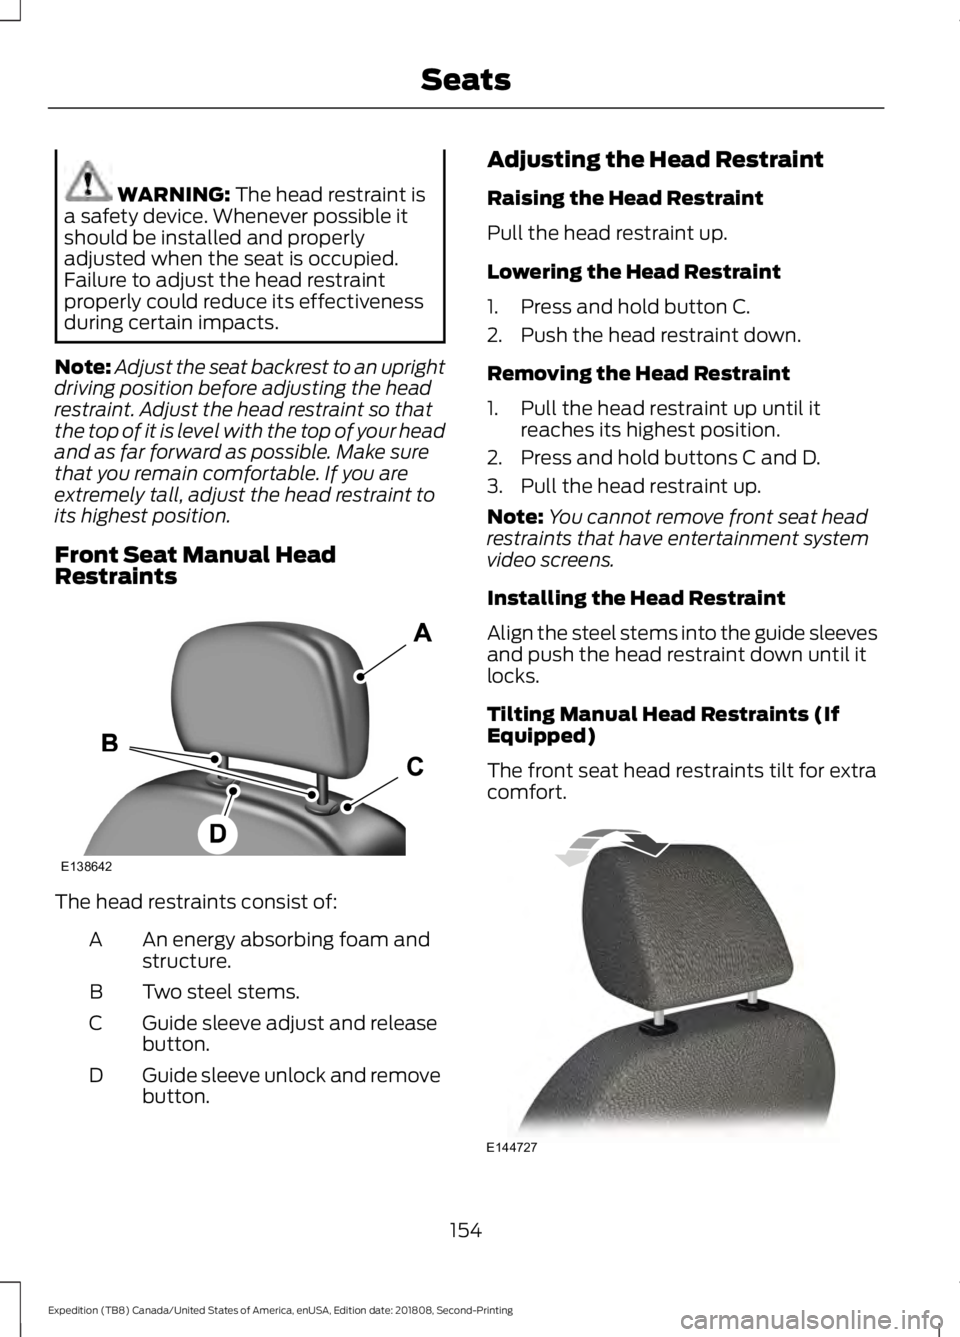
Restraints The head restraints consist of:
An energy absorbing foam and
structure.
A
Two steel stems.
B
Guide sleeve adjust and release
button.
C
Guide sleeve unlock and remove
button.
D Adjusting the Head Restraint
Raising the Head Restraint
Pull the head restraint up.
Lowering the Head Restraint
1. Press and hold button C.
2. Push the head restraint down.
Removing the Head Restraint
1. Pull the head restraint up until it
reaches its highest position.
2. Press and hold buttons C and D.
3. Pull the head restraint up.
Note: You cannot remove front seat head
restraints that have entertainment system
video screens.
Installing the Head Restraint
Align the steel stems into the guide sleeves
and push the head restraint down until it
locks.
Tilting Manual Head Restraints (If
Equipped)
The front seat head restraints tilt for extra
comfort. 154
Expedition (TB8) Canada/United States of America, enUSA, Edition date: 201808, Second-Printing SeatsE138642 E144727
Page 158 of 583
1. Adjust the seat backrest to an upright
driving or riding position.
2. Pivot the head restraint forward toward
your head to the desired position.
After the head restraint reaches the
forward-most tilt position, pivot it forward
again to release it to the rearward, un-tilted
position.
Second Row Outermost Head
Restraints
The outermost head restraints are
non-adjustable, but you can fold them
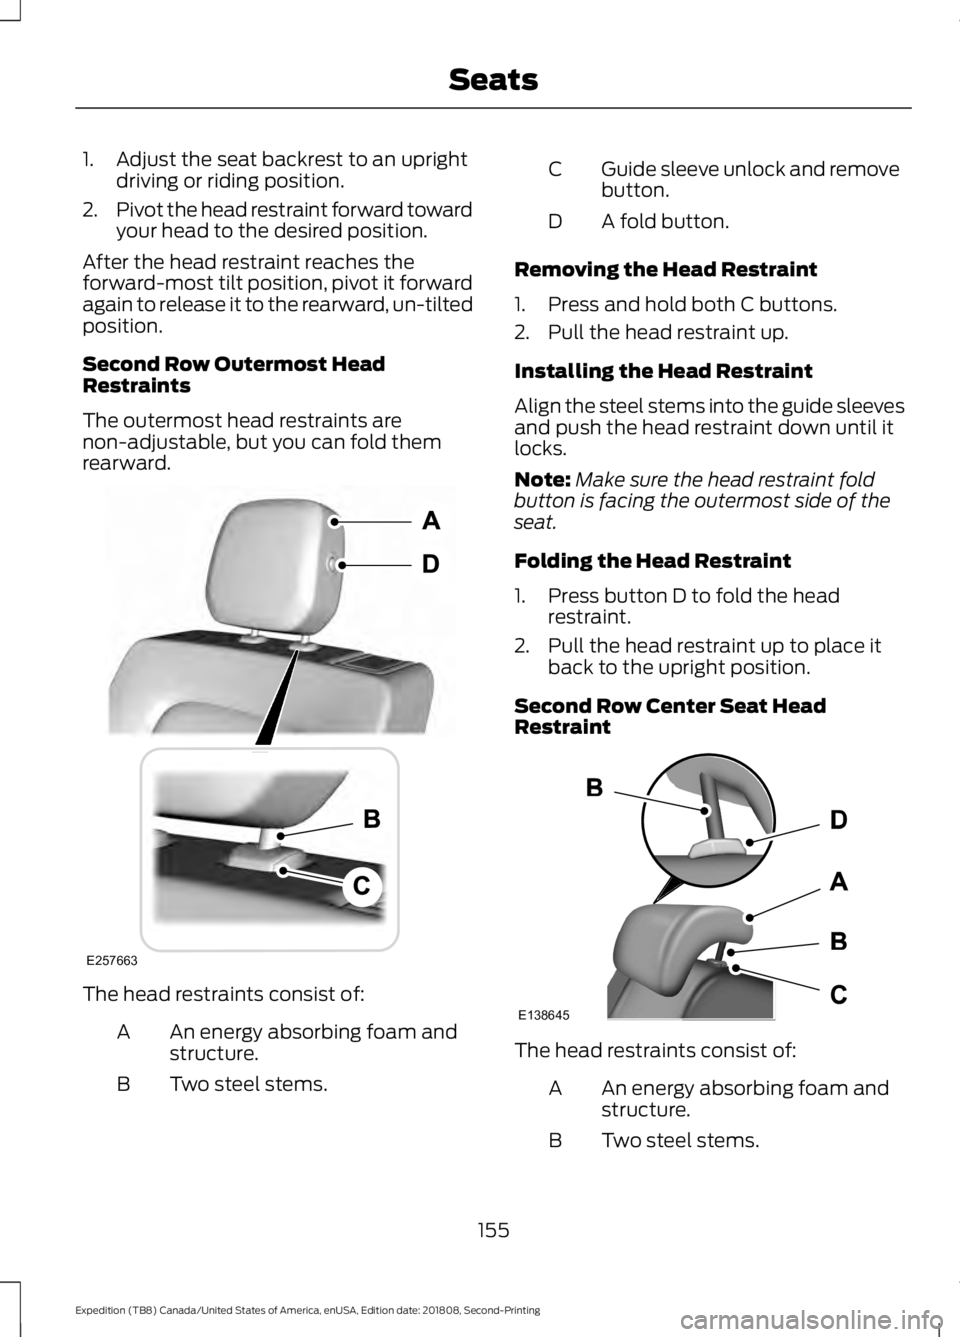
rearward. The head restraints consist of:
An energy absorbing foam and
structure.
A
Two steel stems.
B Guide sleeve unlock and remove
button.
C
A fold button.
D
Removing the Head Restraint
1. Press and hold both C buttons.
2. Pull the head restraint up.
Installing the Head Restraint
Align the steel stems into the guide sleeves
and push the head restraint down until it
locks.
Note: Make sure the head restraint fold
button is facing the outermost side of the
seat.
Folding the Head Restraint
1. Press button D to fold the head restraint.
2. Pull the head restraint up to place it back to the upright position.
Second Row Center Seat Head
Restraint The head restraints consist of:
An energy absorbing foam and
structure.
A
Two steel stems.
B
155
Expedition (TB8) Canada/United States of America, enUSA, Edition date: 201808, Second-Printing SeatsE257663 E138645