2019 FORD EDGE flat tires
[x] Cancel search: flat tiresPage 343 of 547

WARNING: Never place anything
between the vehicle jack and your
vehicle. WARNING:
Never place anything
between the vehicle jack and the ground. WARNING:
Park your vehicle so
that you do not obstruct the flow of
traffic or place yourself in any danger and
set up a warning triangle. WARNING:
Do not get under a
vehicle that is only supported by a
vehicle jack. WARNING:
Do not attempt to
change a tire on the side of the vehicle
close to moving traffic. Pull far enough
off the road to avoid the danger of being
hit when operating the jack or changing
the wheel. WARNING:
Use only the specified
jacking points. If you use other positions,
you may damage the body, steering,
suspension, engine, braking system or
the fuel lines. WARNING:
Always use the jack
provided as original equipment with your
vehicle. If using a jack other than the one
provided, make sure the jack capacity is
adequate for the vehicle weight,
including any vehicle cargo or
modifications. If you are unsure if the jack
capacity is adequate, contact the
authorized dealer. WARNING: The jack supplied with
this vehicle is only intended for changing
wheels. Do not use the vehicle jack other
than when you are changing a wheel in
an emergency. WARNING:
Make sure there is no
grease or oil on the threads or the
surface between the wheel lugs and
nuts. This can cause the lug nuts to
loosen while driving. Note:
The jack does not require
maintenance or additional lubrication over
the service life of your vehicle.
Note: Passengers should not remain in your
vehicle when the vehicle is being jacked.
1. Park on a level surface, set the parking
brake and activate the hazard flashers.
2. Place the transmission in park (P) and
turn the engine off. 3. Block both the front and rear of the
wheel diagonally opposite the flat tire.
For example, if the left front tire is flat,
block the right rear wheel.
340
Edge (CDQ) Canada/United States of America, enUSA, Edition date: 201806, Third-Printing- Wheels and TiresE166722 E175447
Page 345 of 547

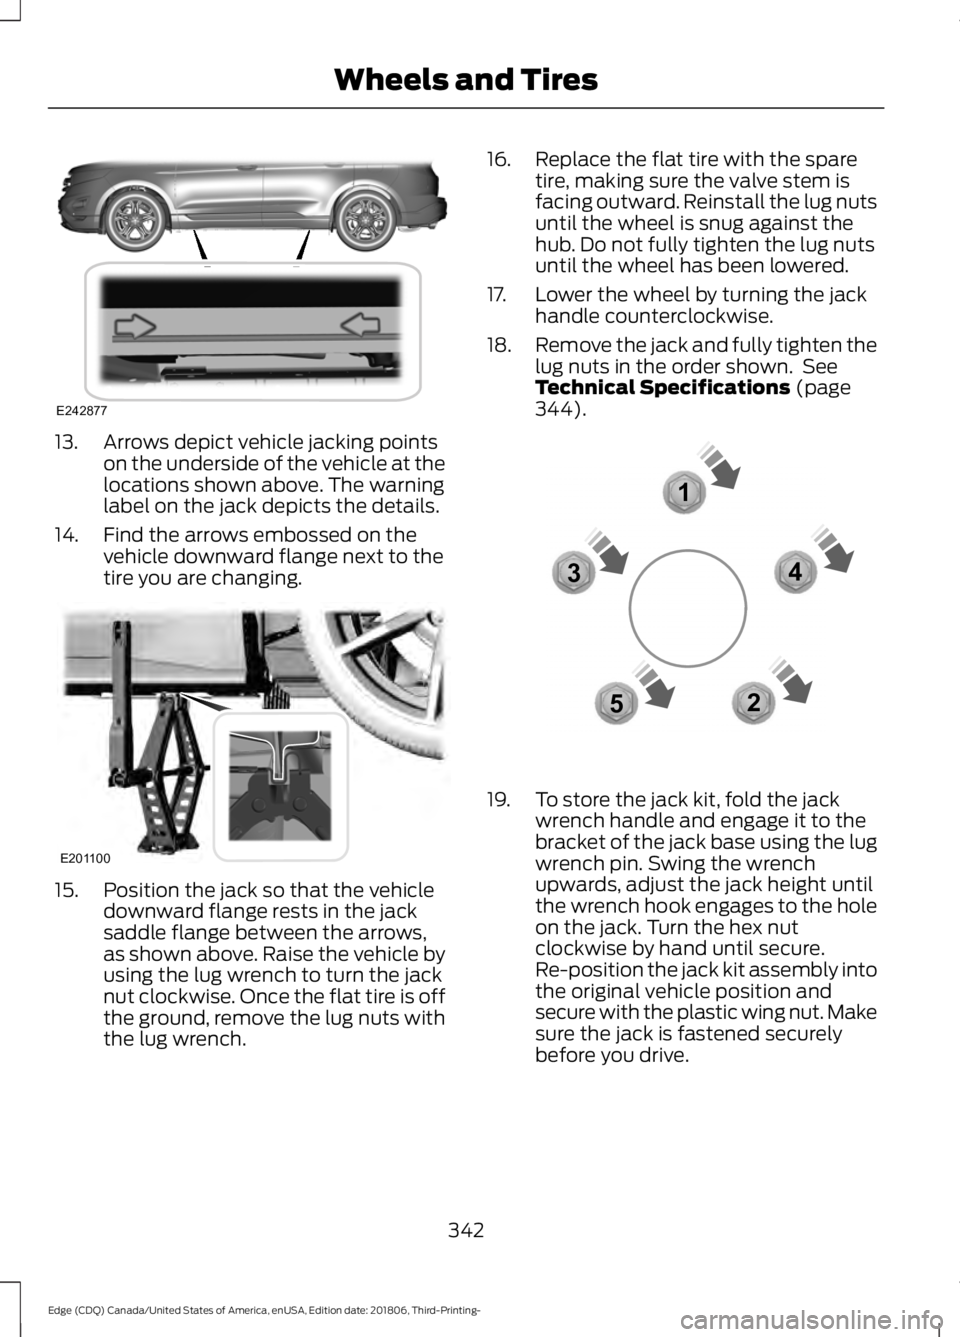
13. Arrows depict vehicle jacking points
on the underside of the vehicle at the
locations shown above. The warning
label on the jack depicts the details.
14. Find the arrows embossed on the vehicle downward flange next to the
tire you are changing.15. Position the jack so that the vehicle
downward flange rests in the jack
saddle flange between the arrows,
as shown above. Raise the vehicle by
using the lug wrench to turn the jack
nut clockwise. Once the flat tire is off
the ground, remove the lug nuts with
the lug wrench. 16. Replace the flat tire with the spare
tire, making sure the valve stem is
facing outward. Reinstall the lug nuts
until the wheel is snug against the
hub. Do not fully tighten the lug nuts
until the wheel has been lowered.
17. Lower the wheel by turning the jack handle counterclockwise.
18. Remove the jack and fully tighten the
lug nuts in the order shown. See
Technical Specifications (page
344). 19. To store the jack kit, fold the jack
wrench handle and engage it to the
bracket of the jack base using the lug
wrench pin. Swing the wrench
upwards, adjust the jack height until
the wrench hook engages to the hole
on the jack. Turn the hex nut
clockwise by hand until secure.
Re-position the jack kit assembly into
the original vehicle position and
secure with the plastic wing nut. Make
sure the jack is fastened securely
before you drive.
342
Edge (CDQ) Canada/United States of America, enUSA, Edition date: 201806, Third-Printing- Wheels and TiresE242877 E201100 12
3
4
5E306781
Page 346 of 547

20. Unblock the wheel and retrieve the
warning triangle.
Stowing the flat tire
You cannot store the full-sized road wheel
in the temporary spare tire well.
1. Find the flat tire retainer strap tucked inside the jack channel. Lower the
carpeted load floor.
2. Stow the flat tire in the cargo area on the load floor with the wheel facing up.
Secure the flat tire with the retainer
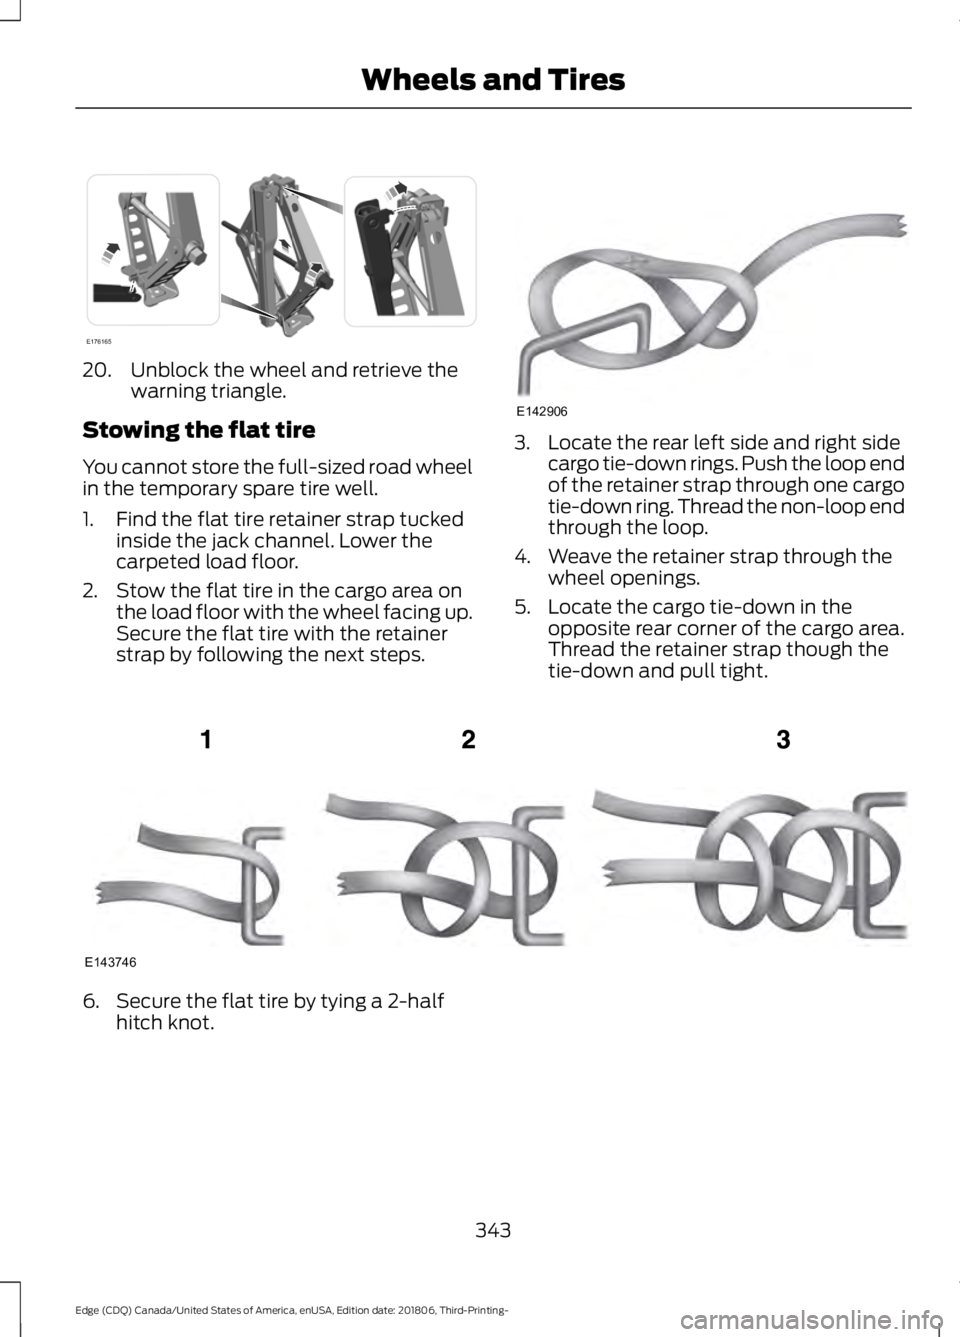
strap by following the next steps. 3. Locate the rear left side and right side
cargo tie-down rings. Push the loop end
of the retainer strap through one cargo
tie-down ring. Thread the non-loop end
through the loop.
4. Weave the retainer strap through the wheel openings.
5. Locate the cargo tie-down in the opposite rear corner of the cargo area.
Thread the retainer strap though the
tie-down and pull tight. 6. Secure the flat tire by tying a 2-half
hitch knot.
343
Edge (CDQ) Canada/United States of America, enUSA, Edition date: 201806, Third-Printing- Wheels and TiresE176165 E142906 E143746
Page 347 of 547

TECHNICAL SPECIFICATIONS
Wheel Lug Nut Torque Specifications
WARNING: When a wheel is installed, always remove any corrosion, dirt or foreign
materials present on the mounting surfaces of the wheel or the surface of the wheel
hub, brake drum or brake disc that contacts the wheel. Make sure that any fasteners
that attach the rotor to the hub are secured so they do not interfere with the mounting
surfaces of the wheel. Installing wheels without correct metal-to-metal contact at the
wheel mounting surfaces can cause the wheel nuts to loosen and the wheel to come
off while your vehicle is in motion, resulting in loss of control. lb.ft (Nm)*
Bolt size
162 lb.ft (220 Nm)
M14 x 1.5
*Torque specifications are for nut and bolt threads free of dirt and rust. Use only Ford
recommended replacement fasteners.
Retighten the lug nuts to the specified torque within 100 miles (160 kilometers) after any
wheel disturbance (such as tire rotation, changing a flat tire, wheel removal). Wheel pilot bore
A
Inspect the wheel pilot hole and
mounting surface prior to installation.
Remove any visible corrosion or loose
particles.
344
Edge (CDQ) Canada/United States of America, enUSA, Edition date: 201806, Third-Printing- Wheels and TiresE145950
Page 479 of 547

When to expect the OIL CHANGE REQUIRED Message
Vehicle Use and Example
Interval
No, or moderate, load or towing
Flat to moderately hilly roads
No extended idling Severe
5,000– 7,500 mi
(8,000– 12,000 km) Moderate to heavy load or towing
Mountainous or off-road conditions
Extended idling
Extended hot or cold operation
Extreme
3,000–5,000 mi
(5,000–8,000 km) Maximum load or towing
Extreme hot or cold operation
Normal Maintenance Intervals At Every Oil Change Interval as Indicated by the Information Display
1
Change engine oil and filter. 2
Rotate the tires.
Perform a multi-point inspection (recommended).
Inspect the automatic transmission fluid level (if equipped with a dipstick). Consult
your dealer for requirements.
Inspect the brake pads, rotors, hoses and parking brake.
Inspect the engine cooling system strength and hoses.
Inspect the exhaust system and heat shields.
Inspect the rear axle and U-joints (All-wheel Drive only).
Inspect the half-shaft boots.
Inspect the steering linkage, ball joints, suspension, tie-rod ends, driveshaft and U-joints
(All-wheel Drive only).
476
Edge (CDQ) Canada/United States of America, enUSA, Edition date: 201806, Third-Printing- Scheduled Maintenance
Page 544 of 547

Display...................................................................
453
General.................................................................. 450
Media Player......................................................... 441
Mobile Apps........................................................ 449
Navigation............................................................. 447
Phone..................................................................... 442
Radio...................................................................... 446
SiriusXM................................................................ 447
Sound.................................................................... 440
Valet Mode........................................................... 454
Vehicle................................................................... 452
Voice Control....................................................... 453
Wi-Fi & Hotspot.................................................. 451
Side Airbags
.....................................................45
Side Sensing System..................................194
Obstacle Distance Indicator........................... 195
Sitting in the Correct Position..................135
Snow Chains See: Using Snow Chains.................................. 331
Spare Wheel See: Changing a Road Wheel....................... 338
Special Notices
................................................14
New Vehicle Limited Warranty......................... 14
On Board Diagnostics Data Link Connector............................................................ 15
Special Instructions.............................................. 14
Special Operating Conditions Scheduled Maintenance...............................................478
Exceptions............................................................ 479
Speed Control See: Cruise Control............................................ 207
Stability Control
............................................189
Principle of Operation...................................... 189
Starting a Gasoline Engine
.......................156
Automatic Engine Shutdown......................... 157
Failure to Start...................................................... 157
Guarding Against Exhaust Fumes................158
Important Ventilating Information..............158
Stopping the Engine When Your Vehicle is Moving............................................................... 158
Stopping the Engine When Your Vehicle is Stationary......................................................... 158
Starting and Stopping the Engine..........155 General Information.......................................... 155
Steering...........................................................235 Adaptive Learning............................................. 236
Electric Power Steering................................... 235
Steering Wheel................................................73 Storage Compartments
.............................154
Sunroof See: Moonroof...................................................... 89
Sun Visors.........................................................89 Illuminated Vanity Mirror................................... 89
Supplementary Restraints System.........40 Principle of Operation........................................ 40
Symbols Glossary
.............................................7
SYNC™ 3.........................................................391 General Information.......................................... 391
SYNC™ 3 Troubleshooting......................454
SYNC™ Applications and Services........................................................378
911 Assist............................................................... 378
SYNC Mobile Apps........................................... 380
SYNC™............................................................374 General Information.......................................... 374
SYNC™ Troubleshooting
.........................382
T
Technical Specifications See: Capacities and Specifications............345
The Better Business Bureau (BBB) Auto Line Program (U.S. Only).......................263
Tire Care
...........................................................315
Glossary of Tire Terminology......................... 318
Important Information About Low-Profile Tires..................................................................... 315
Important Information About Sport Tires and Wheels...................................................... 315
Information About Uniform Tire Quality Grading.............................................................. 316
Information Contained on the Tire Sidewall............................................................ 319
Notice to Crossover Vehicle Owners...........316
Temperature A B C.............................................. 317
Tire Rotation........................................................ 330
Traction AA A B C................................................ 317
Treadwear.............................................................. 317
Tire Inflation When Punctured See: Tire Sealant and Inflator Kit................308
Tire Pressure Monitoring System...........332 Changing Tires With a Tire Pressure
Monitoring System....................................... 333
Understanding Your Tire Pressure Monitoring System ...................................... 333
541
Edge (CDQ) Canada/United States of America, enUSA, Edition date: 201806, Third-Printing- Index
Page 545 of 547

Tire Repair Kit
See: Tire Sealant and Inflator Kit................308
Tire Sealant and Inflator Kit....................308
First Stage: Inflating the Tire with Sealing
Compound and Air........................................ 310
General Information......................................... 309
Second Stage: Checking Tire Pressure............................................................. 312
Tips for Use of the Kit...................................... 309
What to Do After the Tire Has Been Sealed................................................................ 313
What to do When a Tire Is Punctured........310
Tires See: Wheels and Tires..................................... 307
Towing a Trailer.............................................247 Load Placement................................................. 247
Towing the Vehicle on Four Wheels - 2.0L.................................................................252
Emergency Towing............................................ 252
Recreational Towing......................................... 252
Towing the Vehicle on Four Wheels - 2.7L.................................................................252
Emergency Towing............................................ 252
Recreational Towing......................................... 252
Towing..............................................................247
Traction Control............................................188 Principle of Operation...................................... 188
Trailer Sway Control...................................248
Transmission Code Designation
............349
Transmission...................................................173
Transporting the Vehicle..........................260
Type Approvals
.............................................518
China...................................................................... 529
Radio Frequency Certification for Keys and Remote Controls........................................... 529
Radio Frequency Certifications for Blind Spot Information System........................... 527
Radio Frequency Certifications for Body Control Module.............................................. 529
Radio Frequency Certifications for Cruise Control Module.............................................. 529
Radio Frequency Certifications for Mid Range Radar.................................................... 521
Radio Frequency Certifications for Passive Anti-Theft System........................................ 522
Radio Frequency Certifications for Radio Transceiver Module...................................... 525Radio Frequency Certifications for SYNC
3........................................................................\
... 528
Radio Frequency Certifications for Tire Pressure Monitoring Sensor(s)................518
Radio Frequency Certifications for Wireless Charging........................................................... 528
Radio Frequency Statement for Audio Unit..................................................................... 529
U
Under Hood Overview - 2.0L EcoBoost™.................................................282
Under Hood Overview - 2.7L EcoBoost™.................................................283
Unique Driving Characteristics................160
Universal Garage Door Opener...............146 HomeLink Wireless Control System...........146
USB Port
..........................................................372
Using Adaptive Cruise Control - Vehicles With: Adaptive Cruise Control With
Stop and Go/Lane Centering................215
Automatic Cancellation................................... 219
Blocked Sensor................................................... 220
Canceling the Set Speed................................. 218
Changing the Set Speed.................................. 218
Detection Issues.................................................. 219
Following a Vehicle............................................. 217
Following a Vehicle to a Complete Stop..................................................................... 217
Hilly Condition Usage........................................ 219
Overriding the Set Speed................................ 218
Park Brake Application..................................... 219
Resuming the Set Speed................................. 218
Setting the Adaptive Cruise Speed..............216
Setting the Adaptive Cruise Speed When Your Vehicle is Stationary........................... 216
Setting the Gap Distance................................. 217
Switching Adaptive Cruise Control Off........................................................................\
219
Switching Adaptive Cruise Control On........................................................................\
216
Switching to Normal Cruise Control...........222
System Not Available...................................... 220
Using Lane Centering....................................... 222
542
Edge (CDQ) Canada/United States of America, enUSA, Edition date: 201806, Third-Printing- Index