2019 FORD E-350 battery
[x] Cancel search: batteryPage 137 of 329

Protected Component
Fuse Rating
Fuse or Relay
Number
Canister vent control valve.
Powertrain control module relay coil.
Anti-lock brake system relay coil.
40A 2
47
Trailer tow stop lamp and direction indic-
ator lamps.
20A 2
48
Wiper motor.
30A 2
49
Not used.
—
50
Cutaway.
20A 2
51
Modified vehicle and stripped chassis run/
start relay coil.
10A 3
52
Anti-lock brake system run/start feed.
10A 3
53
Fuel pump relay coil.
10A 3
54
Not used.
—
55
Not used.
—
56
Trailer tow park lamp.
20A 3
57
Trailer tow back-up lamp.
15A 3
58
Not used.
—
59
Not used.
—
60
Not used.
—
61
Auxiliary switch #2 relay.
—
62
Trailer tow battery charge.
30A 2
63
Not used.
—
64
Power point 2 (glove box).
20A 2
65
Power point 3 (cutaway B+).
20A 2
66
134
E-Series (TE4) Canada/United States of America, enUSA, Edition date: 201804, Second-Printing Fuses
Page 139 of 329

Protected Component
Fuse Rating
Fuse or Relay
Number
Not used.
—
84
Auxiliary switch #1 relay.
—
85
1 Cartridge fuse
2 A1S fuse
3 Mini fuse
Passenger Compartment Fuse
Panel WARNING: Always disconnect the
battery before servicing high current
fuses.
Note: If your vehicle is equipped with dual
batteries, disconnecting the primary
under-hood battery does not remove power
from all circuits.
The fuse panel is located to the left of the
brake pedal and mounted onto the lower
left cowl panel. Remove the fuse panel
cover to access the fuses.
To remove a fuse, use the fuse puller tool
provided on the inside of the fuse panel
cover. Protected Component
Fuse Rating
Fuse or Relay
Number
Inverter B+.
30A
1
Not used (spare).
15A
2
Not used (spare).
15A
3
Not used (spare).
30A
4
136
E-Series (TE4) Canada/United States of America, enUSA, Edition date: 201804, Second-Printing FusesE269934
Page 141 of 329

Protected Component
Fuse Rating
Fuse or Relay
Number
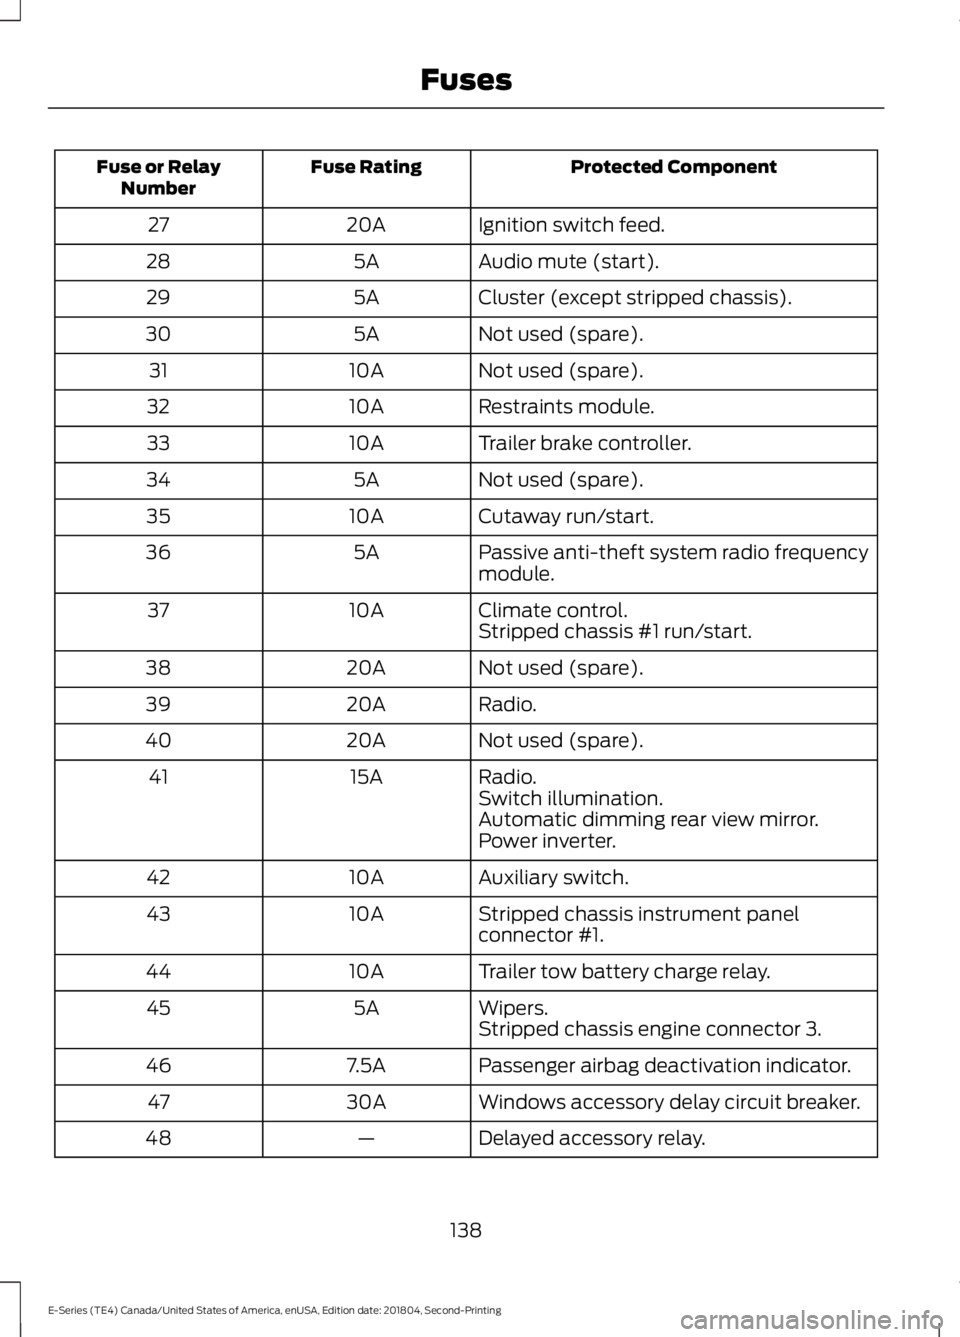
Ignition switch feed.
20A
27
Audio mute (start).
5A
28
Cluster (except stripped chassis).
5A
29
Not used (spare).
5A
30
Not used (spare).
10A
31
Restraints module.
10A
32
Trailer brake controller.
10A
33
Not used (spare).
5A
34
Cutaway run/start.
10A
35
Passive anti-theft system radio frequency
module.
5A
36
Climate control.
10A
37
Stripped chassis #1 run/start.
Not used (spare).
20A
38
Radio.
20A
39
Not used (spare).
20A
40
Radio.
15A
41
Switch illumination.
Automatic dimming rear view mirror.
Power inverter.
Auxiliary switch.
10A
42
Stripped chassis instrument panel
connector #1.
10A
43
Trailer tow battery charge relay.
10A
44
Wipers.
5A
45
Stripped chassis engine connector 3.
Passenger airbag deactivation indicator.
7.5A
46
Windows accessory delay circuit breaker.
30A
47
Delayed accessory relay.
—
48
138
E-Series (TE4) Canada/United States of America, enUSA, Edition date: 201804, Second-Printing Fuses
Page 144 of 329

GENERAL INFORMATION
Have your vehicle serviced regularly to help
maintain its roadworthiness and resale
value. There is a large network of
authorized dealers that are there to help
you with their professional servicing
expertise. We believe that their specially
trained technicians are best qualified to
service your vehicle properly and expertly.
They are supported by a wide range of
highly specialized tools developed
specifically for servicing your vehicle.
If your vehicle requires professional service,
an authorized dealer can provide the
necessary parts and service. Check your
warranty information to find out which
parts and services are covered.
Use only recommended fuels, lubricants,
fluids and service parts conforming to
specifications. Motorcraft® parts are
designed and built to provide the best
performance in your vehicle.
Precautions
•
Do not work on a hot engine.
• Make sure that nothing gets caught in
moving parts.
• Do not work on a vehicle with the
engine running in an enclosed space,
unless you are sure you have enough
ventilation.
• Keep all open flames and other burning
material (such as cigarettes) away
from the battery and all fuel related
parts.
Working with the Engine Off
1. Set the parking brake and shift the transmission to park (P). 2. Switch off the engine.
3. Block the wheels.
Working with the Engine On WARNING: To reduce the risk of
vehicle damage and personal burn
injuries, do not start your engine with the
air cleaner removed and do not remove
it while the engine is running.
1. Set the parking brake and shift the transmission to park (P).
2. Block the wheels.
OPENING AND CLOSING THE
HOOD 1.
Inside the vehicle, pull the hood release
handle located under the bottom left
corner of the instrument panel.
2. Go to the front of the vehicle and push
the auxiliary latch, located in the center
of the top grille, to the left in order to
release the hood.
3. Lift the hood and secure it with the prop rod.
141
E-Series (TE4) Canada/United States of America, enUSA, Edition date: 201804, Second-Printing MaintenanceE196351
Page 145 of 329

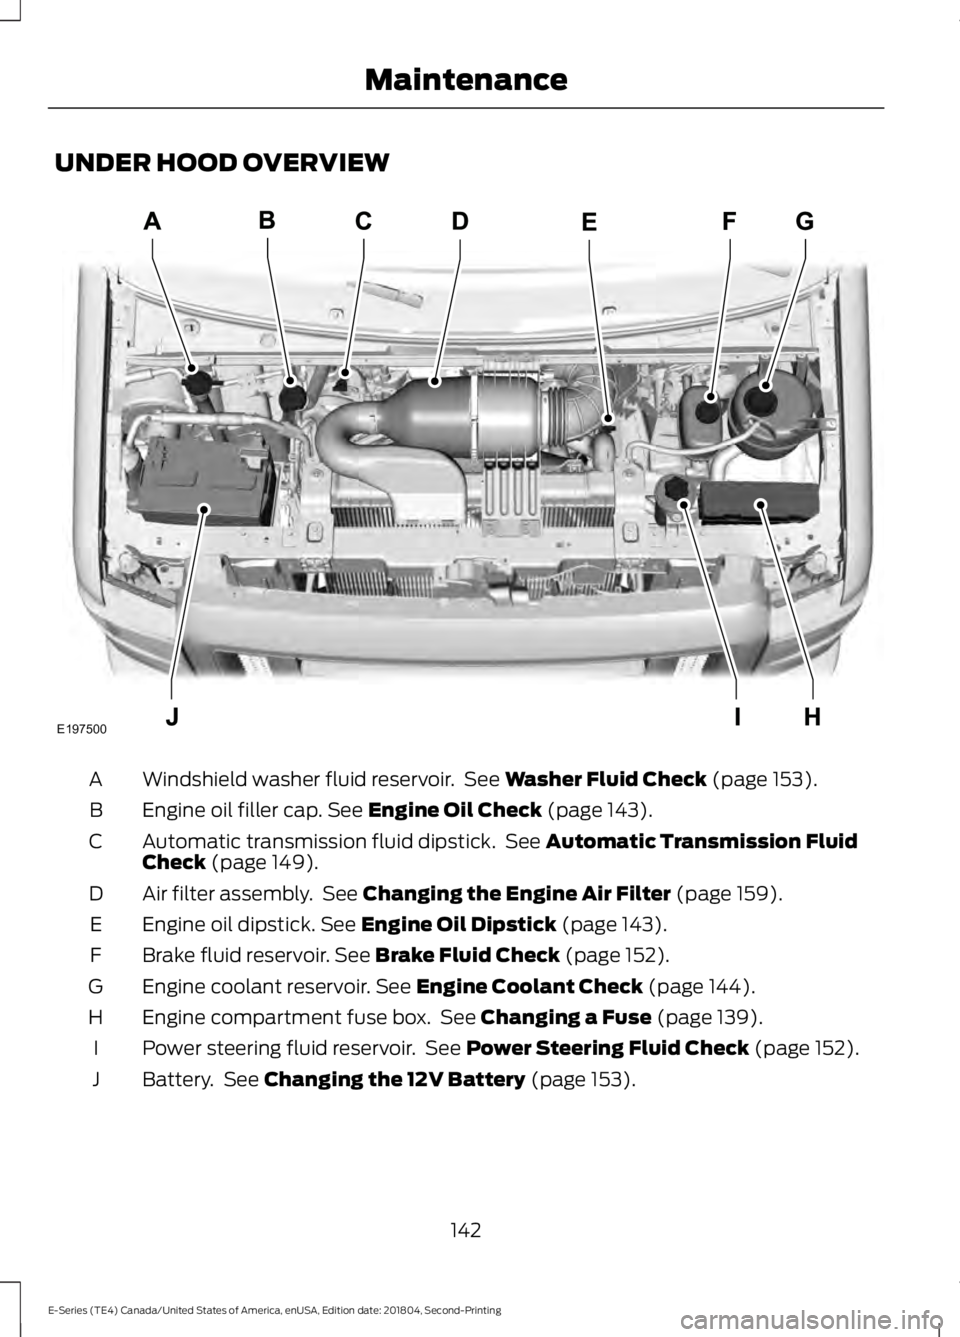
UNDER HOOD OVERVIEW
Windshield washer fluid reservoir. See Washer Fluid Check (page 153).
A
Engine oil filler cap.
See Engine Oil Check (page 143).
B
Automatic transmission fluid dipstick. See
Automatic Transmission Fluid
Check (page 149).
C
Air filter assembly. See
Changing the Engine Air Filter (page 159).
D
Engine oil dipstick.
See Engine Oil Dipstick (page 143).
E
Brake fluid reservoir.
See Brake Fluid Check (page 152).
F
Engine coolant reservoir.
See Engine Coolant Check (page 144).
G
Engine compartment fuse box. See
Changing a Fuse (page 139).
H
Power steering fluid reservoir. See
Power Steering Fluid Check (page 152).
I
Battery. See
Changing the 12V Battery (page 153).
J
142
E-Series (TE4) Canada/United States of America, enUSA, Edition date: 201804, Second-Printing MaintenanceE197500
Page 156 of 329

WARNING: For E-350 and E-450
vehicles with the Hydro-Boost Brake
System, do not press the brake pedal
after the engine has been turned off.
Pressing the brake pedal after the engine
has been turned off will give a false
power steering fluid level reading.
Only use fluid that meets Ford
specifications. See
Capacities and
Specifications (page 203).
To top up the power steering fluid level do
the following.
1. Start the engine and let it run until it reaches normal operating temperature.
2. Make sure the fluid is within the
MIN
and MAX range.
3. If the fluid level is low, add fluid to be within the
MIN and MAX range. Do not
overfill.
4. While the engine idles, turn the steering
wheel left and right several times.
5. Recheck the fluid level in the reservoir.
Note: Do not operate the vehicle with a low
power steering pump fluid level.
WASHER FLUID CHECK WARNING:
If you operate your
vehicle in temperatures below 40°F
(5°C), use washer fluid with antifreeze
protection. Failure to use washer fluid
with antifreeze protection in cold
weather could result in impaired
windshield vision and increase the risk
of injury or accident.
Add fluid to fill the reservoir if the level is
low. Only use a washer fluid that meets
Ford specifications. See
Capacities and
Specifications (page 198). State or local regulations on volatile
organic compounds may restrict the use
of methanol, a common windshield washer
antifreeze additive. Washer fluids
containing non-methanol antifreeze
agents should be used only if they provide
cold weather protection without damaging
the vehicle
’s paint finish, wiper blades or
washer system.
CHANGING THE 12V BATTERY WARNING:
This vehicle may be
fitted with more than one battery,
removal of cable from only one battery
does not disconnect the vehicle
electrical system. Be sure to disconnect
cables from all batteries when
disconnecting power. Failure to do so
may cause serious personal injury or
property damage. WARNING:
Batteries normally
produce explosive gases which can
cause personal injury. Therefore, do not
allow flames, sparks or lighted
substances to come near the battery.
When working near the battery, always
shield your face and protect your eyes.
Always provide proper ventilation. WARNING:
When lifting a
plastic-cased battery, excessive pressure
on the end walls could cause acid to flow
through the vent caps, resulting in
personal injury and/or damage to the
vehicle or battery. Lift the battery with a
battery carrier or with your hands on
opposite corners.
153
E-Series (TE4) Canada/United States of America, enUSA, Edition date: 201804, Second-Printing Maintenance
Page 157 of 329

WARNING: Keep batteries out of
reach of children. Batteries contain
sulfuric acid. Avoid contact with skin,
eyes or clothing. Shield your eyes when
working near the battery to protect
against possible splashing of acid
solution. In case of acid contact with skin
or eyes, flush immediately with water for
a minimum of 15 minutes and get prompt
medical attention. If acid is swallowed,
call a physician immediately. WARNING:
Battery posts,
terminals and related accessories
contain lead and lead compounds. Wash
hands after handling.
Note: If your vehicle battery has a cover,
make sure it is reinstalled after the battery
has been cleaned or replaced.
Note: Electrical or electronic accessories
or components added to the vehicle by the
dealer or the owner may adversely affect
battery performance and durability.
Your vehicle is fitted with a Motorcraft®
maintenance-free battery which normally
does not require additional water during
its life of service.
For longer, trouble-free operation, keep the
top of the battery clean and dry. Also,
make certain the battery cables are always
tightly fastened to the battery terminals.
If you see any corrosion on the battery or
terminals, remove the cables from the
terminals and clean with a wire brush. You
can neutralize the acid with a solution of
baking soda and water.
Always dispose of automotive batteries in
a responsible manner. Follow your local
authorized standards for disposal. Call your
local authorized recycling center to find
out more about recycling automotive
batteries. Reconnecting the Battery
Because your vehicle
’s engine is
electronically controlled by a computer,
some control conditions are maintained
by power from the battery. When the
battery is disconnected or a new battery
is installed, the engine must relearn its idle
and fuel trim strategy for optimum
driveability and performance. Flexible fuel
vehicles (FFV) must also relearn the
ethanol content of the fuel for optimum
driveability and performance.
To begin this process.
1. Switch off all accessories and start the
engine.
2. Run the engine until it reaches normal operating temperature.
3. Allow the engine to idle for at least one
minute.
4. Turn the A/C on and allow the engine to idle for at least one minute.
5. Fully press the foot brake. Release the parking brake. Shift the gearshift lever
to Drive (D) and allow the engine to
idle for at least one minute.
6. Drive the vehicle for approximately 10 mi (16 km)
to complete the
relearning process.
Note: If you do not carry out the above
process, the idle quality of your vehicle may
be adversely affected until the idle trim is
eventually relearned.
Flexible fuel vehicles operating on E85 may
experience poor starts and driveability
problems until the fuel trim and ethanol
content have been relearned.
When the battery is disconnected or a new
battery installed, the transmission must
learn its adaptive strategy. As a result of
this, the transmission may shift firmly. This
operation is considered normal and fully
updates transmission operation to its
154
E-Series (TE4) Canada/United States of America, enUSA, Edition date: 201804, Second-Printing Maintenance
Page 158 of 329

optimum shift feel. We recommend that
the negative battery cable terminal be
disconnected from the battery if you plan
to store your vehicle for an extended period
of time. This minimizes the discharge of
your battery during storage.
Dual Batteries (If Equipped)
Your vehicle may be fitted with a
frame-mounted battery located on the
passenger side frame rail, behind the front
passenger door. This battery is connected
in parallel with the battery in the engine
compartment. Both batteries are used to
start the vehicle.
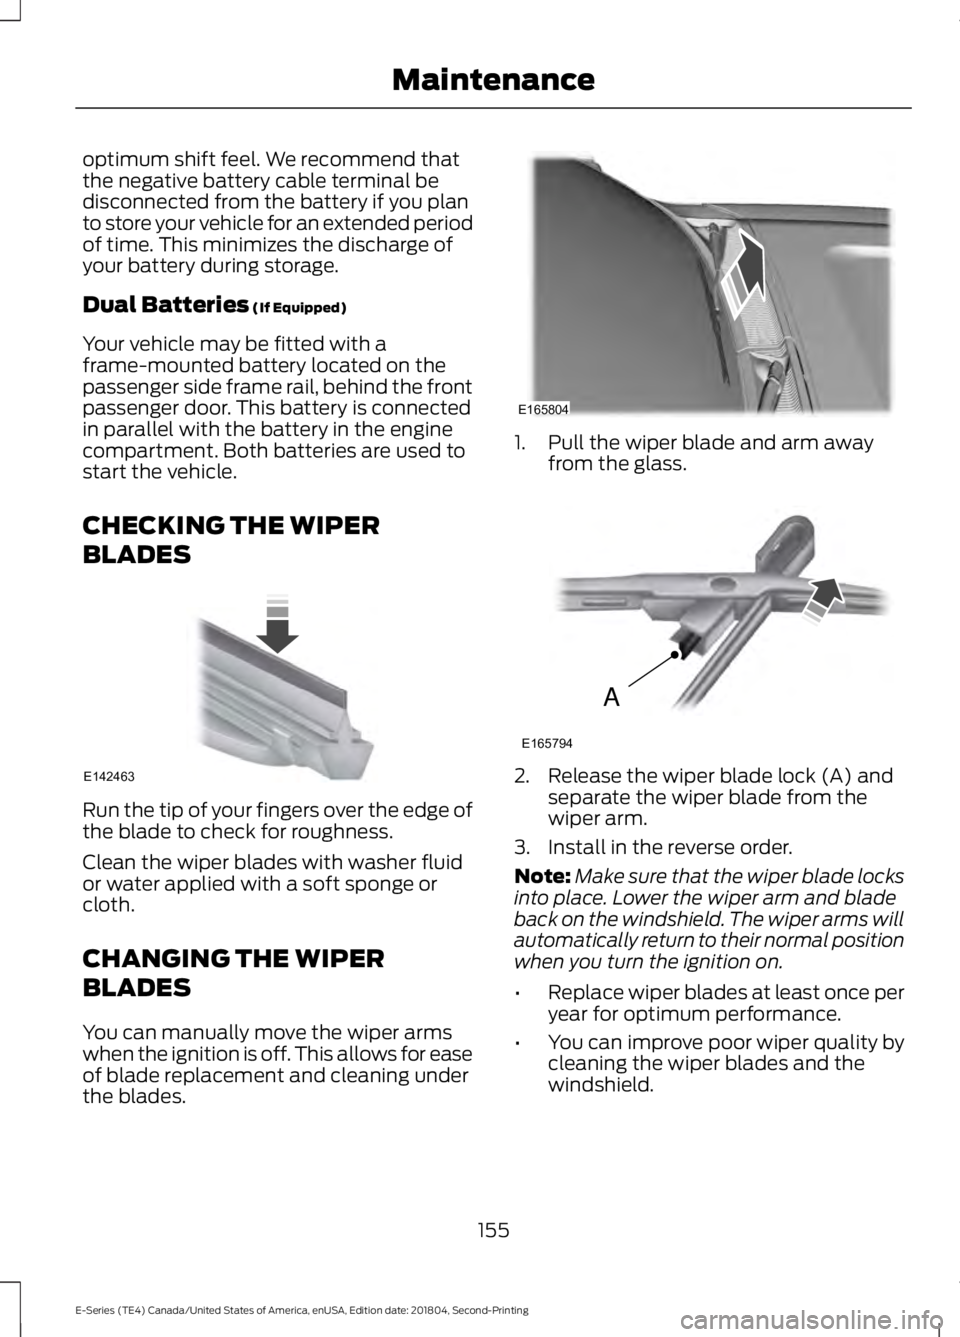
CHECKING THE WIPER
BLADES Run the tip of your fingers over the edge of
the blade to check for roughness.
Clean the wiper blades with washer fluid
or water applied with a soft sponge or
cloth.
CHANGING THE WIPER
BLADES
You can manually move the wiper arms
when the ignition is off. This allows for ease
of blade replacement and cleaning under
the blades. 1. Pull the wiper blade and arm away
from the glass. 2. Release the wiper blade lock (A) and
separate the wiper blade from the
wiper arm.
3. Install in the reverse order.
Note: Make sure that the wiper blade locks
into place. Lower the wiper arm and blade
back on the windshield. The wiper arms will
automatically return to their normal position
when you turn the ignition on.
• Replace wiper blades at least once per
year for optimum performance.
• You can improve poor wiper quality by
cleaning the wiper blades and the
windshield.
155
E-Series (TE4) Canada/United States of America, enUSA, Edition date: 201804, Second-Printing MaintenanceE142463 E165804 A
E165794