2019 FORD E-350 instrument panel
[x] Cancel search: instrument panelPage 75 of 329

12 Volt DC Power Point
WARNING: Do not plug optional
electrical accessories into the cigar
lighter socket. Incorrect use of the cigar
lighter can cause damage not covered
by the vehicle warranty, and can result
in fire or serious injury.
Note: When you switch the ignition on, you
can use the socket to power 12 volt
appliances with a maximum current rating
of 15 amps.
If the power supply does not work after you
switch the ignition off, switch the ignition
on.
Note: Do not hang any accessory from the
accessory plug.
Note: Do not use the power point over the
vehicle capacity of 12 volt DC 180 watts or
a fuse may blow.
Note: Always keep the power point caps
closed when not in use.
Do not insert objects other than an
accessory plug into the power point. This
damages the power point and may blow
the fuse.
Run the vehicle for full capacity use of the
power point.
To prevent the battery from running out of
charge:
• Do not use the power point longer than
necessary when the vehicle is not
running.
• Do not leave devices plugged in
overnight or when you park your vehicle
for extended periods. Locations
Power points may be in the following
locations:
•
On the instrument panel.
• Inside the glove box.
• Behind the driver's seat, upper trim
panel.
110 Volt AC Power Point
(If Equipped) WARNING: Do not keep electrical
devices plugged in the power point
whenever the device is not in use. Do not
use any extension cord with the 110 volt
AC power point, since it will defeat the
safety protection design. Doing so may
cause the power point to overload due
to powering multiple devices that can
reach beyond the 150 watt load limit and
could result in fire or serious injury.
Note: The power point turns off when you
switch the ignition off, or when the battery
voltage drops below 11 volts.
You can use the power point for electric
devices that require up to 150 watts. It is
on the rear of the center console. To gain access to the outlet contacts,
press the plug against the outlet and rotate
clockwise.
72
E-Series (TE4) Canada/United States of America, enUSA, Edition date: 201804, Second-Printing Auxiliary Power PointsE194174
Page 91 of 329
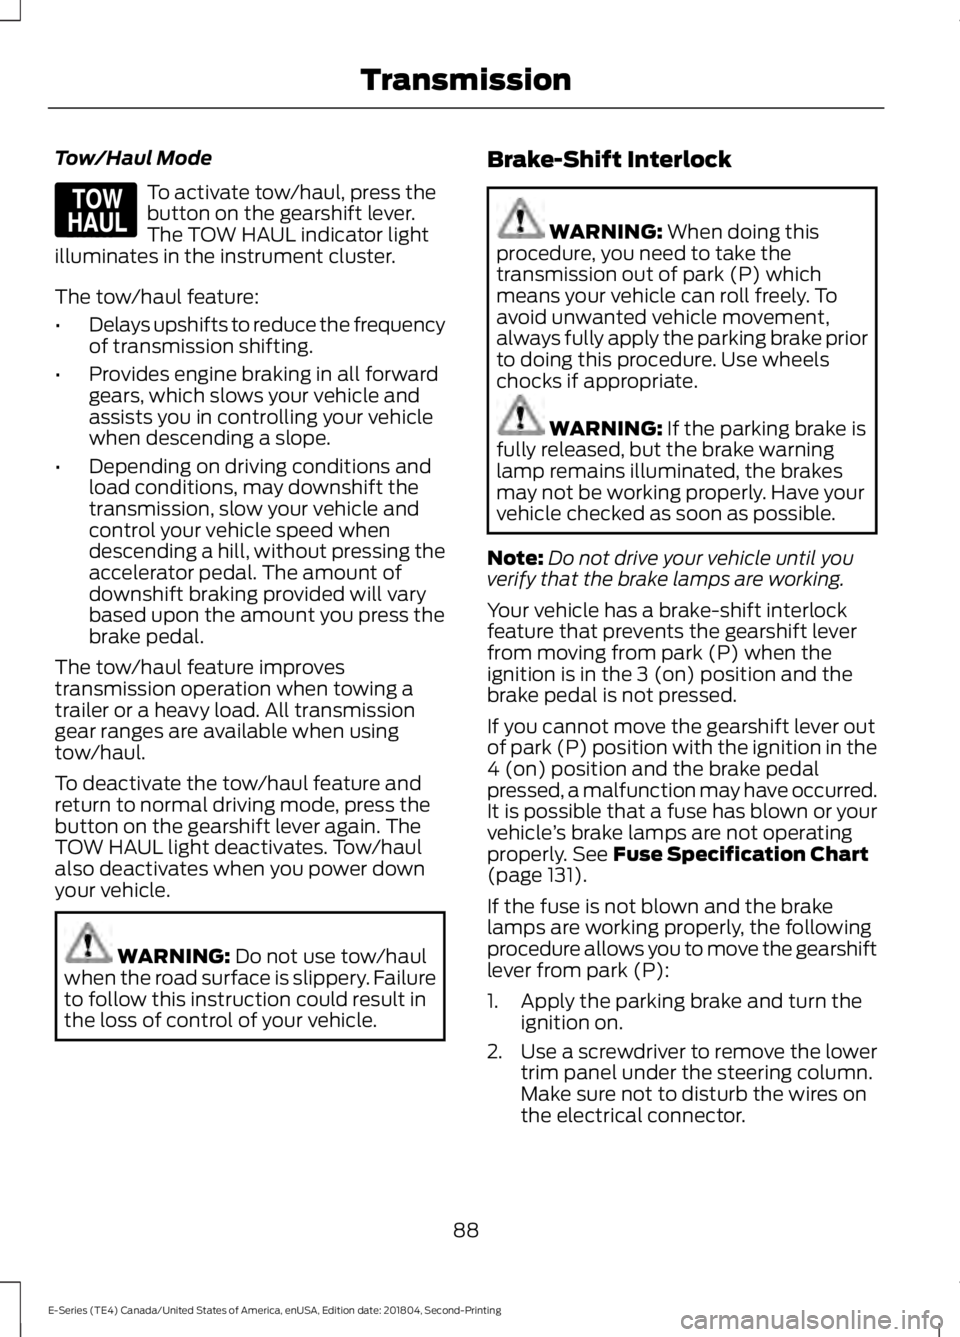
Tow/Haul Mode
To activate tow/haul, press the
button on the gearshift lever.
The TOW HAUL indicator light
illuminates in the instrument cluster.
The tow/haul feature:
• Delays upshifts to reduce the frequency
of transmission shifting.
• Provides engine braking in all forward
gears, which slows your vehicle and
assists you in controlling your vehicle
when descending a slope.
• Depending on driving conditions and
load conditions, may downshift the
transmission, slow your vehicle and
control your vehicle speed when
descending a hill, without pressing the
accelerator pedal. The amount of
downshift braking provided will vary
based upon the amount you press the
brake pedal.
The tow/haul feature improves
transmission operation when towing a
trailer or a heavy load. All transmission
gear ranges are available when using
tow/haul.
To deactivate the tow/haul feature and
return to normal driving mode, press the
button on the gearshift lever again. The
TOW HAUL light deactivates. Tow/haul
also deactivates when you power down
your vehicle. WARNING: Do not use tow/haul
when the road surface is slippery. Failure
to follow this instruction could result in
the loss of control of your vehicle. Brake-Shift Interlock WARNING:
When doing this
procedure, you need to take the
transmission out of park (P) which
means your vehicle can roll freely. To
avoid unwanted vehicle movement,
always fully apply the parking brake prior
to doing this procedure. Use wheels
chocks if appropriate. WARNING:
If the parking brake is
fully released, but the brake warning
lamp remains illuminated, the brakes
may not be working properly. Have your
vehicle checked as soon as possible.
Note: Do not drive your vehicle until you
verify that the brake lamps are working.
Your vehicle has a brake-shift interlock
feature that prevents the gearshift lever
from moving from park (P) when the
ignition is in the 3 (on) position and the
brake pedal is not pressed.
If you cannot move the gearshift lever out
of park (P) position with the ignition in the
4 (on) position and the brake pedal
pressed, a malfunction may have occurred.
It is possible that a fuse has blown or your
vehicle ’s brake lamps are not operating
properly.
See Fuse Specification Chart
(page 131).
If the fuse is not blown and the brake
lamps are working properly, the following
procedure allows you to move the gearshift
lever from park (P):
1. Apply the parking brake and turn the ignition on.
2. Use a screwdriver to remove the lower
trim panel under the steering column.
Make sure not to disturb the wires on
the electrical connector.
88
E-Series (TE4) Canada/United States of America, enUSA, Edition date: 201804, Second-Printing TransmissionE161509
Page 96 of 329
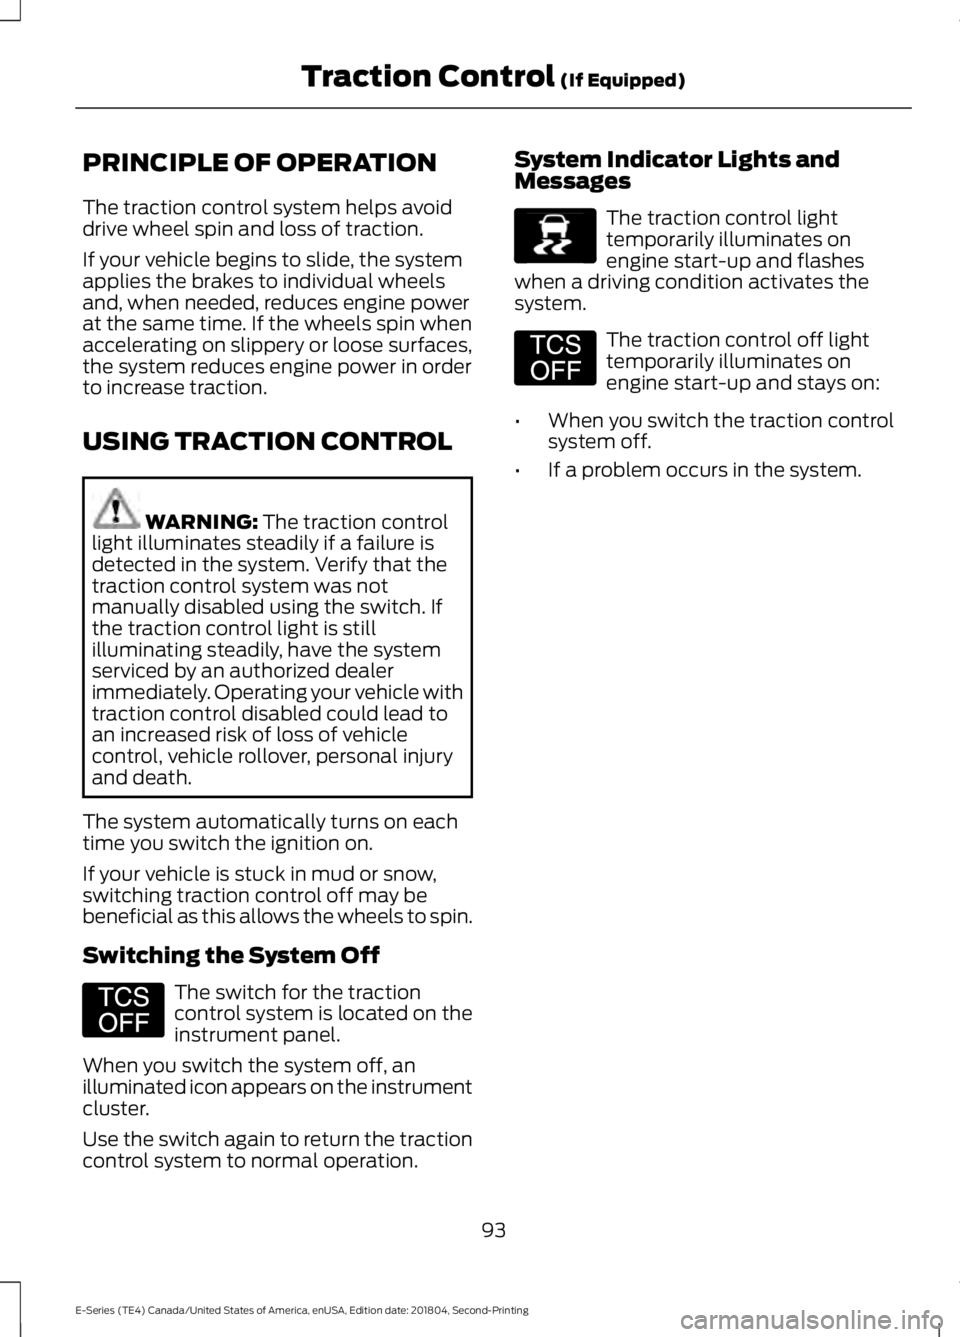
PRINCIPLE OF OPERATION
The traction control system helps avoid
drive wheel spin and loss of traction.
If your vehicle begins to slide, the system
applies the brakes to individual wheels
and, when needed, reduces engine power
at the same time. If the wheels spin when
accelerating on slippery or loose surfaces,
the system reduces engine power in order
to increase traction.
USING TRACTION CONTROL
WARNING: The traction control
light illuminates steadily if a failure is
detected in the system. Verify that the
traction control system was not
manually disabled using the switch. If
the traction control light is still
illuminating steadily, have the system
serviced by an authorized dealer
immediately. Operating your vehicle with
traction control disabled could lead to
an increased risk of loss of vehicle
control, vehicle rollover, personal injury
and death.
The system automatically turns on each
time you switch the ignition on.
If your vehicle is stuck in mud or snow,
switching traction control off may be
beneficial as this allows the wheels to spin.
Switching the System Off The switch for the traction
control system is located on the
instrument panel.
When you switch the system off, an
illuminated icon appears on the instrument
cluster.
Use the switch again to return the traction
control system to normal operation. System Indicator Lights and
Messages The traction control light
temporarily illuminates on
engine start-up and flashes
when a driving condition activates the
system. The traction control off light
temporarily illuminates on
engine start-up and stays on:
• When you switch the traction control
system off.
• If a problem occurs in the system.
93
E-Series (TE4) Canada/United States of America, enUSA, Edition date: 201804, Second-Printing Traction Control
(If Equipped)E194301 E138639 E194301
Page 138 of 329

Protected Component
Fuse Rating
Fuse or Relay
Number
Power point 1 (instrument panel).
20A 2
67
Modified vehicle.
50A 2
68
Not used.
—
69
Stripped chassis.
30A 2
70
Not used.
—
71
Cigarette lighter/power point.
20A 2
72
Not used.
—
73
Power seat.
30A 2
74
Vehicle power 1.
20A 3
75
Powertrain control module power.
Vehicle power 2.
20A 3
76
Powertrain control module emissions
related components.
Vehicle power 3.
10A 3
77
Powertrain control module general
components.
Vehicle power 4.
15A 3
78
Engine ignition coil relay coil.
Vehicle power 5.
10A 3
79
Transmission.
Cluster run/start (stripped chassis).
10A 3
80
Not used.
—
81
Not used.
—
82
Fuel pump diode.
—
83
135
E-Series (TE4) Canada/United States of America, enUSA, Edition date: 201804, Second-Printing Fuses
Page 141 of 329
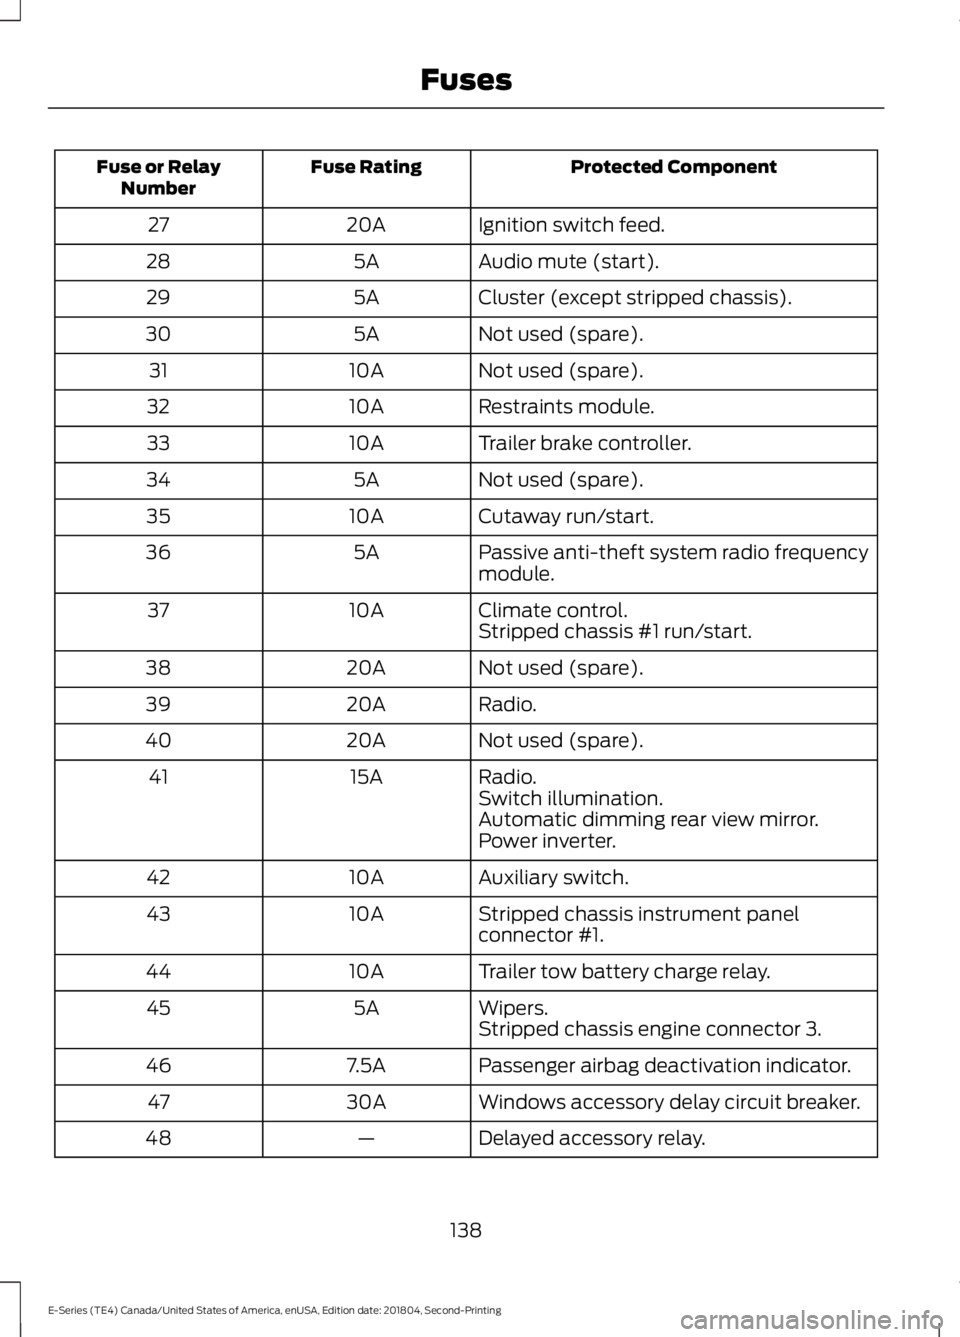
Protected Component
Fuse Rating
Fuse or Relay
Number
Ignition switch feed.
20A
27
Audio mute (start).
5A
28
Cluster (except stripped chassis).
5A
29
Not used (spare).
5A
30
Not used (spare).
10A
31
Restraints module.
10A
32
Trailer brake controller.
10A
33
Not used (spare).
5A
34
Cutaway run/start.
10A
35
Passive anti-theft system radio frequency
module.
5A
36
Climate control.
10A
37
Stripped chassis #1 run/start.
Not used (spare).
20A
38
Radio.
20A
39
Not used (spare).
20A
40
Radio.
15A
41
Switch illumination.
Automatic dimming rear view mirror.
Power inverter.
Auxiliary switch.
10A
42
Stripped chassis instrument panel
connector #1.
10A
43
Trailer tow battery charge relay.
10A
44
Wipers.
5A
45
Stripped chassis engine connector 3.
Passenger airbag deactivation indicator.
7.5A
46
Windows accessory delay circuit breaker.
30A
47
Delayed accessory relay.
—
48
138
E-Series (TE4) Canada/United States of America, enUSA, Edition date: 201804, Second-Printing Fuses
Page 144 of 329

GENERAL INFORMATION
Have your vehicle serviced regularly to help
maintain its roadworthiness and resale
value. There is a large network of
authorized dealers that are there to help
you with their professional servicing
expertise. We believe that their specially
trained technicians are best qualified to
service your vehicle properly and expertly.
They are supported by a wide range of
highly specialized tools developed
specifically for servicing your vehicle.
If your vehicle requires professional service,
an authorized dealer can provide the
necessary parts and service. Check your
warranty information to find out which
parts and services are covered.
Use only recommended fuels, lubricants,
fluids and service parts conforming to
specifications. Motorcraft® parts are
designed and built to provide the best
performance in your vehicle.
Precautions
•
Do not work on a hot engine.
• Make sure that nothing gets caught in
moving parts.
• Do not work on a vehicle with the
engine running in an enclosed space,
unless you are sure you have enough
ventilation.
• Keep all open flames and other burning
material (such as cigarettes) away
from the battery and all fuel related
parts.
Working with the Engine Off
1. Set the parking brake and shift the transmission to park (P). 2. Switch off the engine.
3. Block the wheels.
Working with the Engine On WARNING: To reduce the risk of
vehicle damage and personal burn
injuries, do not start your engine with the
air cleaner removed and do not remove
it while the engine is running.
1. Set the parking brake and shift the transmission to park (P).
2. Block the wheels.
OPENING AND CLOSING THE
HOOD 1.
Inside the vehicle, pull the hood release
handle located under the bottom left
corner of the instrument panel.
2. Go to the front of the vehicle and push
the auxiliary latch, located in the center
of the top grille, to the left in order to
release the hood.
3. Lift the hood and secure it with the prop rod.
141
E-Series (TE4) Canada/United States of America, enUSA, Edition date: 201804, Second-Printing MaintenanceE196351
Page 166 of 329
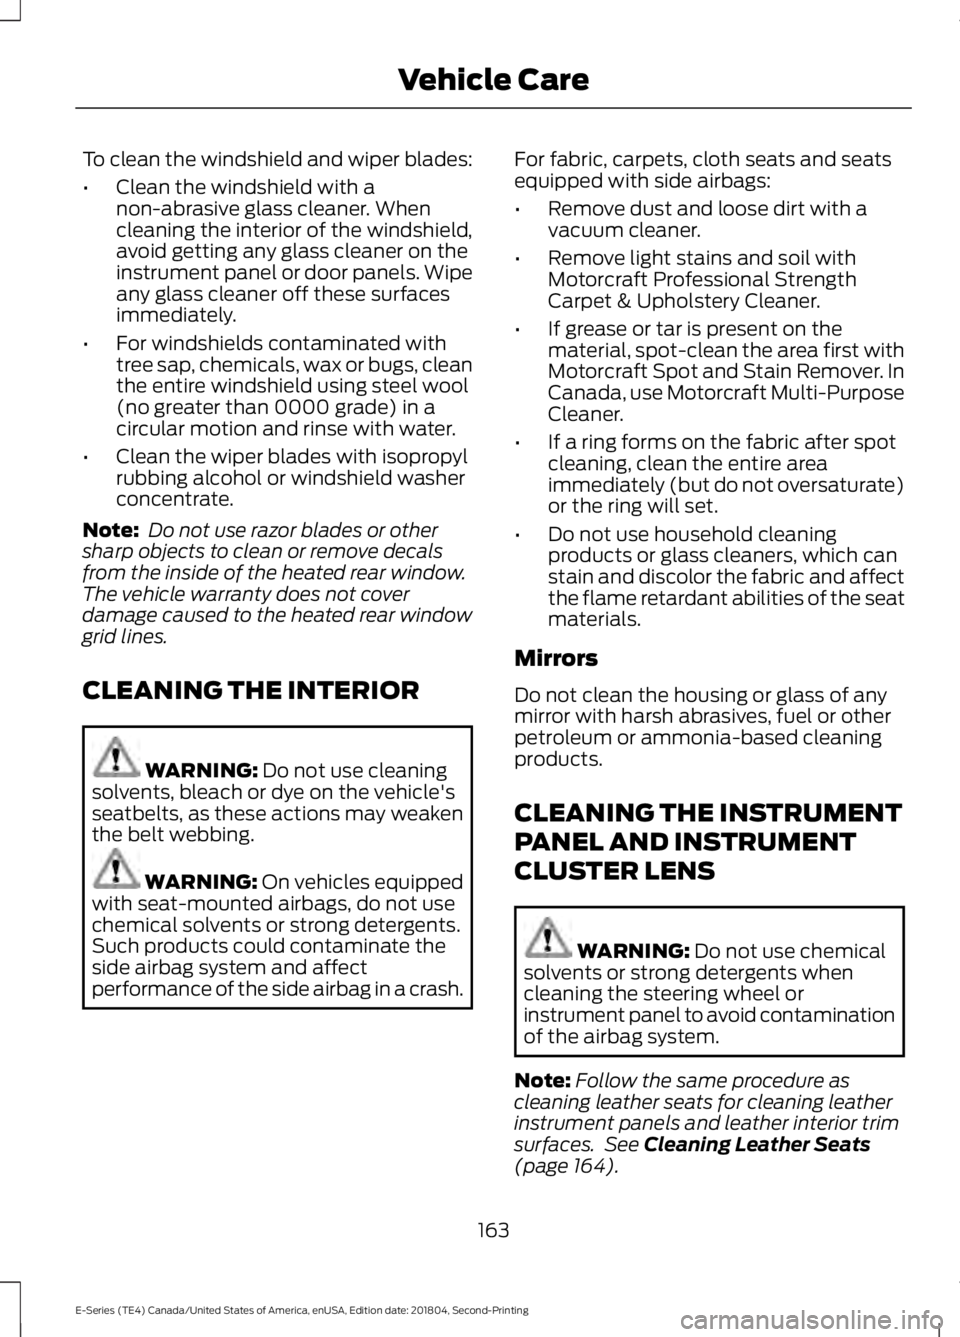
To clean the windshield and wiper blades:
•
Clean the windshield with a
non-abrasive glass cleaner. When
cleaning the interior of the windshield,
avoid getting any glass cleaner on the
instrument panel or door panels. Wipe
any glass cleaner off these surfaces
immediately.
• For windshields contaminated with
tree sap, chemicals, wax or bugs, clean
the entire windshield using steel wool
(no greater than 0000 grade) in a
circular motion and rinse with water.
• Clean the wiper blades with isopropyl
rubbing alcohol or windshield washer
concentrate.
Note: Do not use razor blades or other
sharp objects to clean or remove decals
from the inside of the heated rear window.
The vehicle warranty does not cover
damage caused to the heated rear window
grid lines.
CLEANING THE INTERIOR WARNING: Do not use cleaning
solvents, bleach or dye on the vehicle's
seatbelts, as these actions may weaken
the belt webbing. WARNING:
On vehicles equipped
with seat-mounted airbags, do not use
chemical solvents or strong detergents.
Such products could contaminate the
side airbag system and affect
performance of the side airbag in a crash. For fabric, carpets, cloth seats and seats
equipped with side airbags:
•
Remove dust and loose dirt with a
vacuum cleaner.
• Remove light stains and soil with
Motorcraft Professional Strength
Carpet & Upholstery Cleaner.
• If grease or tar is present on the
material, spot-clean the area first with
Motorcraft Spot and Stain Remover. In
Canada, use Motorcraft Multi-Purpose
Cleaner.
• If a ring forms on the fabric after spot
cleaning, clean the entire area
immediately (but do not oversaturate)
or the ring will set.
• Do not use household cleaning
products or glass cleaners, which can
stain and discolor the fabric and affect
the flame retardant abilities of the seat
materials.
Mirrors
Do not clean the housing or glass of any
mirror with harsh abrasives, fuel or other
petroleum or ammonia-based cleaning
products.
CLEANING THE INSTRUMENT
PANEL AND INSTRUMENT
CLUSTER LENS WARNING:
Do not use chemical
solvents or strong detergents when
cleaning the steering wheel or
instrument panel to avoid contamination
of the airbag system.
Note: Follow the same procedure as
cleaning leather seats for cleaning leather
instrument panels and leather interior trim
surfaces. See
Cleaning Leather Seats
(page 164).
163
E-Series (TE4) Canada/United States of America, enUSA, Edition date: 201804, Second-Printing Vehicle Care
Page 167 of 329
Clean the instrument panel and cluster
lens with a clean, damp and soft cloth,
then use a clean, dry and soft cloth to dry
these areas.
•
Avoid cleaners or polishes that increase
the gloss of the upper portion of the
instrument panel. The dull finish in this
area helps protect you from
undesirable windshield reflection.
• Do not use any household cleaning
products or glass cleaners as these
may damage the finish of the
instrument panel, interior trim and
cluster lens.
• Wash or wipe your hands clean if you
have been in contact with certain
products such as insect repellent and
suntan lotion to avoid possible damage
to the interior painted surfaces.
• Do not allow air fresheners and hand
sanitizers to spill onto interior surfaces.
If a spill occurs, wipe off immediately.
Your warranty may not cover these
damages.
If a staining liquid like coffee or juice has
been spilled on the instrument panel or on
interior trim surfaces:
1. Wipe up spilled liquid using a clean, soft cloth as quickly as possible.
2. Use Motorcraft Premium Leather and Vinyl Cleaner or a commercially
available leather cleaning product for
automotive interiors. Test any cleaner
or stain remover on an inconspicuous
area.
3. Alternatively, wipe the surface with a clean, soft cloth and a mild soap and
water solution. Dry the area with a
clean, soft cloth.
4. If necessary, apply more soap and water solution or cleaning product to
a clean, soft cloth and press it onto the
soiled area. Allow this to set at room
temperature for 30 minutes. 5. Remove the soaked cloth, then with a
clean, damp cloth, use a rubbing
motion for 60 seconds on the soiled
area.
6. Dry the area with a clean, soft cloth.
CLEANING LEATHER SEATS (IF
EQUIPPED)
Note: Follow the same procedure as
cleaning leather seats for cleaning leather
instrument panels and leather interior trim
surfaces.
For routine cleaning, wipe the surface with
a soft, damp cloth and a mild soap and
water solution. Dry the area with a clean,
soft cloth.
For cleaning and removing stains such as
dye transfer, use Motorcraft Premium
Leather and Vinyl Cleaner or a
commercially available leather cleaning
product for automotive interiors.
Note: Test any cleaner or stain remover on
an inconspicuous area.
You should:
• Remove dust and loose dirt with a
vacuum cleaner.
• Clean and treat spills and stains as
soon as possible.
Do not use the following products as these
may damage the leather:
• Oil and petroleum or silicone-based
leather conditioners.
• Household cleaners.
• Alcohol solutions.
• Solvents or cleaners intended
specifically for rubber, vinyl and
plastics.
164
E-Series (TE4) Canada/United States of America, enUSA, Edition date: 201804, Second-Printing Vehicle Care