2019 FORD E-350 door lock
[x] Cancel search: door lockPage 54 of 329

POWER WINDOWS (IF EQUIPPED)
WARNING:
Do not leave children
unattended in your vehicle and do not
let them play with the power windows.
They may seriously injure themselves. WARNING:
When closing the
power windows, you should verify they
are free of obstructions and make sure
that children and pets are not in the
proximity of the window openings. Note:
You may hear a pulsing noise when
just one of the windows is open. Lower the
opposite window slightly to reduce this
noise.
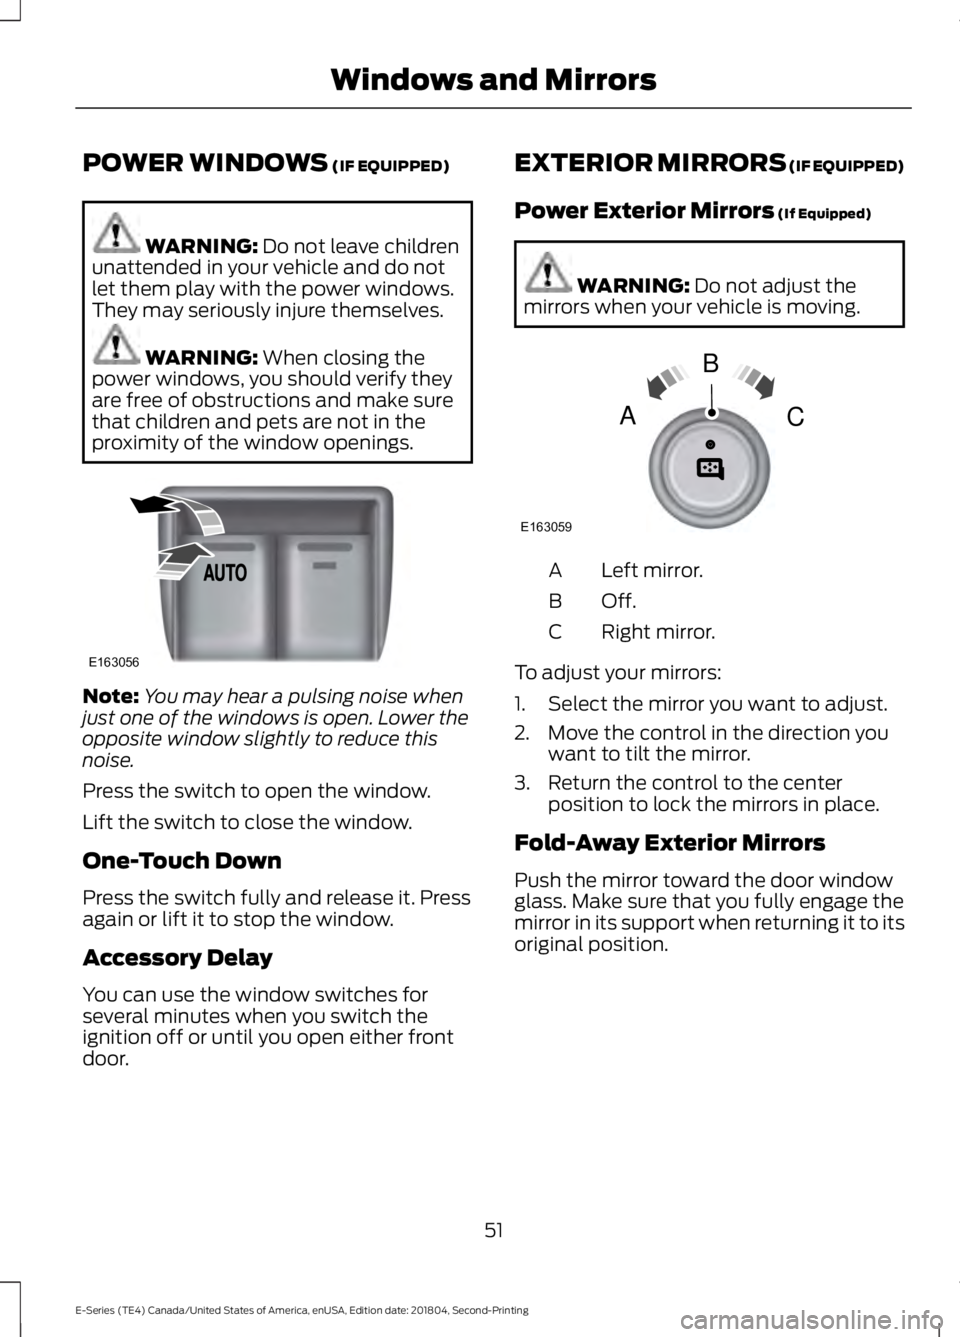
Press the switch to open the window.
Lift the switch to close the window.
One-Touch Down
Press the switch fully and release it. Press
again or lift it to stop the window.
Accessory Delay
You can use the window switches for
several minutes when you switch the
ignition off or until you open either front
door. EXTERIOR MIRRORS
(IF EQUIPPED)
Power Exterior Mirrors
(If Equipped) WARNING:
Do not adjust the
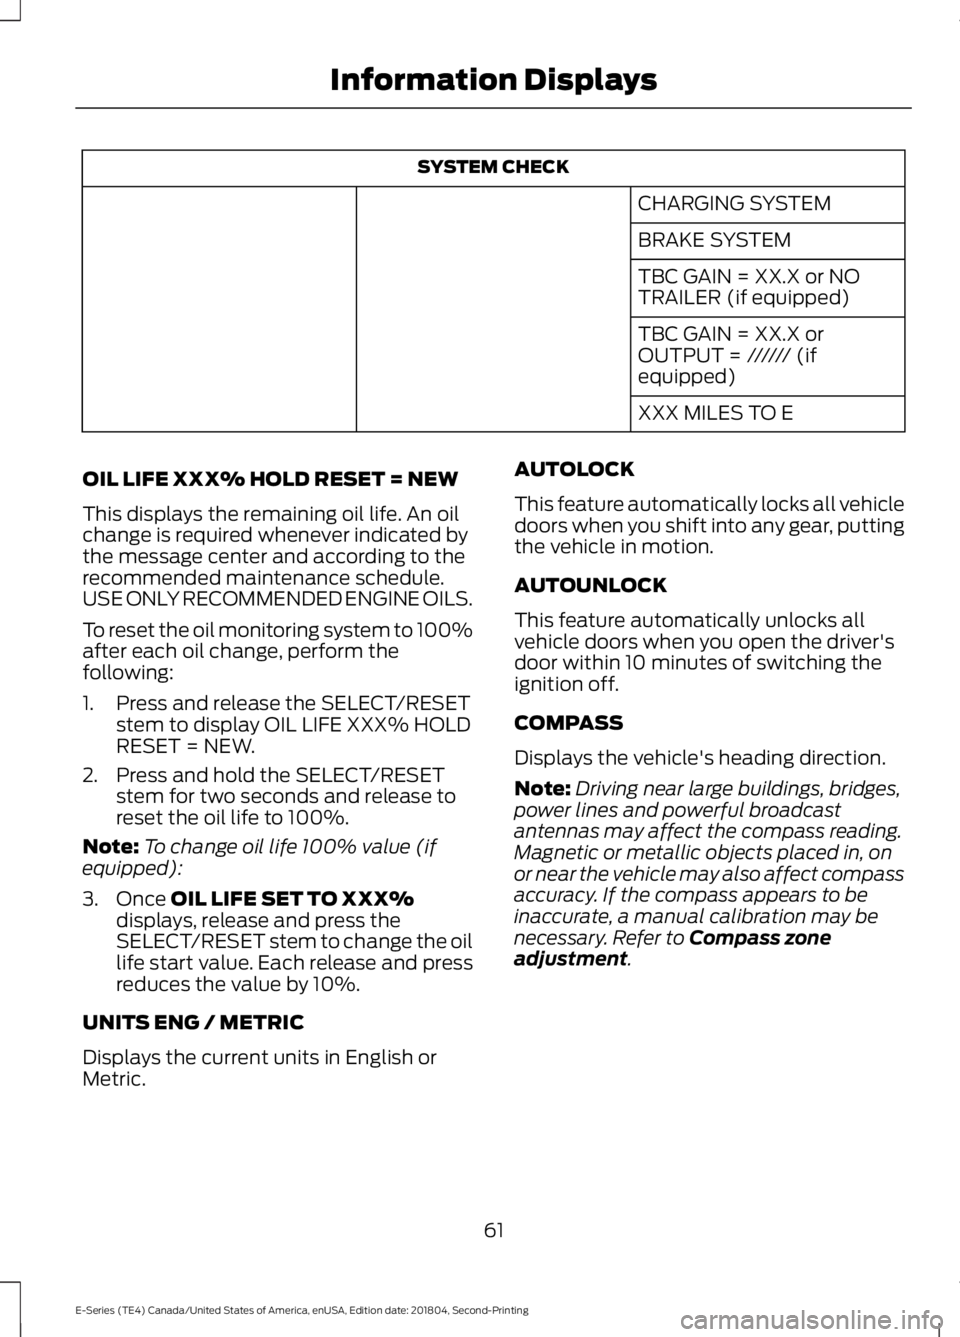
mirrors when your vehicle is moving. Left mirror.
A
Off.B
Right mirror.
C
To adjust your mirrors:
1. Select the mirror you want to adjust.
2. Move the control in the direction you want to tilt the mirror.
3. Return the control to the center position to lock the mirrors in place.
Fold-Away Exterior Mirrors
Push the mirror toward the door window
glass. Make sure that you fully engage the
mirror in its support when returning it to its
original position.
51
E-Series (TE4) Canada/United States of America, enUSA, Edition date: 201804, Second-Printing Windows and MirrorsE163056 E163059
B
AC
Page 64 of 329

SYSTEM CHECK
CHARGING SYSTEM
BRAKE SYSTEM
TBC GAIN = XX.X or NO
TRAILER (if equipped)
TBC GAIN = XX.X or
OUTPUT = ////// (if
equipped)
XXX MILES TO E
OIL LIFE XXX% HOLD RESET = NEW
This displays the remaining oil life. An oil
change is required whenever indicated by
the message center and according to the
recommended maintenance schedule.
USE ONLY RECOMMENDED ENGINE OILS.
To reset the oil monitoring system to 100%
after each oil change, perform the
following:
1. Press and release the SELECT/RESET stem to display OIL LIFE XXX% HOLD
RESET = NEW.
2. Press and hold the SELECT/RESET stem for two seconds and release to
reset the oil life to 100%.
Note: To change oil life 100% value (if
equipped):
3. Once OIL LIFE SET TO XXX%
displays, release and press the
SELECT/RESET stem to change the oil
life start value. Each release and press
reduces the value by 10%.
UNITS ENG / METRIC
Displays the current units in English or
Metric. AUTOLOCK
This feature automatically locks all vehicle
doors when you shift into any gear, putting
the vehicle in motion.
AUTOUNLOCK
This feature automatically unlocks all
vehicle doors when you open the driver's
door within 10 minutes of switching the
ignition off.
COMPASS
Displays the vehicle's heading direction.
Note:
Driving near large buildings, bridges,
power lines and powerful broadcast
antennas may affect the compass reading.
Magnetic or metallic objects placed in, on
or near the vehicle may also affect compass
accuracy. If the compass appears to be
inaccurate, a manual calibration may be
necessary. Refer to
Compass zone
adjustment.
61
E-Series (TE4) Canada/United States of America, enUSA, Edition date: 201804, Second-Printing Information Displays
Page 77 of 329

GENERAL INFORMATION
WARNING: Extended idling at high
engine speeds can produce very high
temperatures in the engine and exhaust
system, creating the risk of fire or other
damage. WARNING: Do not park, idle or
drive your vehicle on dry grass or other
dry ground cover. The emission system
heats up the engine compartment and
exhaust system, creating the risk of fire. WARNING: Do not start the engine
in a closed garage or in other enclosed
areas. Exhaust fumes can be toxic.
Always open the garage door before you
start the engine. WARNING:
Exhaust leaks may
result in entry of harmful and potentially
lethal fumes into the passenger
compartment. If you smell exhaust
fumes inside your vehicle, have your
vehicle inspected immediately. Do not
drive if you smell exhaust fumes.
If you disconnect the battery, your vehicle
may exhibit some unusual driving
characteristics for approximately
5 mi
(8 km) after you reconnect it. This is
because the engine management system
must realign itself with the engine. You
can disregard any unusual driving
characteristics during this period.
The powertrain control system meets all
Canadian interference-causing equipment
standard requirements regulating the
impulse electrical field or radio noise. When you start the engine, avoid pressing
the accelerator pedal before and during
operation. Only use the accelerator pedal
when you have difficulty starting the
engine.
IGNITION SWITCH
A
(accessory) - Allows the electrical
accessories, such as the radio, to operate
while the engine is not running.
Note: Do not leave the ignition key in this
position for too long. This could cause your
vehicle battery to lose charge.
B
(lock) - Locks the gearshift lever and
allows key removal.
C
(off) - The ignition is off.
Note: When you switch the ignition off and
leave your vehicle, do not leave your key in
the ignition. This could cause your vehicle
battery to lose charge.
D
(on) - All electrical circuits are
operational and the warning lamps and
indicators illuminate.
E
(start) - Cranks the engine.
STARTING A GASOLINE
ENGINE
When you start the engine, the idle speed
increases, this helps to warm up the
engine. If the engine idle speed does not
slow down automatically, have your
vehicle checked by an authorized dealer.
74
E-Series (TE4) Canada/United States of America, enUSA, Edition date: 201804, Second-Printing Starting and Stopping the EngineE161572
D
E
C
B
A
Page 79 of 329

ENGINE BLOCK HEATER (IF
EQUIPPED) WARNING:
Failure to follow
engine block heater instructions could
result in property damage or serious
personal injury. WARNING:
Do not use your heater
with ungrounded electrical systems or
two-pronged adapters. There is a risk of
electrical shock. WARNING:
Do not fully close the
hood, or allow it to drop under its own
weight when using the engine block
heater. This could damage the power
cable and may cause an electrical short
resulting in fire, injury and property
damage.
Note: The heater is most effective when
outdoor temperatures are below
0°F
(-18°C).
The heater acts as a starting aid by
warming the engine coolant. This allows
the climate control system to respond
quickly. The equipment includes a heater
element (installed in the engine block) and
a wire harness. You can connect the
system to a grounded 120-volt AC
electrical source.
We recommend that you do the following
for a safe and correct operation:
• Use a 16-gauge outdoor extension cord
that is product certified by
Underwriter ’s Laboratory (UL) or
Canadian Standards Association
(CSA). This extension cord must be
suitable for use outdoors, in cold temperatures, and be clearly marked
Suitable for Use with Outdoor
Appliances. Do not use an indoor
extension cord outdoors. This could
result in an electric shock or become a
fire hazard.
• Use as short an extension cord as
possible.
• Do not use multiple extension cords.
• Make sure that when in operation, the
extension cord plug and heater cord
plug connections are free and clear of
water. This could cause an electric
shock or fire.
• Make sure your vehicle is parked in a
clean area, clear of combustibles.
• Make sure the heater, heater cord and
extension cord are firmly connected.
• Check for heat anywhere in the
electrical hookup once the system has
been operating for approximately 30
minutes.
• Make sure the system is unplugged and
properly stowed before starting and
driving your vehicle. Make sure the
protective cover seals the prongs of the
block heater cord plug when not in use.
• Make sure the heater system is
checked for proper operation before
winter.
Using the Engine Block Heater
Make sure the receptacle terminals are
clean and dry prior to use. Clean them with
a dry cloth if necessary.
The heater uses 0.4 to 1.0 kilowatt-hours
of energy per hour of use. The system does
not have a thermostat. It achieves
maximum temperature after
approximately three hours of operation.
Using the heater longer than three hours
does not improve system performance and
unnecessarily uses electricity.
76
E-Series (TE4) Canada/United States of America, enUSA, Edition date: 201804, Second-Printing Starting and Stopping the Engine
Page 84 of 329

•
Keep the fuel pump nozzle in contact
with the fuel container while filling.
• Do not use a device that would hold
the fuel pump handle in the fill position.
Fuel Filler Cap WARNING: The fuel system may
be under pressure. If you hear a hissing
sound near the fuel filler door, do not
refuel until the sound stops. Otherwise,
fuel may spray out, which could cause
serious personal injury. WARNING:
If you do not use the
proper fuel filler cap, excessive pressure
or vacuum in the fuel tank may damage
the fuel system or cause the fuel cap to
disengage in a collision, which may result
in possible personal injury.
Note: If you must replace the fuel filler cap,
replace it with a fuel filler cap that is
designed for your vehicle. The customer
warranty may be void for any damage to the
fuel tank or fuel system if the correct
genuine Ford, Motorcraft or other certified
fuel filler cap is not used.
Your fuel tank filler cap has an indexed
design with a 1/4th turn on and off feature.
When fueling your vehicle:
1. Put your vehicle in park (P).
2. Switch the engine off.
3. Carefully turn the filler cap counterclockwise until it spins off.
4. Pull to remove the cap from the fuel filler pipe.
5. To install the cap, align the tabs on the
cap with the notches on the filler pipe.
6. Turn the filler cap clockwise 1/4 of a turn clockwise until it clicks at least
once. If the Check Fuel Cap light or a Check Fuel
Cap message appears in the instrument
cluster and stays on after you start the
engine, you may not have installed the fuel
filler properly.
If the fuel cap light remains on, at the next
opportunity, safely pull off of the road,
remove the fuel filler cap, align the cap
properly and reinstall it. The check fuel cap
light or Check fuel cap message may not
reset immediately. It may take several
driving cycles for the indicators to turn off.
A driving cycle consists of an engine
start-up (after four or more hours with the
engine off) followed by normal city and
highway driving.
FUEL CONSUMPTION
Advertised Capacity
The advertised capacity is the maximum
amount of fuel that you can add to the fuel
tank after running out of fuel. Included in
the advertised capacity is an empty
reserve. The empty reserve is an
unspecified amount of fuel that remains
in the fuel tank when the fuel gauge
indicates empty.
Note:
The amount of fuel in the empty
reserve varies and should not be relied upon
to increase driving range.
Fuel Economy
Your vehicle calculates fuel economy
figures through the trip computer average
fuel function. See
General Information
(page 58).
The first
1,000 mi (1,500 km) of driving is
the break-in period of the engine. A more
accurate measurement is obtained after
2,000 mi (3,000 km)
.
81
E-Series (TE4) Canada/United States of America, enUSA, Edition date: 201804, Second-Printing Fuel and Refueling
Page 140 of 329

Protected Component
Fuse Rating
Fuse or Relay
Number
Passenger compartment fuse panel.
10A
5
Brake-shift interlock.
Direction indicators lamps.
20A
6
Hazard lamps.
Stop lamps.
Left-side headlamp low beam.
10A
7
Right-side headlamp low beam.
10A
8
Courtesy lamps.
15A
9
Switch illumination.
15A
10
Not used (spare).
10A
11
Not used (spare).
7.5A
12
Mirrors.
5A
13
SYNC
10A
14
Global positioning system module.
Not used (spare).
10A
15
Not used (spare).
15A
16
Door locks.
20A
17
Not used (spare).
20A
18
Not used (spare).
25A
19
Diagnostic connector, fleet telematics
modem, and FordPass Connect (except
stripped chassis).
15A
20
Not used (spare).
15A
21
Parking lamps.
15A
22
License plate lamps.
Headlamp high beams.
15A
23
Horn (except stripped chassis).
20A
24
Demand lighting.
10A
25
Cluster (except stripped chassis).
10A
26
137
E-Series (TE4) Canada/United States of America, enUSA, Edition date: 201804, Second-Printing Fuses
Page 158 of 329

optimum shift feel. We recommend that
the negative battery cable terminal be
disconnected from the battery if you plan
to store your vehicle for an extended period
of time. This minimizes the discharge of
your battery during storage.
Dual Batteries (If Equipped)
Your vehicle may be fitted with a
frame-mounted battery located on the
passenger side frame rail, behind the front
passenger door. This battery is connected
in parallel with the battery in the engine
compartment. Both batteries are used to
start the vehicle.
CHECKING THE WIPER
BLADES Run the tip of your fingers over the edge of
the blade to check for roughness.
Clean the wiper blades with washer fluid
or water applied with a soft sponge or
cloth.
CHANGING THE WIPER
BLADES
You can manually move the wiper arms
when the ignition is off. This allows for ease
of blade replacement and cleaning under
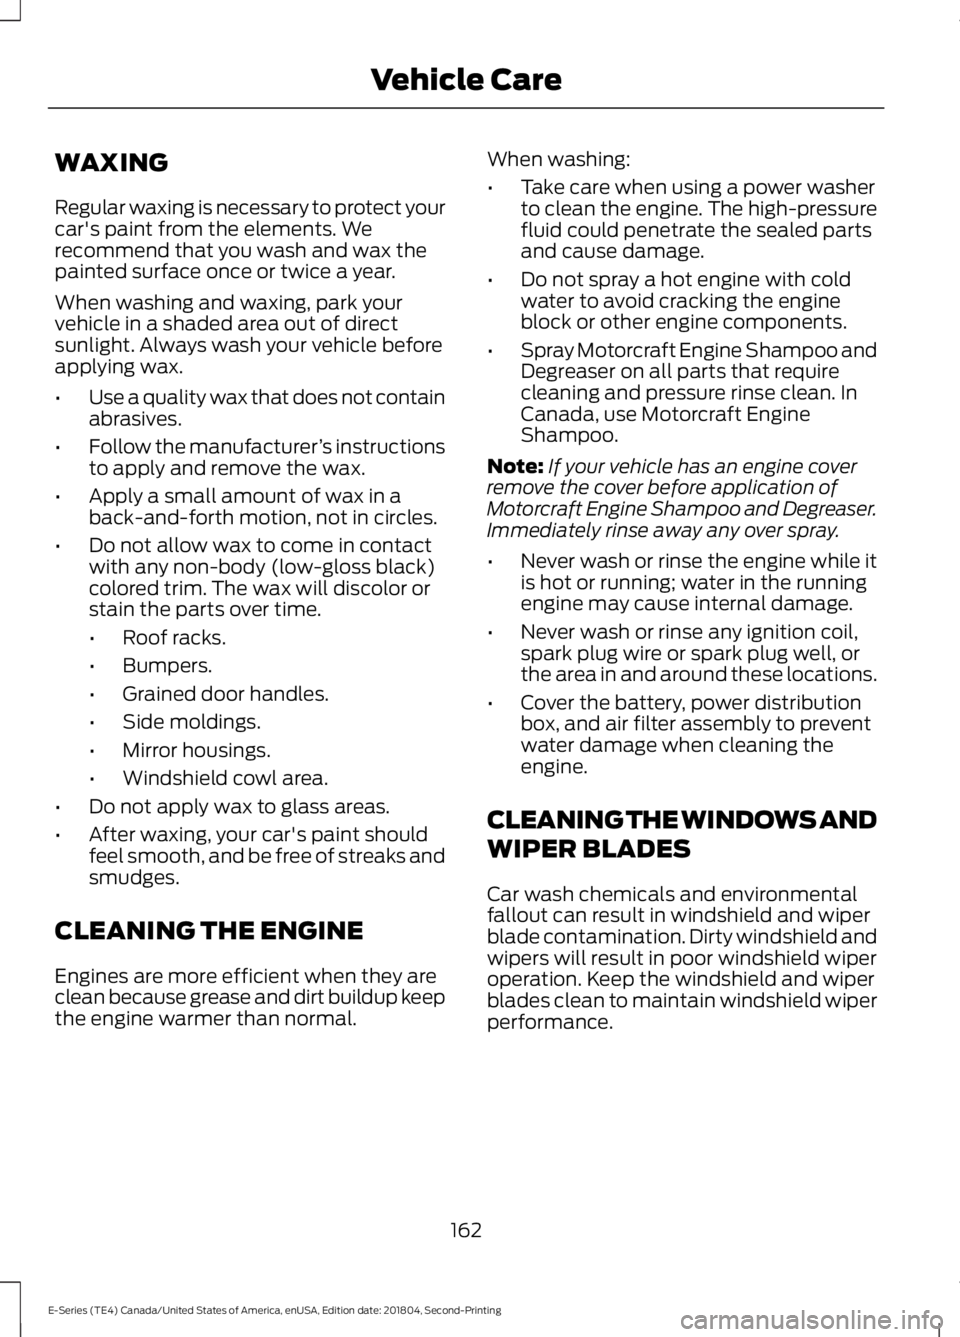
the blades. 1. Pull the wiper blade and arm away
from the glass. 2. Release the wiper blade lock (A) and
separate the wiper blade from the
wiper arm.
3. Install in the reverse order.
Note: Make sure that the wiper blade locks
into place. Lower the wiper arm and blade
back on the windshield. The wiper arms will
automatically return to their normal position
when you turn the ignition on.
• Replace wiper blades at least once per
year for optimum performance.
• You can improve poor wiper quality by
cleaning the wiper blades and the
windshield.
155
E-Series (TE4) Canada/United States of America, enUSA, Edition date: 201804, Second-Printing MaintenanceE142463 E165804 A
E165794
Page 165 of 329

WAXING
Regular waxing is necessary to protect your
car's paint from the elements. We
recommend that you wash and wax the
painted surface once or twice a year.
When washing and waxing, park your
vehicle in a shaded area out of direct
sunlight. Always wash your vehicle before
applying wax.
•
Use a quality wax that does not contain
abrasives.
• Follow the manufacturer ’s instructions
to apply and remove the wax.
• Apply a small amount of wax in a
back-and-forth motion, not in circles.
• Do not allow wax to come in contact
with any non-body (low-gloss black)
colored trim. The wax will discolor or
stain the parts over time.
•Roof racks.
• Bumpers.
• Grained door handles.
• Side moldings.
• Mirror housings.
• Windshield cowl area.
• Do not apply wax to glass areas.
• After waxing, your car's paint should
feel smooth, and be free of streaks and
smudges.
CLEANING THE ENGINE
Engines are more efficient when they are
clean because grease and dirt buildup keep
the engine warmer than normal. When washing:
•
Take care when using a power washer
to clean the engine. The high-pressure
fluid could penetrate the sealed parts
and cause damage.
• Do not spray a hot engine with cold
water to avoid cracking the engine
block or other engine components.
• Spray Motorcraft Engine Shampoo and
Degreaser on all parts that require
cleaning and pressure rinse clean. In
Canada, use Motorcraft Engine
Shampoo.
Note: If your vehicle has an engine cover
remove the cover before application of
Motorcraft Engine Shampoo and Degreaser.
Immediately rinse away any over spray.
• Never wash or rinse the engine while it
is hot or running; water in the running
engine may cause internal damage.
• Never wash or rinse any ignition coil,
spark plug wire or spark plug well, or
the area in and around these locations.
• Cover the battery, power distribution
box, and air filter assembly to prevent
water damage when cleaning the
engine.
CLEANING THE WINDOWS AND
WIPER BLADES
Car wash chemicals and environmental
fallout can result in windshield and wiper
blade contamination. Dirty windshield and
wipers will result in poor windshield wiper
operation. Keep the windshield and wiper
blades clean to maintain windshield wiper
performance.
162
E-Series (TE4) Canada/United States of America, enUSA, Edition date: 201804, Second-Printing Vehicle Care