2019 FIAT TALENTO Owner handbook (in English)
-
 1
1 -
 2
2 -
 3
3 -
 4
4 -
 5
5 -
 6
6 -
 7
7 -
 8
8 -
 9
9 -
 10
10 -
 11
11 -
 12
12 -
 13
13 -
 14
14 -
 15
15 -
 16
16 -
 17
17 -
 18
18 -
 19
19 -
 20
20 -
 21
21 -
 22
22 -
 23
23 -
 24
24 -
 25
25 -
 26
26 -
 27
27 -
 28
28 -
 29
29 -
 30
30 -
 31
31 -
 32
32 -
 33
33 -
 34
34 -
 35
35 -
 36
36 -
 37
37 -
 38
38 -
 39
39 -
 40
40 -
 41
41 -
 42
42 -
 43
43 -
 44
44 -
 45
45 -
 46
46 -
 47
47 -
 48
48 -
 49
49 -
 50
50 -
 51
51 -
 52
52 -
 53
53 -
 54
54 -
 55
55 -
 56
56 -
 57
57 -
 58
58 -
 59
59 -
 60
60 -
 61
61 -
 62
62 -
 63
63 -
 64
64 -
 65
65 -
 66
66 -
 67
67 -
 68
68 -
 69
69 -
 70
70 -
 71
71 -
 72
72 -
 73
73 -
 74
74 -
 75
75 -
 76
76 -
 77
77 -
 78
78 -
 79
79 -
 80
80 -
 81
81 -
 82
82 -
 83
83 -
 84
84 -
 85
85 -
 86
86 -
 87
87 -
 88
88 -
 89
89 -
 90
90 -
 91
91 -
 92
92 -
 93
93 -
 94
94 -
 95
95 -
 96
96 -
 97
97 -
 98
98 -
 99
99 -
 100
100 -
 101
101 -
 102
102 -
 103
103 -
 104
104 -
 105
105 -
 106
106 -
 107
107 -
 108
108 -
 109
109 -
 110
110 -
 111
111 -
 112
112 -
 113
113 -
 114
114 -
 115
115 -
 116
116 -
 117
117 -
 118
118 -
 119
119 -
 120
120 -
 121
121 -
 122
122 -
 123
123 -
 124
124 -
 125
125 -
 126
126 -
 127
127 -
 128
128 -
 129
129 -
 130
130 -
 131
131 -
 132
132 -
 133
133 -
 134
134 -
 135
135 -
 136
136 -
 137
137 -
 138
138 -
 139
139 -
 140
140 -
 141
141 -
 142
142 -
 143
143 -
 144
144 -
 145
145 -
 146
146 -
 147
147 -
 148
148 -
 149
149 -
 150
150 -
 151
151 -
 152
152 -
 153
153 -
 154
154 -
 155
155 -
 156
156 -
 157
157 -
 158
158 -
 159
159 -
 160
160 -
 161
161 -
 162
162 -
 163
163 -
 164
164 -
 165
165 -
 166
166 -
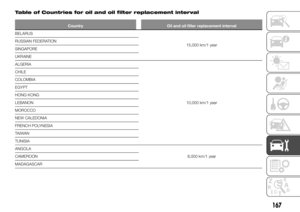
 167
167 -
 168
168 -
 169
169 -
 170
170 -
 171
171 -
 172
172 -
 173
173 -
 174
174 -
 175
175 -
 176
176 -
 177
177 -
 178
178 -
 179
179 -
 180
180 -
 181
181 -
 182
182 -
 183
183 -
 184
184 -
 185
185 -
 186
186 -
 187
187 -
 188
188 -
 189
189 -
 190
190 -
 191
191 -
 192
192 -
 193
193 -
 194
194 -
 195
195 -
 196
196 -
 197
197 -
 198
198 -
 199
199 -
 200
200 -
 201
201 -
 202
202 -
 203
203 -
 204
204 -
 205
205 -
 206
206 -
 207
207 -
 208
208 -
 209
209 -
 210
210 -
 211
211 -
 212
212 -
 213
213 -
 214
214 -
 215
215 -
 216
216 -
 217
217 -
 218
218 -
 219
219 -
 220
220 -
 221
221 -
 222
222 -
 223
223 -
 224
224 -
 225
225 -
 226
226 -
 227
227 -
 228
228 -
 229
229 -
 230
230 -
 231
231 -
 232
232 -
 233
233 -
 234
234 -
 235
235
 If necessary, lower base 9 fig. 122 of
support 8 to extend it.
To refit it, pull the support all the way
towards the driver, lift it until it is
horizontal and push it as far as it will go.
GLOVE COMP")
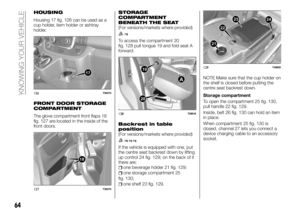
 HOUSING
Housing 17 fig. 126 can be used as a
cup holder, item holder or ashtray
holder.
FRONT DOOR STORAGE
COMPARTMENT
The glove compartment front flaps 18
fig. 127 are located in the inside of the
fr")
 Shelf
To open the compartment 23 fig. 131,
press handle 30.
To install the shelf, insert the end 31
fig. 131 of the shelf referred to in 28 or
29.
Unlock the locking device 32
fig. 132 and press the h")
 CARGO PLUS
(COMPARTMENT AND
FLAP)
69) 75)
Depending on the length of the items
carried in the rear area, use the
compartment or recess 38 fig. 136.
Open flap 37, which is held closed
magnetically.Use")
 ACCESSORIES SOCKET
77) 78)
Socket 3 fig. 141 and, depending on
the trim level, sockets 4 fig. 142 and 5
fig. 143 are approved for connecting
accessories whose power supply is not
greater than 120 Watt")
 MULTIMEDIA
EQUIPMENT
The presence and location of these
devices depend on the multimedia
equipment of the vehicle.
Multimedia ports 1 fig. 144
Multimedia touchscreen 2 fig. 144
Controls on the steerin")
 BAGGAGE COVER
79)
The luggage cover consists of one or
two rigid parts.
There are two possible positions:
position A high fig. 147;
position B low fig. 149.
Depending on the versions, you can lift
up")
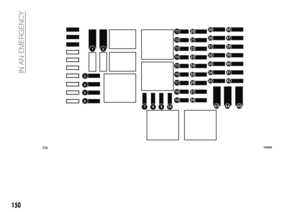
 1fig. 150 General switch ON/Off.
2fig. 151 Activate, store and
increase speed regulator (+).
3fig. 151 Lower speed regulator (-).
4fig. 151 Activate with stored speed
regulator recall (R).
5fig. 151 P")