2019 FIAT 500L dashboard
[x] Cancel search: dashboardPage 110 of 248

WARNING
101)If the engine fails to start with a gear
engaged, the potentially dangerous
situation due to the fact that the
transmission is automatically put in neutral
will be signalled by an acoustic signal.
WARNING
44)Avoid keeping your hand on this lever
except during gear change or AUTO/
MANUAL mode requests.
45)Using the paddles incorrectly (paddles
pushed towards the dashboard) could
break them.
START&STOP
SYSTEM
102) 103)46)
The Start&Stop system automatically
stops the engine whenever the car
is stationary and all the conditions for
automatic switch-off are met. The
engine is restarted when the driver
wants to move off.
In this way, the car efficiency is
increased, by reducing consumption,
dangerous gas emissions and sound
pollution.
OPERATING MODE
Stopping the engine
Versions with manual transmission
: with the car stationary, the engine
stops with the gears in neutral and the
clutch pedal released.
Versions with Dualogic
transmission: the engine stops if the
vehicle is at a standstill and the brake
pedal is pressed. This condition can be
maintained even if the brake pedal is
not depressed, if the gear lever is
in position N (Neutral).
NOTE The engine can only be stopped
automatically after exceeding about
10 km/h, to prevent the engine from
being repeatedly stopped when driving
at walking pace.The
warning light on the instrument
panel switches on to signal that the
engine has stopped.
Restarting the engine
Versions with manual transmission:
press the clutch pedal.
Versions with Dualogic
transmission: if the gear lever is in
position N (Neutral), place it in any other
gear, otherwise release the brake pedal
or move the gear lever to +, – or R.
MANUAL SYSTEM
ACTIVATION/
DEACTIVATION
To activate/deactivate the system
manually, press the
fig. 92 button.
LED off: system activated /LED on:
system deactivated.
WARNING
102)If the battery needs to be replaced,
always contact a Fiat Dealership. Replace
the battery with one of the same type
(HEAVY DUTY) and with the same
specifications.
108
STARTING AND DRIVING
IMPORTANT For versions/markets,
where provided, the system is
activated automatically whenever the
engine is started, regardless of the
condition (system on or off) present
before the engine was stopped.
Page 115 of 248

IMPORTANT In “Traction +” mode, the
Start&Stop system is temporarily
deactivated (LED on the Start&Stop
system button on). To reactivate the
Start&Stop system with “Traction +”
mode on, press the Start&Stop button
located on the dashboard. The
Start&Stop system will be activated
again when “Traction +” mode is
deactivated.
IMPORTANT The City Brake Control -
“Collision Mitigation” system is
temporarily deactivated when “Traction
+” mode is deactivated. Temporary
deactivation of the system is indicated
by the warning light
on the
instrument panel (together with a
message on the display). The City
Brake Control - “Collision Mitigation”
system will be activated again when
“Traction +” mode is deactivated.
“GRAVITY CONTROL” FUNCTION
This driving function aims at maintaining
a constant speed when driving
downhill on a steel gradient. Noise and
vibrations from the wheel sides (brakes)
are normal when the function is active.IMPORTANT The function can only be
selected with “Traction +” mode active,
engine running, handbrake released
and driver side door correctly closed.
Activation
To activate the function, go to a speed
slower than 25 km/h.
After reaching the desired speed,
release the accelerator and brake
pedals completely. If you want to
increase/decrease the speed, press the
accelerator and brake pedals again.
Activation
Turn the ring rightwards (position C fig.
95) and hold in this position for half a
second and in all cases until the
corresponding LED lights up and the
“Gravity Control” mode activation
indicator appears on the display fig. 98.
Once released, the ring-nut returns to
the central position. The “Gravity
Control” is ready to work when the
“Gravity Control” function is selected.
Turning off
To deactivate “Gravity Control” mode,
turn the ring leftwards and hold this
position for half a second.In this case, the LED related to
“Traction +” mode will light up and the
indication that “Gravity Control” function
has been deactivated will appear on
the display.
The “Gravity Control” function is always
deactivated when the engine is started.
IMPORTANT NOTES
IMPORTANT DO NOT USE THE
DEVICE WITH THE TRANSMISSION IN
NEUTRAL.
98F0Y0668C
113
Page 140 of 248

WARNING
53)Halogen bulbs must be handled
holding the metallic part only. Touching the
transparent part of the bulb with your
fingers may reduce the intensity of the
emitted light and even reduce the lifespan
of the bulb. In the event of accidental
contact, wipe the bulb with a cloth
moistened with alcohol and let the bulb
dry.
54)Where possible, it is advisable to have
bulbs changed at a Fiat Dealership. The
correct operation and direction of the
external lights are absolutely essential for
the safety of the car and of compliance
with the law.
REPLACING FUSES
130) 131) 132) 133) 134) 135)55)
FUSE LOCATION
Fuses are grouped together in three
fuseboxes located in the engine
compartment, under the dashboard
and inside the boot.
ENGINE COMPARTMENT
CONTROL UNIT
To access the fuses unscrew the two
screws A fig. 148 and remove the cover
B in the direction shown by the arrow.
IMPORTANT Before removing cover
Bfig. 148 press and turn the two
bayonet screws A slowly anticlockwise
(using the flat tip screwdriver provided)
until unlocking them. This is shown
by the screw heads lifting.After replacing the fuse, make sure you
close cover B on the junction unit.
The fuseboxfig. 149 is located by the
side of the battery.
148F0Y0071C
149F0Y0072C
138
IN AN EMERGENCY
Page 141 of 248

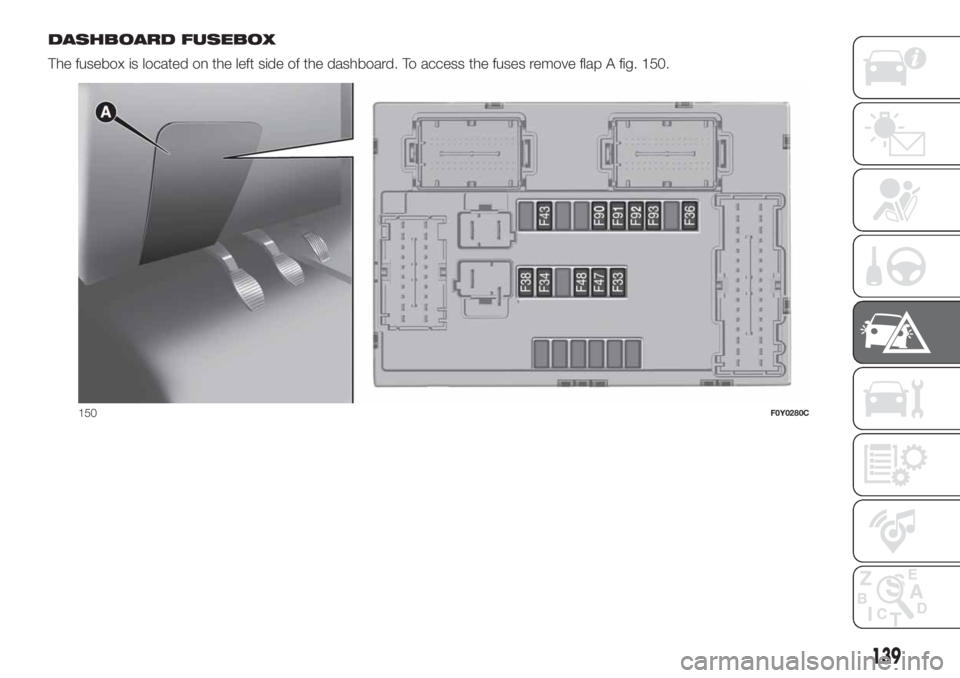
DASHBOARD FUSEBOX
The fusebox is located on the left side of the dashboard. To access the fuses remove flap A fig. 150.
150F0Y0280C
139
Page 142 of 248

ACCESS TO DASHBOARD
FUSES (right-hand drive
version)
To access the fuses, proceed as
follows:
open the passenger side lower glove
compartment;
using the supplied screwdriver fig.
151 remove the two side devices A fig.
152;
press on the devices B fig. 153 at
the sides of the glove compartment;
remove the guard C fig. 154, pulling
it towards you. This gives access to
the fusebox fig. 155 and the faulty fuse
can now be replaced.
After changing the faulty fuse, replace
the guard C and perform the sequence
of operations described above, in
reverse order.Take particular care to fit the devices B
correctly.
151F0Y0236C
152F0Y0235C
153F0Y0238C
154F0Y0239C
155F0Y0237C
140
IN AN EMERGENCY
Page 144 of 248

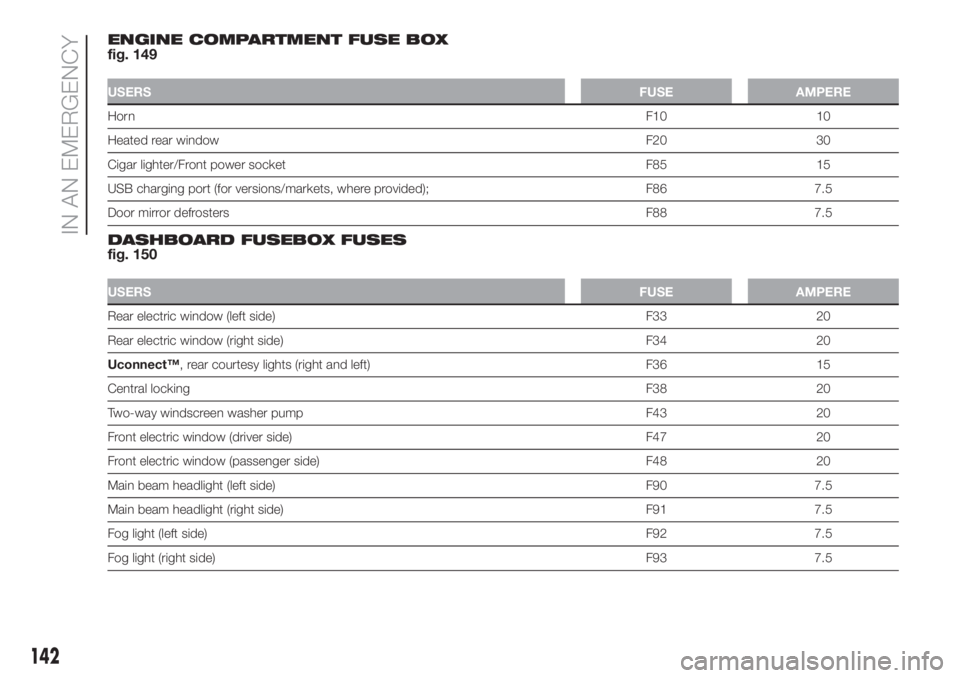
ENGINE COMPARTMENT FUSE BOX
fig. 149
USERSFUSE AMPERE
HornF10 10
Heated rear windowF20 30
Cigar lighter/Front power socket F85 15
USB charging port (for versions/markets, where provided); F86 7.5
Door mirror defrostersF88 7.5
DASHBOARD FUSEBOX FUSES
fig. 150
USERSFUSE AMPERE
Rear electric window (left side) F33 20
Rear electric window (right side) F34 20
Uconnect™, rear courtesy lights (right and left) F36 15
Central lockingF38 20
Two-way windscreen washer pump F43 20
Front electric window (driver side) F47 20
Front electric window (passenger side) F48 20
Main beam headlight (left side) F90 7.5
Main beam headlight (right side) F91 7.5
Fog light (left side)F92 7.5
Fog light (right side)F93 7.5
142
IN AN EMERGENCY
Page 235 of 248

IMPORTANT INFORMATION AND RECOMMENDATIONS
WARNING
INTERIOR FITTINGS
Do not travel with the storage compartments open: they may injure the front seat occupants in the event of an accident.
The cigar lighter gets extremely hot. Handle it carefully and make sure that children don’t use it: risk of fire and/or burns.
ROOF RACK/SKI RACK
After travelling for a few kilometres, check to ensure that the fixing screws for the attachments are well tightened.
Never exceed the maximum permitted loads (see chapter "Technical specifications").
Evenly distribute the load and take into account, when driving, the increased responsiveness of the vehicle to side wind.
INTERIOR
Ever use flammable products, such as petrol ether or rectified petrol to clean the inside of the car. The electrostatic charges which are
generated by rubbing during the cleaning operation may cause a fire.
Do not keep aerosol cans in the car: they might explode. Aerosol cans must not be exposed to a temperature exceeding 50°C. When the
vehicle is exposed to sunlight, the internal temperature can greatly exceed this value.
It is essential that there is nothing under the pedals: make sure the mats are lying flat and do not get in the way of the pedals.
POWER SUPPLY
Modifications or repairs to the fuel system that are not carried out correctly or do not take the system technical specifications into account
can cause malfunctions leading to the risk of fire.
WARNING
ROOF RACK/SKI RACK
Fully comply with the regulations in force concerning maximum clearance.
INTERIOR
Never use alcohol, petrols and derivatives to clean the dashboard and instrument panel lens.
Page 243 of 248

INDEX
A
BS (system).......................71
Active safety systems................71
Additive for diesel emissions
AdBlue (UREA)..................121
ASR (system).......................72
Automatic dual-zone climate
control system....................23
Battery (electrolyte level check).....162
Battery (recharging)................164
Bodywork
(cleaning and maintenance)......168
Bonnet.............................36
Brake fluid (level check).............162
Bulb replacement..................130
Bulb types.........................132
Cargo Magic Space................38
Carrying children safely..............82
Changes/alterations to the car........5
Checking levels....................159
Child protection systems.............82
Child safety device..................33
City Brake Control - Collision
Mitigation system.................74
Climate control system..............22
CO2 emissions....................198
Control buttons (display).............44
Control panel and on-board
instruments.......................42
Cornering lights (light activation)......26Courtesy lights......................26
Cruise Control
(constant speed regulator).......109
Dashboard.........................10
Dashboard fusebox;................139
Daytime running lights (DRL)
(activation)........................25
Demanding use of the car..........149
Dimensions........................180
Dipped headlights
(bulb replacement)...............133
Direction indicators (activation).......26
Direction indicators (bulb
replacement)....................133
Display.............................44
Door emergency device.............33
Door locking / unlocking.............33
Doors...............................33
Driver knee bag.....................97
Driving assistance systems..........74
DST (system)........................72
Dualdrive
(electric power steering)...........39
Dualogic (transmission).............106
Dusk sensor........................26
Electric sunroof.....................31
Electric windows....................34
Engine compartment...............159
Engine compartment junction
unit.............................138Engine coolant fluid
(level check).....................162
Engine oil (consumption)............162
ERM (system).......................72
ESC (system).......................71
Exterior lights.......................25
Fiat CODE (system).................12
Fix&Go Automatic (kit)..............128
Fixed glass roof.....................30
Flashing (activation)..................26
Fluids and lubricants...............195
Fog lights (bulb replacement).......135
Fog lights / rear fog light
(activation)........................25
Follow Me Home (device)............27
Front airbag driver's side.............96
Front airbags........................95
Front ceiling light....................27
Front lower light cluster.............133
Front seats..........................15
Fuel consumption..................198
Fuel cut-off system.................146
Fuses (replacement)................138
Gear Shift Indicator (system)........44
Gravity Control (function).............71
Handbrake........................104
Hazard warning lights..............123
Head restraints......................18
Hill Holder (system)..................71