2019 FIAT 124 SPIDER battery
[x] Cancel search: batteryPage 53 of 228

ODOMETER / TRIP METER
The display mode can be changed from
odometer to “Trip meter A” to “Trip
meter B” and then back to odometer by
pressing the selector 1 fig. 52 while one
of them is displayed. The selected
mode will be displayed.
Trip meter
The trip meter can record the total
distance of two trips. One is recorded in
“Trip A”, and the other is recorded in
“Trip B”.
For instance, “Trip A” can record the
distance from the point of origin, and
“Trip B” can record the distance from
where the fuel tank is filled.
Use this meter to measure trip
distances and to compute fuel
consumption.Versions with Radio 7”: if the fuel
economy data is reset using the fuel
economy monitor, or Trip A is reset
using the trip meter when the function
which synchronizes the fuel economy
monitor and the trip meter is on, the
fuel economy data and Trip A are reset
simultaneously.
NOTE Only the trip meters record
tenths of kilometers (miles).
Trip meter reset
The trip meter will be erased when the
power supply is interrupted (blown fuse
or the battery is disconnected) or when
the vehicle is driven over 9999.9 km
(mile).
INSTRUMENT PANEL
ILLUMINATION
Brightness adjustment
The brightness of the instrument cluster
and dashboard illuminations can be
adjusted by rotating the knob 1 fig. 53:
the brightness decreasesby
rotating the knob to the left. A beep
sound will be heard when the knob has
been rotated to the maximum dim
position;
the brightness increasesby
rotating the knob to the right.Cancelling illumination dimmer
Rotate the knob to the right until a beep
sound is heard while the instrument
cluster is dimmed with the ignition
switched ON. If the instrument cluster's
visibility is reduced due to glare from
surrounding brightness, cancel the
illumination dimmer.
When the illumination dimmer is
canceled, the instrument cluster cannot
be dimmed even if the position lights
are turned on. When the illumination
dimmer is canceled, the screen in the
center display switches to constant
display of the daytime screen.
5205020102-121-001
5305020102-121-001
51
Page 61 of 228

Warning light What it means What to do
KEY WARNING LIGHT (illuminate)
If any malfunction occurs in the keyless entry
system, it illuminates continuously.
IMPORTANT If the key warning indicator light
illuminates or the push button start indicator
light (amber) flashes, the engine may not start.If the engine cannot be started, try starting it
using the emergency operation for starting the
engine, and contact a Fiat Dealership as soon
as possible.
Refer to “Emergency operation for starting
operation” in “Starting the engine” paragraph.
KEY WARNING LIGHT (flashing)
Advanced key malfunction
Take the appropriate action and verify that
the warning light turns off.
The advanced key battery is dead:
replace the key battery.
The advanced key is not within the
operation range/is placed in areas inside
the cabin where it is difficult for the key
to be detected
: bring the advanced key into
the operation range.
A key from another manufacturer
similar to the advanced key is in the
operation range
: take the key from another
manufacturer similar to the advanced key out
of the operation range.
Without the ignition switched off, the
advanced key is taken out of the cabin,
and then all the doors are closed
: bring
the advanced key back into the cabin.
VEHICLE SECURITY ALARM SYSTEM (where
provided)
The warning light switches on to report a
failure of the vehicle security alarm system.Contact a Fiat Dealership as soon as possible.
59
Page 62 of 228
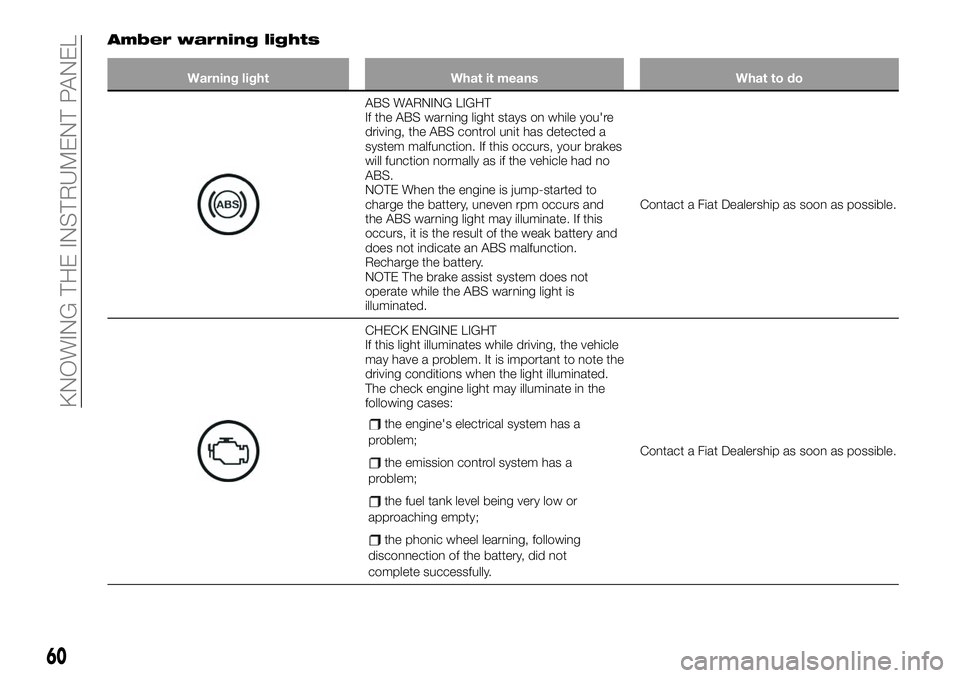
Amber warning lights
Warning light What it means What to do
ABS WARNING LIGHT
If the ABS warning light stays on while you're
driving, the ABS control unit has detected a
system malfunction. If this occurs, your brakes
will function normally as if the vehicle had no
ABS.
NOTE When the engine is jump-started to
charge the battery, uneven rpm occurs and
the ABS warning light may illuminate. If this
occurs, it is the result of the weak battery and
does not indicate an ABS malfunction.
Recharge the battery.
NOTE The brake assist system does not
operate while the ABS warning light is
illuminated.Contact a Fiat Dealership as soon as possible.
CHECK ENGINE LIGHT
If this light illuminates while driving, the vehicle
may have a problem. It is important to note the
driving conditions when the light illuminated.
The check engine light may illuminate in the
following cases:
the engine's electrical system has a
problem;
the emission control system has a
problem;
the fuel tank level being very low or
approaching empty;
the phonic wheel learning, following
disconnection of the battery, did not
complete successfully.
Contact a Fiat Dealership as soon as possible.
60
KNOWING THE INSTRUMENT PANEL
Page 65 of 228

Warning light What it means What to do
MASTER WARNING LIGHT
Versions without Radio 7”
The warning light turns on continuously if there
is a malfunction in the battery management
system or there is a malfunction in the brake
switch.
Versions with Radio 7”
The warning light turns on when the system
has a malfunction. Operate the center display
and verify the content. Refer to “Vehicles with
Radio 7” paragraph in this chapter.Contact a Fiat Dealership as soon as possible.
63
Page 69 of 228

Warning light What it means What to do
KEY INDICATOR LIGHT
Warning light flashing
When the push button start is pressed from
ON to ACC or OFF, the warning light may flash
for approximately 30 seconds indicating that
the remaining battery power of the key is low.Replace with a new battery before the key
becomes unusable.
Blue warning light
Warning light What it means What to do
MAIN BEAM HEADLIGHTS
The warning light switches on when the main
beam headlights are turned on.
LOW ENGINE COOLANT TEMPERATURE
INDICATOR LIGHT
(for versions/markets where provided)
The light illuminates continuously when the
engine coolant temperature is low and turns
off after the engine is warm.
If the low engine coolant temperature indicator
light remains illuminated after the engine has
been sufficiently warmed up, the temperature
sensor could have a malfunction.Contact a Dealership as soon as possible.
67
Page 82 of 228

Tire Pressure Monitoring System
initialization
(versions with conventional tires)
In the following cases, system
initialization must be performed so that
the system operates normally:
a tire pressure is adjusted;
tire rotation is performed;
a tire or wheel is replaced;
the battery is replaced or completely
drained;
the tire pressure monitoring system
warning light is illuminated.
Initialization method
Proceed as follows:
park the car in a safe place and firmly
apply the parking brake;
let the tires cool, then adjust the tire
pressure of all four (4) tires to the
specified pressure indicated on the tire
pressure label located on the driver's
door frame (door open);
switch the ignition ON;
while the vehicle is parked, press and
hold the TPMS system set switch
fig. 60 and verify that the tire pressure
monitoring system warning light in the
instrument cluster flashes twice and a
beep sound is heard once.
IMPORTANT If the system initialization
is performed without adjusting the tire
pressure, the system cannot detect the
normal tire pressure and it may not
illuminate the tire pressure monitoring
system warning light even if a tire
pressure is low, or it may illuminate the
light even if the pressures are normal.
IMPORTANT Adjust the tire pressure on
all four tires and initialize the system
when the tire pressure monitoring
system warning light is turned on. If the
warning light turns on for a reason
other than a flat tire, the tire pressure of
all four tires may have decreased
naturally.
IMPORTANT The system initialization
will not be performed if the switch is
pressed while the vehicle is being
driven.HLA (Hill Launch Assist)
FUNCTION
82)
Hill Launch Assist (HLA) is a function
which assists the driver in accelerating
from a stop while on a slope. When the
driver releases the brake pedal and
depresses the accelerator pedal while
on a slope, the function prevents the
vehicle from rolling. The braking force is
maintained automatically after the brake
pedal is released on a steep grade.
For vehicles with a manual
transmission, Hill Launch Assist
operates on a downward slope when
the shift lever is in the reverse (R)
position, and on an upward slope when
the shift lever is in a position other than
the reverse (R) position.
For vehicles with an automatic
transmission, Hill Launch Assist
operates on a downward slope when
the selector lever is in the reverse (R)
position, and on an upward slope when
the selector lever is in a forward gear.
IMPORTANT Hill Launch Assist does
not operate on a gentle slope. In
addition, the gradient of the slope on
which the system will operate changes
depending on the vehicle's load.
6005120101-12A-321
80
SAFETY
Page 86 of 228

WARNING
83)Always wear your seat belt and make
sure all occupants are properly restrained.
Not wearing a seat belt is extremely
dangerous. During a collision, occupants
not wearing seat belts could hit someone
or things inside the vehicle or even be
thrown out of the vehicle. They could be
seriously injured or even killed. In the same
collision, occupants wearing seat belts
would be much safer.
84)Do not wear twisted seat belts. Twisted
seat belts are dangerous. In a collision, the
full width of the belt is not available to
absorb the impact. This puts more force on
the bones beneath the belt, which could
cause serious injury or death. So, if your
seat belt is twisted, you must straighten
the seat belt to remove any twists and to
allow the full width of the belt to be used.
85)Never use one seat belt on more than
one person at a time. Using one seat belt
for more than one person at a time is
dangerous. A seat belt used in this way
cannot spread the impact forces properly
and the two passengers could be crushed
together and seriously injured or even
killed. Never use one belt for more than
one person at a time and always operate
the vehicle with each occupant properly
restrained.86)Do not operate a vehicle with a
damaged seat belt. Using a damaged seat
belt is dangerous. An accident could
damage the belt webbing of the seat belt in
use. A damaged seat belt cannot provide
adequate protection in a collision. Contact
a Fiat Dealership to inspect all seat belt
systems in use during an accident before
they are used again.
87)Have your seat belts changed
immediately if the pretensioner or load
limiter has been expended. Always have an
expert repairer, we recommend a Fiat
Dealership immediately inspect the seat
belt pretensioners and air bags after any
collision. Like the air bags, the seat belt
pretensioners and load limiters will only
function once and must be replaced after
any collision that caused them to deploy. If
the seat belt pretensioners and load
limiters are not replaced, the risk of injury in
a collision will increase.
88)Positioning the shoulder portion of the
seat belt. Improper positioning of the
shoulder portion of the seat belt is
dangerous. Always make sure the shoulder
portion of the seat belt is positioned across
your shoulder and near your neck, but
never under your arm, on your neck, or on
your upper arm.
89)Positioning the lap portion of the seat
belt. The lap portion of the seat belt worn
too high is dangerous. In a collision, this
would concentrate the impact force directly
on the abdominal area, causing serious
injury. Wear the lap portion of the belt
snugly and as low as possible.90)Instructions for use of seat belt
assemblies. Seat belts are designed to
bear upon the bony structure of the body,
and should be worn low across the front of
the pelvis or the pelvis, chest and
shoulders, as applicable; wearing the lap
section of the belt across the abdominal
area must be avoided. Seat belts should
be adjusted as firmly as possible,
consistent with comfort, to provide the
protection for which they have been
designed. A slack belt will greatly reduce
the protection afforded to the wearer. Care
should be taken to avoid contamination of
the webbing with polishes, oils and
chemicals, and particularly battery acid.
Cleaning may safely be carried out using
mild soap and water. The belt should be
replaced if webbing becomes frayed,
contaminated or damaged. It is essential to
replace the entire assembly after it has
been worn in a severe impact even if
damage to the assembly is not obvious.
Belts should not be worn with straps
twisted. Each belt assembly must only be
used by one occupant; it is dangerous to
put a belt around a child being carried on
the occupant's lap.
91)No modifications or additions should
be made by the user which will either
prevent the seat belt adjusting devices
from operating to remove slack, or prevent
the seat belt assembly from being adjusted
to remove slack.
84
SAFETY
Page 130 of 228
REFUELLING THE
VEHICLE
162) 163) 164) 165) 166) 167)
Always stop the engine before
refuelling.
FUEL REQUIREMENTS
Only use premium unleaded fuel
(conforming to EN 228 specification
within E10) with a number of octanes
not lower than 95.
IMPORTANT USE ONLY UNLEADED
FUEL. Leaded fuel is harmful to the
catalytic converter and oxygen sensors
and will lead to deterioration of the
emission control system and or failures.
IMPORTANT The use of E10 fuel with
10% ethanol in Europe is safe for your
vehicle. Damage to your vehicle may
occur when ethanol exceeds this
recommendation.
IMPORTANT Never add fuel system
additives, otherwise the emission
control system could be damaged.
Contact a Fiat Dealership for details.
REFUELLING
PROCEDURE
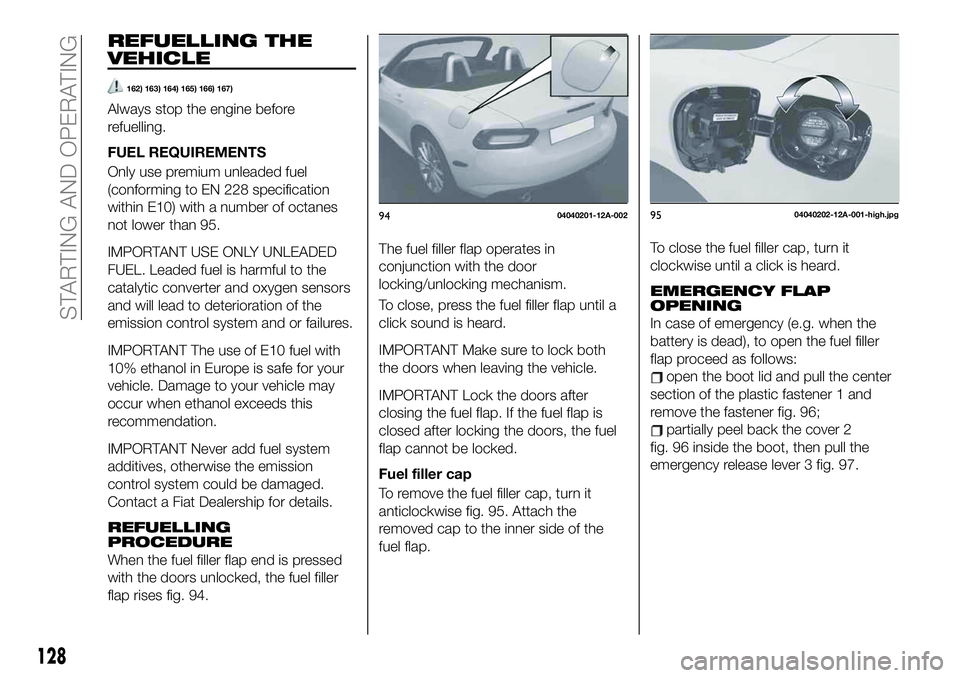
When the fuel filler flap end is pressed
with the doors unlocked, the fuel filler
flap rises fig. 94.The fuel filler flap operates in
conjunction with the door
locking/unlocking mechanism.
To close, press the fuel filler flap until a
click sound is heard.
IMPORTANT Make sure to lock both
the doors when leaving the vehicle.
IMPORTANT Lock the doors after
closing the fuel flap. If the fuel flap is
closed after locking the doors, the fuel
flap cannot be locked.
Fuel filler cap
To remove the fuel filler cap, turn it
anticlockwise fig. 95. Attach the
removed cap to the inner side of the
fuel flap.To close the fuel filler cap, turn it
clockwise until a click is heard.
EMERGENCY FLAP
OPENING
In case of emergency (e.g. when the
battery is dead), to open the fuel filler
flap proceed as follows:
open the boot lid and pull the center
section of the plastic fastener 1 and
remove the fastener fig. 96;
partially peel back the cover 2
fig. 96 inside the boot, then pull the
emergency release lever 3 fig. 97.
9404040201-12A-0029504040202-12A-001-high.jpg
128
STARTING AND OPERATING