2019 DODGE CHARGER check oil
[x] Cancel search: check oilPage 141 of 560

If the light turns on while driving, safely pull over and stop
the vehicle. If the A/C system is on, turn it off. Also, shift
the transmission into NEUTRAL and idle the vehicle. If the
temperature reading does not return to normal, turn the
engine off immediately and call for service.
Refer to “If Your Engine Overheats” in “In Case Of
Emergency” for further information.
— Oil Pressure Warning Light
This warning light will illuminate to indicate low engine
oil pressure. If the light turns on while driving, stop the
vehicle, shut off the engine as soon as possible, and contact
an authorized dealer. A chime will sound when this light
turns on.
Do not operate the vehicle until the cause is corrected. This
light does not indicate how much oil is in the engine. The
engine oil level must be checked under the hood.
— Oil Temperature Warning Light
This warning light will illuminate to indicate the engine oil
temperature is high. If the light turns on while driving,
stop the vehicle and shut off the engine as soon as possible.
Wait for oil temperature to return to normal levels.
— Seat Belt Reminder Warning Light
This warning light indicates when the driver or passenger
seat belt is unbuckled. When the ignition is first placed in
the ON/RUN or ACC/ON/RUN position and if the
driver ’s seat belt is unbuckled, a chime will sound and the
light will turn on. When driving, if the driver or front
passenger seat belt remains unbuckled, the Seat Belt Re-
minder Light will flash or remain on continuously and a
chime will sound.
Refer to “Occupant Restraint Systems” in “Safety” for
further information.
— Transmission Temperature Warning Light —
If Equipped
This warning light will illuminate to warn of a high
transmission fluid temperature. This may occur with
strenuous usage such as trailer towing. If this light turns
on, stop the vehicle and run the engine at idle or slightly
faster, with the transmission in PARK or NEUTRAL, until
the light turns off. Once the light turns off, you may
continue to drive normally.
4
GETTING TO KNOW YOUR INSTRUMENT PANEL 139
Page 142 of 560
WARNING!
If you continue operating the vehicle when the Trans-
mission Temperature Warning Light is illuminated you
could cause the fluid to boil over, come in contact with
hot engine or exhaust components and cause a fire.
CAUTION!
Continuous driving with the Transmission Tempera-
ture Warning Light illuminated will eventually cause
severe transmission damage or transmission failure.
— Trunk Open Warning Light
This indicator will illuminate when the trunk is open and
not fully closed.
NOTE:If the vehicle is moving, there will also be a single
chime.
— Vehicle Security Warning Light — If Equipped
This light will flash at a fast rate for approximately 15
seconds when the vehicle security alarm is arming, and
then will flash slowly until the vehicle is disarmed.
Yellow Warning Lights
— Engine Check/Malfunction Indicator Warning
Light (MIL)
The Engine Check/Malfunction Indicator Light (MIL) is a
part of an Onboard Diagnostic System called OBD II that
monitors engine and automatic transmission control sys-
tems. This warning light will illuminate when the ignition
is in the ON/RUN position before engine start. If the bulb
does not come on when turning the ignition switch from
OFF to ON/RUN, have the condition checked promptly.
Certain conditions, such as a loose or missing gas cap, poor
quality fuel, etc., may illuminate the light after engine start.
The vehicle should be serviced if the light stays on through
several typical driving styles. In most situations, the ve-
hicle will drive normally and will not require towing.
When the engine is running, the MIL may flash to alert
serious conditions that could lead to immediate loss of
power or severe catalytic converter damage. The vehicle
should be serviced by an authorized dealer as soon as
possible if this occurs.
140 GETTING TO KNOW YOUR INSTRUMENT PANEL
Page 222 of 560
WARNING!(Continued)
•If it is necessary to sit in a parked vehicle with the
engine running, adjust your heating or cooling con-
trols to force outside air into the vehicle. Set the
blower at high speed.
The best protection against carbon monoxide entry into the
vehicle body is a properly maintained engine exhaust
system.
Whenever a change is noticed in the sound of the exhaust
system, when exhaust fumes can be detected inside the
vehicle, or when the underside or rear of the vehicle is
damaged, have a competent mechanic inspect the complete
exhaust system and adjacent body areas for broken, dam-
aged, deteriorated, or mispositioned parts. Open seams or
loose connections could permit exhaust fumes to seep into
the passenger compartment. In addition, inspect the ex-
haust system each time the vehicle is raised for lubrication
or oil change. Replace as required.
Safety Checks You Should Make Inside The Vehicle
Seat Belts
Inspect the seat belt system periodically, checking for cuts,
frays, and loose parts. Damaged parts must be replaced
immediately. Do not disassemble or modify the system.
Front seat belt assemblies must be replaced after a collision.
Rear seat belt assemblies must be replaced after a collision
if they have been damaged (i.e., bent retractor, torn web-
bing, etc.). If there is any question regarding seat belt or
retractor condition, replace the seat belt.
Air Bag Warning Light
The Air Bag warning lightwill turn on for four to
eight seconds as a bulb check when the ignition switch
is first turned to ON/RUN. If the light is either not on
during starting, stays on, or turns on while driving,
have the system inspected at an authorized dealer as
soon as possible. After the bulb check, this light will
illuminate with a single chime when a fault with the Air
Bag System has been detected. It will stay on until the
fault is removed. If the light comes on intermittently or
remains on while driving, have an authorized dealer
service the vehicle immediately.
220 SAFETY
Page 225 of 560
Lights
Have someone observe the operation of brake lights and
exterior lights while you work the controls. Check turn
signal and high beam indicator lights on the instrument
panel.
Door Latches
Check for proper closing, latching, and locking.
Fluid Leaks
Check area under the vehicle after overnight parking for
fuel, coolant, oil, or other fluid leaks. Also, if gasoline
fumes are detected or if fuel, or brake fluid leaks are
suspected. The cause should be located and corrected
immediately.
5
SAFETY 223
Page 236 of 560
While cruising, brief full-throttle acceleration within the
limits of local traffic laws contributes to a good break-in.
However, wide-open throttle acceleration in low gear can
be detrimental and should be avoided.
The engine oil, transmission fluid, and axle lubricant
installed at the factory is high-quality and energy-
conserving. Oil, fluid, and lubricant changes should be
consistent with anticipated climate and conditions under
which vehicle operations will occur. For the recommended
viscosity and quality grades, refer to “Fluids And Lubri-
cants” in “Technical Specifications”.
CAUTION!
Never use Non-Detergent Oil or Straight Mineral Oil
in the engine or damage may result.
NOTE: A new engine may consume some oil during its
first few thousand miles (kilometers) of operation. This
should be considered a normal part of the break-in and not
interpreted as an indication of difficulty. Please check your
oil level with the engine oil indicator often during the
break in period. Add oil as required. For vehicles equipped with the 6.4L use the following
engine break-in recommendations:
Despite modern technology and World Class manufactur-
ing methods, the moving parts of the vehicle must still
wear in with each other. This wearing in occurs mainly
during the first 500 miles (805 km) and continues through
the first oil change interval.
It is recommended for the operator to observe the follow-
ing driving behaviors during the new vehicle break-in
period:
0 to 100 miles (0 to 161 km):
•
Do not allow the engine to operate at idle for an
extended period of time.
• Press the accelerator pedal slowly and not more than
halfway to avoid rapid acceleration.
• Avoid aggressive braking.
• Drive with the engine speed less than 3,500 RPM.
• Maintain vehicle speed below 55 mph (88 km/h) and
observe local speed limits.
234 STARTING AND OPERATING
Page 237 of 560
100 to 300 miles (161 to 483 km):
•Press the accelerator pedal slowly and not more than
halfway to avoid rapid acceleration in lower gears (1st to
3rd gears).
• Avoid aggressive braking.
• Drive with the engine speed less than 5,000 RPM.
• Maintain vehicle speed below 70 mph (112 km/h) and
observe local speed limits.
300 to 500 miles (483 to 805 km):
• Exercise the full engine rpm range, shifting manually
(paddles or gear shift) at higher rpms when possible.
• Do not perform sustained operation with the accelerator
pedal at wide open throttle.
• Maintain vehicle speed below 85 mph (136 km/h) and
observe local speed limits.
For the first 1500 miles (2414 km):
• Do not participate in track events, sport driving schools,
or similar activities during the first 1500 miles (2414 km).
NOTE: Check engine oil with every refueling and add if
necessary. Oil and fuel consumption may be higher
through the first oil change interval.PARKING BRAKE
Before leaving the vehicle, make sure that the parking
brake is fully applied and place the gear selector in the
PARK position.
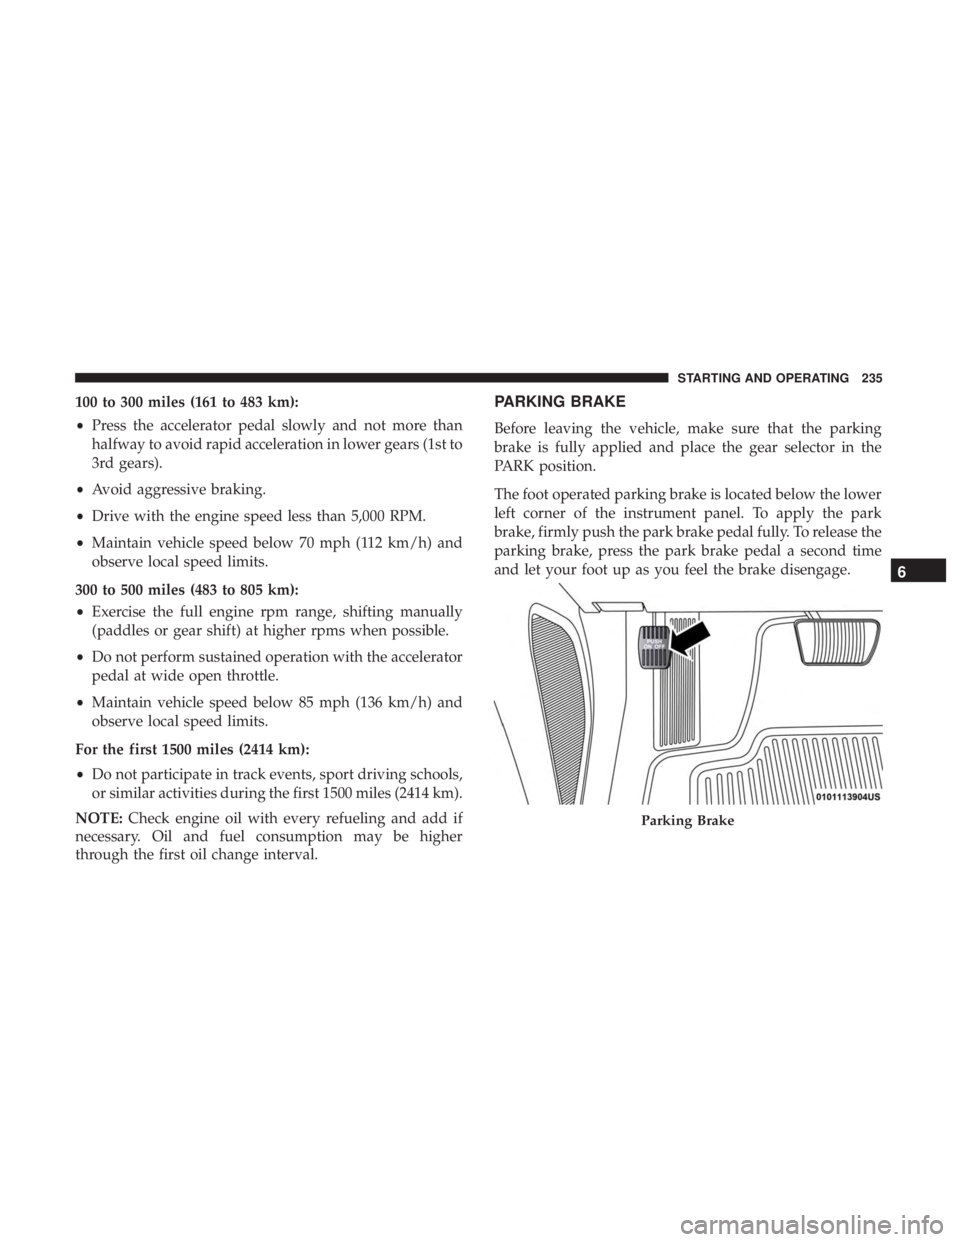
The foot operated parking brake is located below the lower
left corner of the instrument panel. To apply the park
brake, firmly push the park brake pedal fully. To release the
parking brake, press the park brake pedal a second time
and let your foot up as you feel the brake disengage.
Parking Brake
6
STARTING AND OPERATING 235
Page 306 of 560
CAUTION!
•Always check the depth of the standing water before
driving through it. Never drive through standing
water that is deeper than the bottom of the tire rims
mounted on the vehicle.
• Determine the condition of the road or the path that
is under water and if there are any obstacles in the
way before driving through the standing water.
• Do not exceed 5 mph (8 km/h) when driving through
standing water. This will minimize wave effects.
• Driving through standing water may cause damage
to your vehicle’s drivetrain components. Always in-
spect your vehicle’s fluids (i.e., engine oil, transmis-
sion, axle, etc.) for signs of contamination (i.e., fluid
that is milky or foamy in appearance) after driving
through standing water. Do not continue to operate
the vehicle if any fluid appears contaminated, as this
may result in further damage. Such damage is not
covered by the New Vehicle Limited Warranty.
• Getting water inside your vehicle’s engine can cause
it to lock up and stall out, and cause serious internal
damage to the engine. Such damage is not covered by
the New Vehicle Limited Warranty.
304 STARTING AND OPERATING
Page 342 of 560
3. Uncoil the Air Pump Hose (7) (black in color) and screwthe fitting at the end of hose (7) onto the valve stem.
4. Check the pressure in the tire by reading the Pressure Gauge (3).
If tire pressure is less than 19 psi (1.3 Bar):
The tire is too badly damaged. Do not attempt to drive the
vehicle further. Call for assistance.
If the tire pressure is 19 psi (1.3 Bar) or higher:
1. Push the Power Button (4) to turn on Tire Service Kit and inflate the tire to the pressure indicated on the tire
and loading information label on the driver-side door
opening.
NOTE: If the tire becomes over-inflated, push the Deflation
Button (2) to reduce the tire pressure to the recommended
inflation pressure before continuing.
2. Disconnect the Tire Service Kit from the valve stem, reinstall the cap on the valve stem and unplug from 12
Volt outlet.
3. Place the Tire Service Kit in its proper storage area in the vehicle. 4. Have the tire inspected and repaired or replaced at the
earliest opportunity at an authorized dealer or tire
service center.
5. Remove the Speed Limit sticker from the instrument panel after the tire has been repaired.
6. Replace the Sealant Bottle (1) and Sealant Hose (6) assembly at an authorized dealer as soon as possible.
Refer to “(F) Sealant Bottle And Hose Replacement”.
NOTE: When having the tire serviced, advise the autho-
rized dealer or service center that the tire has been sealed
using the Tire Service Kit.
(F) Sealant Bottle And Hose Replacement:
1. Uncoil the Sealant Hose (6) (clear in color).
2. Locate the round Sealant Bottle release button in the recessed area under the sealant bottle.
3. Push the Sealant Bottle release button. The Sealant Bottle (1) will pop up. Remove the bottle and dispose of it
accordingly.
4. Clean any remaining sealant from the Tire Service Kit housing.
340 IN CASE OF EMERGENCY