2019 DODGE CHALLENGER SRT door lock
[x] Cancel search: door lockPage 42 of 500
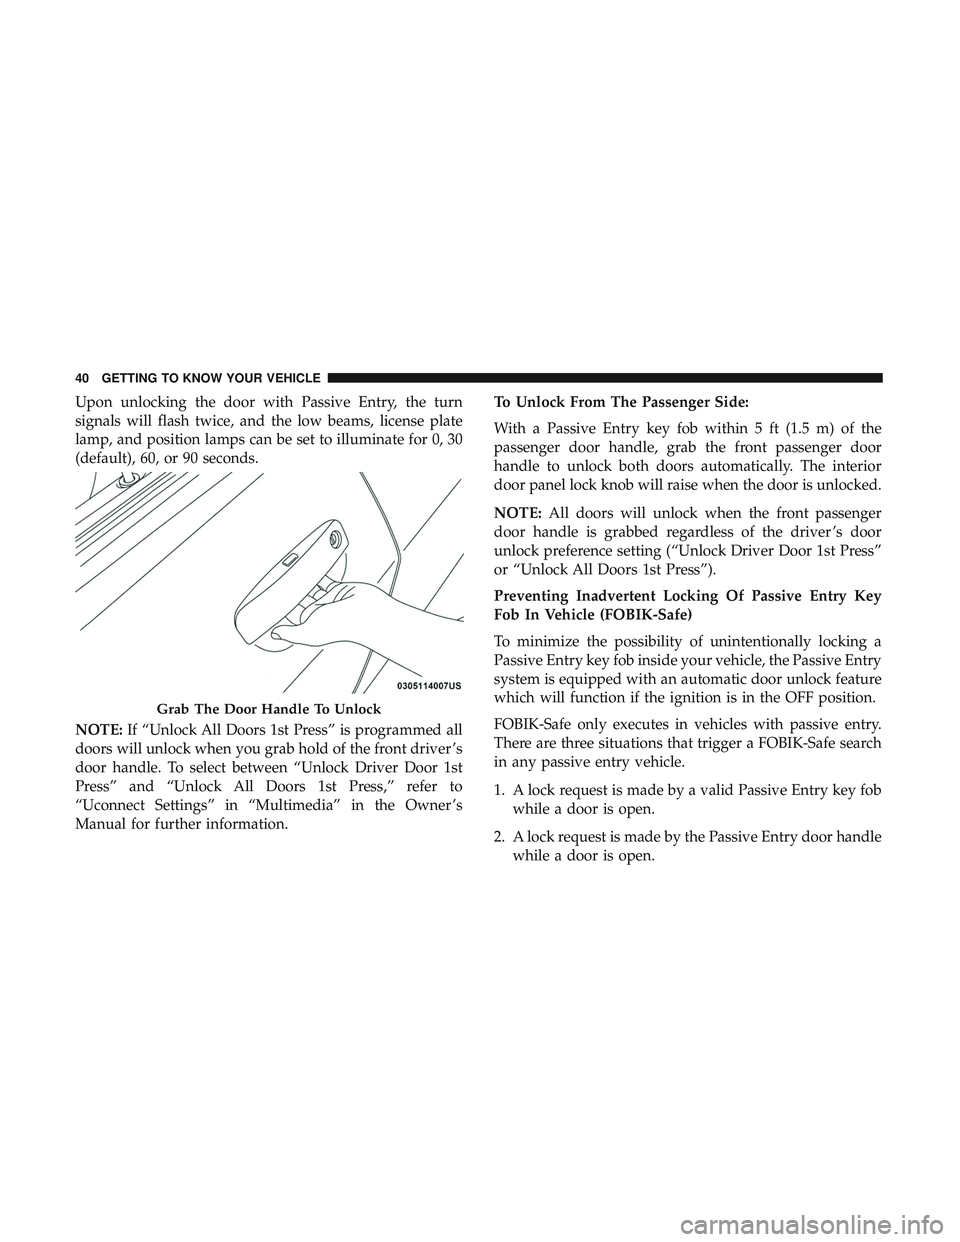
Upon unlocking the door with Passive Entry, the turn
signals will flash twice, and the low beams, license plate
lamp, and position lamps can be set to illuminate for 0, 30
(default), 60, or 90 seconds.
NOTE:If “Unlock All Doors 1st Press” is programmed all
doors will unlock when you grab hold of the front driver ’s
door handle. To select between “Unlock Driver Door 1st
Press” and “Unlock All Doors 1st Press,” refer to
“Uconnect Settings” in “Multimedia” in the Owner ’s
Manual for further information. To Unlock From The Passenger Side:
With a Passive Entry key fob within 5 ft (1.5 m) of the
passenger door handle, grab the front passenger door
handle to unlock both doors automatically. The interior
door panel lock knob will raise when the door is unlocked.
NOTE:
All doors will unlock when the front passenger
door handle is grabbed regardless of the driver ’s door
unlock preference setting (“Unlock Driver Door 1st Press”
or “Unlock All Doors 1st Press”).
Preventing Inadvertent Locking Of Passive Entry Key
Fob In Vehicle (FOBIK-Safe)
To minimize the possibility of unintentionally locking a
Passive Entry key fob inside your vehicle, the Passive Entry
system is equipped with an automatic door unlock feature
which will function if the ignition is in the OFF position.
FOBIK-Safe only executes in vehicles with passive entry.
There are three situations that trigger a FOBIK-Safe search
in any passive entry vehicle.
1. A lock request is made by a valid Passive Entry key fob while a door is open.
2. A lock request is made by the Passive Entry door handle while a door is open.
Grab The Door Handle To Unlock
40 GETTING TO KNOW YOUR VEHICLE
Page 43 of 500
3. A lock request is made by the door panel switch whilethe door is open.
When any of these situations occur, after all open doors are
shut, the FOBIK-Safe search will be executed. If it finds a
Passive Entry key fob inside the car, and it does not find
any Passive Entry key fobs outside the car, the car will
unlock and alert the customer.
NOTE: The vehicle will only unlock the doors when a valid
Passive Entry key fob is detected inside the vehicle, and no
valid Passive Entry key fob is detected outside the vehicle.
The vehicle will not unlock the doors when any of the
following conditions are true:
• The doors are manually locked using the door lock
knobs.
• There is a valid Passive Entry key fob outside the vehicle
and within 5 ft (1.5 m) of either Passive Entry door
handle.
• Three attempts are made to lock the doors using the
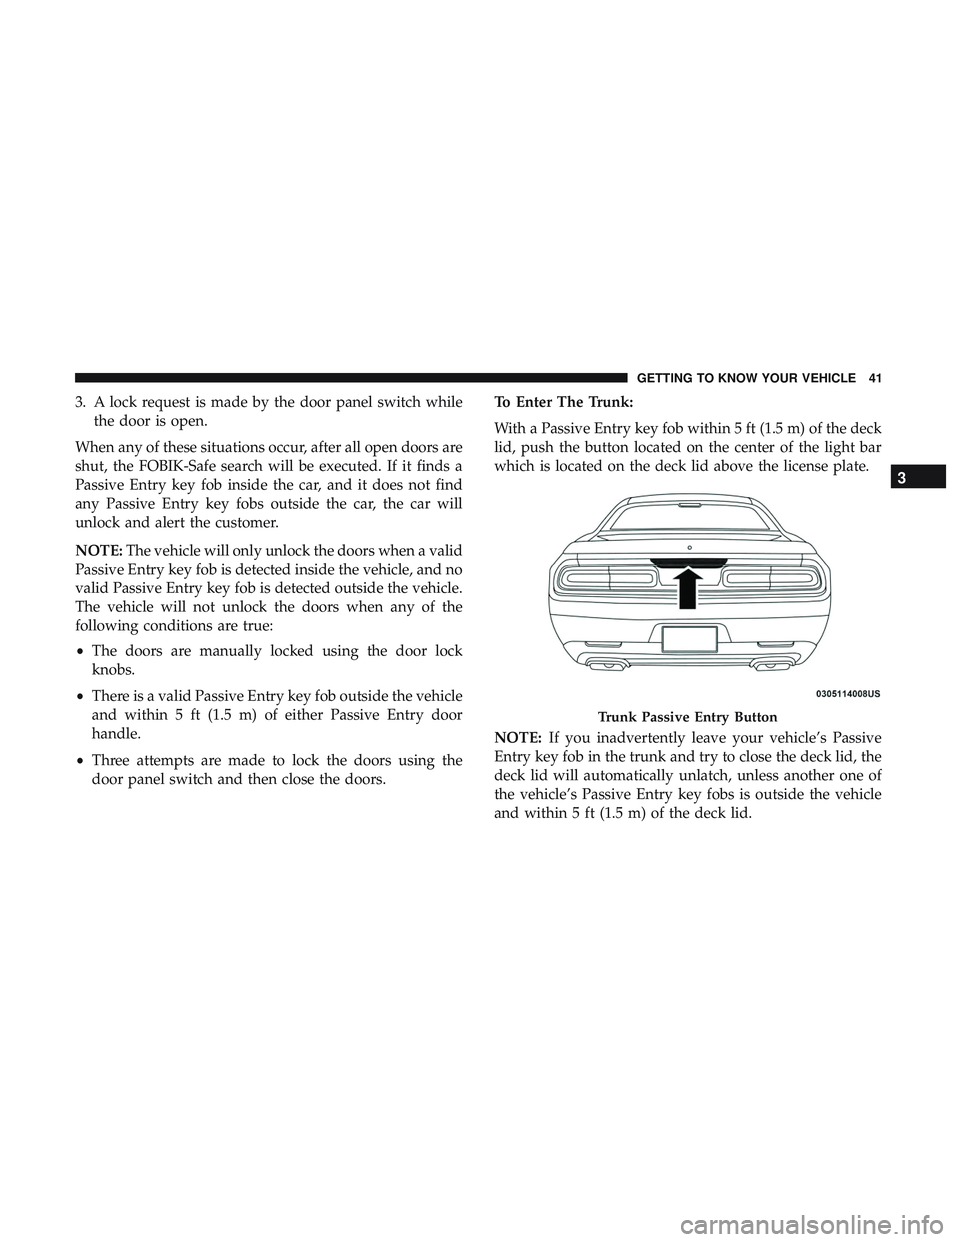
door panel switch and then close the doors. To Enter The Trunk:
With a Passive Entry key fob within 5 ft (1.5 m) of the deck
lid, push the button located on the center of the light bar
which is located on the deck lid above the license plate.
NOTE:
If you inadvertently leave your vehicle’s Passive
Entry key fob in the trunk and try to close the deck lid, the
deck lid will automatically unlatch, unless another one of
the vehicle’s Passive Entry key fobs is outside the vehicle
and within 5 ft (1.5 m) of the deck lid.
Trunk Passive Entry Button
3
GETTING TO KNOW YOUR VEHICLE 41
Page 44 of 500
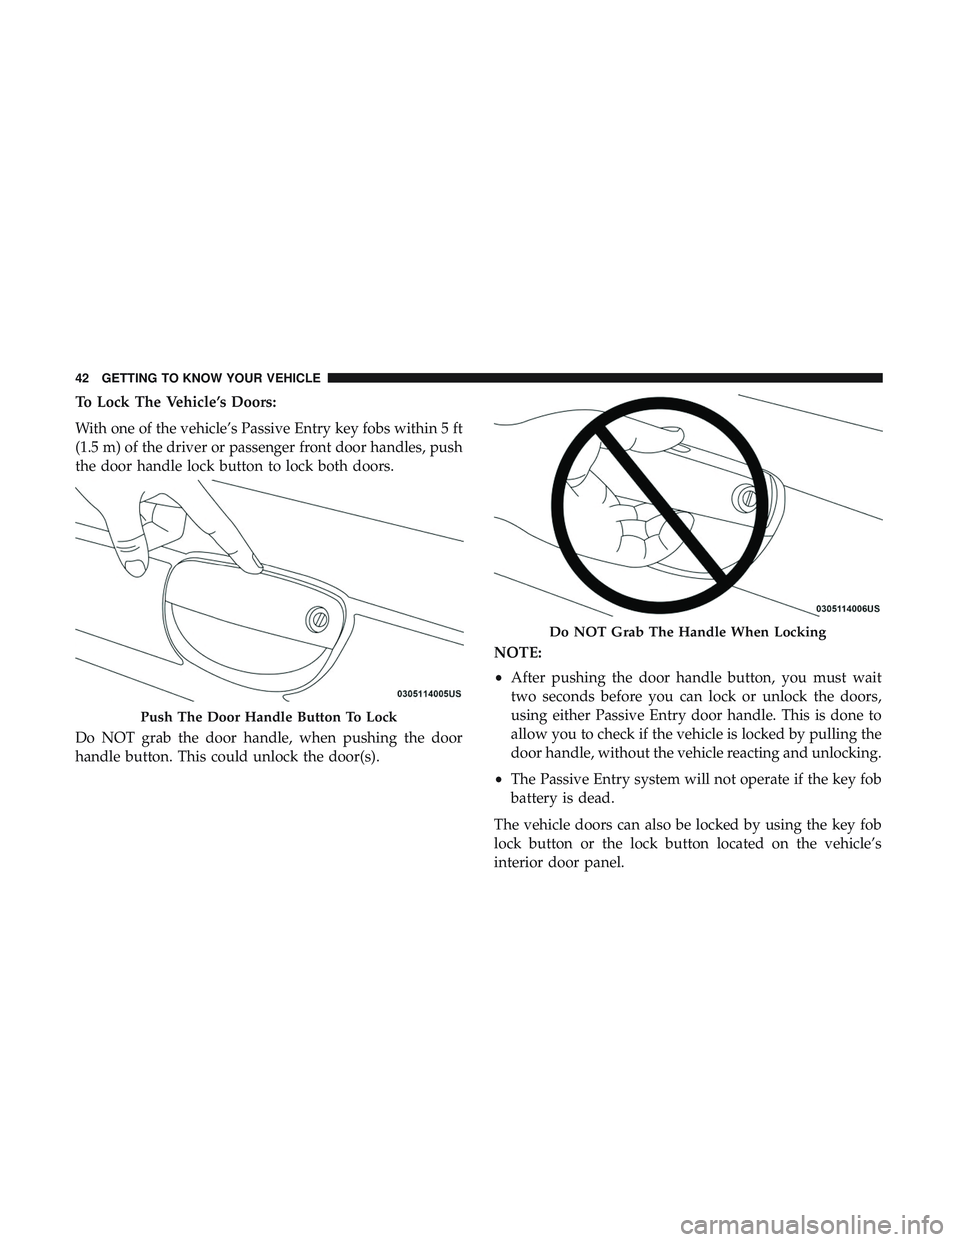
To Lock The Vehicle’s Doors:
With one of the vehicle’s Passive Entry key fobs within 5 ft
(1.5 m) of the driver or passenger front door handles, push
the door handle lock button to lock both doors.
Do NOT grab the door handle, when pushing the door
handle button. This could unlock the door(s).NOTE:
•
After pushing the door handle button, you must wait
two seconds before you can lock or unlock the doors,
using either Passive Entry door handle. This is done to
allow you to check if the vehicle is locked by pulling the
door handle, without the vehicle reacting and unlocking.
• The Passive Entry system will not operate if the key fob
battery is dead.
The vehicle doors can also be locked by using the key fob
lock button or the lock button located on the vehicle’s
interior door panel.
Push The Door Handle Button To Lock
Do NOT Grab The Handle When Locking
42 GETTING TO KNOW YOUR VEHICLE
Page 45 of 500
General Information
The following regulatory statement applies to all radio
frequency (RF) devices equipped in this vehicle:
This device complies with Part 15 of the FCC Rules and
with Industry Canada license-exempt RSS standard(s).
Operation is subject to the following two conditions:
1. This device may not cause harmful interference, and
2. This device must accept any interference received, in-cluding interference that may cause undesired opera-
tion.
NOTE: Changes or modifications not expressly approved
by the party responsible for compliance could void the
user ’s authority to operate the equipment.
Automatic Unlock Doors On Exit
The doors will unlock automatically on vehicles with
power door locks if:
1. The Automatic Unlock Doors On Exit feature is enabled. 2. The vehicle was in motion, then speed returned to
0 mph (0 km/h) and the transmission is placed in PARK.
3. The driver door is opened.
4. The doors were not previously unlocked.
NOTE: Automatic Unlock Doors On Exit Programming
To change the current setting, refer to “Uconnect Settings”
in “Multimedia” for further information.
Use the Automatic Unlock Doors On Exit feature in accor-
dance with local laws.
Automatic Door Locks — If Equipped
The auto door lock feature default condition is enabled.
When enabled, the door locks will lock automatically when
the vehicle’s speed exceeds 15 mph (24 km/h). The auto
door lock feature can be enabled or disabled by an autho-
rized dealer per written request of the customer. Please see
an authorized dealer for service.
3
GETTING TO KNOW YOUR VEHICLE 43
Page 67 of 500

Lane Change Assist — If Equipped
Tap the multifunction lever up or down once, without
moving beyond the detent, and the turn signal (right or
left) will flash three times then automatically turn off.
INTERIOR LIGHTS
The interior lights come on when a door is opened.
To protect the battery, the interior lights will turn off
automatically ten minutes after the ignition is moved to the
OFF position. This will occur if the interior lights were
switched on manually or are on because a door is open.
The Battery Protection also includes the glove compart-
ment light and the trunk light. To restore interior light
operation after automatic battery protection is enabled
(lights off), either place the ignition in the ON/RUN
position or cycle the light switch.
Map/Reading Lights
These lights are mounted between the sun visors on the
overhead console. Each light is turned on by pushing the
lens. Push the lens a second time to turn off the light. These
lights also turn on when a door is opened, when the unlock
button on the remote keyless entry key fob is pushed, or
when the dimmer control is turned fully upward, past the
second detent.
Overhead Console
3
GETTING TO KNOW YOUR VEHICLE 65
Page 86 of 500

CAUTION!
To prevent possible damage, do not slam the hood to
close it. Lower hood to approximately 12 inches (30 cm)
and drop the hood to close. Make sure hood is fully
closed for both latches. Never drive vehicle unless
hood is fully closed, with both latches engaged.
TRUNK
Opening
The trunk can be opened from inside the vehicle using the
power trunk button located on the instrument panel to the
left of the steering wheel.
The trunk lid can be released from outside the vehicle by
pushing the trunk button on the key fob twice within five
seconds or by using the external release switch located on
the underside of the decklid overhang. The release feature
will function only when the vehicle is in the unlock
condition.
With the ignition in the ON/RUN position, the trunk open
symbol will display in the instrument cluster indicating
that the trunk is open. The odometer display will reappear
once the trunk is closed.With the ignition in the OFF position, the trunk open
symbol will display until the trunk is closed.
NOTE:
Refer to “Keyless Enter-N-Go — Passive Entry” in
”Doors” in “Getting To Know Your Vehicle” for further
information on trunk operation with the Passive Entry
feature.
Opening From Inside The Vehicle
Interior Power Trunk Release
The trunk can be opened from inside the
vehicle using the power trunk release
button located on the instrument panel
to the left of the steering wheel.
NOTE:The transmission must be in
PARK before the button will operate.
Opening From Outside The Vehicle
To Unlock/Open The Trunk
The trunk may be unlocked/opened using either of the
following methods:
• Key Fob Trunk Release Button
• Passive Entry Button
Power Trunk
Release
84 GETTING TO KNOW YOUR VEHICLE
Page 88 of 500
Trunk Safety
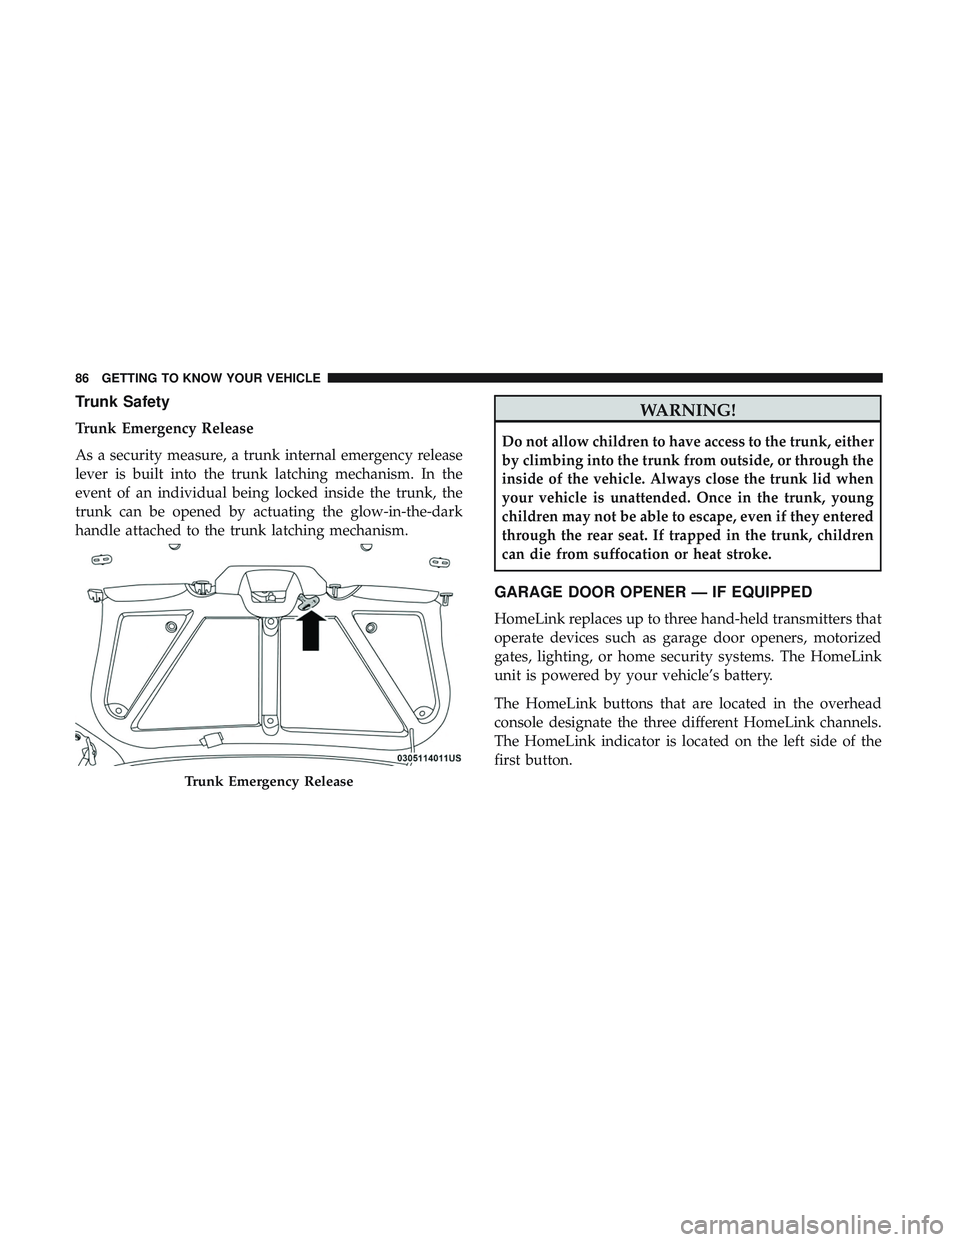
Trunk Emergency Release
As a security measure, a trunk internal emergency release
lever is built into the trunk latching mechanism. In the
event of an individual being locked inside the trunk, the
trunk can be opened by actuating the glow-in-the-dark
handle attached to the trunk latching mechanism.
WARNING!
Do not allow children to have access to the trunk, either
by climbing into the trunk from outside, or through the
inside of the vehicle. Always close the trunk lid when
your vehicle is unattended. Once in the trunk, young
children may not be able to escape, even if they entered
through the rear seat. If trapped in the trunk, children
can die from suffocation or heat stroke.
GARAGE DOOR OPENER — IF EQUIPPED
HomeLink replaces up to three hand-held transmitters that
operate devices such as garage door openers, motorized
gates, lighting, or home security systems. The HomeLink
unit is powered by your vehicle’s battery.
The HomeLink buttons that are located in the overhead
console designate the three different HomeLink channels.
The HomeLink indicator is located on the left side of the
first button.
Trunk Emergency Release
86 GETTING TO KNOW YOUR VEHICLE
Page 93 of 500
NOTE:•If the indicator light stays on constantly, programming
is complete and the garage door/device should acti-
vate when the HomeLink button is pressed.
• To program the two remaining HomeLink buttons,
repeat each step for each remaining button. DO NOT
erase the channels.
If you unplugged the garage door opener/device for
programming, plug it back in at this time.
Reprogramming A Single HomeLink Button (Canadian/
Gate Operator)
To reprogram a channel that has been previously trained,
follow these steps:
1. Cycle the ignition to the ON/RUN position.
2. Press and hold the desired HomeLink button until the indicator light begins to flash after 20 seconds. Do not
release the button.
3. Without releasing the button, proceed with “Canadian/ Gate Operator Programming” step 2 and follow all
remaining steps.Using HomeLink
To operate, push and release the programmed HomeLink
button. Activation will now occur for the programmed
device (i.e. garage door opener, gate operator, security
system, entry door lock, home/office lighting, etc.). The
hand-held transmitter of the device may also be used at
any time.
Security
It is advised to erase all channels before you sell or turn in
your vehicle.
To do this, push and hold the two outside buttons for 20
seconds until the orange indicator flashes. Note that all
channels will be erased. Individual channels cannot be
erased.
The HomeLink Universal Transceiver is disabled when the
Vehicle Security Alarm is active.
Troubleshooting Tips
If you are having trouble programming HomeLink, here
are some of the most common solutions:
•Replace the battery in the Garage Door Opener hand-
held transmitter.
3
GETTING TO KNOW YOUR VEHICLE 91