2019 DODGE CHALLENGER SRT start stop button
[x] Cancel search: start stop buttonPage 217 of 500
CAUTION!(Continued)
•Do not shift between PARK, REVERSE, NEUTRAL,
or DRIVE when the engine is above idle speed.
• Before shifting into any gear, make sure your foot is
firmly pressing the brake pedal.
Tip Start Feature — Automatic Transmission
Place the ignition in the START mode and release it as the
starter engages. The starter motor will automatically dis-
engage itself once engine is running. If the engine fails to
start, the starter will disengage automatically in 10 sec-
onds. If this occurs:
1. Place the ignition in the OFF mode.
2. Wait 10 to 15 seconds.
3. Repeat the “Normal Starting” procedure.
Normal Starting
To Turn On The Engine Using The ENGINE
START/STOP Button — Manual Transmission Only
1. Press and hold the clutch pedal while pushing and
holding the ENGINE START/STOP button. 2. Release the button when the engine starts. If the vehicle
fails to start within 15 seconds, release the button, wait
10 to 15 seconds, then repeat the “Normal Starting”
procedure.
3. If you wish to stop the cranking of the engine prior to the engine starting, release the button.
NOTE: Normal starting of either a cold or a warm engine
is obtained without pumping or pressing the accelerator
pedal.
To Turn On The Engine Using The ENGINE
START/STOP Button — Automatic Transmission
Only
1. The transmission must be in PARK.
2. Press and hold the brake pedal while pushing the ENGINE START/STOP button once.
3. The system takes over and attempts to start the vehicle. If the vehicle fails to start, the starter will disengage
automatically after 10 seconds.
4. If you wish to stop the cranking of the engine prior to the engine starting, push the button again.
6
STARTING AND OPERATING 215
Page 218 of 500
NOTE:Normal starting of either a cold or a warm engine
is obtained without pumping or pressing the accelerator
pedal.
To Turn Off The Engine Using ENGINE
START/STOP Button — Manual Transmission Only
1. With the vehicle stopped, place the gear selector in NEUTRAL, then push and release the ENGINE START/
STOP button.
2. The ignition will return to the OFF mode.
3. Place the gear selector in first gear or REVERSE and then apply the parking brake.
NOTE:
• If the ignition switch is left in the ACC position, the
system will automatically time out after 30 minutes of
inactivity and the ignition will switch to the OFF posi-
tion.
• If the ignition switch is left in the RUN position, the
system will automatically time out after 30 minutes of
inactivity if the vehicle speed is 0 mph (0 km/h) and the
engine is not running. •
If the vehicle speed is above 5 mph (8 km/h), the
ENGINE START/STOP button must be held for two
seconds or three short pushes in a row before the engine
will shut off. The ignition switch position will remain in
the ACC position until the vehicle is stopped, placed in
park and the button is pushed twice to the OFF position.To Turn Off The Engine Using ENGINE
START/STOP Button — Automatic Transmission
Only
1. Place the gear selector in PARK, then push and release
the ENGINE START/STOP button.
2. The ignition will return to the OFF mode.
3. If the gear selector is not in PARK, the ENGINE START/ STOP button must be held for two seconds or three short
pushes in a row with the vehicle speed above 5 mph
(8 km/h) before the engine will shut off. The ignition
will remain in the ACC mode until the gear selector is in
PARK and the button is pushed twice to the OFF mode.
If the gear selector is not in PARK and the ENGINE
START/STOP button is pushed once, the instrument
cluster will display a “Vehicle Not In Park” message and
the engine will remain running. Never leave a vehicle
out of the PARK position, or it could roll.
216 STARTING AND OPERATING
Page 231 of 500
Ignition Park Interlock
This vehicle is equipped with an Ignition Park Interlock
which requires the transmission to be in PARK before the
ignition can be turned to the OFF mode. This helps the
driver avoid inadvertently leaving the vehicle without
placing the transmission in PARK. This system also locks
the transmission in PARK whenever the ignition is in the
OFF mode.
NOTE:The transmission is NOT locked in PARK when the
ignition is in the ACC mode (even though the engine will
be off). Ensure that the transmission is in PARK, and the
ignition is OFF(not in ACC mode) before exiting the
vehicle.
Brake/Transmission Shift Interlock System
This vehicle is equipped with a Brake Transmission Shift
Interlock system (BTSI) that holds the transmission gear
selector in PARK unless the brakes are applied. To shift the
transmission out of PARK, the engine must be running and
the brake pedal must be pressed. The brake pedal must
also be pressed to shift from NEUTRAL into DRIVE or
REVERSE when the vehicle is stopped or moving at low
speeds.
Eight-Speed Automatic Transmission
The transmission gear range (PRNDM) is displayed both
on the gear selector and in the instrument cluster.
To select a gear range, press the lock button on the gear
selector and move the selector rearward or forward. To
shift the transmission out of PARK, the engine must be
running and the brake pedal must be pressed. You must
also press the brake pedal to shift from NEUTRAL into
DRIVE or REVERSE when the vehicle is stopped or mov-
ing at low speeds. Select the DRIVE range for normal
driving.
6
STARTING AND OPERATING 229
Page 235 of 500
The following indicators should be used to ensure that you
have properly engaged the transmission into the PARK
position:
•When shifting into PARK, push the lock button on the
gear selector and firmly move the selector all the way
forward until it stops and is fully seated.
• Look at the transmission gear position display and
verify that it indicates the PARK position (P), and is not
blinking.
• With the brake pedal released, verify that the gear
selector will not move out of PARK.
REVERSE (R)
This range is for moving the vehicle backward. Shift into
REVERSE only after the vehicle has come to a complete
stop.
NEUTRAL (N)
Use this range when the vehicle is standing for prolonged
periods with the engine running. Apply the parking brake
and shift the transmission into PARK if you must exit the
vehicle.WARNING!
Do not coast in NEUTRAL and never turn off the
ignition to coast down a hill. These are unsafe practices
that limit your response to changing traffic or road
conditions. You might lose control of the vehicle and
have a collision.
CAUTION!
Towing the vehicle, coasting, or driving for any other
reason with the transmission in NEUTRAL can cause
severe transmission damage.
Refer to “Recreational Towing” in “Starting And Op-
erating” and “Towing A Disabled Vehicle” in “In Case
Of Emergency” for further information.
DRIVE (D)
This range should be used for most city and highway
driving. It provides the smoothest upshifts and downshifts,
and the best fuel economy. The transmission automatically
upshifts through all forward gears. The DRIVE position
provides optimum driving characteristics under all normal
operating conditions.
6
STARTING AND OPERATING 233
Page 274 of 500
WARNING!
Drivers must be careful when backing up even when
using the Rear Park Assist system. Always check
carefully behind your vehicle, and be sure to check for
pedestrians, animals, other vehicles, obstructions, or
blind spots before backing up. You are responsible for
the safety of your surroundings and must continue to
pay attention while backing up. Failure to do so can
result in serious injury or death.
CAUTION!
•ParkSense is only a parking aid and it is unable to
recognize every obstacle, including small obstacles.
Parking curbs might be temporarily detected or not
detected at all. Obstacles located above or below the
sensors will not be detected when they are in close
proximity.
• The vehicle must be driven slowly when using
ParkSense in order to be able to stop in time when an
obstacle is detected. It is recommended that the
driver looks over his/her shoulder when using
ParkSense.
PARKVIEW REAR BACK UP CAMERA
Your vehicle is equipped with the ParkView Rear Back Up
Camera that allows you to see an on-screen image of the
rear surroundings of your vehicle whenever the gear
selector is put into REVERSE. The ParkView camera is
located on the rear of the vehicle above the rear license
plate. The image will be displayed in the touchscreen
display along with a caution note to “check entire sur-
roundings” across the top of the screen. After five seconds,
this note will disappear.
NOTE: The ParkView Rear Back Up Camera has program-
mable modes of operation that may be selected through the
Uconnect System. Refer to “Uconnect Settings” in “Multi-
media” for further information.
If your vehicle is equipped with the Camera Delay feature
and it is turned on, the rear camera image will be displayed
for up to 10 seconds when the vehicle is shifted out of
REVERSE. However, this feature is canceled if the forward
vehicle speed exceeds 8 mph (13 km/h), the transmission is
shifted into PARK, the vehicle’s ignition is cycled to OFF, or
by pressing the image defeat [X] button.
272 STARTING AND OPERATING
Page 309 of 500

Sealing A Tire With Tire Service Kit
(A) Whenever You Stop To Use Tire Service Kit:
1. Pull over to a safe location and turn on the vehicle’sHazard Warning flashers.
2. Verify that the valve stem (on the wheel with the deflated tire) is in a position that is near to the ground.
This will allow the Tire Service Kit Hoses (6) and (7) to
reach the valve stem and keep the Tire Service Kit flat on
the ground. This will provide the best positioning of the
kit when injecting the sealant into the deflated tire and
running the air pump. Move the vehicle as necessary to
place the valve stem in this position before proceeding.
3. Place the transmission in PARK (auto transmission) or in Gear (manual transmission) and place the ignition in the
OFF position.
4. Apply the parking brake.
(B) Setting Up To Use Tire Service Kit:
1. Push in the Mode Select Knob (5) and turn to the Sealant Mode position.
2. Uncoil the Sealant Hose (6) and then remove the cap from the fitting at the end of the hose. 3. Place the Tire Service Kit flat on the ground next to the
deflated tire.
4. Remove the cap from the valve stem and then screw the fitting at the end of the Sealant Hose (6) onto the valve
stem.
5. Uncoil the Power Plug (8) and insert the plug into the vehicle’s 12 Volt power outlet.
NOTE: Do not remove foreign objects (e.g., screws or
nails) from the tire.
(C) Injecting Tire Service Kit Sealant Into The
Deflated Tire:
• Always start the engine before turning ON the Tire
Service Kit.
NOTE: Manual transmission vehicles must have the park-
ing brake engaged and the gear selector in NEUTRAL.
• After pushing the Power Button (4), the sealant (white
fluid) will flow from the Sealant Bottle (1) through the
Sealant Hose (6) and into the tire.
NOTE: Sealant may leak out through the puncture in the
tire.
7
IN CASE OF EMERGENCY 307
Page 317 of 500

Sealing A Tire With Tire Service Kit
(A) Whenever You Stop To Use Tire Service Kit:
1. Pull over to a safe location and turn on the vehicle’sHazard Warning flashers.
2. Verify that the valve stem (on the wheel with the deflated tire) is in a position that is near to the ground.
This will allow the Tire Service Kit Hoses (3) and (5) to
reach the valve stem and keep the Tire Service Kit flat on
the ground. This will provide the best positioning of the
kit when injecting the sealant into the deflated tire and
running the air pump. Move the vehicle as necessary to
place the valve stem in this position before proceeding.
3. Place the transmission in PARK (auto transmission) or in Gear (manual transmission) and place the ignition in the
OFF position.
4. Apply the parking brake.
(B) Setting Up To Use Tire Service Kit:
1. Push in the Mode Select Knob (2) and turn to the Sealant Mode position.
2. Uncoil the Sealant Hose (3) and then remove the cap from the fitting at the end of the hose. 3. Place the Tire Service Kit flat on the ground next to the
deflated tire.
4. Remove the cap from the valve stem and then screw the fitting at the end of the Sealant Hose (3) onto the valve
stem.
5. Uncoil the Power Plug (7) and insert the plug into the vehicle’s 12 Volt power outlet.
NOTE: Do not remove foreign objects (e.g., screws or
nails) from the tire.
(C) Injecting Tire Service Kit Sealant Into The
Deflated Tire:
• Always start the engine before turning ON the Tire
Service Kit.
NOTE: Manual transmission vehicles must have the park-
ing brake engaged and the gear selector in NEUTRAL.
• After pushing the Power Button (1), the sealant (white
fluid) will flow from the Sealant Bottle (4) through the
Sealant Hose (3) and into the tire.
NOTE: Sealant may leak out through the puncture in the
tire.
7
IN CASE OF EMERGENCY 315
Page 437 of 500
The following options can be selected:
•Pressing the STOP button will freeze the graph. Selecting
Play will clear the graph and restart the process over
• Press the “+” or “–” buttons to change the history of the
graph. The selectable options are 30, 60, 90, 120 seconds.
The graph will expand or constrict depending on the
setting selected.
• Select the “Gear” display setting to turn the graph gear
markers on and off.
NOTE: The Gear on/off feature will only display if your
vehicle is equipped with an Automatic Transmission.SRT DRIVE MODES
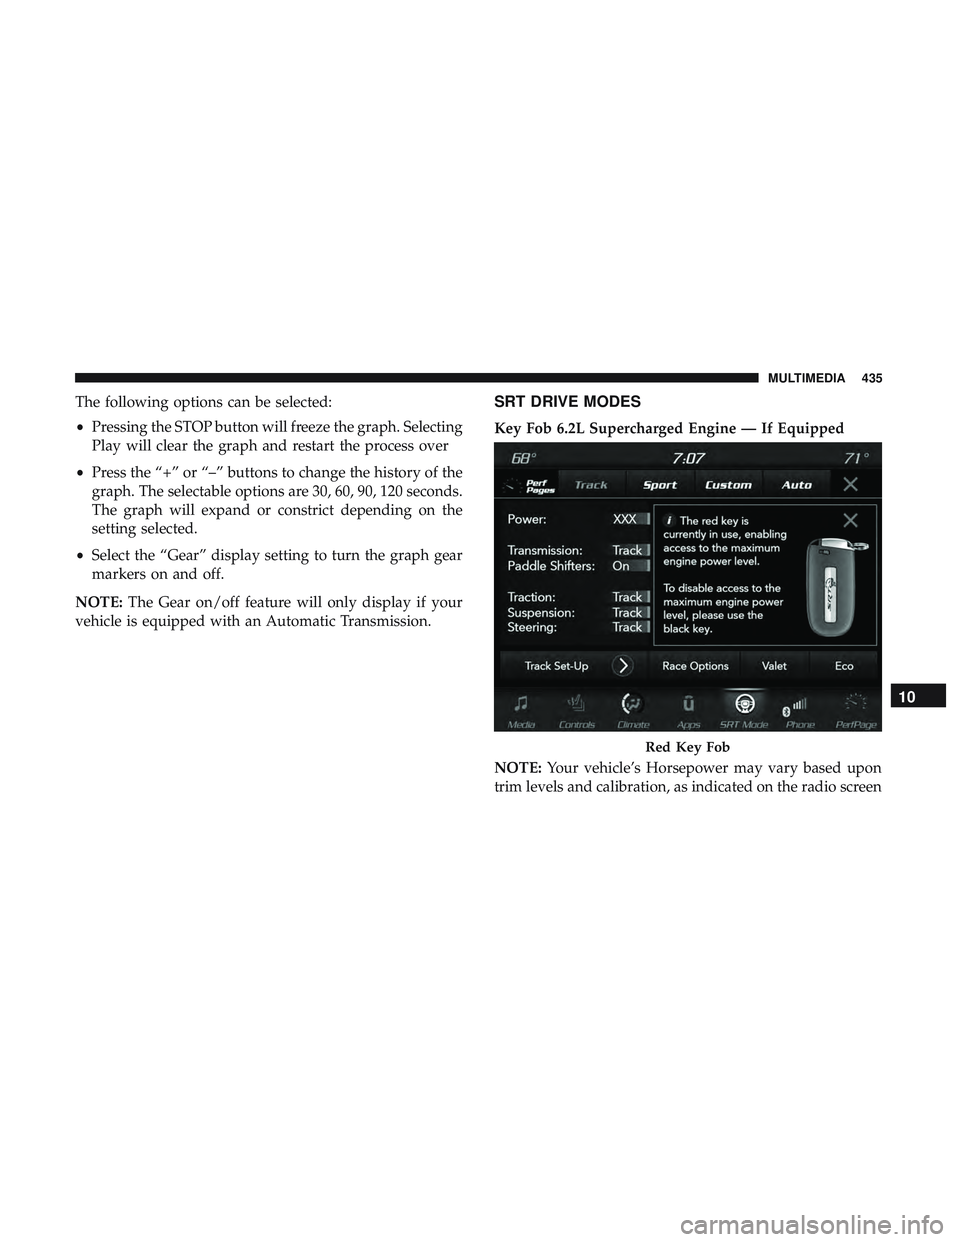
Key Fob 6.2L Supercharged Engine — If Equipped
NOTE: Your vehicle’s Horsepower may vary based upon
trim levels and calibration, as indicated on the radio screen
Red Key Fob
10
MULTIMEDIA 435