2019 DODGE CHALLENGER SRT check engine light
[x] Cancel search: check engine lightPage 184 of 500

Enhanced Accident Response System
In the event of an impact, if the communication network
remains intact, and the power remains intact, depending
on the nature of the event, the ORC will determine whether
to have the Enhanced Accident Response System perform
the following functions:
•Cut off fuel to the engine (If Equipped)
• Cut off battery power to the electric motor (If Equipped)
• Flash hazard lights as long as the battery has power
• Turn on the interior lights, which remain on as long as
the battery has power or for 15 minutes from the
intervention of the Enhanced Accident Response Sys-
tem.
• Unlock the power door locks.
Your vehicle may also be designed to perform any of these
other functions in response to the Enhanced Accident
Response System:
• Turn off the Fuel Filter Heater, Turn off the HVAC
Blower Motor, Close the HVAC Circulation Door
• Cut off battery power to the:
• Engine •
Electric Motor (if equipped)
• Electric power steering
• Brake booster
• Electric park brake
• Automatic transmission gear selector
• Horn
• Front wiper
• Headlamp washer pump
NOTE: After an accident, remember to cycle the ignition
to the STOP (OFF/LOCK) position and remove the key
from the ignition switch to avoid draining the battery.
Carefully check the vehicle for fuel leaks in the engine
compartment and on the ground near the engine compart-
ment and fuel tank before resetting the system and starting
the engine. If there are no fuel leaks or damage to the
vehicle electrical devices (e.g. headlights) after an accident,
reset the system by following the procedure described
below. If you have any doubt, contact an authorized dealer.
182 SAFETY
Page 208 of 500
WARNING!(Continued)
•If you are required to drive with the trunk/liftgate/
rear doors open, make sure that all windows are
closed and the climate control BLOWER switch is set
at high speed. DO NOT use the recirculation mode.
• If it is necessary to sit in a parked vehicle with the
engine running, adjust your heating or cooling con-
trols to force outside air into the vehicle. Set the
blower at high speed.
The best protection against carbon monoxide entry into the
vehicle body is a properly maintained engine exhaust
system.
Whenever a change is noticed in the sound of the exhaust
system, when exhaust fumes can be detected inside the
vehicle, or when the underside or rear of the vehicle is
damaged, have a competent mechanic inspect the complete
exhaust system and adjacent body areas for broken, dam-
aged, deteriorated, or mispositioned parts. Open seams or
loose connections could permit exhaust fumes to seep into
the passenger compartment. In addition, inspect the ex-
haust system each time the vehicle is raised for lubrication
or oil change. Replace as required.
Safety Checks You Should Make Inside The Vehicle
Seat Belts
Inspect the seat belt system periodically, checking for cuts,
frays, and loose parts. Damaged parts must be replaced
immediately. Do not disassemble or modify the system.
Front seat belt assemblies must be replaced after a collision.
Rear seat belt assemblies must be replaced after a collision
if they have been damaged (i.e., bent retractor, torn web-
bing, etc.). If there is any question regarding seat belt or
retractor condition, replace the seat belt.
Air Bag Warning Light
The Air Bag warning lightwill turn on for four to
eight seconds as a bulb check when the ignition switch
is first turned to ON/RUN. If the light is either not on
during starting, stays on, or turns on while driving,
have the system inspected at an authorized dealer as
soon as possible. After the bulb check, this light will
illuminate with a single chime when a fault with the Air
Bag System has been detected. It will stay on until the
fault is removed. If the light comes on intermittently or
remains on while driving, have an authorized dealer
service the vehicle immediately.
206 SAFETY
Page 209 of 500
Refer to “Occupant Restraint Systems” in “Safety” for
further information.
Defroster
Check operation by selecting the defrost mode and place
the blower control on high speed. You should be able to
feel the air directed against the windshield. See an autho-
rized dealer for service if your defroster is inoperable.
Floor Mat Safety Information
Always use floor mats designed to fit your vehicle. Only
use a floor mat that does not interfere with the operation of
the accelerator, brake or clutch pedals. Only use a floor mat
that is securely attached using the floor mat fasteners so it
cannot slip out of position and interfere with the accelera-
tor, brake or clutch pedals or impair safe operation of your
vehicle in other ways.
WARNING!
An improperly attached, damaged, folded, or stacked
floor mat, or damaged floor mat fasteners may cause
your floor mat to interfere with the accelerator, brake,
or clutch pedals and cause a loss of vehicle control. To
prevent SERIOUS INJURY or DEATH:
(Continued)
WARNING!(Continued)
•ALWAYS securely attachyour floor mat using the
floor mat fasteners. DO NOT install your floor mat
upside down or turn your floor mat over. Lightly pull
to confirm mat is secured using the floor mat fasten-
ers on a regular basis.
• ALWAYS REMOVE THE EXISTING FLOOR MAT
FROM THE VEHICLE
before installing any other
floor mat. NEVER install or stack an additional floor
mat on top of an existing floor mat.
•
ONLY install floor mats designed to fit your vehicle.
NEVER install a floor mat that cannot be properly
attached and secured to your vehicle. If a floor mat
needs to be replaced, only use a FCA approved floor mat
for the specific make, model, and year of your vehicle.
•ONLY use the driver ’s side floor mat on the driver ’s side
floor area. To check for interference, with the vehicle
properly parked with the engine off, fully depress the
accelerator, the brake, and the clutch pedal (if present)
to check for interference. If your floor mat interferes
with the operation of any pedal, or is not secure to the
floor, remove the floor mat from the vehicle and place
the floor mat in your trunk.
(Continued)
5
SAFETY 207
Page 223 of 500
For the first 1500 miles (2414 km):
•Do not participate in track events, sport driving schools,
or similar activities during the first 1500 miles (2414 km).
NOTE: Check engine oil with every refueling and add if
necessary. Oil and fuel consumption may be higher
through the first oil change interval. Running the engine
with an oil level below the add mark can cause severe
engine damage.
PARKING BRAKE
Before leaving the vehicle, make sure that the parking
brake is fully applied and place the gear selector in the
PARK or REVERSE (manual transmission only) position.
When the parking brake is applied and the ignition switch
is in the ON/RUN position, the “Brake Warning Light” in
the instrument cluster will illuminate. NOTE:
•
When the parking brake is applied and the transmission
is placed in gear, the “Brake Warning Light” will flash. If
vehicle speed is detected, a chime will sound to alert the
driver. Fully release the parking brake before attempting
to move the vehicle.
• This light only shows that the parking brake is applied.
It does not show the degree of brake application.
When parking on a hill, it is important to turn the front
wheels toward the curb on a downhill grade and away
from the curb on an uphill grade. For vehicles equipped
with an automatic transmission, apply the parking brake
before placing the gear selector in PARK, otherwise the
load on the transmission locking mechanism may make it
difficult to move the gear selector out of PARK. The
parking brake should always be applied whenever the
driver is not in the vehicle.
6
STARTING AND OPERATING 221
Page 277 of 500
WARNING!(Continued)
•Never add fuel when the engine is running. This is
in violation of most state and federal fire regulations
and may cause the “Malfunction Indicator Light” to
turn on.
• A fire may result if fuel is pumped into a portable
container that is inside of a vehicle. You could be
burned. Always place fuel containers on the ground
while filling.
CAUTION!
•Damage to the fuel system or emissions control
system could result from using an improper fuel
tank filler tube cap.
• A poorly fitting fuel filler cap could let impurities
into the fuel system.
• A poorly fitting fuel filler cap may cause the “Mal-
function Indicator Light (MIL)” to turn on.
• To avoid fuel spillage and overfilling, do not “top
off” the fuel tank after filling. When the fuel nozzle
“clicks” or shuts off, the fuel tank is full. NOTE:
•
When the fuel nozzle “clicks” or shuts off, the fuel tank
is full.
• Tighten the gas cap until you hear a “clicking” sound.
This is an indication that the gas cap is tightened
properly. The MIL in the instrument cluster may turn on
if the gas cap is not secured properly. Make sure that the
gas cap is tightened each time the vehicle is refueled.
Loose Fuel Filler Cap Message
If the vehicle diagnostic system determines that the fuel
filler cap is loose, improperly installed, or damaged, a
”gASCAP” message will display in the odometer or a
“Check Gascap” message will display in the instrument
cluster. If this occurs, tighten the fuel filler cap properly
and press the Trip Odometer button to turn off the mes-
sage. If the problem continues, the message will appear the
next time the vehicle is started.
A loose, improperly installed, or damaged fuel filler cap
may also turn on the MIL.
6
STARTING AND OPERATING 275
Page 336 of 500

•Inspect the battery, and clean and tighten the terminals
as required.
• Check the fluid levels of the coolant reservoir, brake
master cylinder, and power steering (6.2L only), and add
as needed.
• Check all lights and other electrical items for correct
operation. At Each Oil Change
•
Change the engine oil filter.
• Inspect the brake hoses and lines.
CAUTION!
Failure to perform the required maintenance items
may result in damage to the vehicle.
Maintenance Plan
Miles:6,000
12,000
18,000
24,000
30,000
36,000
42,000
48,000
54,000
60,000
66,000
72,000
78,000
84,000
90,000
96,000
102,000
108,000
114,000
120,000
126,000
132,000
138,000
144,000
150,000
Or Months: 6 12 18 24 30 36 42 48 54 60 66 72 78 84 90 96 102 108 114 120 126 132 138 144 150
Or Kilometers:
10,000
20,000
30,000
40,000
50,000
60,000
70,000
80,000
90,000
100,000
110,000
120,000
130,000
140,000
150,000
160,000
170,000
180,000
190,000
200,000
210,000
220,000
230,000
240,000
250,000
Change the engine oil and engine oil filter. X X X X X X X X X XXXXXXX XXXXXXXXX
Rotate the tires, rotate at the first sign of ir-
regular wear, even if it occurs before sched-
uled maintenance. XXXXXXXXXXXXXXXX X
XXXXXXXX
Inspect front suspension, tie rod ends, and
boot seals, for cracks or leaks and all parts for
damage, wear, improper looseness or end
play; replace if necessary. XXXXXXXX X X X X
334 SERVICING AND MAINTENANCE
Page 358 of 500
•Do not change the thermostat for Summer or Winter
operation. If replacement is ever necessary, install ONLY
the correct type thermostat. Other designs may result in
unsatisfactory engine coolant (antifreeze) performance,
poor gas mileage, and increased emissions.
Brake System
In order to assure brake system performance, all brake
system components should be inspected periodically. Refer
to the “Maintenance Plan” in this section for the proper
maintenance intervals.
WARNING!
Riding the brakes can lead to brake failure and possi-
bly a collision. Driving with your foot resting or riding
on the brake pedal can result in abnormally high brake
temperatures, excessive lining wear, and possible
brake damage. You would not have your full braking
capacity in an emergency.
Fluid Level Check — Brake Master Cylinder
Check the fluid level in the master cylinder immediately if
the brake system warning light indicates system failure. Check the fluid level in the master cylinder when perform-
ing underhood services.
Clean the top of the master cylinder area before removing
the cap. Add fluid to bring the level up to the top of the
“FULL” mark on the side of the master cylinder reservoir.
Overfilling of fluid is not recommended because it may
cause leaking in the system.
Add enough fluid to bring the level up to the requirements
described on the brake fluid reservoir. With disc brakes,
fluid level can be expected to fall as the brake pads wear.
However, low fluid level may be caused by a leak and a
checkup may be needed.
Use only brake fluid that has been recommended by the
manufacturer, and has been kept in a tightly closed con-
tainer to avoid contamination from foreign matter or
moisture.
Refer to “Fluids And Lubricants” in “Technical Specifica-
tions” for further information.
356 SERVICING AND MAINTENANCE
Page 453 of 500
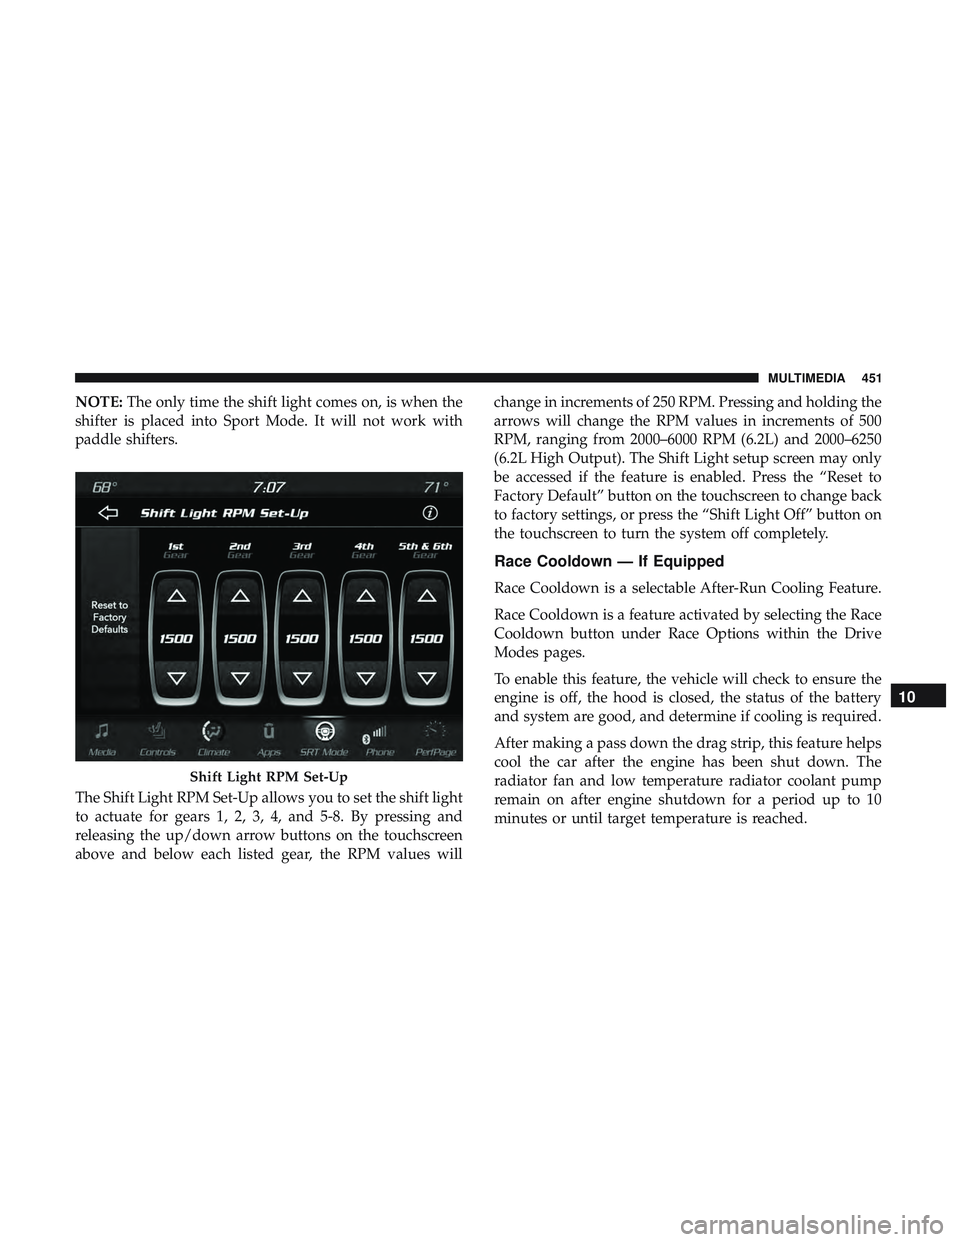
NOTE:The only time the shift light comes on, is when the
shifter is placed into Sport Mode. It will not work with
paddle shifters.
The Shift Light RPM Set-Up allows you to set the shift light
to actuate for gears 1, 2, 3, 4, and 5-8. By pressing and
releasing the up/down arrow buttons on the touchscreen
above and below each listed gear, the RPM values will change in increments of 250 RPM. Pressing and holding the
arrows will change the RPM values in increments of 500
RPM, ranging from 2000–6000 RPM (6.2L) and 2000–6250
(6.2L High Output). The Shift Light setup screen may only
be accessed if the feature is enabled. Press the “Reset to
Factory Default” button on the touchscreen to change back
to factory settings, or press the “Shift Light Off” button on
the touchscreen to turn the system off completely.
Race Cooldown — If Equipped
Race Cooldown is a selectable After-Run Cooling Feature.
Race Cooldown is a feature activated by selecting the Race
Cooldown button under Race Options within the Drive
Modes pages.
To enable this feature, the vehicle will check to ensure the
engine is off, the hood is closed, the status of the battery
and system are good, and determine if cooling is required.
After making a pass down the drag strip, this feature helps
cool the car after the engine has been shut down. The
radiator fan and low temperature radiator coolant pump
remain on after engine shutdown for a period up to 10
minutes or until target temperature is reached.
Shift Light RPM Set-Up
10
MULTIMEDIA 451