Page 409 of 500
Display
After pressing the “Display” button on the touchscreen, the following settings will be available:
Setting NameSelectable Options
Display Mode AutoManual
Display Brightness With Headlights ON +–
NOTE:
•When in the “Display Brightness With Headlights ON” display, you may select the brightness with the headlights
on.
•To make changes to the �Display Brightness With Headlights ON� setting, the headlights must be on and the inte-
rior dimmer switch must not be in the �party�or�parade� positions.
Display Brightness With Headlights OFF +–
NOTE:
•When in the “Display Brightness With Headlights OFF” display, you may select the brightness with the headlights
off. Adjust the brightness from (1–10) with the “+” and “–” buttons on the touchscreen.
•To make changes to the �Display Brightness With Headlights OFF� setting, the headlights must be off and the inte-
rior dimmer switch must not be in the �party�or�parade� positions.
10
MULTIMEDIA 407
Page 410 of 500
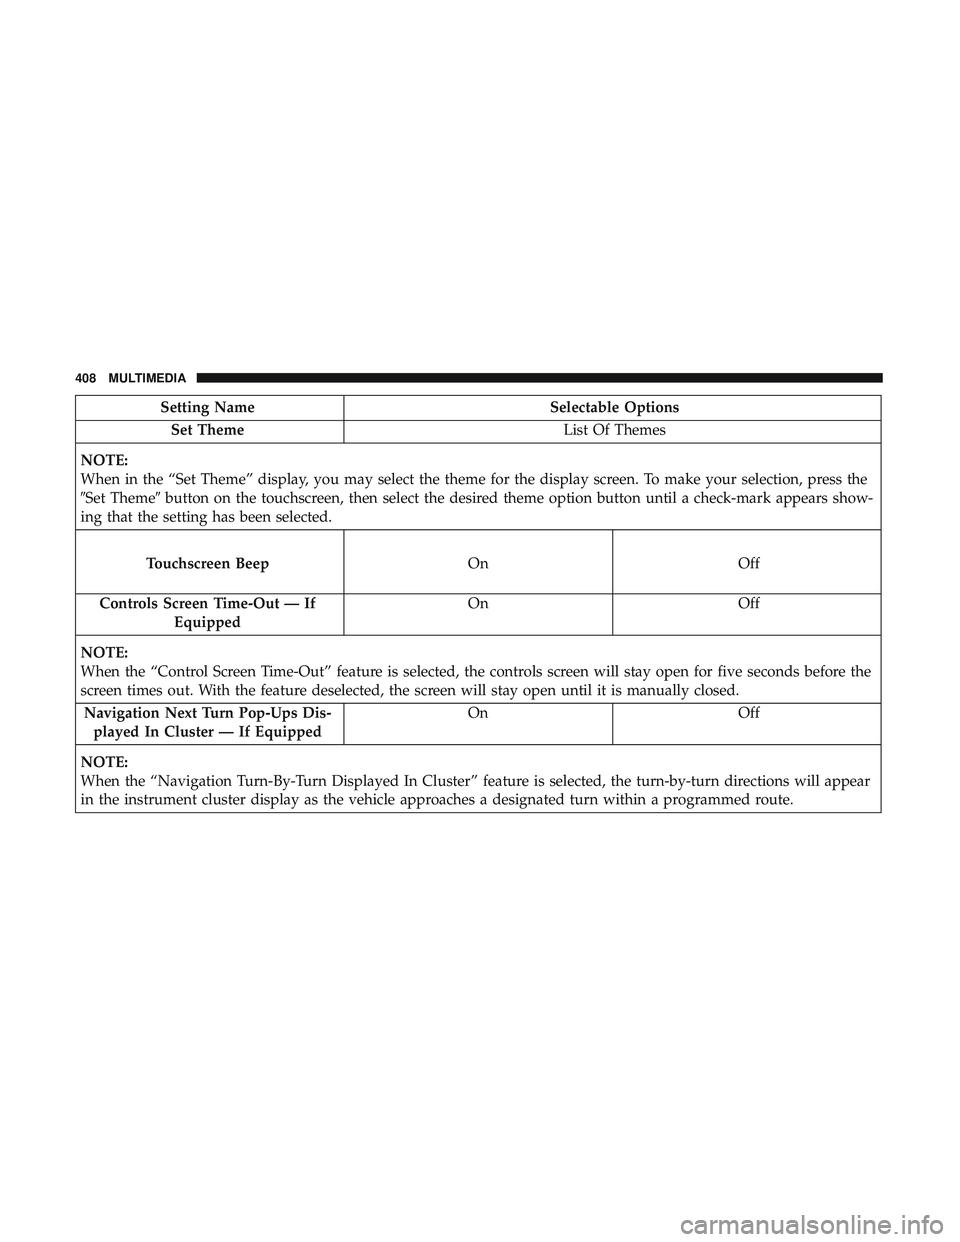
Setting NameSelectable Options
Set Theme List Of Themes
NOTE:
When in the “Set Theme” display, you may select the theme for the display screen. To make your selection, press the
�Set Theme� button on the touchscreen, then select the desired theme option button until a check-mark appears show-
ing that the setting has been selected.
Touchscreen Beep OnOff
Controls
Screen Time-Out — If Equipped On
Off
NOTE:
When the “Control Screen Time-Out” feature is selected, the controls screen will stay open for five seconds before the
screen times out. With the feature deselected, the screen will stay open until it is manually closed. Navigation Next Turn Pop-Ups Dis- played In Cluster — If Equipped On
Off
NOTE:
When the “Navigation Turn-By-Turn Displayed In Cluster” feature is selected, the turn-by-turn directions will appear
in the instrument cluster display as the vehicle approaches a designated turn within a programmed route.
408 MULTIMEDIA
Page 411 of 500
Units
After pressing the “Units” button on the touchscreen, you may select each unit of measure independently displayed in the
instrument cluster display, and navigation system (if equipped). The following selectable units of measure are listed below:
Setting NameSelectable Options
Units USMetric Custom
NOTE: When the “Custom” setting is selected, units will appear according to your personally configured settings. To
configure these settings, press the “Custom” bar. The following settings will appear:
Speed MPH km/h
Distance mi km
Fuel Consumption MPG (US)MPG (UK) L/100 km km/L
Pressure psikPa bar
Temperature °F °C
Voice
After pressing the “Voice” button on the touchscreen, the following settings will be available:
Setting Name Selectable Options
Voice Response Length Brief Detailed
Show Command List Neverw/Help Always
10
MULTIMEDIA 409
Page 413 of 500

Safety & Driving Assistance
After pressing the “Safety & Driving Assistance” button on the touchscreen, the following settings will be available:
Setting NameSelectable Options
ParkView Backup Camera Delay OnOff
NOTE:
The “ParkView Backup Camera Delay” setting determines whether or not the screen will display the rear view image
with dynamic grid lines for up to ten seconds after the vehicle is shifted out of REVERSE. This delay will be canceled
if the vehicle’s speed exceeds 8 mph (13 km/h), the transmission is shifted into PARK, or the ignition is switched to
the OFF position. Active ParkView Backup Camera Guide- lines On
Off
NOTE:
The “Active ParkView Backup Camera Guidelines” feature overlays the Rear Backup Camera image with active, or
dynamic, grid lines to help illustrate the width of the vehicle and its projected back up path, based on the steering
wheel position when the option is checked. A dashed center line overlay indicates the center of the vehicle to assist
with parking or aligning to a hitch/receiver.
10
MULTIMEDIA 411
Page 415 of 500

Setting NameSelectable Options
Electric Power Steering Default — If Equipped Sport
Normal Comfort
NOTE:
When �Electric Power Steering Default� is selected, it allows you to change the default setting of your vehicle to either
normal, sport, or comfort.
ParkSense — If Equipped Sound OnlySound & Display
NOTE:
The ParkSense system will scan for objects behind the vehicle when the gear selector is in REVERSE and the vehicle
speed is less than 7 mph (11 km/h). It will provide an alert (audible and/or visual) to indicate the proximity to other
objects. The system can be enabled with Sound Only, or Sound and Display. Rear ParkSense Volume — If Equipped LowMed High
NOTE:
The Rear ParkSense Chime Volume settings can be selected from the instrument cluster display or Uconnect System.
The chime volume settings include LOW, MEDIUM, and HIGH. The factory default volume setting is MEDIUM. To
make your selection, press the “Rear ParkSense Vol.” button on the touchscreen, until a check-mark appears next to
setting, indicating that the setting had been selected. ParkSense will retain its last known configuration state through
ignition cycles.
10
MULTIMEDIA 413
Page 427 of 500

System Information
After pressing the “System Information” button on the touchscreen, the following settings will be available:
Setting NameSelectable Options
Software License System Software Information Screen
NOTE:
When the “Software License” feature is selected, a “System Software Information” screen will appear, displaying the
system software version. You can also update your maps with a USB device. Please see your authorized dealer for
further information.
PERFORMANCE PAGES — IF EQUIPPED
Performance Pages is an application that provides a dis-
play for performance indicators, as received from the
instrument cluster, that will help you gain familiarity with
the capabilities of your vehicle in real-time.
To access the Performance Pages, press the “Apps” button
on the touchscreen then press the “Performance Pages”
button on the touchscreen. Press the desired button on the
touchscreen to access that specific Performance Page.
WARNING!
Measurement of vehicle statistics with the Perfor-
mance Pages is intended for off-highway or off-road
use only and should not be done on any public
roadways. It is recommended that these features be
used in a controlled environment and within the limits
of the law. The capabilities of the vehicle as measured
by the Performance Pages must never be exploited in a
reckless or dangerous manner, which can jeopardize
the user ’s safety or the safety of others. Only a safe,
attentive, and skillful driver can prevent accidents.
10
MULTIMEDIA 425
Page 429 of 500
2. Press the pencil icon and select the following optionfrom the menu:
• Set Widget: Top Left
• Set Widget: Top Right
• Set Widget: Bottom Left
• Set Widget: Bottom Right
3. After selecting a Widget location: select the gauge to display:
• Gauge: Oil Temp
• Gauge: Oil Pressure
• Gauge: Coolant Temp
• Gauge: Battery Voltage
• Gauge: Trans Temp — If Equipped with an Automatic
Transmission
• Gauge: Boost Pressure — If Equipped
• Gauge: Air/Fuel Ratio — If Equipped •
Gauge: I/C Coolant Temp — If Equipped
• Gauge: Intake Air Temp
• Gauge: Engine Torque
• Gauge: Engine Power
• Gauge: G-Force
• Gauge: Steering Angle
• Gauge: Current Gear
• Gauge: Current Speed
• Timer: 0-60 MPH
• Timer: 0-100 MPH
• Timer: 1/8 Mile
• Timer: 1/4 Mile
• Timer: Brake Distance
• Timer: Reaction Time
10
MULTIMEDIA 427
Page 430 of 500
TimersWhen the Timers Page is selected, you will be able to select
from following “Tickets”:
•Current
Pressing the “Current” button displays a “real time” sum-
mary of performance timers.
• Last
Pressing the “Last” button displays the last recorded run of
performance timers.
• Best
Pressing the “Best” button displays the best recorded run
of performance timers, except for braking data.
• Save
Pressing the “Save” button will let you save the visible
page, current/last/best. Any saved run over ten will
overwrite the last saved run for Uconnect System storage.
The operation of the Save feature is listed below:
Performance Pages — Timers
428 MULTIMEDIA

. The")

