2019 DODGE CHALLENGER check oil
[x] Cancel search: check oilPage 358 of 532
Engine Air Cleaner Filter Selection
The quality of replacement engine air cleaner filters varies
considerably. Only high quality filters should be used to
assure most efficient service. Mopar engine air cleaner
filters are a high quality filter and are recommended.
T/A Air Filter Maintenance — If Equipped
Clean Engine Air Filter
The scheduled air filter cleaning interval is 30,000 miles
(48,280 km), or if in a dusty environment the engine air filter
should be checked periodically to ensure optimal air flow.
Cleaning your engine air filter with the recommended
Mopar Performance Air Filter Service Kit is not required if
you can still see any part the wire screen on the entire air
filter regardless of how dirty it may appear. When any part
of the wire screen is no longer visible on the air filter, that
is an indication it is time to clean the air filter.
1. Spray the air filter with the recommended Mopar airfilter cleaner and let sit for at least 10 minutes to loosen
dirt, before rinsing.
NOTE: Never use strong detergents, high pressure, or
gasoline on air filter. 2. Rinse the air filter with cool low-pressure water applied
from the inside (clean side) out in order to flush the dirt
out of the filter. Continue to rinse the filter until all
traces of the cleaner have been removed.
NOTE: It may be necessary to repeat steps 1 and 2 if the air
filter is not completely clean.
3. After rinsing the air filter, gently shake off the excess water and allow air filter to dry naturally. Do not apply
oil until air filter is completely dry.
NOTE: Do not use forced air pressure as it may damage the
filtering capabilities of the filter ’s microfibers and also void
its warranty.
4.
Using the Mopar Performance Air Filter Service Kit, spray
oil evenly along the crown of each filter pleat holding the
nozzle about 3 inches (76mm) away from the air filter. One
spray per 2 square inches (1,290 square mm) of air filter.
With one complete coat of oil, let it wick (saturate) for
about 20 minutes, and if required touch up any light areas
on either side of the filter.
Air Conditioner Maintenance
For best possible performance, your air conditioner should
be checked and serviced by an authorized dealer at the
start of each warm season. This service should include
356 SERVICING AND MAINTENANCE
Page 359 of 532
cleaning of the condenser fins and a performance test.
Drive belt tension should also be checked at this time.
WARNING!
•Use only refrigerants and compressor lubricants ap-
proved by the manufacturer for your air conditioning
system. Some unapproved refrigerants are flam-
mable and can explode, injuring you. Other unap-
proved refrigerants or lubricants can cause the sys-
tem to fail, requiring costly repairs. Refer to
Warranty Information Book, for further warranty
information.
• The air conditioning system contains refrigerant un-
der high pressure. To avoid risk of personal injury or
damage to the system, adding refrigerant or any
repair requiring lines to be disconnected should be
done by an experienced technician.
CAUTION!
Do not use chemical flushes in your air conditioning
system as the chemicals can damage your air condition-
ing components. Such damage is not covered by the
New Vehicle Limited Warranty.
Refrigerant Recovery And Recycling R-134a —
If Equipped
R-134a Air Conditioning Refrigerant is a hydrofluoro-
carbon (HFC) that is an ozone-friendly substance. The
manufacturer recommends that air conditioning service be
performed by an authorized dealer or other service facili-
ties using recovery and recycling equipment.
NOTE: Use only manufacturer approved A/C system PAG
compressor oil and refrigerants.
Refrigerant Recovery And Recycling R-1234yf —
If Equipped
R–1234yf Air Conditioning Refrigerant is a hydrofluo-
roolefin (HFO) that is endorsed by the Environmental
Protection Agency and is an ozone-friendly substance with
a low global-warming potential. The manufacturer recom-
mends that air conditioning service be performed by an
authorized dealer using recovery and recycling equipment.
NOTE: Use only manufacturer approved A/C system
PAG compressor oil, and refrigerants.8
SERVICING AND MAINTENANCE 357
Page 372 of 532

Add enough fluid to bring the level up to the requirements
described on the brake fluid reservoir. With disc brakes,
fluid level can be expected to fall as the brake pads wear.
However, low fluid level may be caused by a leak and a
checkup may be needed.
Use only brake fluid that has been recommended by the
manufacturer, and has been kept in a tightly closed con-
tainer to avoid contamination from foreign matter or
moisture.
Refer to “Fluids And Lubricants” in “Technical Specifica-
tions” for further information.
WARNING!
•Use only manufacturer’s recommended brake fluid.
Refer to “Fluids And Lubricants” in “Technical
Specifications” for further information. Using the
wrong type of brake fluid can severely damage your
brake system and/or impair its performance. The
proper type of brake fluid for your vehicle is also
identified on the original factory installed hydraulic
master cylinder reservoir.
(Continued)
WARNING! (Continued)
•To avoid contamination from foreign matter or mois-
ture, use only new brake fluid or fluid that has been
in a tightly closed container. Keep the master cylin-
der reservoir cap secured at all times. Brake fluid in
a open container absorbs moisture from the air
resulting in a lower boiling point. This may cause it
to boil unexpectedly during hard or prolonged brak-
ing, resulting in sudden brake failure. This could
result in a collision.
• Overfilling the brake fluid reservoir can result in
spilling brake fluid on hot engine parts, causing the
brake fluid to catch fire. Brake fluid can also damage
painted and vinyl surfaces, care should be taken to
avoid its contact with these surfaces.
• Do not allow petroleum based fluid to contaminate
the brake fluid. Brake seal components could be
damaged, causing partial or complete brake failure.
This could result in a collision.
370 SERVICING AND MAINTENANCE
Page 402 of 532
WARNING!
A frayed or torn belt could rip apart in a collision and
leave you with no protection. Inspect the belt system
periodically, checking for cuts, frays, or loose parts.
Damaged parts must be replaced immediately. Do not
disassemble or modify the system. Seat belt assemblies
must be replaced after a collision if they have been
damaged (i.e., bent retractor, torn webbing, etc.).
Plastic And Coated Parts
Use Mopar Total Clean to clean vinyl upholstery.
CAUTION!
•Direct contact of air fresheners, insect repellents,
suntan lotions, or hand sanitizers to the plastic,
painted, or decorated surfaces of the interior may
cause permanent damage. Wipe away immediately.
• Damage caused by these type of products may not be
covered by your New Vehicle Limited Warranty.
Cleaning Plastic Instrument Cluster Lenses
The lenses in front of the instruments in this vehicle are
molded in clear plastic. When cleaning the lenses, care
must be taken to avoid scratching the plastic.
1. Clean with a wet soft cloth. A mild soap solution may be used, but do not use high alcohol content or abrasive
cleaners. If soap is used, wipe clean with a clean damp
cloth.
2. Dry with a soft cloth.
Leather Parts
Mopar Total Clean is specifically recommended for leather
upholstery.
Your leather upholstery can be best preserved by regular
cleaning with a damp soft cloth. Small particles of dirt can
act as an abrasive and damage the leather upholstery and
should be removed promptly with a damp cloth. Stubborn
soils can be removed easily with a soft cloth and Mopar
Total Clean. Care should be taken to avoid soaking your
leather upholstery with any liquid. Please do not use
polishes, oils, cleaning fluids, solvents, detergents, or
ammonia-based cleaners to clean your leather upholstery.
Application of a leather conditioner is not required to
maintain the original condition.
400 SERVICING AND MAINTENANCE
Page 407 of 532

In the event power assist is lost for any reason (for
example, repeated brake applications with the engine
OFF), the brakes will still function. The effort required to
brake the vehicle will be much greater than that required
with the power system operating.
WHEEL AND TIRE TORQUE SPECIFICATIONS
Proper lug nut/bolt torque is very important to ensure that
the wheel is properly mounted to the vehicle. Any time a
wheel has been removed and reinstalled on the vehicle, the
lug nuts/bolts should be torqued using a properly cali-
brated torque wrench using a high quality six sided (hex)
deep wall socket.
Torque Specifications
Lug Nut/BoltTorque **Lug Nut/Bolt
Size Lug Nut/Bolt
Socket Size
130 Ft-Lbs (176 N·m) M14 x 1.50 22 mm
**Use only your authorized dealer recommended lug nuts/
bolts and clean or remove any dirt or oil before tightening.
Inspect the wheel mounting surface prior to mounting the
tire and remove any corrosion or loose particles.
Tighten the lug nuts/bolts in a star pattern until each
nut/bolt has been tightened twice. Ensure that the socket is
fully engaged on the lug nut/bolt (do not insert it halfway).
NOTE: If in doubt about the correct tightness, have them
checked with a torque wrench by your authorized dealer or
service station.
After 25 miles (40 km), check the lug nut/bolt torque to be
sure that all the lug nuts/bolts are properly seated against
the wheel.
Wheel Mounting Surface
9
TECHNICAL SPECIFICATIONS 405
Page 516 of 532
Camera, Rear............................ .261
Capacities, Fluid ...........................411
Caps, Filler Fuel ................................. .263
Oil (Engine) ........................ .345, 353
Radiator (Coolant Pressure) .................367
Carbon Monoxide Warning ................201, 411
Cargo Vehicle Loading ......................... .265
Car Washes .............................. .398
Cellular Phone ........................... .483
Certification Label ......................... .265
Chains, Tire ............................. .394
Changing A Flat Tire ....................... .373
Charging Wireless ................................98
Chart, Tire Sizing .......................... .375
Check Engine Light (Malfunction Indicator Light). . . .126
Checking Your Vehicle For Safety ...............201
Checks, Safety ............................ .201
Child Restraint ........................... .180
Child Restraints Booster Seats ........................... .184
Child Seat Installation .....................197
How To Stow An unused ALR Seat Belt ........193Infant And Child Restraints
.................183
Lower Anchors And Tethers For Children .......187
Older Children And Child Restraints ...........183
Seating Positions ........................ .186
Clean Air Gasoline ........................ .408
Cleaning Wheels ............................... .393
Climate Control ............................68
Cold Weather Operation ..................... .212
Compact Spare Tire ........................ .391
Contract, Service .......................... .508
Cooling Pressure Cap (Radiator Cap) ............367
Cooling System ........................... .365
Adding Coolant (Antifreeze) .................366
Coolant
Level ....................... .365, 368
Cooling Capacity .........................411
Disposal Of Used Coolant ..................368
Drain, Flush, And Refill ....................365
Inspection ............................. .368
Points To Remember ..................... .368
Pressure Cap ........................... .367
Radiator Cap .......................... .367
Selection Of Coolant (Antifreeze) .......365, 411, 413
Corrosion Protection ....................... .397
Cruise Control (Speed Control) ..............233, 236
514 INDEX
Page 518 of 532
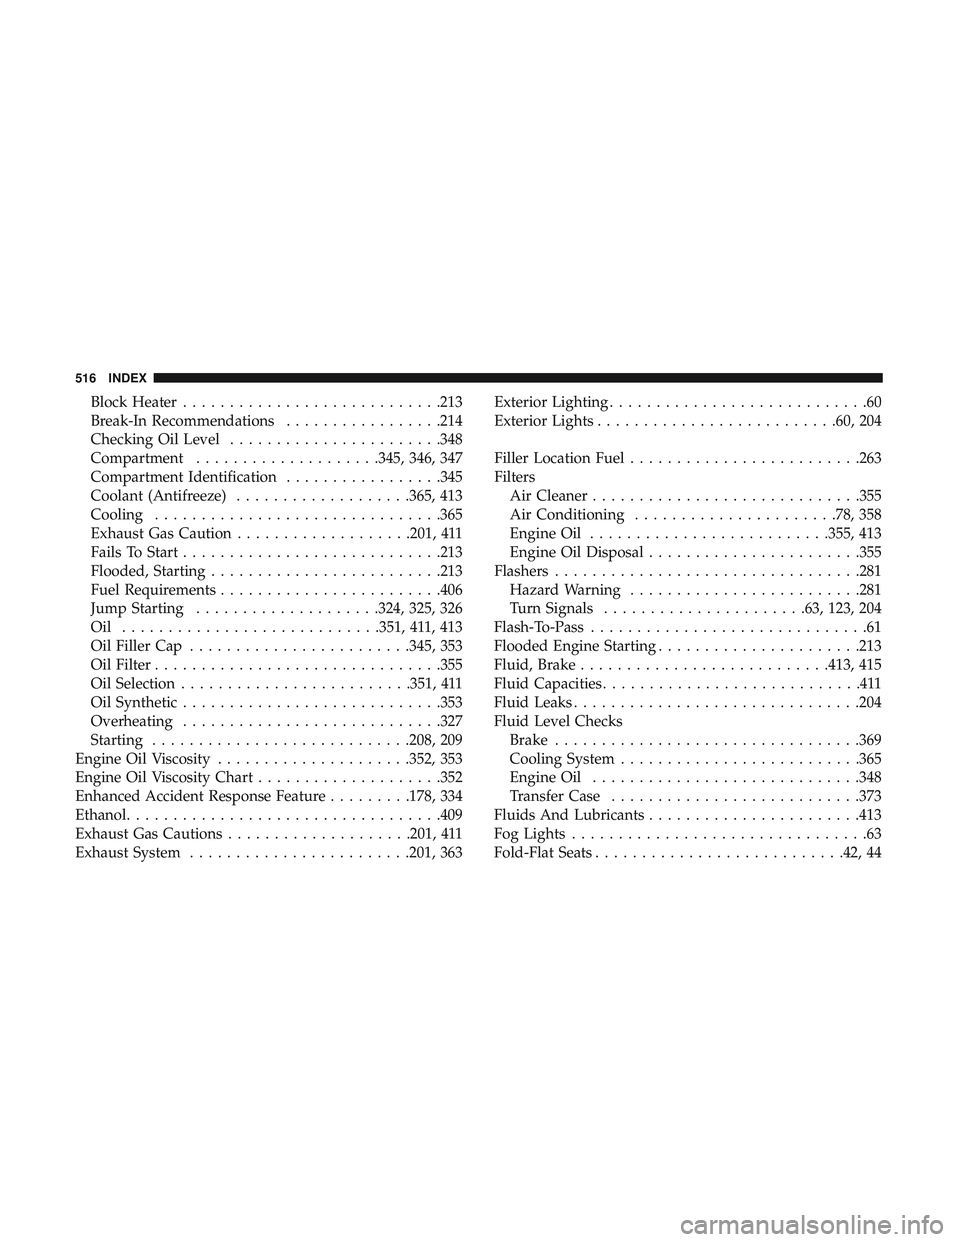
Block Heater........................... .213
Break-In Recommendations .................214
Checking Oil Level ...................... .348
Compartment ....................345, 346, 347
Compartment Identification .................345
Coolant (Antifreeze) ...................365, 413
Cooling .............................. .365
Exhaust Gas Caution ...................201, 411
Fails To Start ........................... .213
Flooded, Starting ........................ .213
Fuel Requirements ....................... .406
Jump Starting ....................324, 325, 326
Oil ........................... .351, 411, 413
Oil Filler Cap ....................... .345, 353
Oil Filter .............................. .355
Oil Selection ........................ .351, 411
Oil Synthetic ........................... .353
Overheating ........................... .327
Starting ........................... .208, 209
Engine Oil Viscosity .....................352, 353
Engine Oil Viscosity Chart ....................352
Enhanced Accident Response Feature .........178, 334
Ethanol ................................. .409
Exhaust Gas Cautions ....................201, 411
Exhaust System ....................... .201, 363Exterior Lighting
............................60
Exterior Lights ......................... .60, 204
Filler Location Fuel ........................ .263
Filters Air Cleaner ............................ .355
Air Conditioning ..................... .78, 358
Engine Oil ......................... .355, 413
Engine Oil Disposal ...................... .355
Flashers ................................ .281
Hazard Warning ........................ .281
Turn Signals ..................... .63,
123, 204
Flash-To-Pass ..............................61
Flooded Engine Starting ..................... .213
Fluid, Brake .......................... .413, 415
Fluid Capacities ............................411
Fluid Leaks .............................. .204
Fluid Level Checks Brake ................................ .369
Cooling System ......................... .365
Engine Oil ............................ .348
Transfer Case .......................... .373
Fluids And Lubricants ...................... .413
Fog Lights ................................63
Fold-Flat Seats .......................... .42, 44
516 INDEX
Page 522 of 532
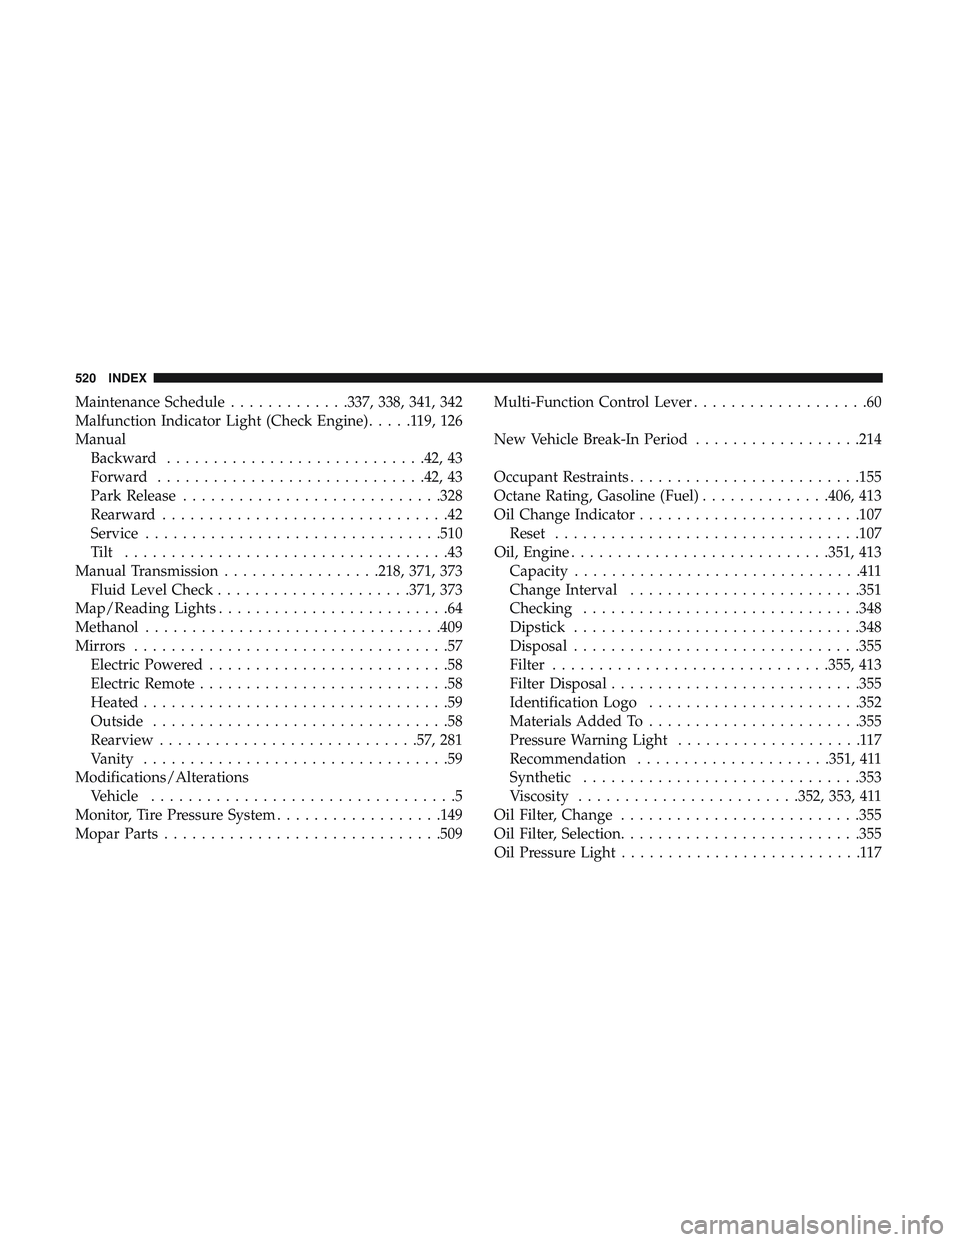
Maintenance Schedule.............337, 338, 341, 342
Malfunction Indicator Light (Check Engine) .....119,126
Manual Backward ........................... .42, 43
Forward ............................ .42, 43
Park Release ........................... .328
Rearward ...............................42
Service ............................... .510
Tilt ...................................43
Manual Transmission .................218, 371, 373
Fluid Level Check .....................371, 373
Map/Reading Lights .........................64
Methanol ............................... .409
Mirrors ..................................57
Electric Powered ..........................58
Electric Remote ...........................58
Heated .................................59
Outside ................................58
Rearview ........................... .57, 281
Vanity .................................59
Modifications/Alterations Vehicle .................................5
Monitor, Tire Pressure System ..................149
Mopar Parts ............................. .509Multi-Function Control Lever
...................60
New Vehicle Break-In Period ..................214
Occupant Restraints ........................ .155
Octane Rating, Gasoline (Fuel) ..............406, 413
Oil Change Indicator ....................... .107
Reset ................................ .107
Oil, Engine ........................... .351, 413
Capacity ...............................411
Change Interval ........................ .351
Checking ............................. .348
Dipstick .............................. .348
Disposal .............................. .355
Filter ............................. .355, 413
Filter Disposal .......................... .355
Identification Logo ...................... .352
Materials Added To ...................... .355
Pr
essure Warning Light ....................117
Recommendation .....................351, 411
Synthetic ............................. .353
Viscosity ....................... .352, 353, 411
Oil Filter, Change ......................... .355
Oil Filter, Selection ......................... .355
Oil Pressure Light ..........................117
520 INDEX