2019 CITROEN BERLINGO VAN height
[x] Cancel search: heightPage 73 of 324

71
Ease of use and comfort
3Moving the partition
Moving the partition forwards
► Fold the backrests of the row 2 seats and
check that they are properly folded. If necessary ,
adjust the position of the row 1 seats (moving
them forwards).
►
Release the upper latches
A
and B.
►
Check that the latches
C and D are retracted.
►
Slide the partition forwards.
►
Lock the lower latches
C
and D and then
check that the locating pins are correctly
engaged in their housings.
►
Lock the upper latches
A
and B.
Moving the partition backwards
► Release the upper latches A and B.
► Release the lower latches C and D.
►
Slide the partition backwards.
►
Lock the upper latches only
A
and B.
►
Return the backrests of the row 2 seats to
their positions.
The upper stops may be adjusted if: – excessive force is needed to operate
the upper latches
A
and B.
–
there is noise while driving, caused by
excessive play
.
When the partition is locked behind the
row 2 or row 1 seats, an engagement
noise tells you that the upper and lower
latches are closed.
Never drive with the partition unlocked.
The partition must not be moved with the latches extended - risk of scratches or
damage to the plastic trims!
The partition must never be removed to convert the vehicle from a commercial
vehicle to a passenger vehicle.
This would pose a risk to the safety of users
due to the absence of a child lock on the
tailgate (mandatory on passenger vehicles).
Pay attention to the loading height
behind the partition and the size of the
long load in the protective cover: the driver
must keep a good field of vision.
Do not place loads between the partition
and the bench seat backrest.
Opening/closing the hatch
► Open/close the hatch E using the latch.
► Use the stay F to keep it in the open position.
When carrying a long load, the hatch E
must be kept in the open position with
the stay F.
Systematically close the hatch E, store
the stay F in its housing (using the clip)
and straighten the backrest of the side
passenger seat(s) (depending on the position
of the partition) when no long load is being
transported.
Avoid placing loads on the sill bar of the hatch E. Whenever possible, place loads
on the folded-down seat backrests.
The maximum load on the sill of the hatch E
is 20 kg.
Page 90 of 324

88
Lighting and visibility
Headlamp beam height
adjustment
To avoid inconvenience to other road users,
the height of the halogen headlamps should be
adjusted according to the load in the vehicle.
0(Initial setting)
Unladen.
1 Partial load.
2 Medium load.
3 Maximum
authorised load.
4 5 6 Not used.
Wiper control stalk
Before operating the wipers in wintry
conditions, clear any snow, ice or frost
from the windscreen and around the wiper
arms and blades.
Do not operate the wipers on a dry
windscreen. In extremely hot or cold
weather, check that the wiper blades are not
stuck to the windscreen before operating the
wipers.
After using an automatic car wash, you may temporarily notice abnormal noises
and poorer wiping performance.
You do not
need to replace the wiper blades.
Without AUTO wiping
With AUTO wiping
Windscreen wipers
► To select the wiping speed: raise or lower the
stalk to the desired position.
Fast wiping (heavy rain)
Normal wiping (moderate rain)
Intermittent wiping (proportional to the
vehicle’s speed)
Switching off
Single wipe (press down and release).
or
Automatic wiping
Refer to the corresponding section.
Windscreen wash
► Pull the wiper control stalk towards you and
hold.
A
final wiping cycle is performed when
screenwashing ends.
The windscreen wash jets are incorporated into the tip of each wiper
arm.
Screenwash fluid is sprayed along the length
of the wiper blade. This improves visibility and
reduces screenwash fluid consumption.
With automatic air conditioning, any
action on the screenwash control results
in temporary closure of the air intake to
protect the passenger compartment from any
odour.
Page 104 of 324

102
Safety
6.Rear centre seat belt (row 2) not fastened/
unfastened warning lamp.
7. Rear right-hand seat belt (row 2) not
fastened/unfastened warning lamp.
Not fastened at the front
When the ignition is switched on, warning lamp
1 lights up on the instrument panel (depending
on version) and the corresponding indicator lamp
(2, 3 or 4 (depending on version)) lights up if the
driver and/or front passenger have not fastened
their seat belts.
At a speed greater than 12 mph (20 km/h),
these warning lamps flash, accompanied by an
increasing audible signal for approximately two
minutes. After two minutes, these warning lamps
remain on as long as the front seatbelts are not
fastened.
Not fastened at the rear
When the ignition is switched on, with the engine
running or the vehicle moving at a speed below
12
mph (20 km/h), warning lamp 1 (depending
on version) and the corresponding indicator
lamps (5 to 7) light up for around sixty seconds,
if one or more rear seat belts (row 2) are not
fastened.
There are no seat belt warning lamps for row 3.
Unfastened
After the ignition is switched on, warning lamp 1
(depending on version) and the corresponding
indicator lamps light up if the driver and/or one or
more passengers unfasten their seat belts.
At a speed greater than 12 mph (20 km/h), these
warning lamps flash, accompanied by an audible
signal for approximately two minutes. After this
time, these warning lamps remain on as long as
the seatbelts are not refastened.
Advice
The driver must ensure that passengers use the seat belts correctly and that they
are all fastened before setting off.
Wherever seated in the vehicle, you must
always fasten the seat belt, even for short
journeys.
Do not invert the seat belt buckles, as they
will not fulfil their role properly.
To ensure the proper functioning of the belt
buckles, make sure that there are no foreign
bodies present (e.g.
a coin) before fastening.
Before and after use, ensure that the seat belt
is reeled in correctly.
After folding or moving a seat or rear bench
seat, ensure that the seat belt is positioned
and reeled in correctly.
Installation
The lower part of the strap must be
positioned as low as possible over the pelvis.
The upper part must be positioned in the
hollow of the shoulder.
At the front, adjusting the position of the
seat belt may require the seat height to be
adjusted.
In order to be effective, a seat belt must:
–
be tightened as close to the body as
possible.
–
be pulled in front of you with a smooth
movement, checking that it is not twisted.
–
must only be used to secure one person.
–
not show signs of tearing or fraying.
–
not be changed or modified, in order to
avoid affecting its performance.
Recommendations for children
Use a suitable child seat if the passenger
is less than 12 years old or shorter than 1.5
metres.
Never use the same seat belt to secure more
than one child.
Never carry a child on your lap.
For more information on Child seats, refer to
the corresponding section.
Maintenance
In accordance with current safety
regulations, for all work on your vehicle's
seat belts, contact a qualified workshop with
the skills and equipment needed, which a
CITROËN dealer is able to provide.
Page 115 of 324

11 3
Safety
5Incorrect installation of a child seat in a
vehicle can compromise a child's safety
in the event of an accident.
Strictly follow the fitting instructions provided
in the installation guide supplied with the child
seat.
Recommended ISOFIX
child seats
Also consult the user guide from the child seat’s manufacturer to find out how to
install and remove the seat.
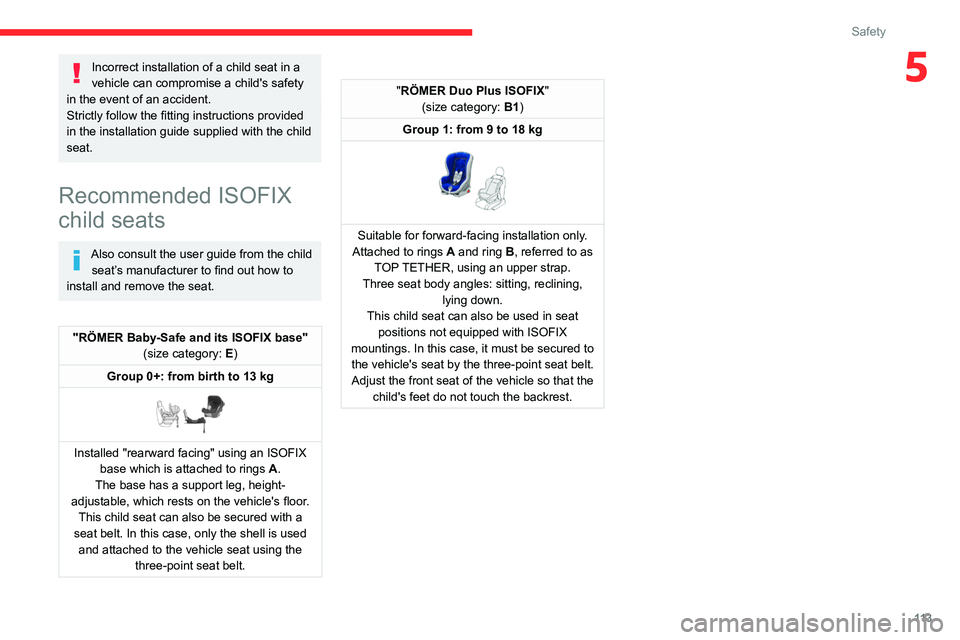
"RÖMER Baby-Safe and its ISOFIX base" (size category: E)
Group 0+: from birth to 13 kg
Installed "rearward facing" using an ISOFIX base which is attached to rings A .
The base has a support leg, height-
adjustable, which rests on the vehicle's floor. This child seat can also be secured with a
seat belt. In this case, only the shell is used and attached to the vehicle seat using the three-point seat belt.
"RÖMER Duo Plus ISOFIX "
(size category: B1)
Group 1: from 9 to 18 kg
Suitable for forward-facing installation only.
Attached to rings A and ring B, referred to as
TOP TETHER, using an upper strap.
Three seat body angles: sitting, reclining, lying down.
This child seat can also be used in seat positions not equipped with ISOFIX
mountings. In this case, it must be secured to the vehicle's seat by the three-point seat belt. Adjust the front seat of the vehicle so that the child's feet do not touch the backrest.
Page 116 of 324

11 4
Safety
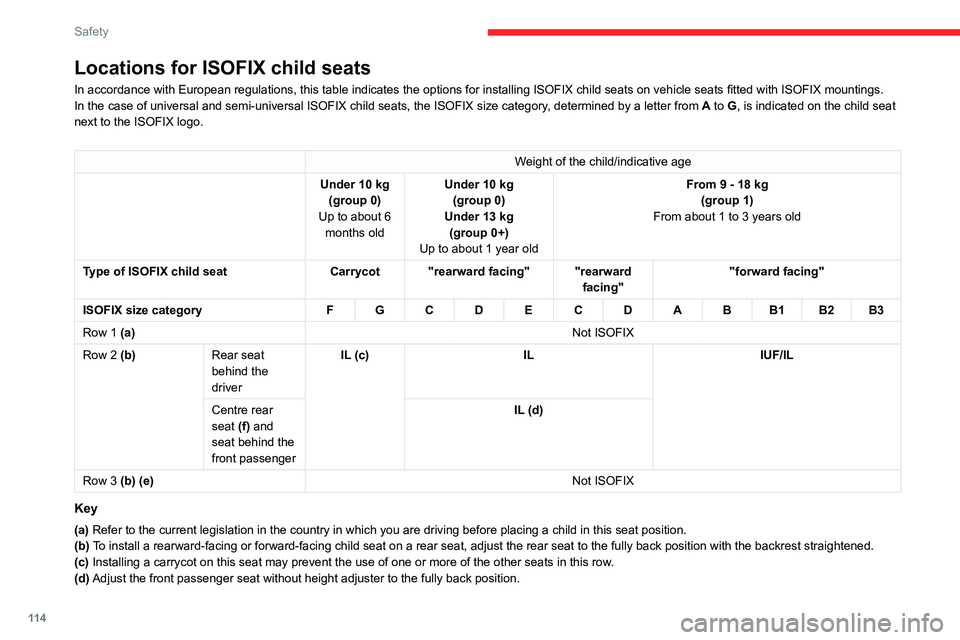
Locations for ISOFIX child seats
In accordance with European regulations, this table indicates the options for installing ISOFIX child seats on vehicle seats fitted with ISOFIX mountings.
In the case of universal and semi-universal ISOFIX child seats, the ISOF\
IX size category, determined by a letter from A to G, is indicated on the child seat
next to the ISOFIX logo.
Weight of the child/indicative age
Under 10
kg
(group
0)
Up to about 6 months old Under 10
kg
(group
0)
Under 13
kg
(group
0+)
Up to about 1 year old From 9 - 18 kg
(group 1)
From about 1 to 3 years old
Type of ISOFIX child seat Carrycot "rearward facing" "rearward
facing""forward facing"
ISOFIX size category F G C D E C D A B B1 B2 B3
Row 1 (a) Not ISOFIX
Row
2 (b) Rear seat
behind the
driver IL (c)
IL IUF/IL
Centre rear
seat (f) and
seat behind the
front passenger IL (d)
Row
3 (b) (e) Not ISOFIX
Key
(a) Refer to the current legislation in the country in which you are drivin\
g before placing a child in this seat position.
(b) To install a rearward-facing or forward-facing child seat on a rear seat,\
adjust the rear seat to the fully back position with the backrest strai\
ghtened.
(c) Installing a carrycot on this seat may prevent the use of one or more o\
f the other seats in this row.
(d) Adjust the front passenger seat without height adjuster to the fully bac\
k position.
Page 118 of 324

11 6
Safety
(c) Adjust the front seat to its maximum height.
(d) On some versions, the central seat is not equipped with ISOFIX mounting\
s.
i-U Suitable for forward-facing and rearward-facing "Universal" i-Size rest\
raint systems.
i-UF Only suitable for forward-facing "Universal" i-Size restraint systems.
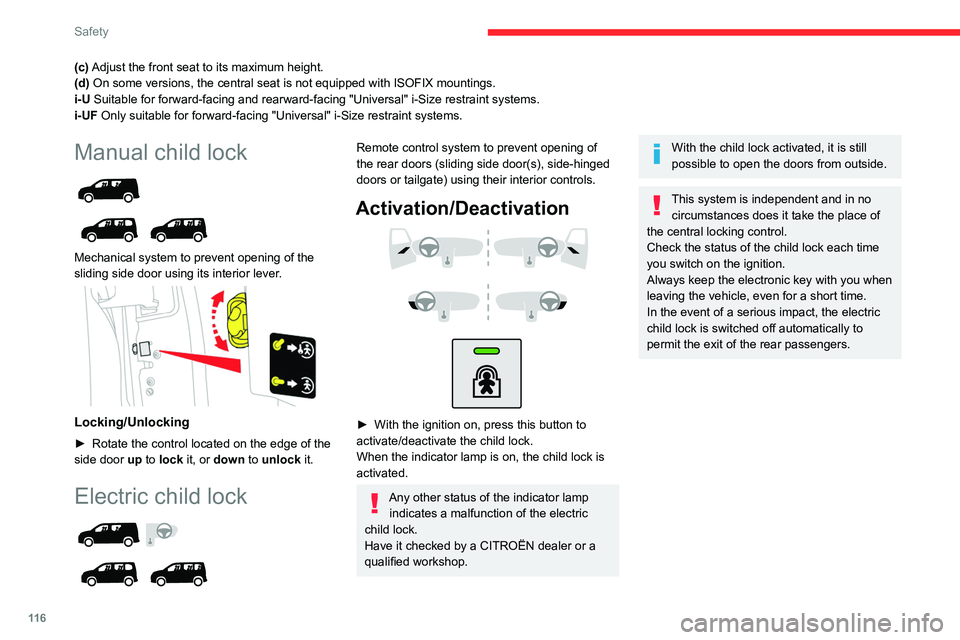
Manual child lock
Mechanical system to prevent opening of the
sliding side door using its interior lever.
Locking/Unlocking
► Rotate the control located on the edge of the
side door up
to lock it, or down to unlock it.
Electric child lock
Remote control system to prevent opening of
the rear doors (sliding side door(s), side-hinged
doors or tailgate) using their interior controls.
Activation/Deactivation
► With the ignition on, press this button to
activate/deactivate the child lock.
When the indicator lamp is on, the child lock is
activated.
Any other status of the indicator lamp indicates a malfunction of the electric
child lock.
Have it checked by a CITROËN dealer or a
qualified workshop.
With the child lock activated, it is still
possible to open the doors from outside.
This system is independent and in no circumstances does it take the place of
the central locking control.
Check the status of the child lock each time
you switch on the ignition.
Always keep the electronic key with you when
leaving the vehicle, even for a short time.
In the event of a serious impact, the electric
child lock is switched off automatically to
permit the exit of the rear passengers.
Page 120 of 324

11 8
Driving
Noise (Electric)
On the outside
Due to the vehicle’s quiet operation when
driving, the driver must pay particular attention.
When manoeuvring, the driver must always
check the vehicle's immediate surroundings.
At speeds of up to 19 mph (30 km/h), the
pedestrian horn warns other road users of the
vehicle’s presence.
Cooling the traction battery
The cooling fan comes on during
charging to cool the on-board charger and the
traction battery.
On the inside
During use, you may hear certain perfectly
normal noises specific to electric vehicles, such
as:
–
T
raction battery relay when starting.
–
V
acuum pump when braking.
–
V
ehicle tyres or aerodynamics when driving.
–
Jolting and knocking noise during hill starts.
Towing
Driving with a trailer places greater
demands on the towing vehicle and
particular care must be taken.
Do not exceed the maximum towable
weights.
At altitude: reduce the maximum load by
10% per 1,000 metres of altitude; the lower
air density at high altitudes decreases engine
performance.
New vehicle: do not tow a trailer until the
vehicle has driven at least 620 miles
(1,000 kilometres).
If the outside temperature is high, let the
engine idle for 1 to 2 minutes after the
vehicle comes to a stop, to help it to cool.
Before setting off
Nose weight
► Distribute the load in the trailer so that the
heaviest items are as close as possible to the
axle and the nose weight (at the point where it
joins your vehicle) approaches the maximum
permitted without exceeding it.
Tyres
► Check the tyre pressures of the towing
vehicle and of the trailer , observing the
recommended pressures.
Lighting
► Check the electrical signalling on the trailer
and the headlamp beam height of your vehicle.
If a genuine CITROËN towing device is
used, the rear parking sensors will be
deactivated automatically to avoid the audible
signal.
When driving
Cooling
Towing a trailer uphill causes the coolant
temperature to increase. The maximum towable
load depends on the gradient and the exterior
temperature. The fan’s cooling capacity does not
increase with engine speed.
►
Reduce speed and lower the engine speed to
limit the amount of heating produced.
►
Pay constant attention to the coolant
temperature.
If this warning lamp and the STOP
warning lamp come on, stop the
vehicle and switch off the engine as soon as
possible.
Brakes
Using the engine brake is recommended to limit
the overheating of the brakes. Braking distances
are increased when towing a trailer.
Side wind
Bear in mind that the vehicle will be more
susceptible to wind when towing.
Page 140 of 324

138
Driving
same as the others), the pressure readjusted
and the reinitialisation carried out.
Head-up display
System which projects various information onto a
smoked blade placed in the driver's field of vision
to avoid the driver having to take their eyes off
the road.
Information displayed
during operation
Once the system has been activated, the
following information is grouped together in the
head-up display:
A.The speed of your vehicle.
B. Cruise control/speed limiter information.
C. If your vehicle is suitably equipped, distances
between vehicles, automatic emergency
braking alerts and navigation instructions.
D.If your vehicle is suitably equipped, speed
limit information.
For more information on Navigation,
refer to the section Audio equipment
and telematics.
Selector
1. Switching on
2. Switching off (long press)
3. Brightness adjustment
4. Display height adjustment
Activation/Deactivation
► With the engine running, press button 1 to
activate the system and deploy the projection
blade.
► Press and hold button 2 to deactivate the
system and retract the projection blade.
The state of the system is saved when the
engine is switched off and restored on restarting.
Adjusting the height
► With the engine running, adjust the display to
the desired height using the buttons 4
:
•
up to move the display up,
•
down to move the display down.
Brightness adjustment
► With the engine running, adjust the
brightness of the information display using the
buttons
3:
•
on the "sun" to increase the brightness,
•
on the "moon" to decrease the brightness.
When stationary or while driving, no
objects should be placed around the
projection blade (or in its recess) so as not to
impede its movement and correct operation.