Page 641 of 718

STEERING WHEEL AUDIO CONTROLS
The remote sound system controls are located on the rear
surface of the steering wheel at the three and nine o’clock
positions. Both controls are rocker-type switches with a
push-button in the center.
The right-hand control is a rocker-type switch with a
push-button in the center and controls the volume and
mode of the sound system. Pushing the top of the rocker
switch will increase the volume, and pushing the bottom of
the rocker switch will decrease the volume.Pushing the center button will make the radio switch
between the various modes available (AM/FM/SXM or
Media etc.)
The left-hand control is a rocker-type switch with a push-
button in the center. The function of the left-hand control is
different depending on which mode you are in.
The following describes the left-hand control operation in
each mode.
Radio Operation
Pushing the top of the switch will “Seek” up for the next
listenable station and pushing the bottom of the switch will
“Seek” down for the next listenable station.
The button located in the center of the left-hand control
will tune to the next preset station that you have pro-
grammed in the radio preset button.
Media Mode
Pushing the top of the switch once goes to the next track on
the selected media (AUX/USB/Bluetooth). Pushing the
bottom of the switch once goes to the beginning of the
current track, or to the beginning of the previous track if it
is within eight seconds after the current track begins to
play.
Steering Wheel Audio Controls (Back View Of Steering
Wheel)
10
MULTIMEDIA 639
Page 656 of 718

Disc Menu
When listening to a CD Audio disc, CD Data disc, DVD or
Blu-ray, pushing the remote control’s arrow buttons will
navigate the cursor on the rear touchscreen in the desired
direction, on whichever touchscreen is selected. The UP,
DOWN, LEFT, and RIGHT arrow buttons, and the OK and
MENU buttons on the remote, along with the correspond-
ing buttons overlaid on the radio touchscreen, can be used
to navigate the disc menu when it appears. This can be
used to select specific chapters in a movie, navigate special
features, or to play the movie from the menu.
NOTE:Inserting a disc into the player will “auto play” the
disc if already in the �Disc�source menu on the rear
screens, and the disc supports “auto play.”
Blu-ray Controls – Disc Specific Functions
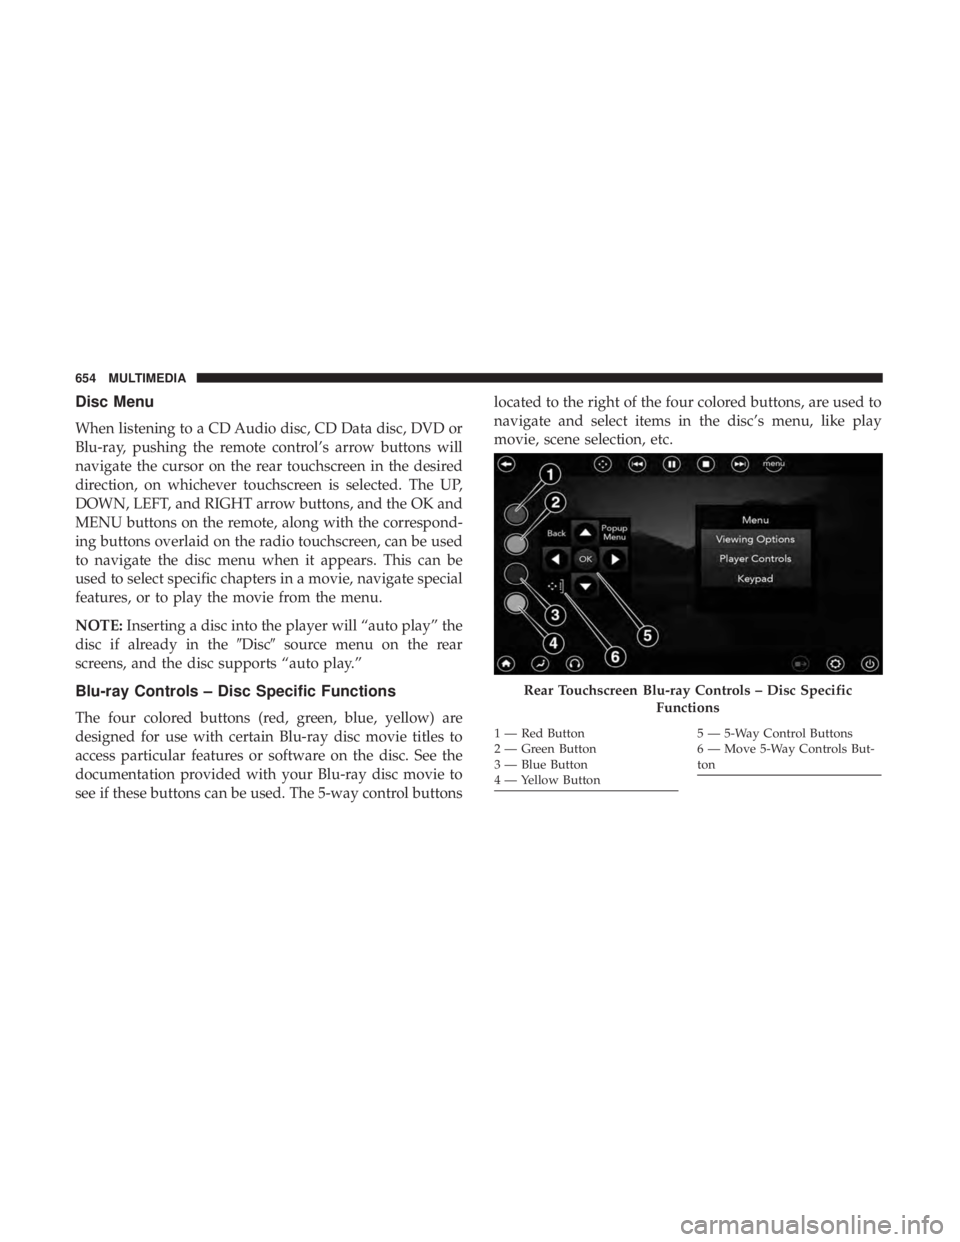
The four colored buttons (red, green, blue, yellow) are
designed for use with certain Blu-ray disc movie titles to
access particular features or software on the disc. See the
documentation provided with your Blu-ray disc movie to
see if these buttons can be used. The 5-way control buttons located to the right of the four colored buttons, are used to
navigate and select items in the disc’s menu, like play
movie, scene selection, etc.
Rear Touchscreen Blu-ray Controls – Disc Specific
Functions
1 — Red Button
2 — Green Button
3 — Blue Button
4 — Yellow Button5 — 5-Way Control Buttons
6 — Move 5-Way Controls But-
ton
654 MULTIMEDIA
Page 665 of 718
IconDescription
Rear Passenger Temperature Up and Down Buttons
Provides the rear passengers with independent temperature control. Press the button on the touchscreen
to increase or decrease the temperature. The temperature will get warmer as you move up toward the
red arrow and colder as you move down toward the blue arrow.
Headliner Mode
Headliner Mode
Air comes from the outlets in the headliner. Each of these outlets can be individually adjusted to direct
the flow of air. Moving the air vanes of the outlets to one side will shut off the airflow.
Bi-Level Mode
Bi-Level Mode
Air comes from both the headliner outlets and the floor outlets.
NOTE: In many temperature positions, the Bi-Level mode is designed to provide cooler air out of the
headliner outlets and warmer air from the floor outlets.
Floor
Mode
Floor Mode
Air comes from the floor outlets.
10
MULTIMEDIA 663
Page 680 of 718
Media
Uconnect offers connections via USB, Bluetooth and auxil-
iary ports (if equipped). Voice operation is only available
for connected USB and AUX devices.
Push the VR button
. After the beep, say one of the
following commands and follow the prompts to switch
your media source or choose an artist.
• “Change source to Bluetooth”
• “Change source to AUX”
• “Change source to USB”
• “Play artist Beethoven”; “ Play albumGreatest Hits”; “
Play song Moonlight Sonata”; “ Play genreClassical”
TIP: Press the Browse button on the touchscreen to see all
of the music on your USB device. Your Voice Command
must match exactlyhow the artist, album, song and genre
information is displayed.
Uconnect 4C/4C NAV Radio
Uconnect 4 Media
678 MULTIMEDIA
Page 683 of 718

2. Listen to the Uconnect prompts. After the beep, repeatone of the pre-defined messages and follow the system
prompts.
PRE-DEFINED VOICE TEXT REPLY RESPONSES
Yes. Stuck in traffic. See you later.No. Start without
me. I’ll be late.
Okay. Where are you? I will be minuteslate.
Call me. Are you there
yet?
I’ll call you later. I need directions.See you in
of minutes.
I’m on my way. Can’t talk right
now.
I’m lost. Thanks.
TIP: Your mobile phone must have the full implementation
of the Message Access Profile (MAP) to take advantage of
this feature. For details about MAP, visit
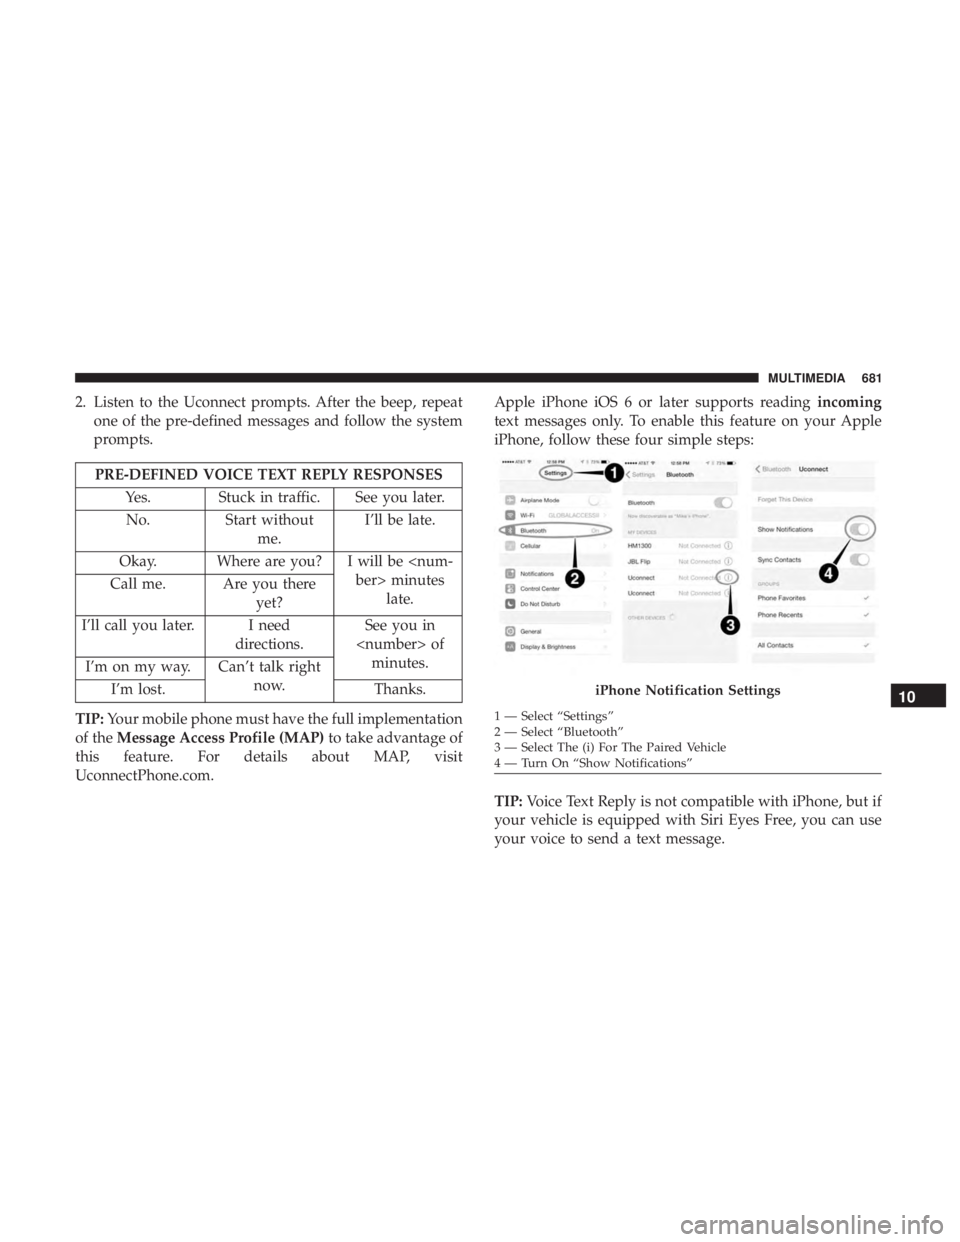
UconnectPhone.com. Apple iPhone iOS 6 or later supports reading
incoming
text messages only. To enable this feature on your Apple
iPhone, follow these four simple steps:
TIP: Voice Text Reply is not compatible with iPhone, but if
your vehicle is equipped with Siri Eyes Free, you can use
your voice to send a text message.
iPhone Notification Settings
1 — Select “Settings”
2 — Select “Bluetooth”
3 — Select The (i) For The Paired Vehicle
4 — Turn On “Show Notifications”
10
MULTIMEDIA 681
Page 690 of 718

Do Not Disturb can automatically reply with a text mes-
sage, a call or both, when declining an incoming call and
send it to voicemail.
Automatic reply messages can be:
•“I am driving right now, I will get back to you shortly.”
• Create a custom auto reply message up to 160 characters.
While in Do Not Disturb, Conference Call can be selected
so you can still place a second call without being inter-
rupted by incoming calls.
NOTE:
• Only the beginning of your custom message will be seen
on the touchscreen.
• Reply with text message is not compatible with iPhones.
• Auto reply with text message is only available on
phones that supporting Bluetooth MAP.Android Auto — If Equipped
NOTE: Feature availability depends on your carrier and
mobile phone manufacturer. Some Android Auto features
may or may not be available in every region and/or
language.
Android Auto allows you to use your voice to interact with
Android’s best-in-class speech technology through your
vehicle’s voice recognition system, and use your smart-
phone’s data plan to project your Android powered smart-
phone and a number of its apps onto your Uconnect
touchscreen. Connect your Android 5.0 (Lollipop), or
higher, to one of the media USB ports, using the factory-
provided USB cable, and press the new Android Auto icon
that replaces your “Phone” icon on the main menu bar to
begin Android Auto. Push and hold the VR button on the
steering wheel, or press and hold the “Microphone” icon
within Android Auto, to activate Android’s VR, which
688 MULTIMEDIA
Page:
< prev 1-8 9-16 17-24