Page 97 of 718

Using the mirror control switch, push on any of the four
arrows for the direction that you want the mirror to move.
Left and Right side power mirror preselected positions can
be controlled by the optional Driver Memory Seat Feature.
Refer to “Driver Memory Seat” in “Seats” for further
information.
Outside Mirrors Folding Feature
All outside mirrors are hinged and may be moved either
forward or rearward to resist damage. The hinges have
three detent positions:
•Full forward position
• Full rearward position
• Normal position
Heated Mirrors — If Equipped
These mirrors are heated to melt frost or ice. This
feature will be activated whenever you turn on the
rear window defroster (if equipped).
Refer to “Climate Controls” in this section for further
information.
Tilt Side Mirrors In Reverse (Available With
Memory Seat Only) — If Equipped
Tilt Side Mirrors In Reverse provides automatic outside
mirror positioning which will aid the driver ’s view of the
ground rearward of the front doors. The driver’s outside
mirror will move slightly downward from the present
position when the vehicle is shifted into REVERSE. The
driver’s outside mirror will then return to the original
position when the vehicle is shifted out of the REVERSE
position. Each stored memory setting will have an associ-
ated Tilt Side Mirrors In Reverse position.
NOTE: The Tilt Side Mirrors In Reverse feature is not
enabled when delivered from the factory. The Tilt Side
Mirrors In Reverse feature can be enabled or disabled
through the radio touchscreen. Refer to “Uconnect Set-
tings” in “Multimedia” for further information.
Power Folding Mirrors — If Equipped
The switch for the power folding mirrors is located be-
tween the power mirror switches L (left) and R (right).
Push the switch once and the mirrors will fold in, pushing
the switch a second time will return the mirrors to the
normal driving position.
3
GETTING TO KNOW YOUR VEHICLE 95
Page 106 of 718
setting (extreme bottom) interior lights are turned off
(dome off), and the cluster, radio and instrument lighting
go to their lowest dimmable setting.
Parade Mode (Daytime Brightness Feature)
Rotate the instrument panel dimmer control upward to the
first detent. This feature brightens all text displays such as
the odometer, instrument cluster display, and radio when
the position lights or headlights are on.
WINDSHIELD WIPER AND WASHERS
Windshield Wiper Operation
The wipers and washers are operated by a switch within
the wiper lever. Rotate the end of the lever upward, to the
first detent past the intermittent settings for low-speed
wiper operation. Rotate the end of the lever upward to the
second detent past the intermittent settings for high-speed
wiper operation.
Instrument Panel Dimmer
Washer And Wiper Controls
104 GETTING TO KNOW YOUR VEHICLE
Page 152 of 718
Hands-Free Liftgate — If Equipped
To open the liftgate using hands-free activation, use a
straight in and out kicking motion under the vehicle
activation zone in the general location below the liftgate
door handle. Do not move your foot sideways or in a
sweeping motion or the sensors may not detect the motion.Vehicles Equipped With A Trailer Tow Package
NOTE:
If your vehicle is equipped with the Trailer Tow
Package, the hands-free activation zone(s) for the Power
Liftgate will be located on the left and right side of the
receiver. Use a straight kicking motion under either activa-
tion zone to open the Hands-Free Liftgate.
When a valid kicking motion is completed, the liftgate will
chime, the hazard lights will flash and the liftgate will open
after approximately one second. This assumes all options
are enabled in the radio.
Hands-Free Liftgate Activation Zone
Hands-Free Liftgate Trailer Tow Activation Zones
150 GETTING TO KNOW YOUR VEHICLE
Page 162 of 718

2. Return to vacuum nozzle storage location located be-hind the sliding door.
3. Grab the vacuum nozzle and gently pull the hose out through vacuum nozzle storage location.
4. Shake the hose to remove any objects stuck in the hose. Take care not to perforate the hose while attempting to
dislodge any objects.
5. Reverse the procedure to reinstall and clip the hose into place.
GARAGE DOOR OPENER — IF EQUIPPED
HomeLink replaces up to three hand-held transmitters that
operate devices such as garage door openers, motorized
gates, lighting or home security systems. The HomeLink
unit is powered by your vehicle’s 12 Volt battery.
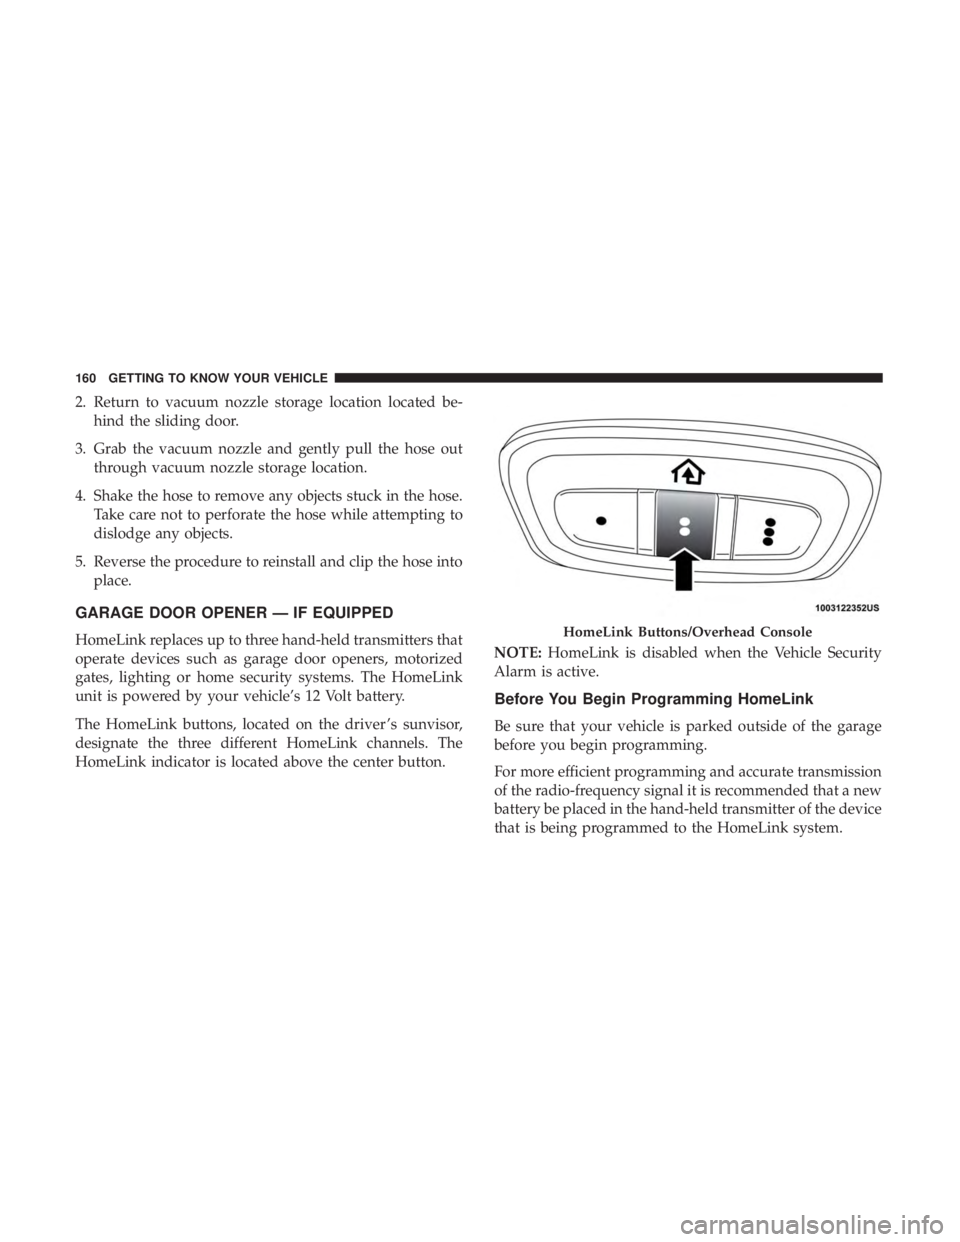
The HomeLink buttons, located on the driver ’s sunvisor,
designate the three different HomeLink channels. The
HomeLink indicator is located above the center button. NOTE:
HomeLink is disabled when the Vehicle Security
Alarm is active.
Before You Begin Programming HomeLink
Be sure that your vehicle is parked outside of the garage
before you begin programming.
For more efficient programming and accurate transmission
of the radio-frequency signal it is recommended that a new
battery be placed in the hand-held transmitter of the device
that is being programmed to the HomeLink system.
HomeLink Buttons/Overhead Console
160 GETTING TO KNOW YOUR VEHICLE
Page 165 of 718

3. Press and hold the HomeLink button you want toprogram while you press and hold the hand-held trans-
mitter button.
4. Continue to hold both buttons and observe the indicator light. The HomeLink indicator will flash slowly and
then rapidly after HomeLink has received the frequency
signal from the hand-held transmitter. Release both
buttons after the indicator light changes from slow to
rapid.
5. Press and hold the programmed HomeLink button and observe the indicator light.
• If the indicator light stays on constantly, programming
is complete and the garage door/device should acti-
vate when the HomeLink button is pressed.
• To program the two remaining HomeLink buttons,
repeat each step for each remaining button. DO NOT
erase the channels.
Reprogramming A Single HomeLink Button (Non-
Rolling Code)
To reprogram a channel that has been previously trained,
follow these steps:
1. Cycle the ignition to the ON/RUN position. 2. Press and hold the desired HomeLink button until the
indicator light begins to flash after 20 seconds. Do not
release the button.
3. Without releasing the button, proceed with “Program- ming A Non-Rolling Code” step 2 and follow all remain-
ing steps.
Canadian/Gate Operator Programming
For programming transmitters in Canada/United States
that require the transmitter signals to “time-out” after
several seconds of transmission.
Canadian radio frequency laws require transmitter signals
to time-out (or quit) after several seconds of transmission –
which may not be long enough for HomeLink to pick up
the signal during programming. Similar to this Canadian
law, some U.S. gate operators are designed to time-out in
the same manner.
It may be helpful to unplug the device during the cycling
process to prevent possible overheating of the garage door
or gate motor.
1. Cycle the ignition to the ON/RUN position.
3
GETTING TO KNOW YOUR VEHICLE 163
Page 168 of 718
General Information
The following regulatory statement applies to all Radio
Frequency (RF) devices equipped in this vehicle:
This device complies with Part 15 of the FCC Rules and
with Innovation, Science and Economic Development
Canada license-exempt RSS standard(s). Operation is sub-
ject to the following two conditions:
1. This device may not cause harmful interference, and
2. This device must accept any interference received, in-cluding interference that may cause undesired opera-
tion.
NOTE: Changes or modifications not expressly approved
by the party responsible for compliance could void the
user ’s authority to operate the equipment.
INTERNAL EQUIPMENT
Storage
Glove Compartment
The glove compartment is located on the passenger side of
the instrument panel.
To open the glove compartment, pull the release handle.
Release Handle
166 GETTING TO KNOW YOUR VEHICLE
Page 188 of 718

6. Repeat the procedure to stow the second crossbar on theopposite side.
NOTE:
• To help control wind noise, stow the crossbars in the side
rails when they are not in use.
• If any metallic object is placed over the satellite radio
antenna (if equipped), you may experience interruption
of satellite radio reception.WARNING!
Cargo must be securely tied down before driving your
vehicle. Improperly secured loads can fly off the ve-
hicle, particularly at high speeds, resulting in personal
injury or property damage. Follow the roof rack cau-
tions when carrying cargo on your roof rack.
CAUTION!
• To prevent damage to the roof of your vehicle, DO
NOT carry any loads on the roof rack without the
crossbars deployed. The load should be secured and
placed on top of the crossbars, not directly on the
roof. If it is necessary to place the load on the roof,
place a blanket or other protective layer between the
load and the roof surface.
• To avoid damage to the roof rack and vehicle, do not
exceed the maximum roof rack load capacity of 150 lb
(68 kg). Always distribute heavy loads as evenly as
possible and secure the load appropriately.
• Load should always be secured to cross bars first,
with tie down loops used as additional securing
(Continued)
Stowed Crossbars
186 GETTING TO KNOW YOUR VEHICLE
Page 205 of 718

•HVAC System
• 150W Power Inverter System
• Audio and Telematics System
Loss of the battery charge may indicate one or more of the
following conditions:
• The charging system cannot deliver enough electrical
power to the vehicle system because the electrical loads
are larger than the capability of charging system. The
charging system is still functioning properly.
• Turning on all possible vehicle electrical loads (e.g.
HVAC to max settings, exterior and interior lights,
overloaded power outlets +12V, 150W, USB ports) dur-
ing certain driving conditions (city driving, towing,
frequent stopping).
• Installing options like additional lights, upfitter electri-
cal accessories, audio systems, alarms and similar de-
vices.
• Unusual driving cycles (short trips separated by long
parking periods). •
The vehicle was parked for an extended period of time
(weeks, months).
• The battery was recently replaced and was not charged
completely.
• The battery was discharged by an electrical load left on
when the vehicle was parked.
• The battery was used for an extended period with the
engine not running to supply radio, lights, chargers,
+12V portable appliances like vacuum cleaners, game
consoles and similar devices.
What to do when an electrical load reduction action
message is present (“Battery Saver On” or “Battery Saver
Mode”)
During a trip:
• Reduce power to unnecessary loads if possible:
– Turn off redundant lights (interior or exterior)
– Check what may be plugged in to power outlets +12V, 150W, USB ports
– Check HVAC settings (blower, temperature)
– Check the audio settings (volume)
4
GETTING TO KNOW YOUR INSTRUMENT PANEL 203