Page 541 of 718
 — Metric tire sizing is based on U.S.
design standards. P-Metric tires have the letter “P”
molded into the sidewall preceding the size designation.
Example: P215/65R15 95H")
NOTE:
•P (Passenger) — Metric tire sizing is based on U.S.
design standards. P-Metric tires have the letter “P”
molded into the sidewall preceding the size designation.
Example: P215/65R15 95H.
• European — Metric tire sizing is based on European
design standards. Tires designed to this standard have
the tire size molded into the sidewall beginning with the
section width. The letter �P�is absent from this tire size
designation. Example: 215/65R15 96H.
• LT (Light Truck) — Metric tire sizing is based on U.S.
design standards. The size designation for LT-Metric
tires is the same as for P-Metric tires except for the letters
“LT” that are molded into the sidewall preceding the
size designation. Example: LT235/85R16. •
Temporary spare tires are designed for temporary emer-
gency use only. Temporary high pressure compact spare
tires have the letter “T” or “S” molded into the sidewall
preceding the size designation. Example: T145/80D18
103M.
• High flotation tire sizing is based on U.S. design stan-
dards and it begins with the tire diameter molded into
the sidewall. Example: 31x10.5 R15 LT.
8
SERVICING AND MAINTENANCE 539
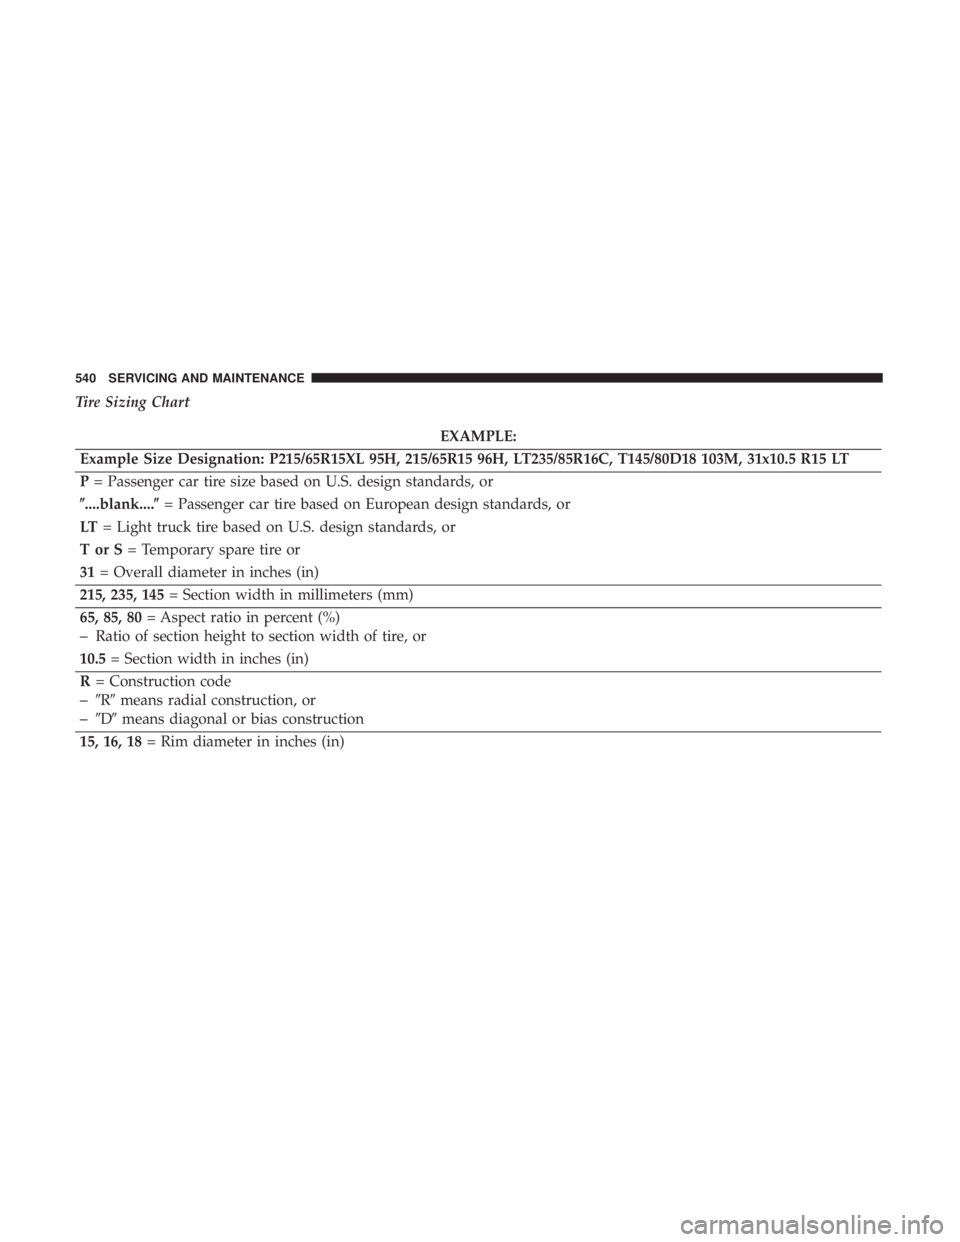
Page 542 of 718
Tire Sizing Chart
EXAMPLE:
Example Size Designation: P215/65R15XL 95H, 215/65R15 96H, LT235/85R16C, T145/80D18 103M, 31x10.5 R15 LT
P = Passenger car tire size based on U.S. design standards, or
�....blank....� = Passenger car tire based on European design standards, or
LT = Light truck tire based on U.S. design standards, or
TorS= Temporary spare tire or
31 = Overall diameter in inches (in)
215, 235, 145 = Section width in millimeters (mm)
65, 85, 80 = Aspect ratio in percent (%)
–Ratio of section height to section width of tire, or
10.5 = Section width in inches (in)
R = Construction code
–�R� means radial construction, or
–�D� means diagonal or bias construction
15, 16, 18 = Rim diameter in inches (in)
540 SERVICING AND MAINTENANCE
Page 543 of 718

EXAMPLE:
Service Description:
95 = Load Index
–A numerical code associated with the maximum load a tire can carry
H = Speed Symbol
–A symbol indicating the range of speeds at which a tire can carry a load corresponding to its load index under cer-
tain operating conditions
–The maximum speed corresponding to the speed symbol should only be achieved under specified operating condi-
tions (i.e., tire pressure, vehicle loading, road conditions, and posted speed limits)
Load Identification:
Absence of the following load identification symbols on the sidewall of the tire indicates a Standard Load (SL) tire:
• XL = Extra load (or reinforced) tire, or
• LL = Light load tire or
• C, D, E, F, G = Load range associated with the maximum load a tire can carry at a specified pressure
Maximum Load – Maximum load indicates the maximum load this tire is designed to carry
Maximum Pressure – Maximum pressure indicates the maximum permissible cold tire inflation pressure for this tire
Tire Identification Number (TIN)
The TIN may be found on one or both sides of the tire;
however, the date code may only be on one side. Tires with
white sidewalls will have the full TIN, including the date
code, located on the white sidewall side of the tire. Look for the TIN on the outboard side of black sidewall tires as
mounted on the vehicle. If the TIN is not found on the
outboard side, then you will find it on the inboard side of
the tire.
8
SERVICING AND MAINTENANCE 541
Page 555 of 718

WARNING!
Tires and the spare tire should be replaced after six
years, regardless of the remaining tread. Failure to
follow this warning can result in sudden tire failure.
You could lose control and have a collision resulting in
serious injury or death.
NOTE: Wheel Valve Stem must be replaced as well when
installing new tires due to wear and tear in existing tires.
Keep dismounted tires in a cool, dry place with as little
exposure to light as possible. Protect tires from contact with
oil, grease, and gasoline.
Replacement Tires
The tires on your new vehicle provide a balance of many
characteristics. They should be inspected regularly for
wear and correct cold tire inflation pressures. The manu-
facturer strongly recommends that you use tires equivalent
to the originals in size, quality and performance when
replacement is needed. Refer to the paragraph on “Tread
Wear Indicators” in this section. Refer to the Tire and
Loading Information placard or the Vehicle Certification Label for the size designation of your tire. The Load Index
and Speed Symbol for your tire will be found on the
original equipment tire sidewall.
See the Tire Sizing Chart example found in the “Tire Safety
Information” section of this manual for more information
relating to the Load Index and Speed Symbol of a tire.
It is recommended to replace the two front tires or two rear
tires as a pair. Replacing just one tire can seriously affect
your vehicle’s handling. If you ever replace a wheel, make
sure that the wheel’s specifications match those of the
original wheels.
It is recommended you contact an authorized tire dealer or
original equipment dealer with any questions you may
have on tire specifications or capability. Failure to use
equivalent replacement tires may adversely affect the
safety, handling, and ride of your vehicle.
WARNING!
•
Do not use a tire, wheel size, load rating, or speed
rating other than that specified for your vehicle.
Some combinations of unapproved tires and wheels
(Continued)
8
SERVICING AND MAINTENANCE 553
Page 564 of 718

include acceleration, cornering, hydroplaning, or
peak traction characteristics.
Temperature Grades
The Temperature grades are A (the highest), B, and C,
representing the tire’s")
WARNING!(Continued)
include acceleration, cornering, hydroplaning, or
peak traction characteristics.
Temperature Grades
The Temperature grades are A (the highest), B, and C,
representing the tire’s resistance to the generation of
heat and its ability to dissipate heat, when tested under
controlled conditions on a specified indoor laboratory
test wheel.
Sustained high temperature can cause the material of
the tire to degenerate and reduce tire life, and excessive
temperature can lead to sudden tire failure. The grade C
corresponds to a level of performance, which all pas-
senger vehicle tires must meet under the Federal Motor
Vehicle Safety Standard No. 109. Grades B and A
represent higher levels of performance on the laboratory
test wheel, than the minimum required by law.
WARNING!
The temperature grade for this tire is established for
a tire that is properly inflated and not overloaded.
(Continued)
WARNING! (Continued)
Excessive speed, under-inflation, or excessive load-
ing, either separately or in combination, can cause
heat buildup and possible tire failure.
STORING THE VEHICLE
If the vehicle should remain stationary for more than a
month, observe the following precautions:
• Park your vehicle in a covered, dry and possibly airy
location the windows open slightly.
• Check that the Electric Park Brake is not engaged.
• Disconnect the negative (-) terminal from the battery
post and be sure that the battery is fully charged. During
storage check battery charge quarterly.
• If you do not disconnect the battery from the electrical
system, check the battery charge every 30 days.
• Clean and protect the painted parts by applying protec-
tive waxes.
• Clean and protect polished metal parts by applying
protective waxes.
562 SERVICING AND MAINTENANCE
Page 566 of 718

What Causes Corrosion?
Corrosion is the result of deterioration or removal of paint
and protective coatings from your vehicle.
The most common causes are:
•Road salt, dirt and moisture accumulation.
• Stone and gravel impact.
• Insects, tree sap and tar.
• Salt in the air near seacoast localities.
• Atmospheric fallout/industrial pollutants.
Body And Underbody Maintenance
Cleaning Headlights
Your vehicle is equipped with plastic headlights and fog
lights that are lighter and less susceptible to stone breakage
than glass headlights.
Plastic is not as scratch resistant as glass and therefore
different lens cleaning procedures must be followed.
To minimize the possibility of scratching the lenses and
reducing light output, avoid wiping with a dry cloth. To
remove road dirt, wash with a mild soap solution followed
by rinsing. Do not use abrasive cleaning components, solvents, steel
wool or other aggressive material to clean the lenses.
Preserving The Bodywork
Washing
•
Wash your vehicle regularly. Always wash your vehicle
in the shade using Mopar Car Wash, or a mild car wash
soap, and rinse the panels completely with clear water.
• If insects, tar, or other similar deposits have accumulated
on your vehicle, use Mopar Super Kleen Bug and Tar
Remover to remove.
• Use a high quality cleaner wax, such as Mopar Cleaner
Wax to remove road film, stains and to protect your
paint finish. Take care never to scratch the paint.
• Avoid using abrasive compounds and power buffing
that may diminish the gloss or thin out the paint finish.
564 SERVICING AND MAINTENANCE
Page 569 of 718

soils can be removed easily with a soft cloth and Mopar
Total Clean. Care should be taken to avoid soaking your
leather upholstery with any liquid. Please do not use
polishes, oils, cleaning fluids, solvents, detergents, or
ammonia-based cleaners to clean your leather upholstery.
Application of a leather conditioner is not required to
maintain the original condition.
NOTE:If equipped with light colored leather, it tends to
show any foreign material, dirt, and fabric dye transfer
more so than darker colors. The leather is designed for easy
cleaning, and FCA recommends Mopar total care leather
cleaner applied on a cloth to clean the leather seats as
needed.
CAUTION!
Do not use Alcohol and Alcohol-based and/or Ketone
based cleaning products to clean leather seats, as
damage to the seat may result.
Glass Surfaces
All glass surfaces should be cleaned on a regular basis with
Mopar Glass Cleaner, or any commercial household-type
glass cleaner. Never use an abrasive type cleaner. Use
caution when cleaning the inside rear window equipped
with electric defrosters or windows equipped with radio
antennas. Do not use scrapers or other sharp instruments
that may scratch the elements.
When cleaning the rear view mirror, spray cleaner on the
towel or cloth that you are using. Do not spray cleaner
directly on the mirror.
8
SERVICING AND MAINTENANCE 567
Page 572 of 718
IDENTIFICATION DATA
Vehicle Identification Number
The Vehicle Identification Number (VIN) is on the left front
corner of the instrument panel and is visible from outside
of the vehicle through the windshield. This number also
appears stamped under the right rear sliding door trim
panel and printed on the Automobile Information Disclo-
sure Label affixed to a window on your vehicle, the vehicle
registration and title.NOTE:It is illegal to remove or alter the VIN.
BRAKE SYSTEM
Your vehicle is equipped with dual hydraulic brake sys-
tems. If either of the two hydraulic systems loses normal
capability, the remaining system will still function. How-
ever, there will be some loss of overall braking effective-
ness. You may notice increased pedal travel during appli-
cation, greater pedal force required to slow or stop, and
potential activation of the Brake Warning Light.
Vehicle Identification Number
Vehicle Identification Number
570 TECHNICAL SPECIFICATIONS
 is on the left front
corner of the instrument panel and is visible from outside
of the vehicle through the win")