Page 264 of 492
To change between the different control modes, push the
Adaptive Cruise Control (ACC) on/off button which turns
the ACC and the Normal (Fixed Speed) Cruise Control off.
Pushing the Normal (Fixed Speed) Cruise Control on/off
button will result in turning on (changing to) the Normal
(Fixed Speed) Cruise Control mode.
WARNING!
In the Normal (Fixed Speed) Cruise Control mode, the
system will not react to vehicles ahead. In addition, the
proximity warning does not activate and no alarm will
sound even if you are too close to the vehicle ahead
since neither the presence of the vehicle ahead nor the
vehicle-to-vehicle distance is detected. Be sure to main-
tain a safe distance between your vehicle and the
vehicle ahead. Always be aware which mode is se-
lected.
To Set A Desired Speed
Turn the Normal (Fixed Speed) Cruise Control
on. When the vehicle has reached the desired
speed, push the SET (+) or SET (-) button and
release. Release the accelerator and the vehicle
will operate at the selected speed. Once a speed has been set a message “CRUISE CONTROL SET TO MPH (km/h)”
will appear indicating what speed was set. This light will
turn on when the system is turned on via the on/off
control. It turns green when the cruise control is set.
To Vary The Speed Setting
To Increase Speed
When the Normal (Fixed Speed) Cruise Control is set, you
can increase speed by pushing the SET
(+)button.
The driver’s preferred units can be selected through the
instrument cluster display. Refer to “Getting To Know Your
Instrument Panel” for more information. The speed incre-
ment shown is dependant on the speed of U.S. (mph) or
Metric (km/h) units:
U.S. Speed (mph)
• Pushing the SET (+)button once will result ina1mph
increase in set speed. Each subsequent tap of the button
results in an increase of 1 mph.
• If the button is continually pushed, the set speed will
continue to increase in 5 mph increments until the
button is released. The increase in set speed is reflected
in the instrument cluster display.
262 STARTING AND OPERATING
Page 265 of 492
Metric Speed (km/h)
•Pushing the SET (+)button once will result in a 1 km/h
increase in set speed. Each subsequent tap of the button
results in an increase of 1 km/h.
• If the button is continually pushed, the set speed will
continue to increase in 10 km/h increments until the
button is released. The increase in set speed is reflected
in the instrument cluster display.
To Decrease Speed
When the Normal (Fixed Speed) Cruise Control is set, you
can decrease speed by pushing the SET (-)button.
The driver’s preferred units can be selected through the
instrument cluster display. Refer to “Getting To Know Your
Instrument Panel” for more information. The speed decre-
ment shown is dependant on the speed of U.S. (mph) or
Metric (km/h) units:
U.S. Speed (mph)
• Pushing the SET (-)button once will result in a 1 mph
decrease in set speed. Each subsequent tap of the button
results in a decrease of 1 mph. •
If the button is continually pushed, the set speed will
continue to decrease in 5 mph decrements until the
button is released. The decrease in set speed is reflected
in the instrument cluster display.
Metric Speed (km/h)
• Pushing the SET (-)button once will result in a 1 km/h
decrease in set speed. Each subsequent tap of the button
results in a decrease of 1 km/h.
• If the button is continually pushed, the set speed will
continue to decrease in 10 km/h decrements until the
button is released. The decrease in set speed is reflected
in the instrument cluster display.
To Cancel
The following conditions will cancel the Normal (Fixed
Speed) Cruise Control without clearing the memory:
• The brake pedal is applied.
• The CANC button is pushed.
• The Electronic Stability Control/Traction Control Sys-
tem (ESC/TCS) activates.
6
STARTING AND OPERATING 263
Page 267 of 492
ParkSense Sensors
The four ParkSense sensors, located in the rear fascia/
bumper, monitor the area behind the vehicle that is within
the sensors’ field of view. The sensors can detect obstacles
from approximately 12 inches (30 cm) up to 79 inches (200
cm) from the rear fascia/bumper in the horizontal direc-
tion, depending on the location, type and orientation of the
obstacle.
The six ParkSense sensors, located in the front fascia/
bumper, monitor the area in front of the vehicle that is
within the sensors’ field of view. The sensors can detect
obstacles from approximately 12 inches (30 cm) up to 47
inches (120 cm) from the front fascia/bumper in the
horizontal direction, depending on the location, type and
orientation of the obstacle.
ParkSense Warning Display
The ParkSense Warning screen will only be displayed if
Sound and Display is selected from the Customer Pro-
grammable Features section of the Uconnect System. Refer
to�Uconnect Settings” in “Multimedia” for further infor-
mation. The ParkSense Warning screen is located within the instru-
ment cluster display. It provides visual warnings to indi-
cate the distance between the rear fascia/bumper and/or
front fascia/bumper and the detected obstacle. Refer to
“Instrument Cluster Display” in “Getting To Know Your
Instrument Panel” for further information.
ParkSense Display
Rear Park Assist
While the vehicle is in REVERSE, the ParkSense Display is
shown in the instrument cluster.
The system will indicate a detected obstacle by showing a
single arc in one or more regions based on the obstacle’s
distance and location relative to the vehicle.
If an obstacle is detected in the center rear region, the
display will show a single solid arc in the center rear region
and will produce a one-half second tone. As the vehicle
moves closer to the obstacle, the display will show the
single arc moving closer to the vehicle and the sound tone
will change from slow, to fast, to continuous.6
STARTING AND OPERATING 265
Page 268 of 492
If an obstacle is detected in the left and/or right rear
region, the display will show a single flashing arc in the left
and/or right rear region and will produce a fast sound
tone. As the vehicle moves closer to the obstacle, the
display will show the single arc moving closer to the
vehicle and the tone will change from fast to continuous.
Single 1/2 Second Tone/Solid Arc
Slow Tone/Solid Arc
Slow Tone/Solid Arc
266 STARTING AND OPERATING
Page 269 of 492
The vehicle is close to the obstacle when the warning
display shows one flashing arc and sounds a continuous
tone. The following chart shows the warning alert opera-
tion when the system is detecting an obstacle:
Fast Tone/Flashing Arc
Fast Tone/Flashing Arc
Continuous Tone/Flashing Arc
6
STARTING AND OPERATING 267
Page 271 of 492
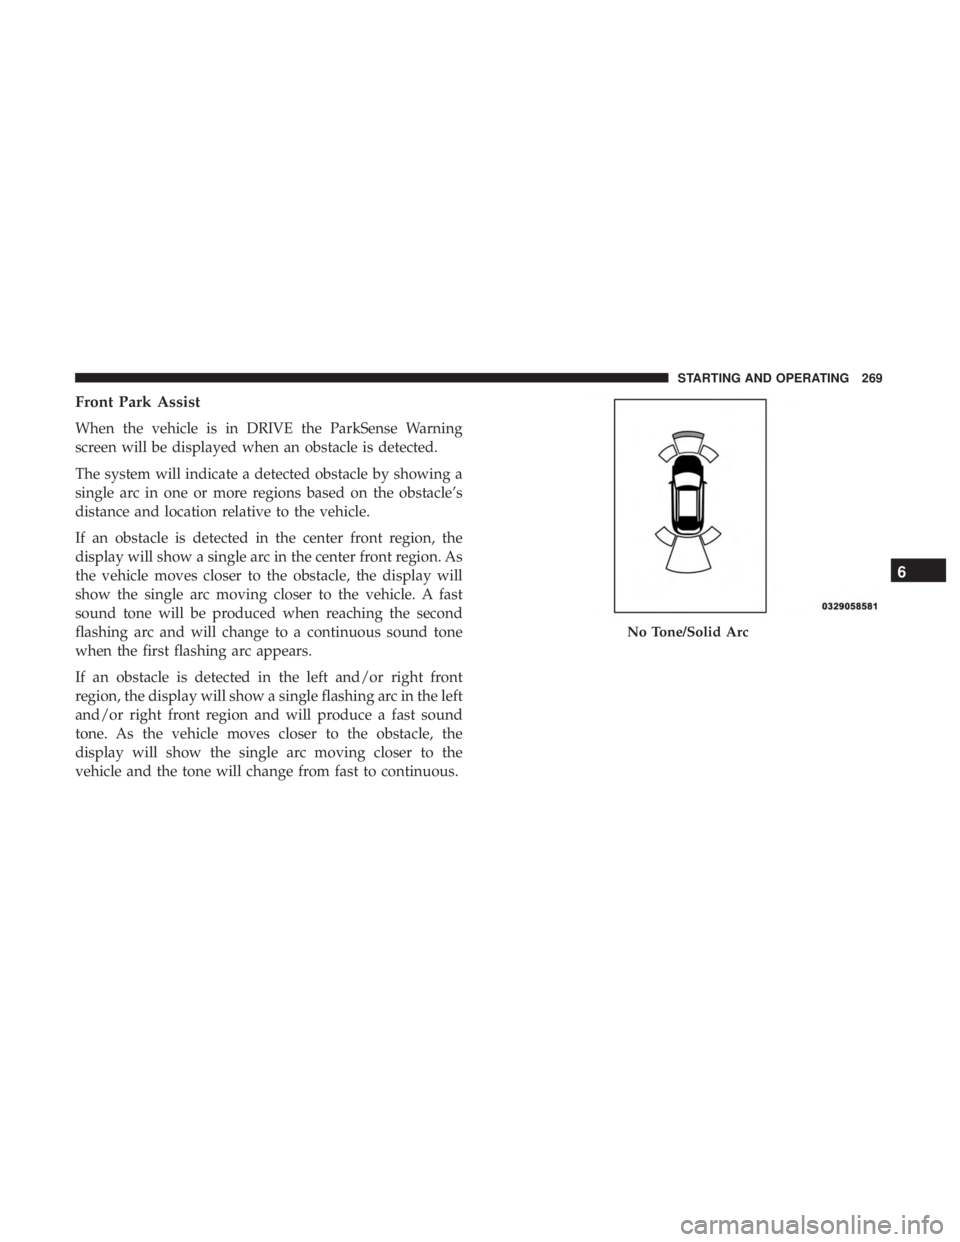
Front Park Assist
When the vehicle is in DRIVE the ParkSense Warning
screen will be displayed when an obstacle is detected.
The system will indicate a detected obstacle by showing a
single arc in one or more regions based on the obstacle’s
distance and location relative to the vehicle.
If an obstacle is detected in the center front region, the
display will show a single arc in the center front region. As
the vehicle moves closer to the obstacle, the display will
show the single arc moving closer to the vehicle. A fast
sound tone will be produced when reaching the second
flashing arc and will change to a continuous sound tone
when the first flashing arc appears.
If an obstacle is detected in the left and/or right front
region, the display will show a single flashing arc in the left
and/or right front region and will produce a fast sound
tone. As the vehicle moves closer to the obstacle, the
display will show the single arc moving closer to the
vehicle and the tone will change from fast to continuous.
No Tone/Solid Arc
6
STARTING AND OPERATING 269
Page 272 of 492
The vehicle is close to the obstacle when the warning
display shows one flashing arc and sounds a continuous
tone. The following chart shows the warning alert opera-
tion when the system is detecting an obstacle:
Fast Tone/Flashing ArcContinuous Tone/Flashing Arc
270 STARTING AND OPERATING
Page 273 of 492
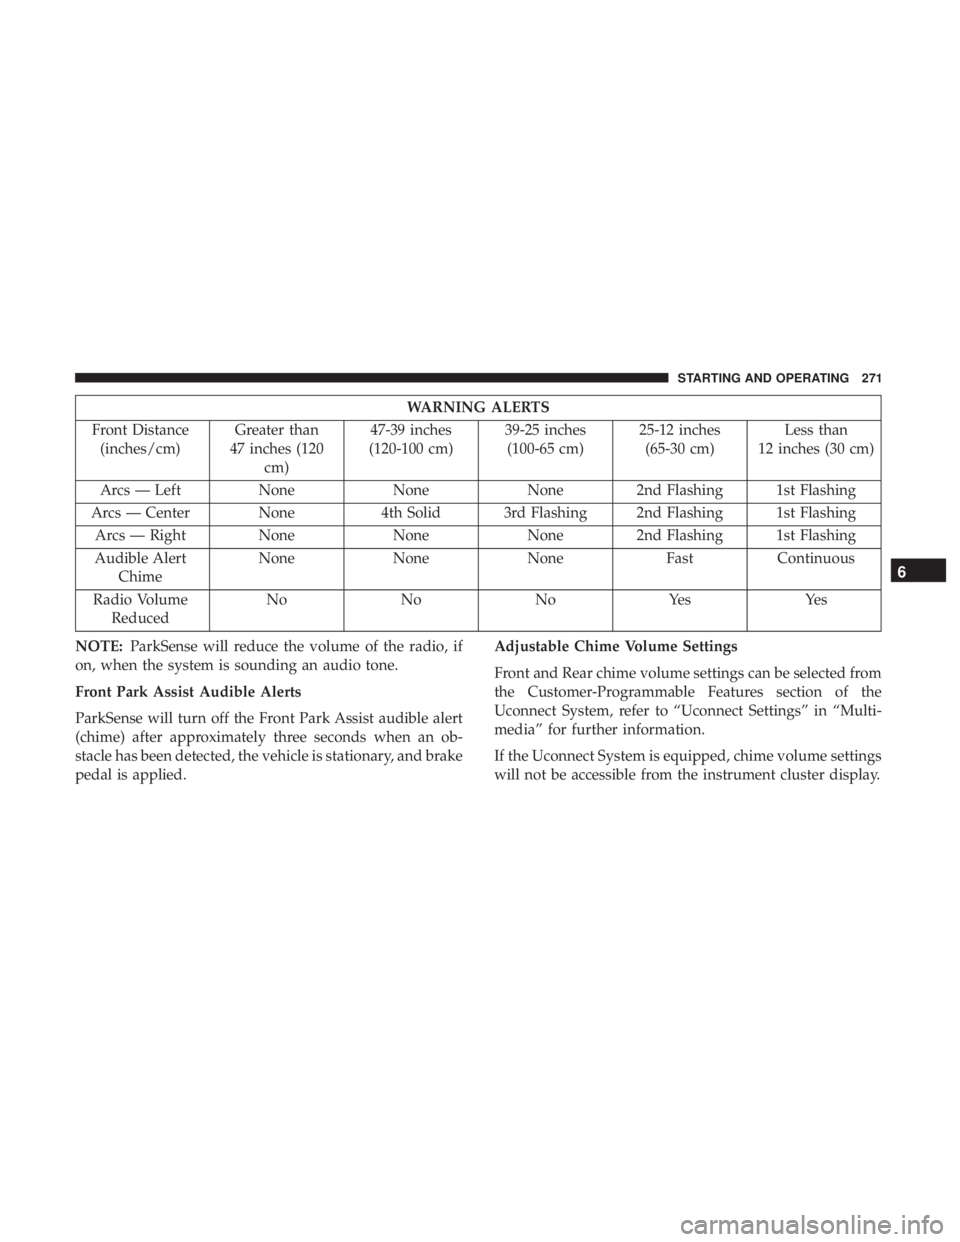
WARNING ALERTS
Front Distance (inches/cm) Greater than
47 inches (120 cm) 47-39 inches
(120-100 cm) 39-25 inches
(100-65 cm) 25-12 inches
(65-30 cm) Less than
12 inches (30 cm)
Arcs — Left None None None 2nd Flashing 1st Flashing
Arcs — Center None 4th Solid 3rd Flashing 2nd Flashing 1st Flashing
Arcs — Right None NoneNone 2nd Flashing 1st Flashing
Audible Alert Chime None
NoneNone FastContinuous
Radio Volume Reduced No
NoNoYes Yes
NOTE: ParkSense will reduce the volume of the radio, if
on, when the system is sounding an audio tone.
Front Park Assist Audible Alerts
ParkSense will turn off the Front Park Assist audible alert
(chime) after approximately three seconds when an ob-
stacle has been detected, the vehicle is stationary, and brake
pedal is applied. Adjustable Chime Volume Settings
Front and Rear chime volume settings can be selected from
the Customer-Programmable Features section of the
Uconnect System, refer to “Uconnect Settings” in “Multi-
media” for further information.
If the Uconnect System is equipped, chime volume settings
will not be accessible from the instrument cluster display.
6
STARTING AND OPERATING 271