2019 CHEVROLET VOLT high
[x] Cancel search: highPage 81 of 373
Chevrolet VOLT Owner Manual (GMNA-Localizing-U.S./Canada/Mexico-
12163007) - 2019 - CRC - 11/5/18
80 Seats and Restraints
Replacing Airbag System
Parts after a Crash
{Warning
A crash can damage the airbag
systems in the vehicle.
A damaged airbag system may
not properly protect you and your
passenger(s) in a crash, resulting
in serious injury or even death. To
help make sure the airbag
systems are working properly
after a crash, have them
inspected and any necessary
replacements made as soon as
possible.
If an airbag inflates, you will need to
replace airbag system parts. See
your dealer for service.
If the airbag readiness light stays on
after the vehicle is started or comes
on when you are driving, the airbag
system may not work properly. Have
the vehicle serviced right away. See
Airbag Readiness Light 0113.
Child Restraints
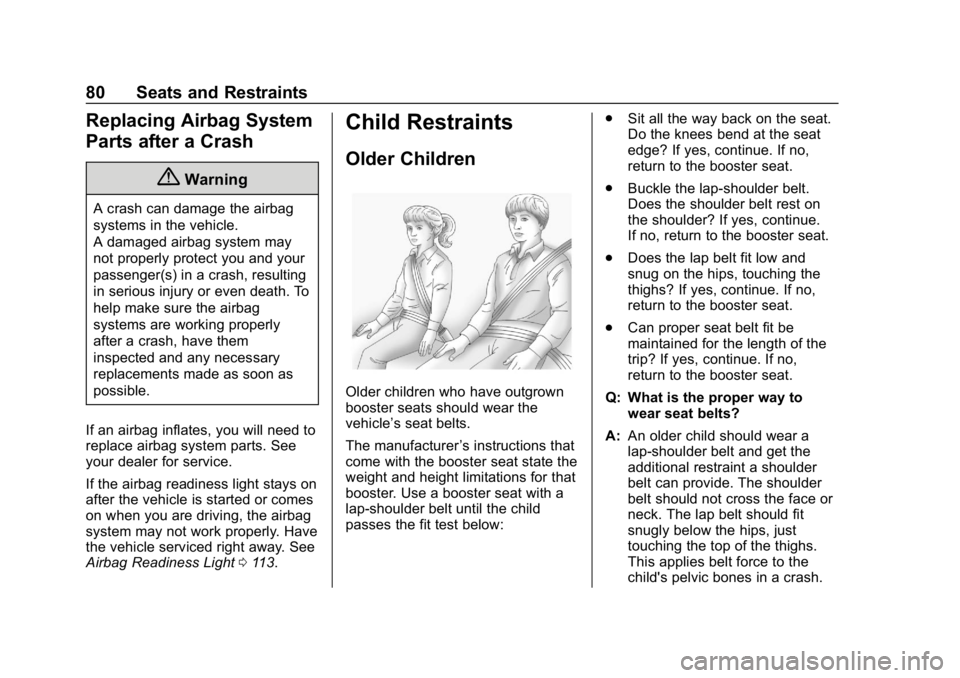
Older Children
Older children who have outgrown
booster seats should wear the
vehicle’s seat belts.
The manufacturer ’s instructions that
come with the booster seat state the
weight and height limitations for that
booster. Use a booster seat with a
lap-shoulder belt until the child
passes the fit test below: .
Sit all the way back on the seat.
Do the knees bend at the seat
edge? If yes, continue. If no,
return to the booster seat.
. Buckle the lap-shoulder belt.
Does the shoulder belt rest on
the shoulder? If yes, continue.
If no, return to the booster seat.
. Does the lap belt fit low and
snug on the hips, touching the
thighs? If yes, continue. If no,
return to the booster seat.
. Can proper seat belt fit be
maintained for the length of the
trip? If yes, continue. If no,
return to the booster seat.
Q: What is the proper way to wear seat belts?
A: An older child should wear a
lap-shoulder belt and get the
additional restraint a shoulder
belt can provide. The shoulder
belt should not cross the face or
neck. The lap belt should fit
snugly below the hips, just
touching the top of the thighs.
This applies belt force to the
child's pelvic bones in a crash.
Page 86 of 373
Chevrolet VOLT Owner Manual (GMNA-Localizing-U.S./Canada/Mexico-
12163007) - 2019 - CRC - 11/5/18
Seats and Restraints 85
Securing an Add-On Child
Restraint in the Vehicle
{Warning
A child can be seriously injured or
killed in a crash if the child
restraint is not properly secured in
the vehicle. Secure the child
restraint properly in the vehicle
using the vehicle’s seat belt or
LATCH system, following the
instructions that came with that
child restraint and the instructions
in this manual.
To help reduce the chance of injury,
the child restraint must be secured
in the vehicle. Child restraints must
be secured in vehicle seats by lap
belts or the lap belt portion of a
lap-shoulder belt, or by the LATCH
system. See Lower Anchors and
Tethers for Children (LATCH
System) 087 for more information.
Children can be endangered in a
crash if the child restraint is not
properly secured in the vehicle. When securing an add-on child
restraint, refer to the instructions
that come with the restraint which
may be on the restraint itself or in a
booklet, or both, and to this manual.
The child restraint instructions are
important, so if they are not
available, obtain a replacement
copy from the manufacturer.
Keep in mind that an unsecured
child restraint can move around in a
collision or sudden stop and injure
people in the vehicle. Be sure to
properly secure any child restraint in
the vehicle
—even when no child is
in it.
In some areas of the United States
and Canada, Certified Child
Passenger Safety Technicians
(CPSTs) are available to inspect
and demonstrate how to correctly
use and install child restraints. In
the U.S., refer to the National
Highway Traffic Safety
Administration (NHTSA) website to
locate the nearest child safety seat
inspection station. For CPST availability in Canada, check with
Transport Canada or the Provincial
Ministry of Transportation office.
Securing the Child Within the
Child Restraint
{Warning
A child can be seriously injured or
killed in a crash if the child is not
properly secured in the child
restraint. Secure the child
properly following the instructions
that came with that child restraint.
Where to Put the
Restraint
According to accident statistics,
children and infants are safer when
properly restrained in an appropriate
child restraint secured in a rear
seating position.
Whenever possible, children aged
12 and under should be secured in
a rear seating position.
Page 102 of 373

Chevrolet VOLT Owner Manual (GMNA-Localizing-U.S./Canada/Mexico-
12163007) - 2019 - CRC - 11/5/18
Instruments and Controls 101
Instruments and
Controls
Controls
Steering Wheel Adjustment . . . 102
Steering Wheel Controls . . . . . . 102
Heated Steering Wheel . . . . . . . 102
Horn . . . . . . . . . . . . . . . . . . . . . . . . . . 102
Pedestrian Safety Signal . . . . . 102
Windshield Wiper/Washer . . . . 103
Compass . . . . . . . . . . . . . . . . . . . . . 104
Clock . . . . . . . . . . . . . . . . . . . . . . . . . 104
Power Outlets . . . . . . . . . . . . . . . . 104
Wireless Charging . . . . . . . . . . . . 105
Warning Lights, Gauges, and
Indicators
Warning Lights, Gauges, andIndicators . . . . . . . . . . . . . . . . . . . 107
Instrument Cluster . . . . . . . . . . . . 107
Speedometer . . . . . . . . . . . . . . . . . 110
Odometer . . . . . . . . . . . . . . . . . . . . . 110
Trip Odometer . . . . . . . . . . . . . . . . 110
Battery Gauge (High Voltage) . . . . . . . . . . . . . . . . . . . . . 110
Fuel Gauge . . . . . . . . . . . . . . . . . . . 111
Driver Efficiency Gauge . . . . . . . 111
Power Indicator Gauge . . . . . . . 112 Seat Belt Reminders . . . . . . . . . . 112
Airbag Readiness Light . . . . . . . 113
Passenger Airbag Status
Indicator . . . . . . . . . . . . . . . . . . . . . 113
Charging System Light (12-Volt
Battery) . . . . . . . . . . . . . . . . . . . . . 114
Malfunction Indicator Lamp (Check Engine Light) . . . . . . . . 114
Brake System Warning Light . . . . . . . . . . . . . . . . . . . . . . . . 116
Electric Parking Brake Light . . . . . . . . . . . . . . . . . . . . . . . . 117
Service Electric Parking Brake Light . . . . . . . . . . . . . . . . . . . . . . . . 117
Antilock Brake System (ABS) Warning Light . . . . . . . . . . . . . . . 117
Sport Mode Light . . . . . . . . . . . . . 118
Mountain Mode Light . . . . . . . . . 118
Hold Mode Light . . . . . . . . . . . . . . 118
Lane Keep Assist (LKA) Light . . . . . . . . . . . . . . . . . . . . . . . . 118
Vehicle Ahead Indicator . . . . . . . 119
Traction Off Light . . . . . . . . . . . . . 119
StabiliTrak OFF Light . . . . . . . . . 119
Traction Control System (TCS)/ StabiliTrak Light . . . . . . . . . . . . . 119
Engine Coolant Temperature Warning Light . . . . . . . . . . . . . . . 120
Tire Pressure Light . . . . . . . . . . . 120
Engine Oil Pressure Light . . . . 121 Low Fuel Warning Light . . . . . . 121
Security Light . . . . . . . . . . . . . . . . . 121
Vehicle Ready Light . . . . . . . . . . 122
High-Beam On Light . . . . . . . . . . 122
Lamps On Reminder . . . . . . . . . 122
Cruise Control Light . . . . . . . . . . 122
Door Ajar Light . . . . . . . . . . . . . . . 123
Information Displays
Power Flows . . . . . . . . . . . . . . . . . 123
Programmable Charging . . . . . . 123
Energy Information . . . . . . . . . . . 131
Driver Information
Center (DIC) . . . . . . . . . . . . . . . . 133
Vehicle Messages
Vehicle Messages . . . . . . . . . . . . 135
Propulsion PowerMessages . . . . . . . . . . . . . . . . . . . 136
Vehicle Speed Messages . . . . . 136
Vehicle Personalization
Vehicle Personalization . . . . . . . 137
Page 110 of 373

Chevrolet VOLT Owner Manual (GMNA-Localizing-U.S./Canada/Mexico-
12163007) - 2019 - CRC - 11/5/18
Instruments and Controls 109
Cluster Menu
There is an interactive display area
in the center of the instrument
cluster.
Use the right steering wheel control
to open and scroll through the
different items and displays.
Press
oto access the cluster
applications. Use
worxto scroll
through the list of applications.
Press
Vto select. .
Info. View the Driver Information
Center (DIC) displays. See
Driver Information Center (DIC)
0133.
. Audio
. Navigation
. Phone
. Display Layout
. Options
Audio
While the Audio application page is
displayed, press
pto enter the
Audio menu. In the Audio menu,
search for music or change the
audio source.
Navigation
If there is no active route, press
p
to access the Recents or Favorites
list. If there is an active route,
press
pto end route guidance or
turn the voice prompts on or off. Phone
While the Phone application page is
displayed, press
pto enter the
Phone menu. In the Phone menu,
if there is no active phone call, view
recent calls or scroll through
contacts. If there is an active call,
mute the phone or switch to handset
operation.
Display Layout
Use
worxto choose Simple or
Enhanced. Press
Vto select.
Options
Use
worxto scroll through the
items in the Options menu.
Units : Press
pwhile Units is
highlighted to enter the Units menu.
Choose US or Metric by pressing
V
while the desired item is highlighted.
A radio button will be displayed next
to the selected item.
Speed Warning : The Speed
Warning display allows the driver to
set a speed that they do not want to
exceed. To set the Speed Warning,
Page 111 of 373

Chevrolet VOLT Owner Manual (GMNA-Localizing-U.S./Canada/Mexico-
12163007) - 2019 - CRC - 11/5/18
110 Instruments and Controls
presspwhen Speed Warning is
displayed. Press
worxto adjust
the value. Press
Vto set the speed.
Once the speed is set, this feature
can be turned off by pressing
V
while viewing this page. If the
selected speed limit is exceeded, a
pop-up warning is displayed with a
chime.
Tutorial : Press
Vwhile Tutorial is
highlighted to view the tutorials that
explain some of the features of the
instrument cluster. The tutorials are
only available when the vehicle is in
P (Park).
Open Source Software : Press
V
while Open Source Software is
highlighted to display open source
software information.
Speedometer
The speedometer shows the
vehicle's speed in either kilometers
per hour (km/h) or miles per
hour (mph).
Odometer
The odometer shows how far the
vehicle has been driven, in either
kilometers or miles.
Trip Odometer
The trip odometer shows how far
the vehicle has been driven since
the trip odometer was last reset.
The trip odometer is accessed and
reset through the Driver Information
Center (DIC). SeeDriver
Information Center (DIC) 0133.
Battery Gauge (High
Voltage)
This gauge shows the high voltage
battery charge level.
The arrow next to the battery
symbol points to the side of the
vehicle the charge port is on.
See Electric Mode 0174.
EV Range is an estimate based on
recent driving history and energy
usage. It predicts the range based
on past driving history. Mileage may
vary depending on current drive
cycle conditions.
Page 123 of 373

Chevrolet VOLT Owner Manual (GMNA-Localizing-U.S./Canada/Mexico-
12163007) - 2019 - CRC - 11/5/18
122 Instruments and Controls
Vehicle Ready Light
The vehicle ready light comes on
whenever the vehicle is ready to be
driven.
High-Beam On Light
This light comes on when the
high-beam headlamps are in use.
SeeHeadlamp High/Low-Beam
Changer 0144.
IntelliBeam Light
This light comes on when the
IntelliBeam system, if equipped, is
enabled.
See Exterior Lamp Controls 0142.
Lamps On Reminder
This light comes on when the
exterior lamps are in use. See
Exterior Lamp Controls 0142.
Cruise Control Light
The cruise control light is white
when the cruise control is on and
ready, and turns green when the
cruise control is set and active. See
Cruise Control 0188.
Adaptive Cruise Control Light
This light comes on when Adaptive
Cruise Control (if equipped) is
active. See Adaptive Cruise Control
0 191.
Page 124 of 373

Chevrolet VOLT Owner Manual (GMNA-Localizing-U.S./Canada/Mexico-
12163007) - 2019 - CRC - 11/5/18
Instruments and Controls 123
Door Ajar Light
This light comes on when a door is
open or not securely latched.
Information Displays
Power Flows
To view the Power Flow screen,
touch Energy on the infotainment
display and then select Energy on
the top left. Touch Flow on the
upper left of the display.
If the Flow button is not visible, click
on More
kon the left side of the
screen and select Flow.
The Power Flow screen indicates
the current operating condition. The
screen shows energy flow between
the engine, generator, and high
voltage battery. These components
will be highlighted when they are
active.
Programmable Charging
Important Information about
Portable Electric Vehicle Charging
. Charging an electric vehicle can
stress a building’ s electrical
system more than a typical
household appliance.
. Before plugging into any
electrical outlet, have a qualified
electrician inspect and verify the
electrical system (electrical
outlet, wiring, junctions, and
protection devices) for
heavy-duty service at a 12 amp
continuous load.
. Electrical outlets may wear out
with normal usage or may be
damaged over time, making
them unsuitable for electric
vehicle charging.
. Check the electrical outlet/plug
while charging and discontinue
use if the electrical outlet/plug is
hot, then have the electrical
outlet serviced by a qualified
electrician.
Page 130 of 373
Chevrolet VOLT Owner Manual (GMNA-Localizing-U.S./Canada/Mexico-
12163007) - 2019 - CRC - 11/5/18
Instruments and Controls 129
12 am to 6 am and only three hours
of charge are needed, Earliest
Possible would start charging at 12
am and Latest Possible would start
charging at 3 am. Use the Earliest
Possible setting to charge as soon
as possible. Use the Latest Possible
setting to optimize energy usage.
To edit the Charge Completion:1. From the Utility Rate Charging screen, touch Charge
Completion.
2. Select Earliest Possible or Latest Possible.
Rate Schedule Type
Utility rates, or cost per unit, may
vary based on time, weekday/
weekend, and season. During the
day when the demand for electricity
is high, the rates are usually higher
and are called Peak rates. At night
when the demand for electricity is
low, the rates are usually lower and
are called Off-Peak rates. In some
areas, a Mid-Peak rate is offered. Contact the utility company to obtain
the rate schedule for your area. The
summer and winter start dates must
be established to use a summer/
winter schedule.
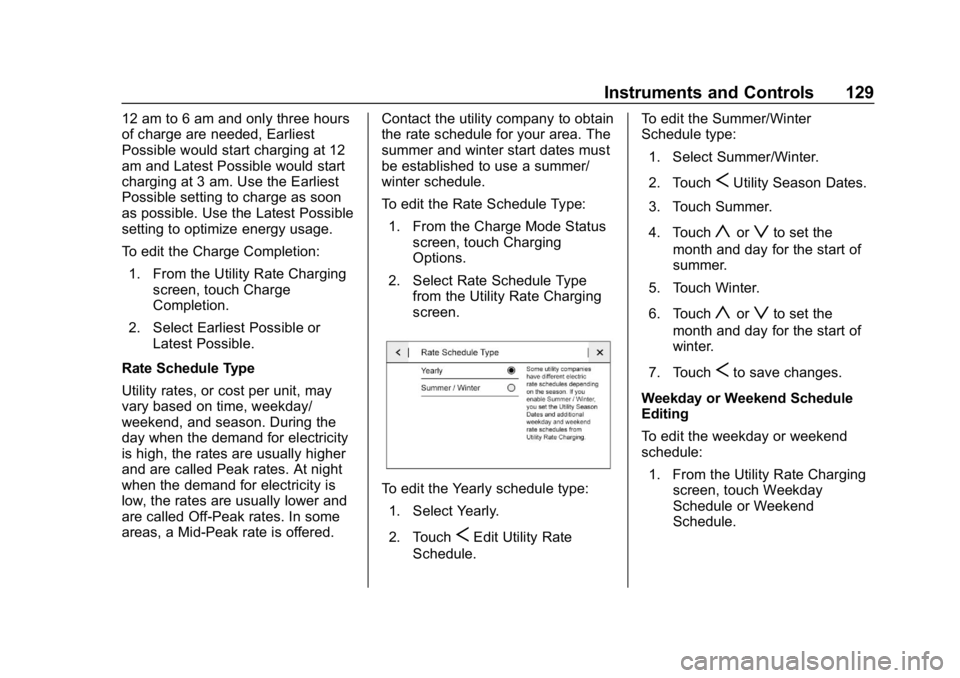
To edit the Rate Schedule Type:
1. From the Charge Mode Status screen, touch Charging
Options.
2. Select Rate Schedule Type from the Utility Rate Charging
screen.
To edit the Yearly schedule type:
1. Select Yearly.
2. Touch
SEdit Utility Rate
Schedule. To edit the Summer/Winter
Schedule type:
1. Select Summer/Winter.
2. Touch
SUtility Season Dates.
3. Touch Summer.
4. Touch
yorzto set the
month and day for the start of
summer.
5. Touch Winter.
6. Touch
yorzto set the
month and day for the start of
winter.
7. Touch
Sto save changes.
Weekday or Weekend Schedule
Editing
To edit the weekday or weekend
schedule: 1. From the Utility Rate Charging screen, touch Weekday
Schedule or Weekend
Schedule.