2019 CHEVROLET SUBURBAN service
[x] Cancel search: servicePage 362 of 460

Chevrolet Tahoe/Suburban Owner Manual (GMNA-Localizing-U.S./Canada/
Mexico-12460269) - 2019 - CRC - 9/11/18
Vehicle Care 361
malfunction light and the DIC
message should go off at the next
ignition cycle. The sensors are
matched to the tire/wheel positions,
using a TPMS relearn tool, in the
following order: driver side front tire,
passenger side front tire, passenger
side rear tire, and driver side rear.
See your dealer for service or to
purchase a relearn tool. A TPMS
relearn tool can also be purchased.
See Tire Pressure Monitor
Sensor Activation Tool at
www.gmtoolsandequipment.com or
call 1-800-GM TOOLS
(1-800-468-6657).
There are two minutes to match the
first tire/wheel position, and
five minutes overall to match all four
tire/wheel positions. If it takes
longer, the matching process stops
and must be restarted.
The TPMS sensor matching
process is:1. Set the parking brake.
2. Turn the ignition on without starting the vehicle or place the
vehicle in Service Mode. 3. Uplevel DIC Only: Make sure
the Tire Pressure info page
option is turned on. The info
pages on the DIC can be
turned on and off through the
Settings menu. See Driver
Information Center (DIC) (Base
Level) 0163 orDriver
Information Center (DIC)
(Uplevel) 0164.
4. If the vehicle has an uplevel DIC, use the DIC controls on
the right side of the steering
wheel to scroll to the Tire
Pressure screen under the DIC
info page.
If the vehicle has a base level
DIC, use the trip odometer
reset stem to scroll to the Tire
Pressure screen.
5. If the vehicle has an uplevel DIC, press and hold
Vin the
center of the DIC controls.
If the vehicle has a base level
DIC, press and hold the trip
odometer reset stem for about
five seconds. A message
asking if the process should begin should appear. Select
yes and press the trip
odometer reset stem to confirm
the selection.
The horn sounds twice to
signal the receiver is in relearn
mode and the TIRE
LEARNING ACTIVE message
displays on the DIC screen.
6. Start with the driver side front tire.
7. Place the relearn tool against the tire sidewall, near the valve
stem. Then press the button to
activate the TPMS sensor.
A horn chirp confirms that the
sensor identification code has
been matched to this tire and
wheel position.
8. Proceed to the passenger side front tire, and repeat the
procedure in Step 7.
9. Proceed to the passenger side rear tire, and repeat the
procedure in Step 7.
Page 366 of 460

Chevrolet Tahoe/Suburban Owner Manual (GMNA-Localizing-U.S./Canada/
Mexico-12460269) - 2019 - CRC - 9/11/18
Vehicle Care 365
{Warning
Tires could explode during
improper service. Attempting
to mount or dismount a tire
could cause injury or death.
Only your dealer or authorized
tire service center should
mount or dismount the tires.
{Warning
Mixing tires of different sizes,
brands, or types may cause
loss of control of the vehicle,
resulting in a crash or other
vehicle damage. Use the
correct size, brand, and type
of tires on all wheels.
This vehicle may have a
different size spare than the
road tires originally installed
on the vehicle. When new, the
vehicle included a spare tire
(Continued)
Warning (Continued)
and wheel assembly with a
similar overall diameter as the
road tires and wheels, so it is
all right to drive on it. The
spare tire was developed for
use on this vehicle and will not
affect vehicle handling.
{Warning
Using bias-ply tires on the
vehicle may cause the wheel
rim flanges to develop cracks
after many miles of driving.
A tire and/or wheel could fail
suddenly and cause a crash.
Use only radial-ply tires with
the wheels on the vehicle.
Winter tires with the same speed
rating as the original equipment
tires may not be available for H,
V, W, Y and ZR speed rated tires. Never exceed the winter
tires’
maximum speed capability
when using winter tires with a
lower speed rating.
If the vehicle tires must be
replaced with a tire that does not
have a TPC Spec number, make
sure they are the same size,
load range, speed rating, and
construction (radial) as the
original tires.
Vehicles that have a tire
pressure monitoring system
could give an inaccurate
low-pressure warning if non-TPC
Spec rated tires are installed.
See Tire Pressure Monitor
System 0357.
The Tire and Loading
Information label indicates the
original equipment tires on the
vehicle. See Vehicle Load Limits
0 215 for the label location and
more information about the Tire
and Loading Information label.
Page 368 of 460

Chevrolet Tahoe/Suburban Owner Manual (GMNA-Localizing-U.S./Canada/
Mexico-12460269) - 2019 - CRC - 9/11/18
Vehicle Care 367
Treadwear
The treadwear grade is a
comparative rating based on the
wear rate of the tire when tested
under controlled conditions on a
specified government test
course. For example, a tire
graded 150 would wear one and
one-half (1½) times as well on
the government course as a tire
graded 100. The relative
performance of tires depends
upon the actual conditions of
their use, however, and may
depart significantly from the
norm due to variations in driving
habits, service practices and
differences in road
characteristics and climate.
Traction
The traction grades, from
highest to lowest, are AA, A, B,
and C. Those grades represent
the tire's ability to stop on wet
pavement as measured under
controlled conditions onspecified government test
surfaces of asphalt and
concrete. A tire marked C may
have poor traction performance.
Warning: The traction grade
assigned to this tire is based on
straight-ahead braking traction
tests, and does not include
acceleration, cornering,
hydroplaning, or peak traction
characteristics.
Temperature
The temperature grades are A
(the highest), B, and C,
representing the tire's resistance
to the generation of heat and its
ability to dissipate heat when
tested under controlled
conditions on a specified indoor
laboratory test wheel. Sustained
high temperature can cause the
material of the tire to degenerate
and reduce tire life, and
excessive temperature can lead
to sudden tire failure. The grade
C corresponds to a level of
performance which all
passenger car tires must meet
under the Federal Motor Safety
Standard No. 109. Grades B and
A represent higher levels of
performance on the laboratory
test wheel than the minimum
required by law. Warning: The
temperature grade for this tire is
established for a tire that is
properly inflated and not
overloaded. Excessive speed,
underinflation, or excessive
loading, either separately or in
combination, can cause heat
buildup and possible tire failure.
Wheel Alignment and Tire
Balance
The tires and wheels were aligned
and balanced at the factory to
provide the longest tire life and best
overall performance. Adjustments to
wheel alignment and tire balancing
are not necessary on a regular
basis. Consider an alignment check
if there is unusual tire wear or the
Page 371 of 460

Chevrolet Tahoe/Suburban Owner Manual (GMNA-Localizing-U.S./Canada/
Mexico-12460269) - 2019 - CRC - 9/11/18
370 Vehicle Care
Warning (Continued)
that has been driven on while
severely underinflated or flat.
Have your dealer or an authorized
tire service center repair or
replace the flat tire as soon as
possible.
{Warning
Lifting a vehicle and getting under
it to do maintenance or repairs is
dangerous without the
appropriate safety equipment and
training. If a jack is provided with
the vehicle, it is designed only for
changing a flat tire. If it is used for
anything else, you or others could
be badly injured or killed if the
vehicle slips off the jack. If a jack
is provided with the vehicle, only
use it for changing a flat tire.If a tire goes flat, avoid further tire
and wheel damage by driving slowly
to a level place, well off the road,
if possible. Turn on the hazard
warning flashers. See
Hazard
Warning Flashers 0187.
{Warning
Changing a tire can be
dangerous. The vehicle can slip
off the jack and roll over or fall
causing injury or death. Find a
level place to change the tire. To
help prevent the vehicle from
moving:
1. Set the parking brake firmly.
2. Put the shift lever inP (Park).
3. For vehicles with four-wheel drive with an N (Neutral)
transfer case position, be
sure the transfer case is in a
drive gear —not in
N (Neutral).
(Continued)
Warning (Continued)
4. Turn off the engine and donot restart while the vehicle
is raised.
5. Do not allow passengers to remain in the vehicle.
6. Place wheel blocks, if equipped, on both sides of
the tire at the opposite
corner of the tire being
changed.
When the vehicle has a flat tire (2),
use the following example as a
guide to assist in the placement of
the wheel blocks (1), if equipped.
1. Wheel Block (If Equipped)
Page 381 of 460

Chevrolet Tahoe/Suburban Owner Manual (GMNA-Localizing-U.S./Canada/
Mexico-12460269) - 2019 - CRC - 9/11/18
380 Vehicle Care
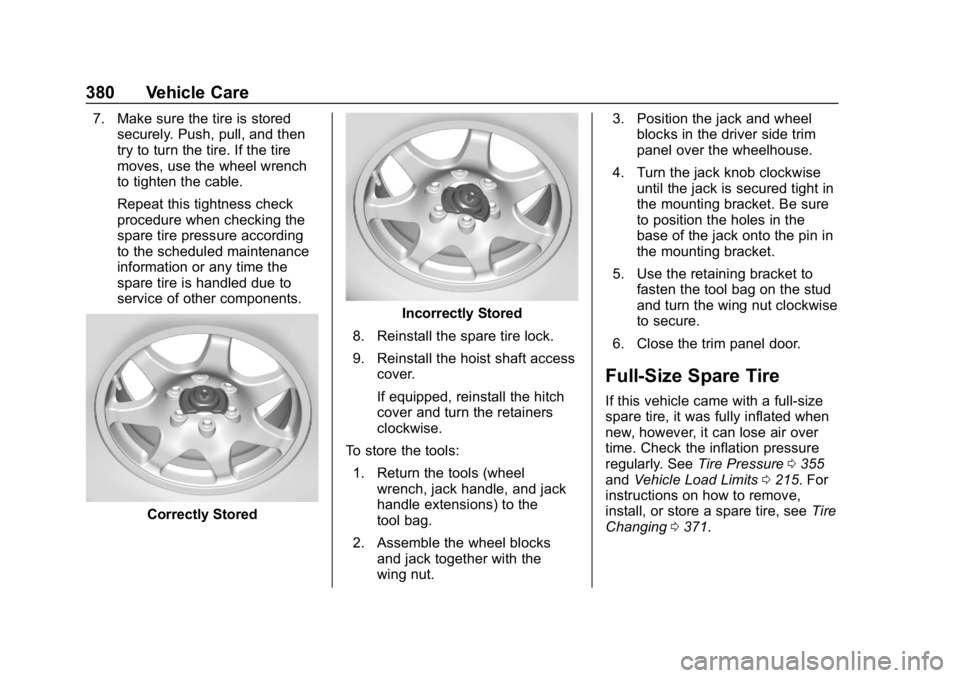
7. Make sure the tire is storedsecurely. Push, pull, and then
try to turn the tire. If the tire
moves, use the wheel wrench
to tighten the cable.
Repeat this tightness check
procedure when checking the
spare tire pressure according
to the scheduled maintenance
information or any time the
spare tire is handled due to
service of other components.
Correctly Stored
Incorrectly Stored
8. Reinstall the spare tire lock.
9. Reinstall the hoist shaft access cover.
If equipped, reinstall the hitch
cover and turn the retainers
clockwise.
To store the tools:
1. Return the tools (wheel wrench, jack handle, and jack
handle extensions) to the
tool bag.
2. Assemble the wheel blocks and jack together with the
wing nut. 3. Position the jack and wheel
blocks in the driver side trim
panel over the wheelhouse.
4. Turn the jack knob clockwise until the jack is secured tight in
the mounting bracket. Be sure
to position the holes in the
base of the jack onto the pin in
the mounting bracket.
5. Use the retaining bracket to fasten the tool bag on the stud
and turn the wing nut clockwise
to secure.
6. Close the trim panel door.
Full-Size Spare Tire
If this vehicle came with a full-size
spare tire, it was fully inflated when
new, however, it can lose air over
time. Check the inflation pressure
regularly. See Tire Pressure0355
and Vehicle Load Limits 0215. For
instructions on how to remove,
install, or store a spare tire, see Tire
Changing 0371.
Page 385 of 460

Chevrolet Tahoe/Suburban Owner Manual (GMNA-Localizing-U.S./Canada/
Mexico-12460269) - 2019 - CRC - 9/11/18
384 Vehicle Care
vehicle has one. Negative (−)
will go to a heavy, unpainted
metal engine part or to a
remote negative (−) terminal if
the vehicle has one.
Do not connect positive (+) to
negative (−) or you will get a
short that would damage the
battery and maybe other parts
too. And do not connect the
negative (−) cable to the
negative (−) terminal on the
dead battery because this can
cause sparks.7. Connect the red positive (+)cable to the positive (+)
terminal of the vehicle with the
dead battery.
8. Do not let the other end touch metal. Connect it to the
positive (+) terminal of the
good battery. Use a remote
positive (+) terminal if the
vehicle has one.
9. Connect the black negative (−) cable to the negative (−)
terminal of the good battery.
Use a remote negative (−)
terminal if the vehicle has one.
Do not let the other end touch
anything until the next step.
10. Connect the other end of the negative (−) cable to the metal
bracket that is bolted to the
engine and supports the
resonator, on the vehicle with
the dead battery.
11. Start the vehicle with the good battery and run the engine for a
while.
12. Try to start the vehicle that had the dead battery. If it will not
start after a few tries, it
probably needs service.
Page 386 of 460

Chevrolet Tahoe/Suburban Owner Manual (GMNA-Localizing-U.S./Canada/
Mexico-12460269) - 2019 - CRC - 9/11/18
Vehicle Care 385
Caution
If the jumper cables are
connected or removed in the
wrong order, electrical shorting
may occur and damage the
vehicle. The repairs would not be
covered by the vehicle warranty.
Always connect and remove the
jumper cables in the correct order,
making sure that the cables do
not touch each other or other
metal.
Jumper Cable Removal
Reverse the sequence exactly when
removing the jumper cables.
After starting the disabled vehicle
and removing the jumper cables,
allow it to idle for several minutes.
Towing the Vehicle
Caution
Incorrectly towing a disabled
vehicle may cause damage. The
damage would not be covered by
the vehicle warranty. Do not lash
or hook to suspension
components. Use the proper
straps around the tires to secure
the vehicle. Do not drag a locked
wheel/tire while loading the
vehicle. Do not use a sling type
lift to tow the vehicle. This could
damage the vehicle.
GM recommends a flatbed tow truck
to transport a disabled vehicle. Use
ramps to help reduce approach
angles, if necessary. A towed
vehicle should have its drive wheels
off the ground. Contact Roadside
Assistance or a professional towing
service if the disabled vehicle must
be towed.
Front Attachment Points
The vehicle is equipped with
specific attachment points to be
used to pull the vehicle onto a
flatbed car carrier from a flat road
surface. Do not use these
attachment points to pull the vehicle
from snow, mud or sand.
Recreational Vehicle
Towing
Recreational vehicle towing means
towing the vehicle behind another
vehicle, such as a motor home. The
two most common types of
Page 402 of 460

Chevrolet Tahoe/Suburban Owner Manual (GMNA-Localizing-U.S./Canada/
Mexico-12460269) - 2019 - CRC - 9/11/18
Service and Maintenance 401
Service and
Maintenance
General Information
General Information . . . . . . . . . . 401
Maintenance Schedule
Maintenance Schedule . . . . . . . 403
Special Application Services
Special ApplicationServices . . . . . . . . . . . . . . . . . . . . 409
Additional Maintenance
and Care
Additional Maintenanceand Care . . . . . . . . . . . . . . . . . . . . 410
Recommended Fluids,
Lubricants, and Parts
Recommended Fluids andLubricants . . . . . . . . . . . . . . . . . . . 413
Maintenance Replacement Parts . . . . . . . . . . . . . . . . . . . . . . . . 415
Maintenance Records
Maintenance Records . . . . . . . . 416
General Information
Your vehicle is an important
investment. This section describes
the required maintenance for the
vehicle. Follow this schedule to help
protect against major repair
expenses resulting from neglect or
inadequate maintenance. It may
also help to maintain the value of
the vehicle if it is sold. It is the
responsibility of the owner to have
all required maintenance performed.
Your dealer has trained technicians
who can perform required
maintenance using genuine
replacement parts. They have
up-to-date tools and equipment for
fast and accurate diagnostics. Many
dealers have extended evening and
Saturday hours, courtesy
transportation, and online
scheduling to assist with service
needs.
Your dealer recognizes the
importance of providing
competitively priced maintenance
and repair services. With trained
technicians, the dealer is the place for routine maintenance such as oil
changes and tire rotations and
additional maintenance items like
tires, brakes, batteries, and wiper
blades.
Caution
Damage caused by improper
maintenance can lead to costly
repairs and may not be covered
by the vehicle warranty.
Maintenance intervals, checks,
inspections, recommended fluids,
and lubricants are important to
keep the vehicle in good working
condition.
Do not have chemical flushes that
are not approved by GM
performed on the vehicle. The
use of flushes, solvents, cleaners,
or lubricants that are not
approved by GM could damage
the vehicle, requiring expensive
repairs that are not covered by
the vehicle warranty.