2019 CHEVROLET SPARK parking brake
[x] Cancel search: parking brakePage 202 of 343

Chevrolet Spark Owner Manual (GMNA-Localizing-U.S./Canada-12146335) -
2019 - CRC - 4/30/18
Driving and Operating 201
Park Assist
If equipped, the Rear Park Assist
(RPA) system assists the driver with
parking and avoiding objects while
in R (Reverse). RPA operates at
speeds less than 8 km/h (5 mph).
The sensors on the rear bumper
detect objects up to 1.7 m (5.5 ft)
behind the vehicle, and at least
20 cm (8 in) off the ground. The
distance objects can be detected
may be less during warmer or humid
weather.
{Warning
The Park Assist system does not
detect children, pedestrians,
bicyclists, animals, or objects
below the bumper or that are too
close or too far from the vehicle.
It is not available at speeds
greater than 8 km/h (5 mph). To
prevent injury, death, or vehicle
damage, even with Park Assist,
always check the area around the
vehicle and check all mirrors
before backing.
How the System Works
RPA comes on automatically when
the shift lever is moved into
R (Reverse).
An obstacle is indicated by audible
beeps. The interval between the
beeps becomes shorter as the
vehicle gets closer to the obstacle.
When the distance is less than
50 cm (20 in) the beeping is a
continuous tone.
Turning the System On and Off
The RPA system can be turned on
and off using the infotainment
system controls. SeeVehicle
Personalization 0121.
When the System Does Not
Seem to Work Properly
This light may come on for the
following reasons:
.
The sensors are not clean. Keep
the vehicle's rear bumper free of
mud, dirt, snow, ice, and slush.
For cleaning instructions, see
Exterior Care 0280.
. The sensors are covered by
frost or ice. Frost or ice can form
around and behind the sensors
and may not always be seen;
this can occur after washing the
vehicle in cold weather. The light
may not clear until the frost or
ice has melted.
. An object was hanging out of the
liftgate during the last drive
cycle. Once the object is
removed, RPA will return to
normal operation.
. The bumper is damaged. Take
the vehicle to your dealer to
repair the system.
. Other conditions, such as
vibrations from a jackhammer or
the compression of air brakes on
a very large truck, are affecting
system performance.
Page 213 of 343

Chevrolet Spark Owner Manual (GMNA-Localizing-U.S./Canada-12146335) -
2019 - CRC - 4/26/18
212 Vehicle Care
Vehicle Care
General Information
General Information . . . . . . . . . . 213
California Proposition65 Warning . . . . . . . . . . . . . . . . . 213
California Perchlorate Materials Requirements . . . . . 214
Accessories and Modifications . . . . . . . . . . . . . . . . 214
Vehicle Checks
Doing Your OwnService Work . . . . . . . . . . . . . . . 214
Hood . . . . . . . . . . . . . . . . . . . . . . . . . 215
Engine Compartment Overview . . . . . . . . . . . . . . . . . . . . 217
Engine Oil . . . . . . . . . . . . . . . . . . . . 218
Engine Oil Life System . . . . . . . 220
Automatic Transmission Fluid . . . . . . . . . . . . . . . . . . . . . . . . 221
Manual Transmission Fluid . . . 222
Hydraulic Clutch . . . . . . . . . . . . . . 222
Engine Air Cleaner/Filter . . . . . . 223
Cooling System . . . . . . . . . . . . . . 224
Engine Overheating . . . . . . . . . . 227
Washer Fluid . . . . . . . . . . . . . . . . . 228
Brakes . . . . . . . . . . . . . . . . . . . . . . . 229
Brake Fluid . . . . . . . . . . . . . . . . . . . 229 Battery - North America . . . . . . 231
Starter Switch Check . . . . . . . . . 232
Automatic Transmission Shift
Lock Control Function
Check . . . . . . . . . . . . . . . . . . . . . . . 233
Ignition Transmission Lock Check . . . . . . . . . . . . . . . . . . . . . . . 233
Park Brake and P (Park) Mechanism Check . . . . . . . . . . 233
Wiper Blade Replacement . . . . 234
Windshield Replacement . . . . . 235
Gas Strut(s) . . . . . . . . . . . . . . . . . . 235Headlamp Aiming
Headlamp Aiming . . . . . . . . . . . . 236
Bulb Replacement
Bulb Replacement . . . . . . . . . . . . 236
Halogen Bulbs . . . . . . . . . . . . . . . . 236
High Intensity Discharge (HID) Lighting . . . . . . . . . . . . . . . . . . . . . 237
LED Lighting . . . . . . . . . . . . . . . . . 237
Headlamps, Front Turn Signal, Sidemarker, and Parking
Lamps . . . . . . . . . . . . . . . . . . . . . . 237
Taillamps, Turn Signal, Stoplamps, and Back-Up
Lamps . . . . . . . . . . . . . . . . . . . . . . 240
License Plate Lamp . . . . . . . . . . 240
Electrical System
Electrical System Overload . . . 241
Fuses and Circuit Breakers . . . 242
Engine Compartment Fuse
Block . . . . . . . . . . . . . . . . . . . . . . . . 242
Instrument Panel Fuse
Block . . . . . . . . . . . . . . . . . . . . . . . . 245
Wheels and Tires
Tires . . . . . . . . . . . . . . . . . . . . . . . . . . 247
All-Season Tires . . . . . . . . . . . . . . 248
Winter Tires . . . . . . . . . . . . . . . . . . 248
Tire Sidewall Labeling . . . . . . . . 249
Tire Designations . . . . . . . . . . . . . 251
Tire Terminology andDefinitions . . . . . . . . . . . . . . . . . . 251
Tire Pressure . . . . . . . . . . . . . . . . . 254
Tire Pressure Monitor System . . . . . . . . . . . . . . . . . . . . . . 255
Tire Pressure Monitor Operation . . . . . . . . . . . . . . . . . . . 256
Tire Inspection . . . . . . . . . . . . . . . . 259
Tire Rotation . . . . . . . . . . . . . . . . . 259
When It Is Time for New Tires . . . . . . . . . . . . . . . . . . . . . . . . 260
Buying New Tires . . . . . . . . . . . . . 261
Different Size Tires and Wheels . . . . . . . . . . . . . . . . . . . . . . 263
Wheel Covers . . . . . . . . . . . . . . . . 263
Page 231 of 343

Chevrolet Spark Owner Manual (GMNA-Localizing-U.S./Canada-12146335) -
2019 - CRC - 4/26/18
230 Vehicle Care
Checking Brake Fluid
Place the vehicle in P (Park) or
Neutral with the parking brake
applied if equipped with a manual
transmission. On a level surface,
the brake fluid level should be
between the minimum and
maximum marks on the brake fluid
reservoir.
There are only two reasons why the
brake fluid level in the reservoir may
go down:
.Normal brake lining wear. When
new linings are installed, the
fluid level goes back up.
. A fluid leak in the brake/clutch
hydraulic system. Have the
brake/clutch hydraulic system
fixed. With a leak, the brakes will
not work well.
Always clean the brake fluid
reservoir cap and the area around
the cap before removing it.
Do not top off the brake/clutch fluid.
Adding fluid does not correct a leak.
If fluid is added when the linings are
worn, there will be too much fluid when new brake linings are
installed. Add or remove fluid, as
necessary, only when work is done
on the brake/clutch hydraulic
system.
{Warning
If too much brake fluid is added, it
can spill on the engine and burn,
if the engine is hot enough. You
or others could be burned, and
the vehicle could be damaged.
Add brake fluid only when work is
done on the brake/clutch
hydraulic system.
When the brake/clutch fluid falls to a
low level, the brake warning light
comes on. See Brake System
Warning Light 0107.
Brake fluid absorbs water over time
which degrades the effectiveness of
the brake fluid. Replace brake fluid
at the specified intervals to prevent
increased stopping distance. See
Maintenance Schedule 0291. What to Add
Use only GM approved DOT 4
brake fluid from a clean, sealed
container. See
Recommended
Fluids and Lubricants 0299.
{Warning
The wrong or contaminated brake
fluid could result in damage to the
brake system. This could result in
the loss of braking leading to a
possible injury. Always use the
proper GM approved brake fluid.
Caution
If brake fluid is spilled on the
vehicle's painted surfaces, the
paint finish can be damaged.
Immediately wash off any painted
surface.
Page 233 of 343

Chevrolet Spark Owner Manual (GMNA-Localizing-U.S./Canada-12146335) -
2019 - CRC - 4/26/18
232 Vehicle Care
3. Loosen the negative batterycable nut (1).
4. Remove the negative battery cable (2) from the battery.
Negative Battery Cable
Reconnection
Caution
When reconnecting the battery:. Use the original nut from the
vehicle to secure the
negative battery cable. Do
(Continued)
Caution (Continued)
not use a different nut.
If you need a replacement
nut, see your dealer.
. Tighten the nut by hand. Do
not use an impact wrench or
power tools to tighten
the nut.
The vehicle could be damaged if
these guidelines are not followed.
Caution
Do not use paints, lubricants,
or corrosion inhibitors on the nut
that secures the negative battery
cable to the vehicle. This could
damage the vehicle.
1. Install the negative battery cable (2) to the battery.
2. Install the negative battery cable nut (1) and tighten.
3. Turn the ignition on.
Starter Switch Check
{Warning
When you are doing this
inspection, the vehicle could
move suddenly. If the vehicle
moves, you or others could be
injured.
1. Before starting this check, be sure there is enough room
around the vehicle.
2. Apply both the parking brake and the regular brake.
Do not use the accelerator
pedal, and be ready to turn off
the engine immediately if it
starts.
3. Try to start the engine in each gear. The vehicle should start
only in P (Park) or N (Neutral).
If the vehicle starts in any other
position, contact your dealer for
service.
Page 234 of 343

Chevrolet Spark Owner Manual (GMNA-Localizing-U.S./Canada-12146335) -
2019 - CRC - 4/26/18
Vehicle Care 233
Automatic Transmission
Shift Lock Control
Function Check
{Warning
When you are doing this
inspection, the vehicle could
move suddenly. If the vehicle
moves, you or others could be
injured.
1. Before starting this check, be sure there is enough room
around the vehicle. It should be
parked on a level surface.
2. Apply the parking brake. Be ready to apply the regular
brake immediately if the vehicle
begins to move.
3. With the engine off, turn the ignition on, but do not start the
engine. Without applying the
regular brake, try to move the
shift lever out of P (Park) with normal effort. If the shift lever
moves out of P (Park), contact
your dealer for service.
Ignition Transmission
Lock Check
If equipped with Key Access, while
parked, and with the parking brake
set, try to turn the ignition off in
each shift lever position.
.
For automatic transmission
vehicles, the ignition should turn
off only when the shift lever is in
P (Park).
. For manual transmission
vehicles, the ignition should turn
off only when the shift lever is in
Neutral.
On all Key Access vehicles, the
ignition key should come out only
when the ignition is off.
Contact your dealer if service is
required.
Park Brake and P (Park)
Mechanism Check
{Warning
When you are doing this check,
the vehicle could begin to move.
You or others could be injured
and property could be damaged.
Make sure there is room in front
of the vehicle in case it begins to
roll. Be ready to apply the regular
brake at once should the vehicle
begin to move.
Park on a fairly steep hill, with the
vehicle facing downhill. Keeping
your foot on the regular brake, set
the parking brake.
. To check the parking brake's
holding ability: With the engine
running and the transmission in
N (Neutral), slowly remove foot
pressure from the regular brake
pedal. Do this until the vehicle is
held by the parking brake only.
Page 235 of 343

Chevrolet Spark Owner Manual (GMNA-Localizing-U.S./Canada-12146335) -
2019 - CRC - 4/26/18
234 Vehicle Care
.To check the P (Park)
mechanism's holding ability:
With the engine running, shift to
P (Park). Then release the
parking brake followed by the
regular brake.
Contact your dealer if service is
required.
Wiper Blade Replacement
Windshield Wiper Blades
Windshield wiper blades should be
inspected for wear and cracking.
Replacement blades come in
different types and are removed in
different ways. For proper type and
length, see Maintenance
Replacement Parts 0300.
Caution
Allowing the wiper arm to touch
the windshield when no wiper
blade is installed could damage
the windshield. Any damage that
occurs would not be covered by
(Continued)
Caution (Continued)
the vehicle warranty. Do not allow
the wiper arm to touch the
windshield.
To replace the windshield wiper
blade: 1. Pull the windshield wiper assembly away from the
windshield.
2. Press the release lever in themiddle of the wiper blade
where the wiper blade
attaches. 3. Remove the wiper blade.
4. Reverse Steps 1–3 for wiper
blade replacement.
Rear Wiper Blade
1. Lift the wiper arm away fromthe rear windshield.
2. Push the wiper blade away from the wiper arm.
3. Once the blade pin disengages from the wiper arm, remove the
wiper blade by sliding the blade
off the arm.
4. Reverse Steps 1–3 to install a new wiper blade.
Page 259 of 343

Chevrolet Spark Owner Manual (GMNA-Localizing-U.S./Canada-12146335) -
2019 - CRC - 4/26/18
258 Vehicle Care
installed and the sensor
matching process is performed
successfully. See your dealer for
service.
. Replacement tires or wheels do
not match the original equipment
tires or wheels. Tires and wheels
other than those recommended
could prevent the TPMS from
functioning properly. See Buying
New Tires 0261.
. Operating electronic devices or
being near facilities using radio
wave frequencies similar to the
TPMS could cause the TPMS
sensors to malfunction.
If the TPMS is not functioning
properly, it cannot detect or signal a
low tire pressure condition. See
your dealer for service if the TPMS
malfunction light and DIC message,
if equipped, come on and stay on.
TPMS Sensor Matching
Process
Each TPMS sensor has a unique
identification code. The identification
code needs to be matched to a new
tire/wheel position after rotating the vehicle’s tires or replacing one or
more of the TPMS sensors. Also,
the TPMS sensor matching process
should be performed after replacing
a spare tire with a road tire
containing the TPMS sensor. The
malfunction light and the DIC
message, if equipped, should go off
at the next ignition cycle. The
sensors are matched to the tire/
wheel positions, using a TPMS
relearn tool, in the following order:
driver side front tire, passenger side
front tire, passenger side rear tire,
and driver side rear. See your
dealer for service or to purchase a
relearn tool. A TPMS relearn tool
can also be purchased.
See Tire Pressure Monitor
Sensor Activation Tool at
www.gmtoolsandequipment.com or
call 1-800-GM TOOLS
(1-800-468-6657).
There are two minutes to match the
first tire/wheel position, and
five minutes overall to match all four
tire/wheel positions. If it takes
longer, the matching process stops
and must be restarted.
The TPMS sensor matching
process is:
1. Set the parking brake.
2. Turn the ignition on without starting the vehicle or place the
vehicle in Service Mode.
See Ignition Positions (Keyless
Access) 0175 orIgnition
Positions (Key Access) 0177.
3. Use MENU to select the Vehicle Information Menu
(Menu 2) in the Driver
Information Center (DIC).
4. Use the thumbwheel (or up and down arrows) to scroll to the
Tire Pressure Learn Menu Item
(Base DIC) or the Tire
Pressure Menu Item screen
(Uplevel DIC).
5. Press and hold SET/CLR to begin the sensor matching
process.
A message requesting
acceptance of the process may
display.
6. If requested, press SET/CLR again to confirm the selection.
Page 262 of 343
Chevrolet Spark Owner Manual (GMNA-Localizing-U.S./Canada-12146335) -
2019 - CRC - 4/26/18
Vehicle Care 261
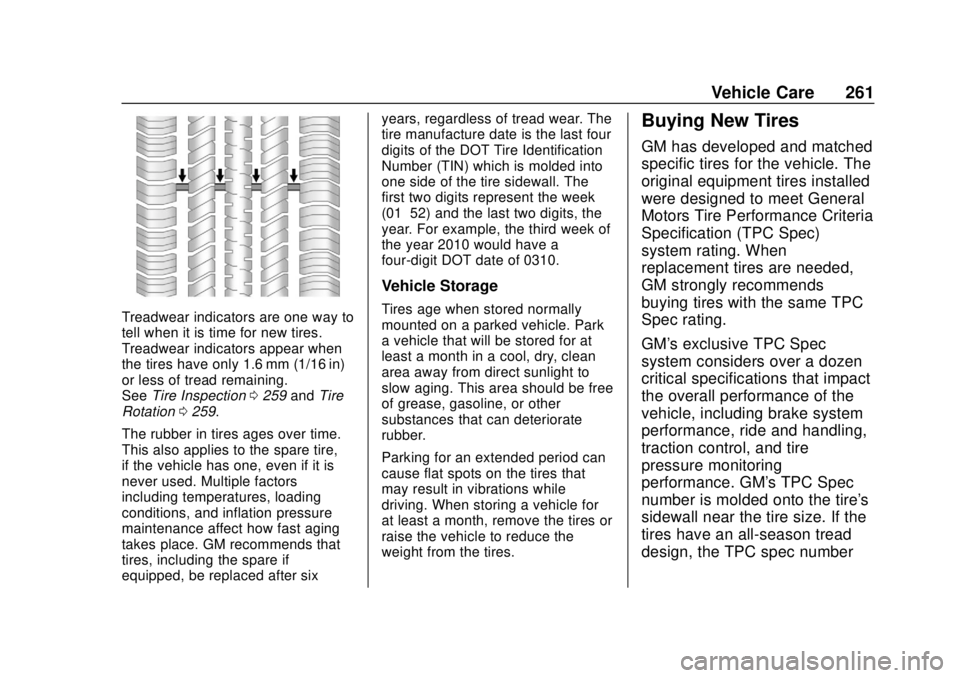
Treadwear indicators are one way to
tell when it is time for new tires.
Treadwear indicators appear when
the tires have only 1.6 mm (1/16 in)
or less of tread remaining.
SeeTire Inspection 0259 andTire
Rotation 0259.
The rubber in tires ages over time.
This also applies to the spare tire,
if the vehicle has one, even if it is
never used. Multiple factors
including temperatures, loading
conditions, and inflation pressure
maintenance affect how fast aging
takes place. GM recommends that
tires, including the spare if
equipped, be replaced after six years, regardless of tread wear. The
tire manufacture date is the last four
digits of the DOT Tire Identification
Number (TIN) which is molded into
one side of the tire sidewall. The
first two digits represent the week
(01–52) and the last two digits, the
year. For example, the third week of
the year 2010 would have a
four-digit DOT date of 0310.
Vehicle Storage
Tires age when stored normally
mounted on a parked vehicle. Park
a vehicle that will be stored for at
least a month in a cool, dry, clean
area away from direct sunlight to
slow aging. This area should be free
of grease, gasoline, or other
substances that can deteriorate
rubber.
Parking for an extended period can
cause flat spots on the tires that
may result in vibrations while
driving. When storing a vehicle for
at least a month, remove the tires or
raise the vehicle to reduce the
weight from the tires.
Buying New Tires
GM has developed and matched
specific tires for the vehicle. The
original equipment tires installed
were designed to meet General
Motors Tire Performance Criteria
Specification (TPC Spec)
system rating. When
replacement tires are needed,
GM strongly recommends
buying tires with the same TPC
Spec rating.
GM's exclusive TPC Spec
system considers over a dozen
critical specifications that impact
the overall performance of the
vehicle, including brake system
performance, ride and handling,
traction control, and tire
pressure monitoring
performance. GM's TPC Spec
number is molded onto the tire's
sidewall near the tire size. If the
tires have an all-season tread
design, the TPC spec number