2019 CHEVROLET SONIC lock
[x] Cancel search: lockPage 277 of 351
Chevrolet Sonic Owner Manual (GMNA-Localizing-U.S./Canada-12461769) -
2019 - crc - 5/21/18
276 Vehicle Care
Warning (Continued)
damage, be sure to fit the jack lift
head into the proper location
before raising the vehicle.
7. Turn the wheel wrench clockwise to raise the vehicle.
Raise the vehicle far enough
off the ground so there is
enough room for the compact
spare tire to fit underneath the
wheel well.
8. Turn the wheel nuts counterclockwise to
remove them.
9. Remove the flat tire.
{Warning
Rust or dirt on a wheel, or on the
parts to which it is fastened, can
make wheel nuts become loose
after time. The wheel could come
off and cause a crash. When
changing a wheel, remove any (Continued)
Warning (Continued)
rust or dirt from places where the
wheel attaches to the vehicle. In
an emergency, a cloth or a paper
towel can be used; however, use
a scraper or wire brush later to
remove all rust or dirt.
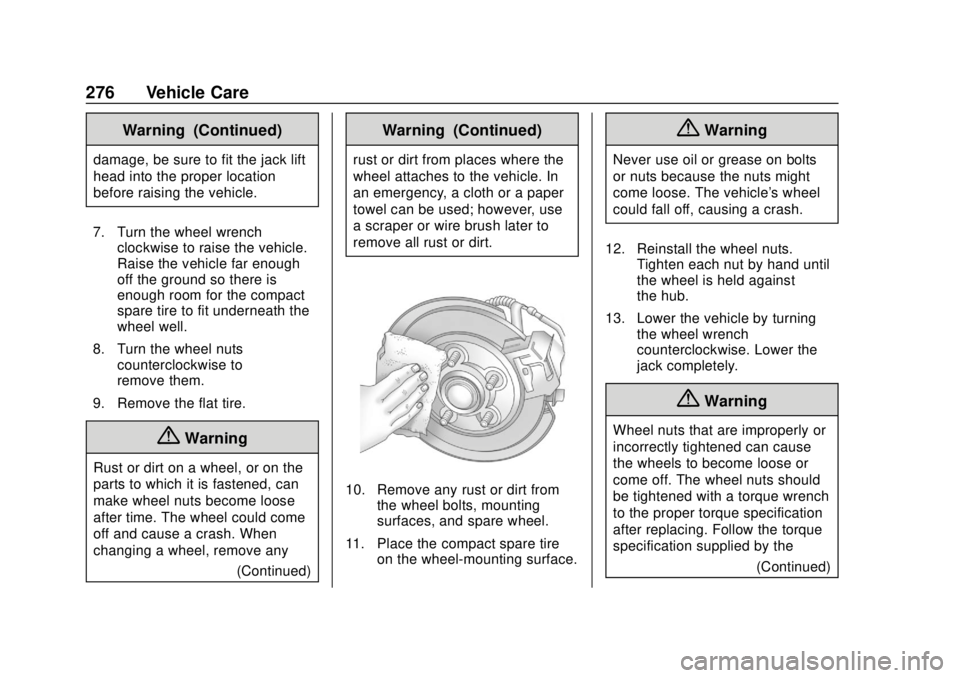
10. Remove any rust or dirt fromthe wheel bolts, mounting
surfaces, and spare wheel.
11. Place the compact spare tire on the wheel-mounting surface.
{Warning
Never use oil or grease on bolts
or nuts because the nuts might
come loose. The vehicle's wheel
could fall off, causing a crash.
12. Reinstall the wheel nuts. Tighten each nut by hand until
the wheel is held against
the hub.
13. Lower the vehicle by turning the wheel wrench
counterclockwise. Lower the
jack completely.
{Warning
Wheel nuts that are improperly or
incorrectly tightened can cause
the wheels to become loose or
come off. The wheel nuts should
be tightened with a torque wrench
to the proper torque specification
after replacing. Follow the torque
specification supplied by the
(Continued)
Page 278 of 351
Chevrolet Sonic Owner Manual (GMNA-Localizing-U.S./Canada-12461769) -
2019 - crc - 5/21/18
Vehicle Care 277
Warning (Continued)
aftermarket manufacturer when
using accessory locking wheel
nuts. SeeCapacities and
Specifications 0310 for original
equipment wheel nut torque
specifications.
Caution
Improperly tightened wheel nuts
can lead to brake pulsation and
rotor damage. To avoid expensive
brake repairs, evenly tighten the
wheel nuts in the proper
sequence and to the proper
torque specification. See
Capacities and Specifications
0 310 for the wheel nut torque
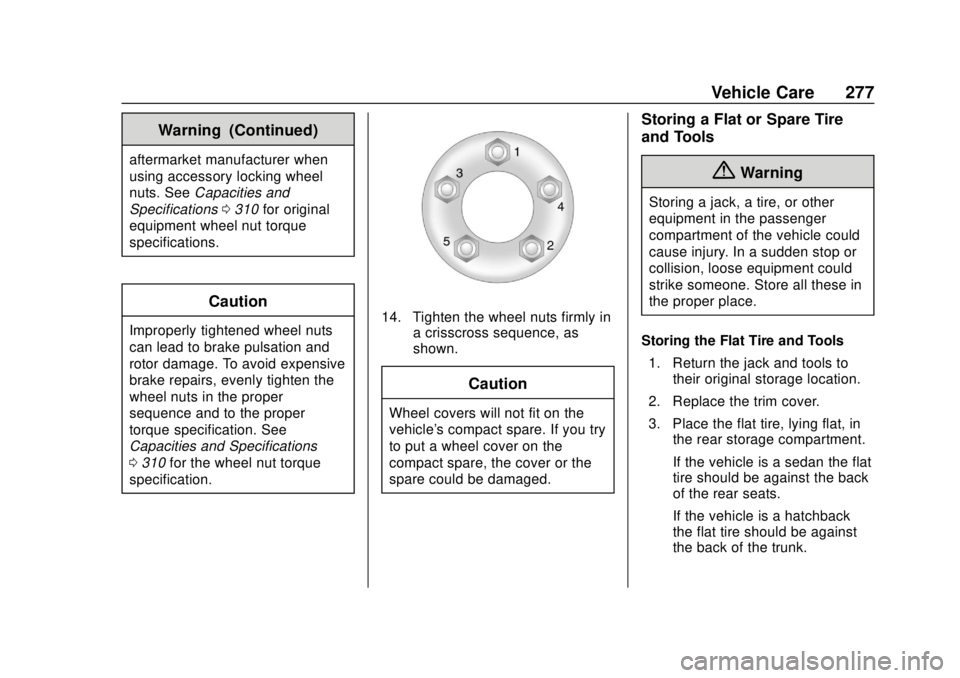
specification.14. Tighten the wheel nuts firmly in a crisscross sequence, as
shown.
Caution
Wheel covers will not fit on the
vehicle's compact spare. If you try
to put a wheel cover on the
compact spare, the cover or the
spare could be damaged.
Storing a Flat or Spare Tire
and Tools
{Warning
Storing a jack, a tire, or other
equipment in the passenger
compartment of the vehicle could
cause injury. In a sudden stop or
collision, loose equipment could
strike someone. Store all these in
the proper place.
Storing the Flat Tire and Tools 1. Return the jack and tools to their original storage location.
2. Replace the trim cover.
3. Place the flat tire, lying flat, in the rear storage compartment.
If the vehicle is a sedan the flat
tire should be against the back
of the rear seats.
If the vehicle is a hatchback
the flat tire should be against
the back of the trunk.
Page 283 of 351
Chevrolet Sonic Owner Manual (GMNA-Localizing-U.S./Canada-12461769) -
2019 - crc - 5/21/18
282 Vehicle Care
10. Try to start the vehicle that hadthe dead battery. If it will not
start after a few tries, it
probably needs service.
Caution
If the jumper cables are
connected or removed in the
wrong order, electrical shorting
may occur and damage the
vehicle. The repairs would not be
covered by the vehicle warranty.
Always connect and remove the
jumper cables in the correct order,
making sure that the cables do
not touch each other or other
metal.
Jumper Cable Removal
Reverse the sequence exactly when
removing the jumper cables.
After starting the disabled vehicle
and removing the jumper cables,
allow it to idle for several minutes.
Towing the Vehicle
Caution
Incorrectly towing a disabled
vehicle may cause damage. The
damage would not be covered by
the vehicle warranty. Do not lash
or hook to suspension
components. Use the proper
straps around the tires to secure
the vehicle. Do not drag a locked
wheel/tire while loading the
vehicle. Do not use a sling type
lift to tow the vehicle. This could
damage the vehicle.
GM recommends a flatbed tow truck
to transport a disabled vehicle. Use
ramps to help reduce approach
angles, if necessary. A towed
vehicle should have its drive wheels
off the ground. Contact Roadside
Assistance or a professional towing
service if the disabled vehicle must
be towed.
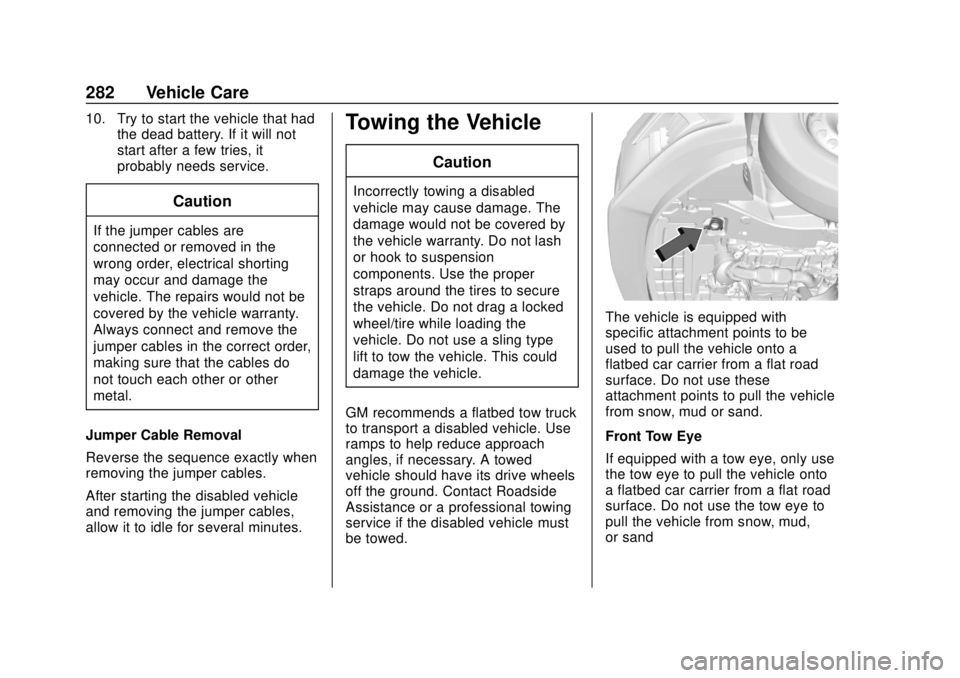
The vehicle is equipped with
specific attachment points to be
used to pull the vehicle onto a
flatbed car carrier from a flat road
surface. Do not use these
attachment points to pull the vehicle
from snow, mud or sand.
Front Tow Eye
If equipped with a tow eye, only use
the tow eye to pull the vehicle onto
a flatbed car carrier from a flat road
surface. Do not use the tow eye to
pull the vehicle from snow, mud,
or sand
Page 285 of 351
Chevrolet Sonic Owner Manual (GMNA-Localizing-U.S./Canada-12461769) -
2019 - crc - 5/21/18
284 Vehicle Care
Caution (Continued)
warranty. If using a shield, only
use one that attaches to the
towing vehicle.
Dinghy Towing
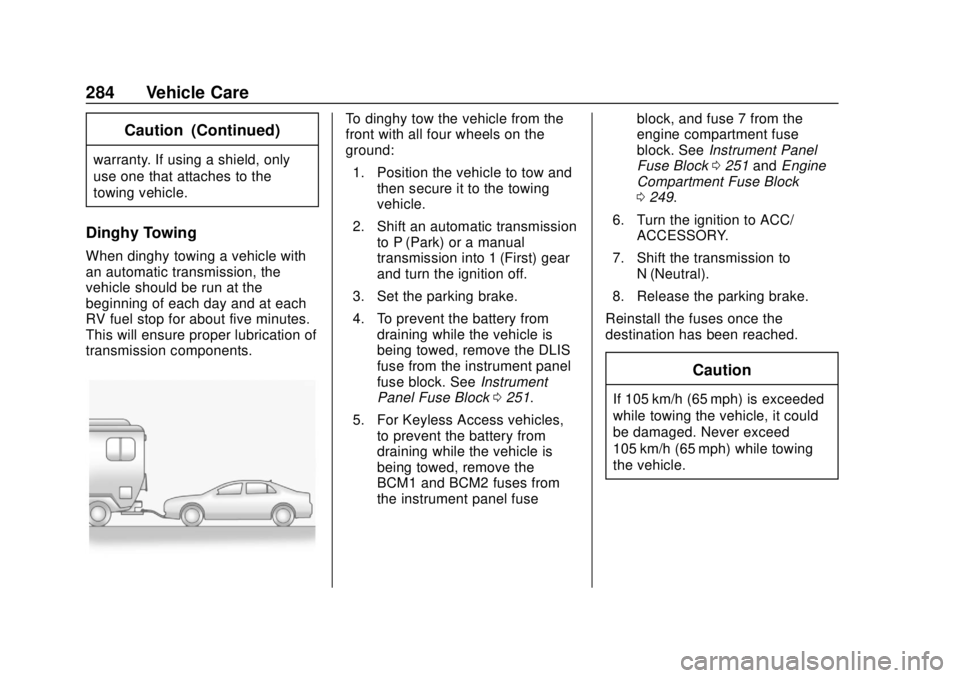
When dinghy towing a vehicle with
an automatic transmission, the
vehicle should be run at the
beginning of each day and at each
RV fuel stop for about five minutes.
This will ensure proper lubrication of
transmission components.
To dinghy tow the vehicle from the
front with all four wheels on the
ground:1. Position the vehicle to tow and then secure it to the towing
vehicle.
2. Shift an automatic transmission to P (Park) or a manual
transmission into 1 (First) gear
and turn the ignition off.
3. Set the parking brake.
4. To prevent the battery from draining while the vehicle is
being towed, remove the DLIS
fuse from the instrument panel
fuse block. See Instrument
Panel Fuse Block 0251.
5. For Keyless Access vehicles, to prevent the battery from
draining while the vehicle is
being towed, remove the
BCM1 and BCM2 fuses from
the instrument panel fuse block, and fuse 7 from the
engine compartment fuse
block. See
Instrument Panel
Fuse Block 0251 andEngine
Compartment Fuse Block
0 249.
6. Turn the ignition to ACC/ ACCESSORY.
7. Shift the transmission to N (Neutral).
8. Release the parking brake.
Reinstall the fuses once the
destination has been reached.
Caution
If 105 km/h (65 mph) is exceeded
while towing the vehicle, it could
be damaged. Never exceed
105 km/h (65 mph) while towing
the vehicle.
Page 287 of 351
Chevrolet Sonic Owner Manual (GMNA-Localizing-U.S./Canada-12461769) -
2019 - crc - 5/21/18
286 Vehicle Care
Appearance Care
Exterior Care
Locks
Locks are lubricated at the factory.
Use a de-icing agent only when
absolutely necessary, and have the
locks greased after using. See
Recommended Fluids and
Lubricants0306.
Washing the Vehicle
To preserve the vehicle's finish,
wash it often and out of direct
sunlight.
Caution
Do not use petroleum-based,
acidic, or abrasive cleaning
agents as they can damage the
vehicle's paint, metal, or plastic
parts. If damage occurs, it would
not be covered by the vehicle
warranty. Approved cleaning
products can be obtained from
(Continued)
Caution (Continued)
your dealer. Follow all
manufacturer directions regarding
correct product usage, necessary
safety precautions, and
appropriate disposal of any
vehicle care product.
Caution
Avoid using high-pressure
washes closer than 30 cm (12 in)
to the surface of the vehicle. Use
of power washers exceeding
8,274 kPa (1,200 psi) can result
in damage or removal of paint
and decals.
Caution
Do not power wash any
component under the hood that
has this
esymbol.
This could cause damage that
would not be covered by the
vehicle warranty.
If using an automatic car wash,
follow the car wash instructions. The
windshield wiper and rear window
wiper, if equipped, must be off.
Remove any accessories that may
be damaged or interfere with the car
wash equipment.
Rinse the vehicle well, before
washing and after, to remove all
cleaning agents completely. If they
are allowed to dry on the surface,
they could stain.
Dry the finish with a soft, clean
chamois or an all-cotton towel to
avoid surface scratches and water
spotting.
Page 291 of 351
Chevrolet Sonic Owner Manual (GMNA-Localizing-U.S./Canada-12461769) -
2019 - crc - 5/21/18
290 Vehicle Care
Body Component Lubrication
Lubricate all key lock cylinders,
hood hinges, liftgate hinges, and the
steel fuel door hinges, unless the
components are plastic. Applying
silicone grease on weatherstrips
with a clean cloth will make them
last longer, seal better, and not stick
or squeak.
Underbody Maintenance
At least twice a year, spring and fall,
use plain water to flush any
corrosive materials from the
underbody. Take care to thoroughly
clean any areas where mud and
other debris can collect.
Do not directly power wash the
transfer case and/or front/rear axle
output seals. High pressure water
can overcome the seals and
contaminate the fluid. Contaminated
fluid will decrease the life of the
transfer case and/or axles and
should be replaced.
Sheet Metal Damage
If the vehicle is damaged and
requires sheet metal repair or
replacement, make sure the body
repair shop applies anti-corrosion
material to parts repaired or
replaced to restore corrosion
protection.
Original manufacturer replacement
parts will provide the corrosion
protection while maintaining the
vehicle warranty.
Finish Damage
Quickly repair minor chips and
scratches with touch-up materials
available from your dealer to avoid
corrosion. Larger areas of finish
damage can be corrected in your
dealer's body and paint shop.
Chemical Paint Spotting
Airborne pollutants can fall upon
and attack painted vehicle surfaces
causing blotchy, ring-shaped
discolorations, and small, irregular
dark spots etched into the paint
surface. See“Finish Care”
previously in this section.
Interior Care
To prevent dirt particle abrasions,
regularly clean the vehicle's interior.
Immediately remove any soils.
Newspapers or dark garments can
transfer color to the vehicle’s
interior.
Use a soft bristle brush to remove
dust from knobs and crevices on the
instrument cluster. Using a mild
soap solution, immediately remove
hand lotions, sunscreen, and insect
repellent from all interior surfaces or
permanent damage may result.
Use cleaners specifically designed
for the surfaces being cleaned to
prevent permanent damage. Apply
all cleaners directly to the cleaning
cloth. Do not spray cleaners on any
switches or controls. Remove
cleaners quickly.
Before using cleaners, read and
follow all safety instructions on the
label. While cleaning the interior,
open the doors and windows to get
proper ventilation.
Page 295 of 351
Chevrolet Sonic Owner Manual (GMNA-Localizing-U.S./Canada-12461769) -
2019 - crc - 5/21/18
294 Vehicle Care
.Do not use a floor mat if the
vehicle is not equipped with a
floor mat retainer on the driver
side floor.
. Use the floor mat with the
correct side up. Do not turn
it over.
. Do not place anything on top of
the driver side floor mat.
. Use only a single floor mat on
the driver side.
. Do not place one floor mat on
top of another.
Removing and Replacing the
Floor Mats
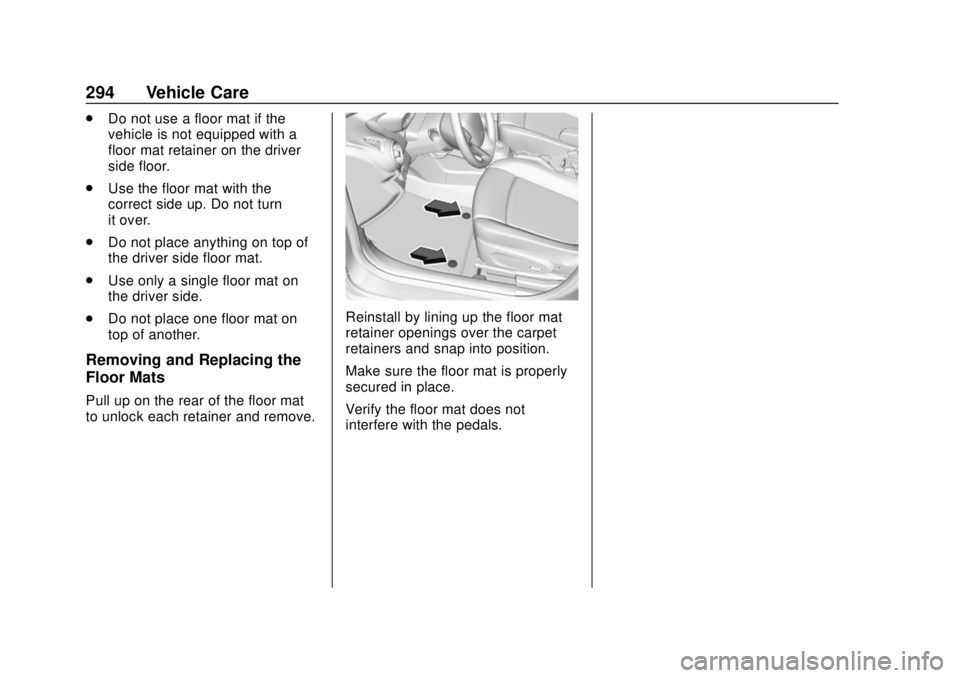
Pull up on the rear of the floor mat
to unlock each retainer and remove.
Reinstall by lining up the floor mat
retainer openings over the carpet
retainers and snap into position.
Make sure the floor mat is properly
secured in place.
Verify the floor mat does not
interfere with the pedals.
Page 299 of 351

Chevrolet Sonic Owner Manual (GMNA-Localizing-U.S./Canada-12461769) -
2019 - crc - 5/21/18
298 Service and Maintenance
parts, or signs of wear at least
once a year. SeeExterior Care
0 286.
. Inspect power steering for
proper attachment, connections,
binding, leaks, cracks,
chafing, etc.
. Visually inspect halfshafts and
drive shafts for excessive wear,
lubricant leaks, and/or damage
including: tube dents or cracks,
constant velocity joint or
universal joint looseness,
cracked or missing boots, loose
or missing boot clamps, center
bearing excessive looseness,
loose or missing fasteners, and
axle seal leaks.
. Check restraint system
components. See Safety System
Check 069.
. Visually inspect fuel system for
damage or leaks. .
Visually inspect exhaust system
and nearby heat shields for
loose or damaged parts.
. Lubricate body components. See
Exterior Care 0286.
. Check starter switch. See Starter
Switch Check 0240.
. Check automatic transmission
shift lock control function. See
Automatic Transmission Shift
Lock Control Function Check
0241.
. Check ignition transmission lock.
See Ignition Transmission Lock
Check 0241.
. Check parking brake and
automatic transmission park
mechanism. See Park Brake and
P (Park) Mechanism Check
0 241.
. Check accelerator pedal for
damage, high effort, or binding.
Replace if needed. .
Visually inspect gas strut for
signs of wear, cracks, or other
damage. Check the hold open
ability of the strut. If the hold
open is low, service the gas
strut. See Gas Strut(s) 0243.
. Inspect sunroof track and seal,
if equipped. See Sunroof052.