2019 CHEVROLET SILVERADO weight
[x] Cancel search: weightPage 94 of 474

Chevrolet Silverado Owner Manual (GMNA-Localizing-U.S./Canada/Mexico-
1500-11698642) - 2019 - CRC - 2/20/19
Seats and Restraints 93
The passenger sensing system
works with sensors that are part of
the front outboard passenger seat
and seat belt. The sensors are
designed to detect the presence of
a properly seated occupant and
determine if the front outboard
passenger frontal airbag should be
allowed to inflate or not.
According to accident statistics,
children are safer when properly
secured in a rear seat in the correct
child restraint for their weight
and size.
Whenever possible, children aged
12 and under should be secured in
a rear seating position.
Never put a rear-facing child seat in
the front. This is because the risk to
the rear-facing child is so great,
if the airbag inflates.
{Warning
A child in a rear-facing child
restraint can be seriously injured
or killed if the passenger frontal(Continued)
Warning (Continued)
airbag inflates. This is because
the back of the rear-facing child
restraint would be very close to
the inflating airbag. A child in a
forward-facing child restraint can
be seriously injured or killed if the
passenger frontal airbag inflates
and the passenger seat is in a
forward position.
Even if the passenger sensing
system has turned off the
passenger frontal airbag, no
system is fail-safe. No one can
guarantee that an airbag will not
deploy under some unusual
circumstance, even though the
airbag is turned off.
Never put a rear-facing child
restraint in the front seat, even if
the airbag is off. If securing a
forward-facing child restraint in
the front outboard passenger
seat, always move the seat as far
back as it will go. It is better to(Continued)
Warning (Continued)
secure child restraints in the rear
seat. Consider using another
vehicle to transport the child
when a rear seat is not available.
If the vehicle does not have a rear
seat that will accommodate a
rear-facing child restraint, a
rear-facing child restraint should not
be installed in the vehicle, even if
the airbag is off.
The passenger sensing system is
designed to turn off the front
outboard passenger frontal airbag if:
. The front outboard passenger
seat is unoccupied.
. The system determines an infant
is present in a child restraint.
. A front outboard passenger
takes his/her weight off of the
seat for a period of time.
. There is a critical problem with
the airbag system or the
passenger sensing system.
Page 100 of 474
Chevrolet Silverado Owner Manual (GMNA-Localizing-U.S./Canada/Mexico-
1500-11698642) - 2019 - CRC - 2/20/19
Seats and Restraints 99
Child Restraints
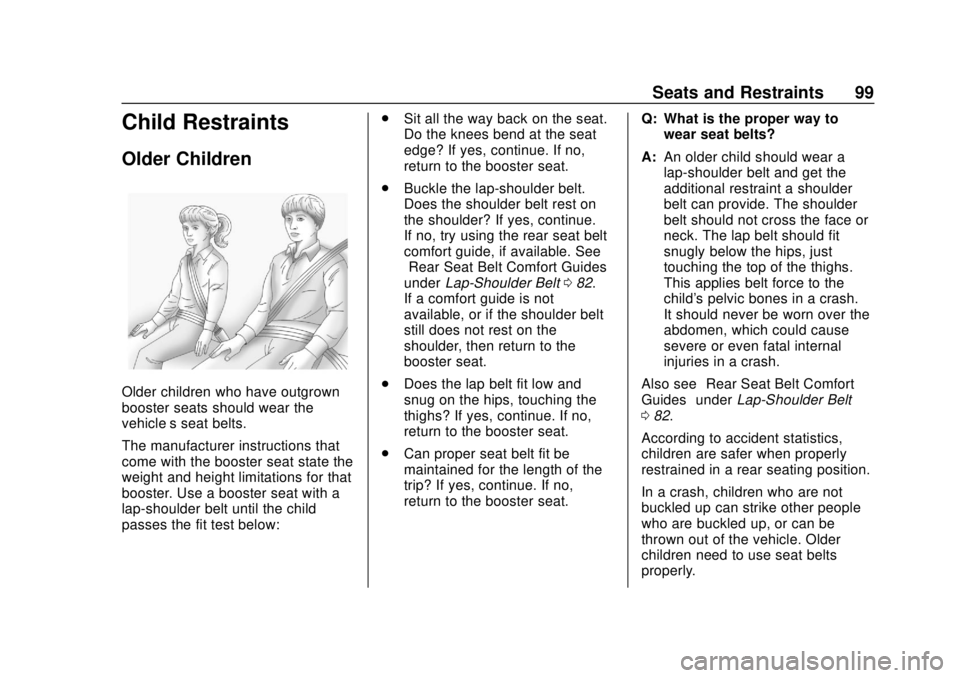
Older Children
Older children who have outgrown
booster seats should wear the
vehicle’s seat belts.
The manufacturer instructions that
come with the booster seat state the
weight and height limitations for that
booster. Use a booster seat with a
lap-shoulder belt until the child
passes the fit test below:.
Sit all the way back on the seat.
Do the knees bend at the seat
edge? If yes, continue. If no,
return to the booster seat.
. Buckle the lap-shoulder belt.
Does the shoulder belt rest on
the shoulder? If yes, continue.
If no, try using the rear seat belt
comfort guide, if available. See
“Rear Seat Belt Comfort Guides”
under Lap-Shoulder Belt 082.
If a comfort guide is not
available, or if the shoulder belt
still does not rest on the
shoulder, then return to the
booster seat.
. Does the lap belt fit low and
snug on the hips, touching the
thighs? If yes, continue. If no,
return to the booster seat.
. Can proper seat belt fit be
maintained for the length of the
trip? If yes, continue. If no,
return to the booster seat. Q: What is the proper way to
wear seat belts?
A: An older child should wear a
lap-shoulder belt and get the
additional restraint a shoulder
belt can provide. The shoulder
belt should not cross the face or
neck. The lap belt should fit
snugly below the hips, just
touching the top of the thighs.
This applies belt force to the
child's pelvic bones in a crash.
It should never be worn over the
abdomen, which could cause
severe or even fatal internal
injuries in a crash.
Also see “Rear Seat Belt Comfort
Guides” underLap-Shoulder Belt
0 82.
According to accident statistics,
children are safer when properly
restrained in a rear seating position.
In a crash, children who are not
buckled up can strike other people
who are buckled up, or can be
thrown out of the vehicle. Older
children need to use seat belts
properly.
Page 103 of 474
Chevrolet Silverado Owner Manual (GMNA-Localizing-U.S./Canada/Mexico-
1500-11698642) - 2019 - CRC - 2/20/19
102 Seats and Restraints
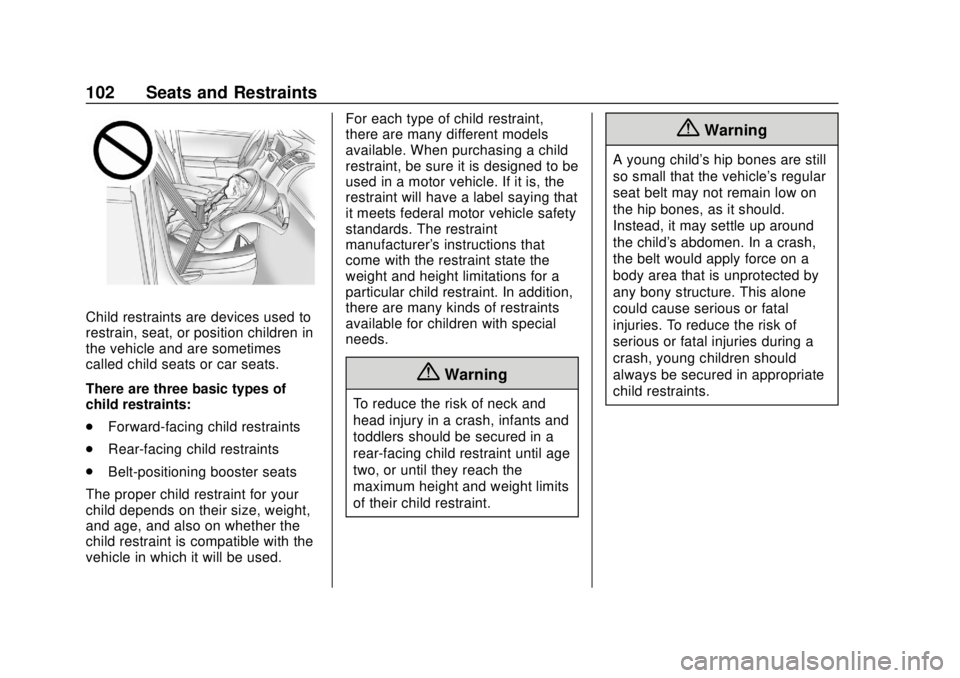
Child restraints are devices used to
restrain, seat, or position children in
the vehicle and are sometimes
called child seats or car seats.
There are three basic types of
child restraints:
.Forward-facing child restraints
. Rear-facing child restraints
. Belt-positioning booster seats
The proper child restraint for your
child depends on their size, weight,
and age, and also on whether the
child restraint is compatible with the
vehicle in which it will be used. For each type of child restraint,
there are many different models
available. When purchasing a child
restraint, be sure it is designed to be
used in a motor vehicle. If it is, the
restraint will have a label saying that
it meets federal motor vehicle safety
standards. The restraint
manufacturer's instructions that
come with the restraint state the
weight and height limitations for a
particular child restraint. In addition,
there are many kinds of restraints
available for children with special
needs.
{Warning
To reduce the risk of neck and
head injury in a crash, infants and
toddlers should be secured in a
rear-facing child restraint until age
two, or until they reach the
maximum height and weight limits
of their child restraint.
{Warning
A young child's hip bones are still
so small that the vehicle's regular
seat belt may not remain low on
the hip bones, as it should.
Instead, it may settle up around
the child's abdomen. In a crash,
the belt would apply force on a
body area that is unprotected by
any bony structure. This alone
could cause serious or fatal
injuries. To reduce the risk of
serious or fatal injuries during a
crash, young children should
always be secured in appropriate
child restraints.
Page 107 of 474
Chevrolet Silverado Owner Manual (GMNA-Localizing-U.S./Canada/Mexico-
1500-11698642) - 2019 - CRC - 2/20/19
106 Seats and Restraints
Wherever a child restraint is
installed, be sure to follow the
instructions that came with the child
restraint and secure the child
restraint properly.
Keep in mind that an unsecured
child restraint can move around in a
collision or sudden stop and injure
people in the vehicle. Be sure to
properly secure any child restraint in
the vehicle—even when no child is
in it.
Lower Anchors and
Tethers for Children
(LATCH System)
The LATCH system secures a child
restraint during driving or in a crash.
LATCH attachments on the child
restraint are used to attach the child
restraint to the anchors in the
vehicle. This system is designed to
make installation of a child restraint
easier.
In order to use the LATCH system in
your vehicle, you need a child
restraint that has LATCH
attachments. LATCH-compatible rear-facing and forward-facing child
seats can be properly installed
using either the LATCH anchors or
the vehicle’
s seat belts. Do not use
both the seat belts and the LATCH
anchorage system to secure a
rear-facing or forward-facing
child seat.
Booster seats use the vehicle’s seat
belts to secure the child and the
booster seat. If the manufacturer
recommends that the booster seat
be secured with the LATCH system,
this can be done as long as the
booster seat can be positioned
properly and there is no interference
with the proper positioning of the
lap-shoulder belt on the child.
Make sure to follow the instructions
that came with the child restraint,
and also the instructions in this
manual.
When installing a child restraint with
a top tether, you must also use
either the lower anchors or the seat
belts to properly secure the child
restraint. A child restraint must
never be installed using only the top
tether and anchor. The LATCH anchorage system can
be used until the combined weight
of the child plus the child restraint is
29.5 kg (65 lbs). Use the seat belt
alone instead of the LATCH
anchorage system once the
combined weight is more than
29.5 kg (65 lbs).
See
Securing Child Restraints (With
the Seat Belt in the Front Passenger
Seat) 0121 or
Securing Child Restraints (In the
Center Front Seat) 0124 or
Securing Child Restraints (With the
Seat Belt in the Rear Seat) 0117.
Child restraints built after March
2014 will be labeled with the
specific child weight up to which the
LATCH system can be used to
install the restraint.
The following explains how to attach
a child restraint with these
attachments in the vehicle.
Page 114 of 474
Chevrolet Silverado Owner Manual (GMNA-Localizing-U.S./Canada/Mexico-
1500-11698642) - 2019 - CRC - 2/20/19
Seats and Restraints 113
3. Secure the child restraint in theright front seating position with
the vehicle belts. See Securing
Child Restraints (With the Seat
Belt in the Front Passenger
Seat) 0121 or
Securing Child Restraints (In
the Center Front Seat) 0124 or
Securing Child Restraints (With
the Seat Belt in the Rear Seat)
0 117.
4. Before placing a child in the child restraint, make sure it is
securely held in place. To
check, grasp the child restraint
at the belt path and attempt to
move it side to side and back
and forth. There should be no
more than 2.5 cm (1 in) of
movement for proper
installation.
Double and Crew Cab Models 1. Attach and tighten the lower attachments to the lower
anchors. If the child restraint
does not have lower
attachments or the desired
seating position does not have
lower anchors, secure the child restraint with the top tether and
the seat belts. Refer to the
child restraint manufacturer
instructions and the
instructions in this manual.
1.1. Find the lower anchors
for the desired seating
position.
1.2. Put the child restraint on the seat.
1.3. Attach and tighten the lower attachments on the
child restraint to the lower
anchors.
2. For forward-facing child restraints, attach and tighten
the top tether to the top tether
anchor, if your vehicle has one.
Follow the child restraint
instructions and the vehicle
LATCH anchor weight limits
described at the beginning of
this section, and the following
steps:
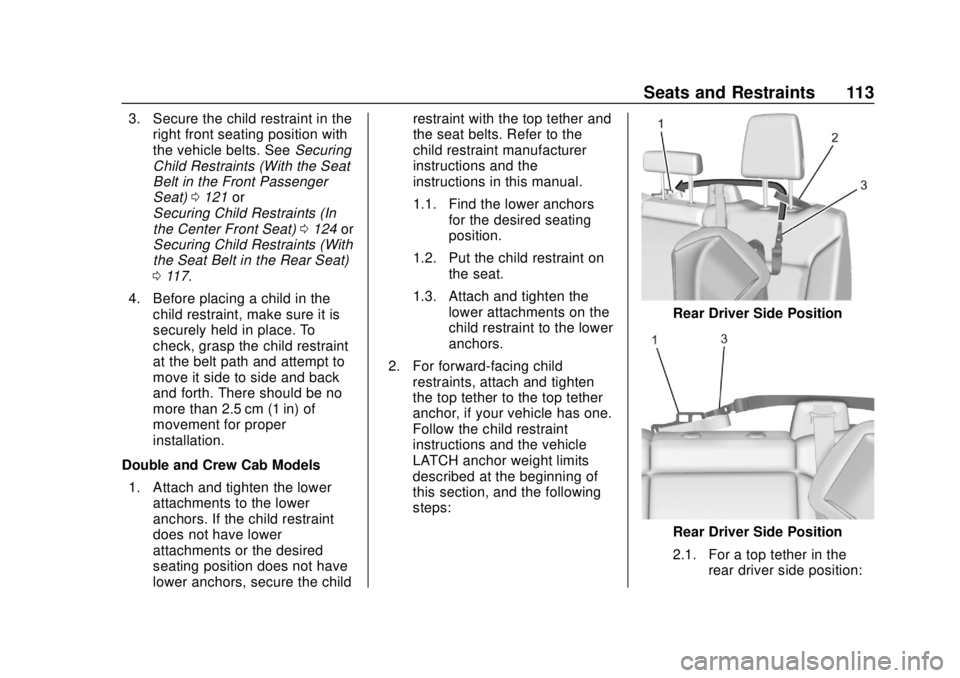
Rear Driver Side Position
Rear Driver Side Position
2.1. For a top tether in the rear driver side position:
Page 120 of 474
Chevrolet Silverado Owner Manual (GMNA-Localizing-U.S./Canada/Mexico-
1500-11698642) - 2019 - CRC - 2/20/19
Seats and Restraints 119
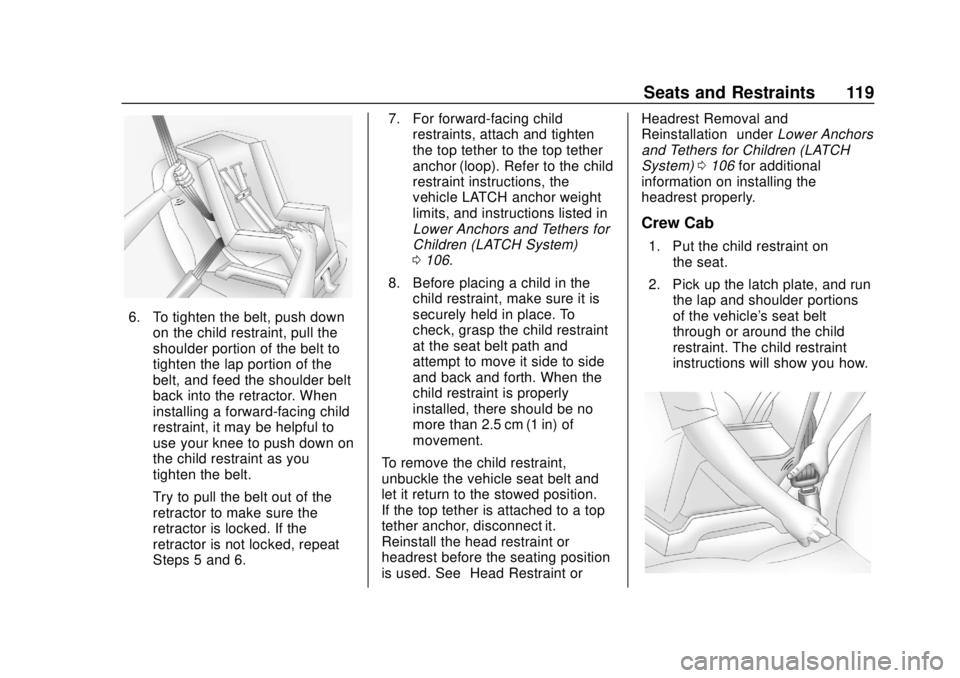
6. To tighten the belt, push downon the child restraint, pull the
shoulder portion of the belt to
tighten the lap portion of the
belt, and feed the shoulder belt
back into the retractor. When
installing a forward-facing child
restraint, it may be helpful to
use your knee to push down on
the child restraint as you
tighten the belt.
Try to pull the belt out of the
retractor to make sure the
retractor is locked. If the
retractor is not locked, repeat
Steps 5 and 6. 7. For forward-facing child
restraints, attach and tighten
the top tether to the top tether
anchor (loop). Refer to the child
restraint instructions, the
vehicle LATCH anchor weight
limits, and instructions listed in
Lower Anchors and Tethers for
Children (LATCH System)
0106.
8. Before placing a child in the child restraint, make sure it is
securely held in place. To
check, grasp the child restraint
at the seat belt path and
attempt to move it side to side
and back and forth. When the
child restraint is properly
installed, there should be no
more than 2.5 cm (1 in) of
movement.
To remove the child restraint,
unbuckle the vehicle seat belt and
let it return to the stowed position.
If the top tether is attached to a top
tether anchor, disconnect it.
Reinstall the head restraint or
headrest before the seating position
is used. See “Head Restraint or Headrest Removal and
Reinstallation”
underLower Anchors
and Tethers for Children (LATCH
System) 0106 for additional
information on installing the
headrest properly.
Crew Cab
1. Put the child restraint on the seat.
2. Pick up the latch plate, and run the lap and shoulder portions
of the vehicle's seat belt
through or around the child
restraint. The child restraint
instructions will show you how.
Page 205 of 474
Chevrolet Silverado Owner Manual (GMNA-Localizing-U.S./Canada/Mexico-
1500-11698642) - 2019 - CRC - 2/20/19
204 Driving and Operating
{Warning
Heavy braking when going down
a hill can cause your brakes to
overheat and fade. This could
cause loss of control and you or
others could be injured or killed.
Apply the brakes lightly when
descending a hill and use a low
gear to keep vehicle speed under
control.
If a brake fade condition is detected,
a DIC warning message is
displayed. Adjust brake pedal use
and shift to a lower transmission
gear to reduce braking.
If the brakes continue to fade to a
severe condition, additional DIC
messages are displayed. The brake
system warning light will illuminate,
and the vehicle speed may be
limited. See Brake System Warning
Light 0152. If the vehicle stalls on a hill:
1. Apply the brakes to stop the vehicle, and then apply the
parking brake.
2. Shift into P (Park) and then restart the engine.
.If driving uphill when the
vehicle stalls, shift to
R (Reverse), release the
parking brake, and back
straight down.
. Never try to turn the vehicle
around. If the hill is steep
enough to stall the vehicle,
it is steep enough to cause
it to roll over.
. If you cannot make it up the
hill, back straight down
the hill.
. Never back down a hill in
N (Neutral) using only the
brake. The vehicle can roll
backward quickly and you
could lose control. .
If driving downhill when the
vehicle stalls, shift to a
lower gear, release the
parking brake, and drive
straight down the hill.
3. If the vehicle cannot be restarted after stalling, set the
parking brake, shift into
P (Park), and turn the
vehicle off.
3.1. Leave the vehicle and seek help.
3.2. Stay clear of the path the vehicle would take if it
rolled downhill.
. Avoid turns that take the vehicle
across the incline of the hill.
A hill that can be driven straight
up or down might be too steep to
drive across. Driving across an
incline puts more weight on the
downhill wheels, which could
cause a downhill slide or a
rollover.
. Surface conditions can be a
problem. Loose gravel, muddy
spots, or even wet grass can
cause the tires to slip sideways,
Page 211 of 474

Chevrolet Silverado Owner Manual (GMNA-Localizing-U.S./Canada/Mexico-
1500-11698642) - 2019 - CRC - 2/20/19
210 Driving and Operating
Caution
Never use recovery hooks to tow
the vehicle. The vehicle could be
damaged, and the repairs would
not be covered by the vehicle
warranty.
There are recovery hooks at the
front of the vehicle. Use them if the
vehicle is stuck off-road and needs
to be pulled some place to continue
driving.
Vehicle Load Limits
It is very important to know how
much weight the vehicle can
carry. This weight is called the
vehicle capacity weight and
includes the weight of all
occupants, cargo, and all
nonfactory-installed options.
Two labels on the vehicle may
show how much weight it was
designed to carry: the Tire and
Loading Information label and
the Certification/Tire label.
{Warning
Do not load the vehicle any
heavier than the Gross
Vehicle Weight Rating
(GVWR), or either the
maximum front or rear Gross
Axle Weight Rating (GAWR).
This can cause systems to
break and change the way the
vehicle handles. This could
(Continued)
Warning (Continued)
cause loss of control and a
crash. Overloading can also
reduce stopping distance,
damage the tires, and shorten
the life of the vehicle.
Tire and Loading Information
Label
Label Example
A vehicle-specific Tire and
Loading Information label is
attached to the center pillar
(B-pillar). The Tire and Loading