2019 CHEVROLET SILVERADO length
[x] Cancel search: lengthPage 100 of 474

Chevrolet Silverado Owner Manual (GMNA-Localizing-U.S./Canada/Mexico-
1500-11698642) - 2019 - CRC - 2/20/19
Seats and Restraints 99
Child Restraints
Older Children
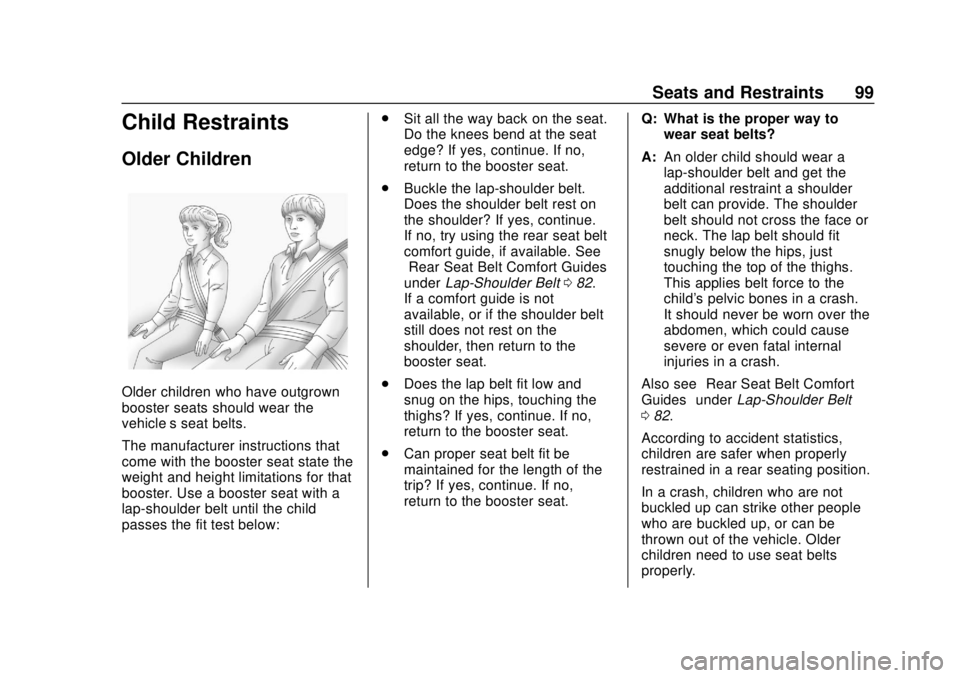
Older children who have outgrown
booster seats should wear the
vehicle’s seat belts.
The manufacturer instructions that
come with the booster seat state the
weight and height limitations for that
booster. Use a booster seat with a
lap-shoulder belt until the child
passes the fit test below:.
Sit all the way back on the seat.
Do the knees bend at the seat
edge? If yes, continue. If no,
return to the booster seat.
. Buckle the lap-shoulder belt.
Does the shoulder belt rest on
the shoulder? If yes, continue.
If no, try using the rear seat belt
comfort guide, if available. See
“Rear Seat Belt Comfort Guides”
under Lap-Shoulder Belt 082.
If a comfort guide is not
available, or if the shoulder belt
still does not rest on the
shoulder, then return to the
booster seat.
. Does the lap belt fit low and
snug on the hips, touching the
thighs? If yes, continue. If no,
return to the booster seat.
. Can proper seat belt fit be
maintained for the length of the
trip? If yes, continue. If no,
return to the booster seat. Q: What is the proper way to
wear seat belts?
A: An older child should wear a
lap-shoulder belt and get the
additional restraint a shoulder
belt can provide. The shoulder
belt should not cross the face or
neck. The lap belt should fit
snugly below the hips, just
touching the top of the thighs.
This applies belt force to the
child's pelvic bones in a crash.
It should never be worn over the
abdomen, which could cause
severe or even fatal internal
injuries in a crash.
Also see “Rear Seat Belt Comfort
Guides” underLap-Shoulder Belt
0 82.
According to accident statistics,
children are safer when properly
restrained in a rear seating position.
In a crash, children who are not
buckled up can strike other people
who are buckled up, or can be
thrown out of the vehicle. Older
children need to use seat belts
properly.
Page 227 of 474

Chevrolet Silverado Owner Manual (GMNA-Localizing-U.S./Canada/Mexico-
1500-11698642) - 2019 - CRC - 2/20/19
226 Driving and Operating
The length of time the heater should
remain plugged in depends on
several factors. Ask a dealer in the
area where you will be parking the
vehicle for the best advice on this.
Retained Accessory
Power (RAP)
Some vehicle accessories may be
used after the ignition is turned off.
The power windows and sunroof,
if equipped, will continue to work for
up to 10 minutes or until any door is
opened.
The infotainment system will
continue to work for 10 minutes,
until the driver door is opened,
or until the ignition is turned on or
placed in ACC/ACCESSORY.
Shifting Into Park
{Warning
It can be dangerous to get out of
the vehicle if the shift lever is not
fully in P (Park) with the parking
brake firmly set. The vehicle can
roll. If you have left the engine
running, the vehicle can move
suddenly. You or others could be
injured. To be sure the vehicle will
not move, even when you are on
fairly level ground, use the steps
that follow. With four-wheel drive,
if the transfer case is in
N (Neutral), the vehicle will be
free to roll, even if the shift lever
is in P (Park). Be sure the transfer
case is in a drive gear. If towing a
trailer, seeDriving Characteristics
and Towing Tips 0277.
1. Hold the brake pedal down, then set the parking brake. See
Electric Parking Brake 0242. 2. Move the shift lever into the
P (Park) position by pulling the
shift lever toward you and
moving it up as far as it will go.
3. Be sure the transfer case (if equipped) is in a drive
gear –not in N (Neutral).
4. Turn the ignition off. For Key Access, push the ignition key
in, towards the steering column
and then turn the ignition off.
5. For Key Access, remove the key and take it with you. If you
can leave the vehicle with the
ignition key in your hand, the
vehicle is in P (Park).
For Keyless Access, take the
Remote Keyless Entry (RKE)
transmitter with you.
Page 248 of 474

Chevrolet Silverado Owner Manual (GMNA-Localizing-U.S./Canada/Mexico-
1500-11698642) - 2019 - CRC - 2/20/19
Driving and Operating 247
If HDC is to be used for more than
three minutes or on grades steeper
than 25%, the transfer case should
be put into Four-Wheel Drive Low (4
n) to reduce the possibility of brake
overheating.
Noise from the Electronic Brake
Control Module (EBCM) is normal
when HDC is active.
When HDC is activated, the initial
HDC speed is set to the current
driving speed. It can be increased or
decreased by pressing +RES or
SET- on the steering wheel, or by
applying the accelerator or brake
pedal. This adjusted speed
becomes the new set speed.
HDC will remain enabled between
30 and 60 km/h (19 and 37 mph);
however, vehicle speed cannot be
set or maintained in this range. HDC
will automatically disable if the
vehicle speed is above 80 km/h
(50 mph) or above 60 km/h
(37 mph) for at least 30 seconds.
5must be pressed again to
re-enable HDC. HDC may disable
after an extended period of use. If this happens, HDC will require
time to cool down. The length of
time HDC remains active depends
on road conditions, grade, set
speed, vehicle loading, and outside
temperature.
When enabled, if the vehicle speed
is above 30 km/h (19 mph) and
below 60 km/h (37 mph), a DIC
message will display.
Driver Mode Control
This feature adds a sportier feel,
provides a more comfortable ride,
or assists in different weather
conditions or terrain to optimize
driving performance. Depending on
the option package, available
features, and mode selected, the
suspension, steering, and
powertrain will change settings to
achieve the desired mode
characteristics. Selecting the
various Driver Modes enhances the
ride performance for the road
conditions and the selected mode.
Mode Activation
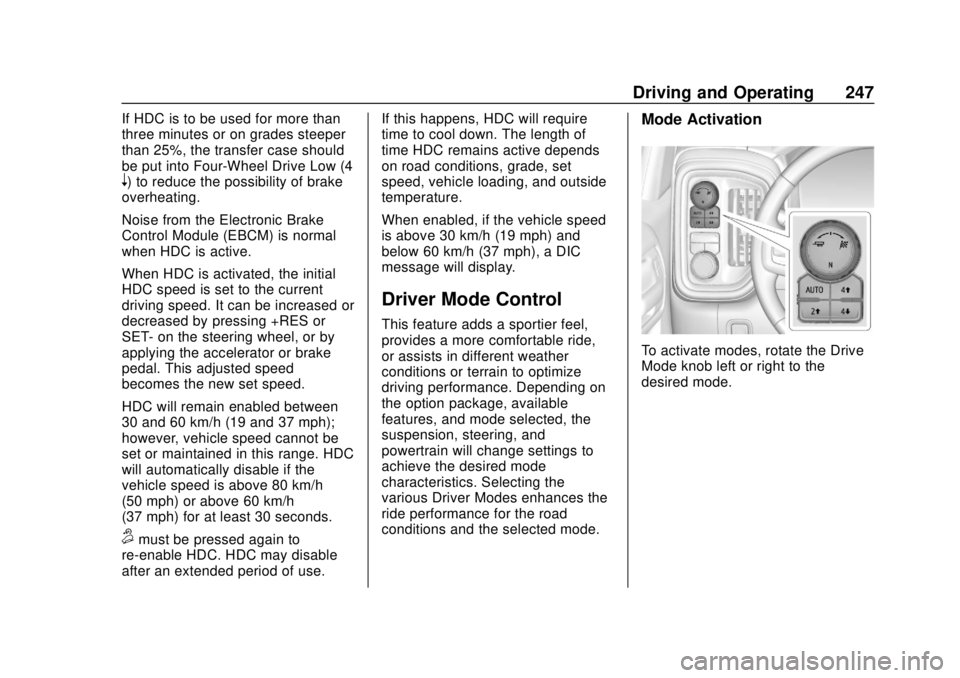
To activate modes, rotate the Drive
Mode knob left or right to the
desired mode.
Page 346 of 474

Chevrolet Silverado Owner Manual (GMNA-Localizing-U.S./Canada/Mexico-
1500-11698642) - 2019 - CRC - 2/20/19
Vehicle Care 345
Park on a fairly steep hill, with the
vehicle facing downhill. Keeping
your foot on the regular brake, set
the parking brake.
.To check the parking brake's
holding ability: With the engine
running and the transmission in
N (Neutral), slowly remove foot
pressure from the regular brake
pedal. Do this until the vehicle is
held by the parking brake only.
. To check the P (Park)
mechanism's holding ability:
With the engine running, shift to
P (Park). Then release the
parking brake followed by the
regular brake.
Contact your dealer if service is
required.
Wiper Blade Replacement
Windshield wiper blades should be
replaced periodically. See
Maintenance Schedule 0417. Replacement blades come in
different types and are removed in
different ways. For proper type and
length, see
Maintenance
Replacement Parts 0428.
Caution
Allowing the wiper arm to touch
the windshield when no wiper
blade is installed could damage
the windshield. Any damage that
occurs would not be covered by
the vehicle warranty. Do not allow
the wiper arm to touch the
windshield.
Front Wiper Blade
Replacement
To replace the wiper blade:
1. Pull the wiper assembly away from the windshield.
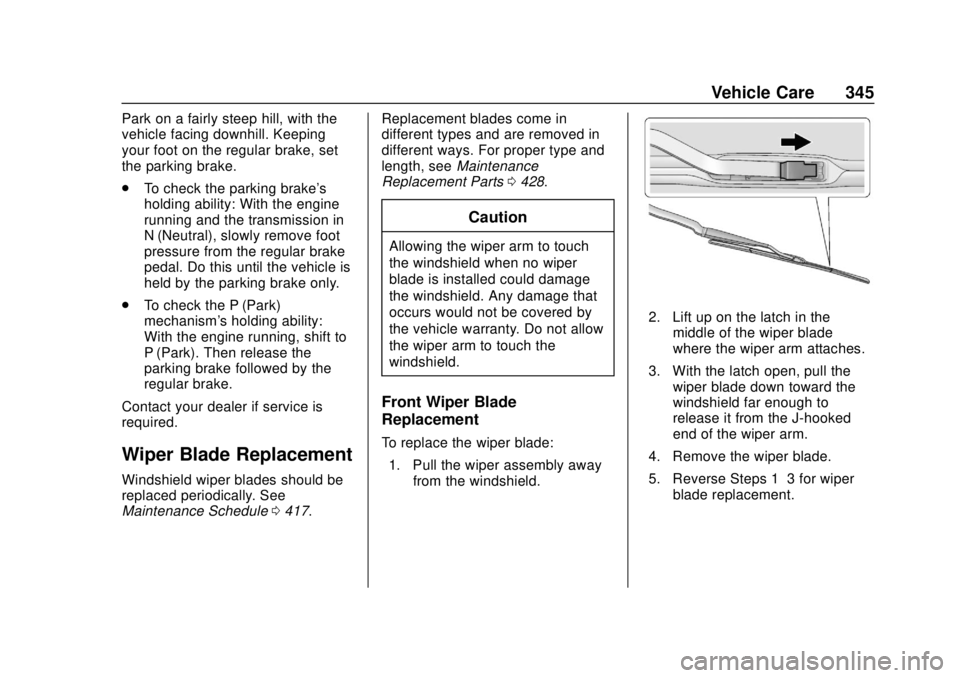
2. Lift up on the latch in themiddle of the wiper blade
where the wiper arm attaches.
3. With the latch open, pull the wiper blade down toward the
windshield far enough to
release it from the J-hooked
end of the wiper arm.
4. Remove the wiper blade.
5. Reverse Steps 1–3 for wiper blade replacement.