2019 CHEVROLET SILVERADO brake
[x] Cancel search: brakePage 248 of 474
Chevrolet Silverado Owner Manual (GMNA-Localizing-U.S./Canada/Mexico-
1500-11698642) - 2019 - CRC - 2/20/19
Driving and Operating 247
If HDC is to be used for more than
three minutes or on grades steeper
than 25%, the transfer case should
be put into Four-Wheel Drive Low (4
n) to reduce the possibility of brake
overheating.
Noise from the Electronic Brake
Control Module (EBCM) is normal
when HDC is active.
When HDC is activated, the initial
HDC speed is set to the current
driving speed. It can be increased or
decreased by pressing +RES or
SET- on the steering wheel, or by
applying the accelerator or brake
pedal. This adjusted speed
becomes the new set speed.
HDC will remain enabled between
30 and 60 km/h (19 and 37 mph);
however, vehicle speed cannot be
set or maintained in this range. HDC
will automatically disable if the
vehicle speed is above 80 km/h
(50 mph) or above 60 km/h
(37 mph) for at least 30 seconds.
5must be pressed again to
re-enable HDC. HDC may disable
after an extended period of use. If this happens, HDC will require
time to cool down. The length of
time HDC remains active depends
on road conditions, grade, set
speed, vehicle loading, and outside
temperature.
When enabled, if the vehicle speed
is above 30 km/h (19 mph) and
below 60 km/h (37 mph), a DIC
message will display.
Driver Mode Control
This feature adds a sportier feel,
provides a more comfortable ride,
or assists in different weather
conditions or terrain to optimize
driving performance. Depending on
the option package, available
features, and mode selected, the
suspension, steering, and
powertrain will change settings to
achieve the desired mode
characteristics. Selecting the
various Driver Modes enhances the
ride performance for the road
conditions and the selected mode.
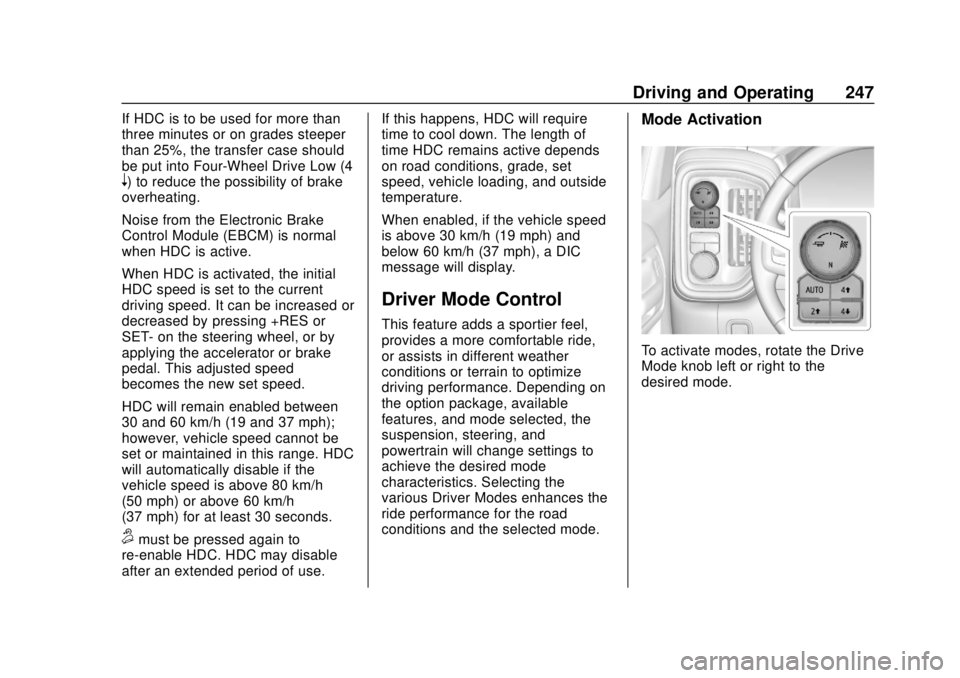
Mode Activation
To activate modes, rotate the Drive
Mode knob left or right to the
desired mode.
Page 250 of 474
Chevrolet Silverado Owner Manual (GMNA-Localizing-U.S./Canada/Mexico-
1500-11698642) - 2019 - CRC - 2/20/19
Driving and Operating 249
Off-Road Mode
Use to improve driving at moderate
speeds, on grass, gravel, dirt,
unpaved roads, or snow-covered
roads that have not been groomed
or plowed.
The accelerator pedal will be more
sensitive to provide finer control of
the torque at the wheels. Electronic
Stability Control (ESC), the Antilock
Brake System (ABS), and the
Traction Control System (TCS) will
change for optimal off-road
performance. Use this mode for
public off-road recreational driving.
SeeOff-Road Driving 0201.
When selected, the Off-Road Mode
indicator light displays in the
instrument cluster.
Tow/Haul Mode
This feature assists when pulling a
heavy trailer or a large or heavy
load. See Tow/Haul Mode 0235.
Tow/Haul Mode is designed to be
most effective when the vehicle and
trailer combined weight is at least
75% of the vehicle’s Gross Combined Weight Rating (GCWR).
See
“Weight of the Trailer” under
Trailer Towing 0282.
Tow/Haul Mode is most useful when
pulling a heavy trailer or a large or
heavy load under the following
conditions:
. Through rolling terrain
. In stop-and-go traffic
. In busy parking lots where
improved low speed control of
the vehicle is desired
Operating the vehicle in Tow/Haul
Mode when lightly loaded or with no
trailer at all will not cause damage.
However, there is no benefit to
selecting Tow/Haul Mode when the
vehicle is unloaded. Such a
selection when unloaded may result
in unpleasant engine and
transmission driving characteristics
and reduced fuel economy.
When selected, the Tow/Haul Mode
light will display in the instrument
cluster. If the vehicle is turned off with Tow/
Haul Mode active, Tow/Haul Mode
will remain active after the vehicle
has been turned on if the vehicle
was turned off for less than four
hours. Otherwise, the vehicle will
start up in Tour Mode.
Terrain Mode
Use for finer control during low
speed, off-road driving. When using
this mode it will mimic the
characteristics of four-wheel-drive
low without the torque capabilities.
Use when:
.
Traveling on very rough roads at
very low speeds, such as a
two-track or heavily rutted road.
. Traveling slowly in grassy fields.
. Pulling a boat out of the water
on a trailer.
. Using the vehicle for public
off-road recreational driving. See
Off-Road Driving 0201 and
Hill and Mountain Roads 0207.
Page 251 of 474
Chevrolet Silverado Owner Manual (GMNA-Localizing-U.S./Canada/Mexico-
1500-11698642) - 2019 - CRC - 2/20/19
250 Driving and Operating
When in Terrain Mode, the vehicle
will shift automatically but may hold
a lower gear longer to maximize
engine torque. The steering will
change to provide more precise
control. A unique pedal map,
transmission shift pattern, and rpm
control are utilized to give better
control at lower speeds and over
rough terrain. When the vehicle
comes to a stop, Vehicle Hold is
engaged. TCS will be optimized for
maximum torque transfer across
axles, and Active Braking During Lift
Throttle will be engaged.
Active Braking During Lift Throttle:
.Automatically applies light
braking, similar to heavy engine
braking of four-wheel-drive low.
. In D (Drive), the vehicle will
apply light braking until the
vehicle is at idle speeds. In
Manual L1 and Manual L2,
moderate braking may stop the
vehicle.
. Trailer braking is reduced. Terrain Mode
Drive Select Expected Vehicle Behavior Ideal Terrain
Drive (L3-Lx) Minor deceleration when off
throttle and mild ability to
modulate throttle, mimicks
performance of 4-low without
torque multiplication. Grassy fields,
mild two tracks,
rutted roads,
large rolling hills,
L2 Moderate deceleration when
off throttle and moderate
ability to modulate throttle.
Will bring vehicle to a stop in
most cases. Mild rock crawling,
heavy ruts,
short, steeper grades,
L1 Significant deceleration when
off throttle and significant
ability to modulate throttle.
Will bring vehicle to a stop in
most cases. Rock crawling
down hill
Active Braking During Lift Throttle
will reduce the back and forth
between the accelerator and brake
pedals.
Vehicle Hold Features:
. When the vehicle comes to a
stop on an incline grade in
forward gear or on a decline grade in reverse gear, Vehicle
Hold is engaged until the
accelerator pedal is pressed.
. When the vehicle is in forward
gear on a decline, the vehicle is
allowed to creep down the hill
when brake pedal is released
Page 252 of 474
Chevrolet Silverado Owner Manual (GMNA-Localizing-U.S./Canada/Mexico-
1500-11698642) - 2019 - CRC - 2/20/19
Driving and Operating 251
without pressing accelerator
pedal. The vehicle will also
creep forward on flat ground.
. If the driver seat belt is removed
and the driver door is opened
while vehicle is being held, EPB
will be engaged.
. EPB will engage if vehicle is
held for an extended period.
Terrain Mode is only available on
vehicles equipped with the single
speed transfer case.
Terrain Mode can only be
active when:
. Vehicle speed is less than
80 km/h (50 mph).
. The transfer case is in 4
m.
Frequent use of this mode may
cause brake wear due to the light
braking.
The vehicle will automatically exit
the mode if the brakes get too hot.
Terrain mode can be turned back on
after the brakes have cooled.
When Terrain Mode is selected: .
Auto Engine Start/Stop will be
disabled.
. The Terrain Mode indicator
displays on the instrument
cluster.
Limited-Slip Differential
If equipped, the limited-slip
differential can give more traction on
snow, mud, ice, sand, or gravel.
It works like a standard axle most of
the time, but when traction is low,
this feature allows the drive wheel
with the most traction to move the
vehicle. For vehicles with the
limited-slip differential, driven under
severe conditions, the rear axle fluid
should be changed. See
Maintenance Schedule 0417.
Locking Rear Axle
Vehicles with a locking rear axle can
give more traction on snow, mud,
ice, sand, or gravel. It works like a
standard axle most of the time, but
when traction is low, this feature will
allow the rear wheel with the most
traction to move the vehicle.
Cruise Control
{Warning
Cruise control can be dangerous
where you cannot drive safely at
a steady speed. Do not use
cruise control on winding roads or
in heavy traffic.
Cruise control can be dangerous
on slippery roads. On such roads,
fast changes in tire traction can
cause excessive wheel slip, and
you could lose control. Do not use
cruise control on slippery roads.
If equipped with cruise control, a
speed of about 40 km/h (25 mph) or
more can be maintained without
keeping your foot on the
accelerator. Cruise control does not
work at speeds below about
40 km/h (25 mph).
If the cruise control is being used
and the Traction Control System
(TCS) or StabiliTrak/Electronic
Stability Control (ESC) begins to
limit wheel spin, the cruise control
Page 253 of 474
Chevrolet Silverado Owner Manual (GMNA-Localizing-U.S./Canada/Mexico-
1500-11698642) - 2019 - CRC - 2/20/19
252 Driving and Operating
will automatically disengage. See
Traction Control/Electronic Stability
Control0244. If a collision alert
occurs when cruise control is
activated, cruise control is
disengaged. See Forward Collision
Alert (FCA) System 0261. When
road conditions allow you to safely
use it again, cruise control can be
turned back on.
Turning off the TCS or StabiliTrak/
ESC system will disengage the
cruise control.
If the brakes are applied, cruise
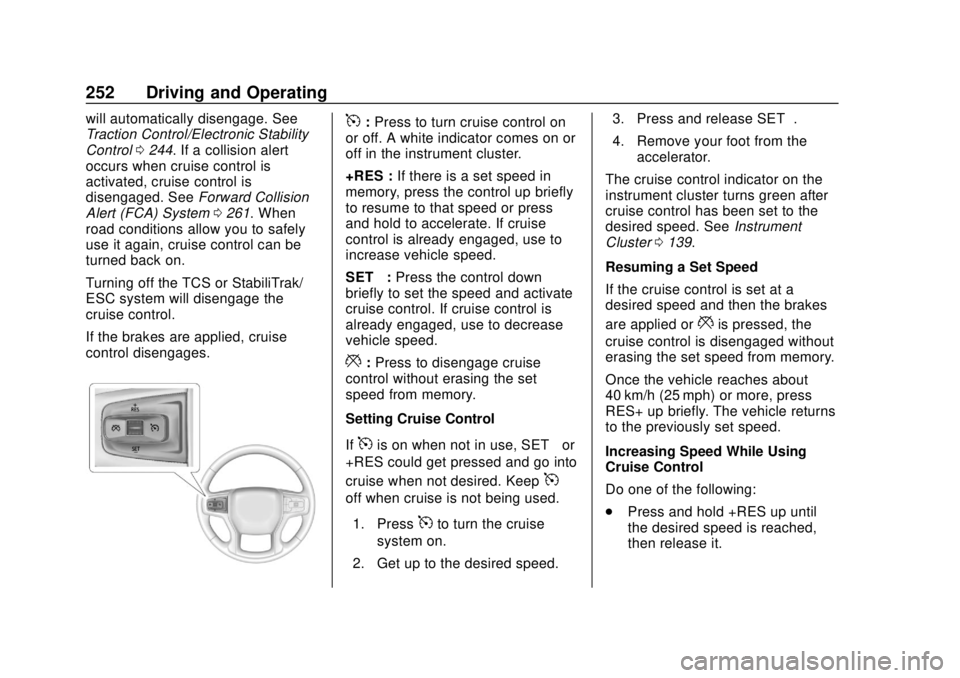
control disengages.5: Press to turn cruise control on
or off. A white indicator comes on or
off in the instrument cluster.
+RES : If there is a set speed in
memory, press the control up briefly
to resume to that speed or press
and hold to accelerate. If cruise
control is already engaged, use to
increase vehicle speed.
SET− :Press the control down
briefly to set the speed and activate
cruise control. If cruise control is
already engaged, use to decrease
vehicle speed.
*: Press to disengage cruise
control without erasing the set
speed from memory.
Setting Cruise Control
If
5is on when not in use, SET− or
+RES could get pressed and go into
cruise when not desired. Keep
5
off when cruise is not being used.
1. Press
5to turn the cruise
system on.
2. Get up to the desired speed. 3. Press and release SET−.
4. Remove your foot from the
accelerator.
The cruise control indicator on the
instrument cluster turns green after
cruise control has been set to the
desired speed. See Instrument
Cluster 0139.
Resuming a Set Speed
If the cruise control is set at a
desired speed and then the brakes
are applied or
*is pressed, the
cruise control is disengaged without
erasing the set speed from memory.
Once the vehicle reaches about
40 km/h (25 mph) or more, press
RES+ up briefly. The vehicle returns
to the previously set speed.
Increasing Speed While Using
Cruise Control
Do one of the following:
. Press and hold +RES up until
the desired speed is reached,
then release it.
Page 254 of 474
Chevrolet Silverado Owner Manual (GMNA-Localizing-U.S./Canada/Mexico-
1500-11698642) - 2019 - CRC - 2/20/19
Driving and Operating 253
.To increase vehicle speed in
small increments, press +RES
up briefly. For each press, the
vehicle goes about 1 km/h
(1 mph) faster.
The speedometer reading can be
displayed in either English or metric
units. See Instrument Cluster 0139.
The increment value used depends
on the units displayed.
Reducing Speed While Using
Cruise Control
Do one of the following:
. Press and hold SET– down until
the desired lower speed is
reached, then release it.
. To slow down in small
increments, press SET– down
briefly. For each press, the
vehicle goes about 1 km/h
(1 mph) slower.
The speedometer reading can be
displayed in either English or metric
units. See Instrument Cluster 0139.
The increment value used depends
on the units displayed. Passing Another Vehicle While
Using Cruise Control
Use the accelerator pedal to
increase the vehicle speed. When
you take your foot off the pedal, the
vehicle will slow down to the
previously set cruise speed. While
pressing the accelerator pedal or
shortly following the release to
override cruise control, briefly
pressing SET–
will result in cruise
control set to the current vehicle
speed.
Using Cruise Control on Hills
How well the cruise control works
on hills depends on the vehicle
speed, the load, and the steepness
of the hills. When going up steep
hills, pressing the accelerator pedal
may be necessary to maintain
vehicle speed.
While going downhill, cruise braking
helps maintain driver selected
speed.
Cruise Grade Braking is enabled
when the vehicle is started and
cruise control is active. It is not
enabled in Range Selection Mode. It assists in maintaining driver
selected speed when driving on
downhill grades by using the engine
and transmission to slow the
vehicle.
For other forms of descent control,
see
Hill Descent Control (HDC)
0 246, Automatic Transmission
0 230, and Tow/Haul Mode 0235.
Ending Cruise Control
There are four ways to end cruise
control:
. Step lightly on the brake pedal.
. Press
*.
. Shift the transmission to
N (Neutral).
. To turn off cruise control,
press
5.
Erasing Speed Memory
The cruise control set speed is
erased from memory if
5is pressed
or the ignition is turned off.
Page 255 of 474

Chevrolet Silverado Owner Manual (GMNA-Localizing-U.S./Canada/Mexico-
1500-11698642) - 2019 - CRC - 2/20/19
254 Driving and Operating
Driver Assistance
Systems
This vehicle may have features that
work together to help avoid crashes
or reduce crash damage while
driving, backing, and parking. Read
this entire section before using
these systems.
{Warning
Do not rely on the Driver
Assistance Systems. These
systems do not replace the need
for paying attention and driving
safely. You may not hear or feel
alerts or warnings provided by
these systems. Failure to use
proper care when driving may
result in injury, death, or vehicle
damage. SeeDefensive Driving
0 199.
Under many conditions, these
systems will not: (Continued)
Warning (Continued)
.Detect children,
pedestrians, bicyclists,
or animals.
. Detect vehicles or objects
outside the area monitored
by the system.
. Work at all driving speeds.
. Warn you or provide you
with enough time to avoid a
crash.
. Work under poor visibility or
bad weather conditions.
. Work if the detection sensor
is not cleaned or is covered
by ice, snow, mud, or dirt.
. Work if the detection sensor
is covered up, such as with
a sticker, magnet, or metal
plate.
. Work if the area surrounding
the detection sensor is
damaged or not properly
repaired.
(Continued)
Warning (Continued)
Complete attention is always
required while driving, and you
should be ready to take action
and apply the brakes and/or steer
the vehicle to avoid crashes.
Audible or Safety Alert Seat
Some driver assistance features
alert the driver of obstacles by
beeping. To change the volume of
the warning chime, see “Comfort
and Convenience” underVehicle
Personalization 0168.
If equipped with the Safety Alert
Seat, the driver seat cushion may
provide a vibrating pulse alert
instead of beeping. To change this,
see “Collision/Detection Systems”
under Vehicle Personalization
0 168.
Cleaning
Depending on vehicle options, keep
these areas of the vehicle clean to
ensure the best driver assistance
feature performance. Driver
Page 259 of 474
Chevrolet Silverado Owner Manual (GMNA-Localizing-U.S./Canada/Mexico-
1500-11698642) - 2019 - CRC - 2/20/19
258 Driving and Operating
Front/Rear Junction View :
Displays a front or rear cross traffic
view that shows objects directly to
the left and right of the front or back
of the vehicle. Touch Junction View
on the infotainment display when a
camera view is active. Touching the
button multiple times will toggle
between front and rear camera
views.
Front/Rear Overhead View :
Displays a front or rear overhead
view of the vehicle. Touching the
button will toggle between the two
views.
Front/Rear Bowl View :Displays a
view of the vehicle from either the
front or the back of the vehicle.
Touch Bowl View on the
infotainment display when a camera
view is active. Touching the button
multiple times will toggle between
forward and rearward views. Park
Assist and RCTA overlays are not
available when Bowl view is active.
Side Forward/Rearward View :
Displays a view that shows objects
next to the front or rear sides of the
vehicle. Touch Side Forward/ Rearward View on the infotainment
display when a camera view is
active. Touching the button multiple
times will toggle between forward
and rearward views. Park Assist
and RCTA overlays are not
available when Side Forward/
Rearward view is active.
Hitch View :
Assists while
connecting to a trailer. Displays a
zoomed-in view of the hitch to help
align the vehicle’s hitch ball with the
trailer coupler. Shifting into P (Park)
while in this view will automatically
engage the Electronic Parking
Brake (EPB).
Guidance Lines : Displays
available guidelines, including
standard and Hitch Guidance. When
enabled, the guidelines will display
when the vehicle is shifted into
R (Reverse).
Top Down View : Displays an
image of the area surrounding the
vehicle, along with the rear camera
view in the infotainment display. The
rear camera view will be replaced
by the front camera view after
shifting from R (Reverse) to a forward gear or when the vehicle is
moving forward slower than 12 km/h
(8 mph). This view can only be
enabled in Front/Rear Standard
View by touching the Top Down
View button when the CAMERA
view is active.
Hitch Guidance
This feature displays a single,
centered guideline on the camera
display to assist with aligning a
vehicle’s hitch ball with a trailer
coupler. Select the trailer guidance
line button, then align the trailer
guidance line over the trailer
coupler. Continuously steer the
vehicle to keep the guidance line
centered on the coupler when
backing. RVC Park Assist overlays
will not display when the trailer
guidance line is active. Hitch
Guidance is only available in
Standard View.
To check the trailer when in a
forward gear above 12 km/h
(8 mph), touch CAMERA on the
infotainment display to view the rear