2019 CHEVROLET SILVERADO ECO mode
[x] Cancel search: ECO modePage 148 of 474

Chevrolet Silverado Owner Manual (GMNA-Localizing-U.S./Canada/Mexico-
1500-11698642) - 2019 - CRC - 2/20/19
Instruments and Controls 147
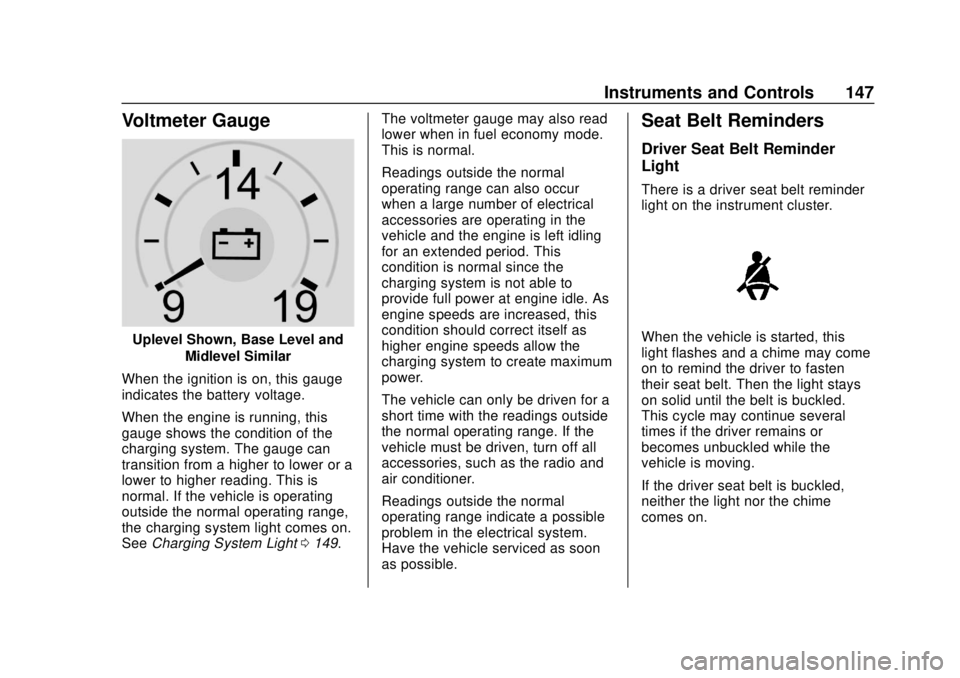
Voltmeter Gauge
Uplevel Shown, Base Level andMidlevel Similar
When the ignition is on, this gauge
indicates the battery voltage.
When the engine is running, this
gauge shows the condition of the
charging system. The gauge can
transition from a higher to lower or a
lower to higher reading. This is
normal. If the vehicle is operating
outside the normal operating range,
the charging system light comes on.
See Charging System Light 0149. The voltmeter gauge may also read
lower when in fuel economy mode.
This is normal.
Readings outside the normal
operating range can also occur
when a large number of electrical
accessories are operating in the
vehicle and the engine is left idling
for an extended period. This
condition is normal since the
charging system is not able to
provide full power at engine idle. As
engine speeds are increased, this
condition should correct itself as
higher engine speeds allow the
charging system to create maximum
power.
The vehicle can only be driven for a
short time with the readings outside
the normal operating range. If the
vehicle must be driven, turn off all
accessories, such as the radio and
air conditioner.
Readings outside the normal
operating range indicate a possible
problem in the electrical system.
Have the vehicle serviced as soon
as possible.
Seat Belt Reminders
Driver Seat Belt Reminder
Light
There is a driver seat belt reminder
light on the instrument cluster.
When the vehicle is started, this
light flashes and a chime may come
on to remind the driver to fasten
their seat belt. Then the light stays
on solid until the belt is buckled.
This cycle may continue several
times if the driver remains or
becomes unbuckled while the
vehicle is moving.
If the driver seat belt is buckled,
neither the light nor the chime
comes on.
Page 183 of 474

Chevrolet Silverado Owner Manual (GMNA-Localizing-U.S./Canada/Mexico-
1500-11698642) - 2019 - CRC - 2/20/19
182 Lighting
Turn and Lane-Change
Signals
An arrow on the instrument cluster
flashes in the direction of the turn or
lane change.
Move the turn signal lever all the
way up or down to signal a turn.
Partially raise or lower the lever for
less than one second until the arrow
starts to flash to signal a lane
change. This causes the turn
signals to automatically flash three
times. It will flash six times if Tow/
Haul Mode is active. Holding the
turn signal lever for more than
one second will cause the turn
signals to flash until the lever is
released.The lever returns to its starting
position whenever it is released.
If after signaling a turn or a lane
change the arrows flash rapidly or
do not come on, a signal bulb could
be burned out. If equipped with LED
turn signals, see your dealer.
Replace any burned out bulbs. If a
bulb is not burned out, check the
fuse. See
Fuses and Circuit
Breakers 0351.
Turn Signal On Chime
If the turn signal is left on for more
than 1.2 km (0.75 mi), a chime
sounds at each flash of the turn
signal. A message may appear in
the Driver Information Center (DIC).
See Vehicle Messages 0167. To
turn the chime and message off,
move the turn signal lever to the off
position.
Fog Lamps
If equipped, the fog lamp control is
near the exterior lamp control to the
left of the steering column.
The ignition must be on for the fog
lamps to come on.
#: Press to turn the fog lamps on
or off. A light will come on in the
instrument cluster.
When the fog lamps are turned on,
the parking lamps automatically
turn on.
Page 190 of 474

Chevrolet Silverado Owner Manual (GMNA-Localizing-U.S./Canada/Mexico-
1500-11698642) - 2019 - CRC - 2/20/19
Climate Controls 189
Climate Controls
Climate Control Systems
Climate Control Systems . . . . . 189
Dual Automatic ClimateControl System . . . . . . . . . . . . . 191
Air Vents
Air Vents . . . . . . . . . . . . . . . . . . . . . 195
Maintenance
Passenger Compartment AirFilter . . . . . . . . . . . . . . . . . . . . . . . . 195
Service . . . . . . . . . . . . . . . . . . . . . . . 196
Climate Control Systems
The heating, cooling, and ventilation in the vehicle can be controlled with this
system.
1. Fan Control
2. MAX Defrost
3. Air Delivery Mode Controls
4. A/C (Air Conditioning)
5. TEMP (Temperature Control)
6. Recirculation
7. Rear Window Defogger (If
Equipped)9:Turn clockwise or
counterclockwise to increase or
decrease the fan speed. Turn the
knob all the way counterclockwise
to turn the fan off.
TEMP : Turn clockwise or
counterclockwise to increase or
decrease the temperature inside the
vehicle.
Page 198 of 474

Chevrolet Silverado Owner Manual (GMNA-Localizing-U.S./Canada/Mexico-
1500-11698642) - 2019 - CRC - 2/20/19
Driving and Operating 197
Driving and
Operating
Driving Information
Distracted Driving . . . . . . . . . . . . 198
Defensive Driving . . . . . . . . . . . . . 199
Drunk Driving . . . . . . . . . . . . . . . . . 199
Control of a Vehicle . . . . . . . . . . . 199
Braking . . . . . . . . . . . . . . . . . . . . . . . 199
Steering . . . . . . . . . . . . . . . . . . . . . . 200
Off-Road Recovery . . . . . . . . . . . 200
Loss of Control . . . . . . . . . . . . . . . 201
Off-Road Driving . . . . . . . . . . . . . 201
Driving on Wet Roads . . . . . . . . 206
Hill and Mountain Roads . . . . . 207
Winter Driving . . . . . . . . . . . . . . . . 207
If the Vehicle Is Stuck . . . . . . . . 209
Vehicle Load Limits . . . . . . . . . . . 210
Truck-Camper LoadingInformation . . . . . . . . . . . . . . . . . . 215
Starting and Operating
New Vehicle Break-In . . . . . . . . . 217
Ignition Positions (KeyAccess) . . . . . . . . . . . . . . . . . . . . . 218
Ignition Positions (Keyless Access) . . . . . . . . . . . . . . . . . . . . . 220
Starting the Engine . . . . . . . . . . . 222 Stop/Start System . . . . . . . . . . . . 223
Engine Heater . . . . . . . . . . . . . . . . 224
Retained Accessory
Power (RAP) . . . . . . . . . . . . . . . . 226
Shifting Into Park . . . . . . . . . . . . . 226
Shifting out of Park . . . . . . . . . . . 227
Parking over Things
That Burn . . . . . . . . . . . . . . . . . . . 228
Active Fuel Management . . . . . 228
Extended Parking . . . . . . . . . . . . 228
Engine Exhaust
Engine Exhaust . . . . . . . . . . . . . . 229
Running the Vehicle While Parked . . . . . . . . . . . . . . . . . . . . . . 229
Automatic Transmission
Automatic Transmission . . . . . . 230
Manual Mode . . . . . . . . . . . . . . . . . 233
Tow/Haul Mode . . . . . . . . . . . . . . . 235
Drive Systems
Four-Wheel Drive . . . . . . . . . . . . . 236
Brakes
Antilock BrakeSystem (ABS) . . . . . . . . . . . . . . . 241
Electric Parking Brake . . . . . . . . 242
Brake Assist . . . . . . . . . . . . . . . . . . 243
Hill Start Assist (HSA) . . . . . . . . 244
Ride Control Systems
Traction Control/Electronic Stability Control . . . . . . . . . . . . . 244
Hill Descent Control (HDC) . . . 246
Driver Mode Control . . . . . . . . . . 247
Limited-Slip Differential . . . . . . . 251
Locking Rear Axle . . . . . . . . . . . . 251
Cruise Control
Cruise Control . . . . . . . . . . . . . . . . 251
Driver Assistance Systems
Driver Assistance Systems . . . 254
Assistance Systems for Parking or Backing . . . . . . . . . . 255
Assistance Systems for Driving . . . . . . . . . . . . . . . . . . . . . . 261
Forward Collision Alert (FCA) System . . . . . . . . . . . . . . . . . . . . . . 261
Forward Automatic Braking (FAB) . . . . . . . . . . . . . . . 264
Front Pedestrian Braking (FPB) System . . . . . . . . . . . . . . . 265
Side Blind Zone Alert (SBZA) . . . . . . . . . . . . . . . . 267
Lane Change Alert (LCA) . . . . . 268
Lane Departure Warning (LDW) . . . . . . . . . . . . . 270
Lane Keep Assist (LKA) . . . . . . 270
Page 222 of 474

Chevrolet Silverado Owner Manual (GMNA-Localizing-U.S./Canada/Mexico-
1500-11698642) - 2019 - CRC - 2/20/19
Driving and Operating 221
Stopping the Engine/LOCK/
OFF (No Indicator Lights) :When
the vehicle is stopped, press
ENGINE START/STOP once to turn
the engine off.
If the vehicle is in P (Park), the
ignition will turn off, and Retained
Accessory Power (RAP) will remain
active. See Retained Accessory
Power (RAP) 0226.
If the vehicle is not in P (Park), the
ignition will return to ACC/
ACCESSORY and display the
message SHIFT TO PARK in the
Driver Information Center (DIC).
When the vehicle is shifted into
P (Park), the ignition system will
turn off.
The vehicle may have an electric
steering column lock. The lock is
activated when the ignition is turned
off and either front door is opened.
A sound may be heard as the lock
actuates or releases. The steering
column lock may not release with
the wheels turned off center. If this
happens, the vehicle may not start.
Move the steering wheel from left to right while attempting to start the
vehicle. If this does not work, the
vehicle needs service.
If the vehicle must be shut off in an
emergency:
1. Brake using a firm and steady pressure. Do not pump the
brakes repeatedly. This may
deplete power assist, requiring
increased brake pedal force.
2. Shift the vehicle to N (Neutral). This can be done while the
vehicle is moving. After shifting
to N (Neutral), firmly apply the
brakes and steer the vehicle to
a safe location.
3. Come to a complete stop.
4. Hold the brake pedal down and shift to P (Park). The shift lever
must be in P (Park) to turn the
ignition off.
5. Continue to hold the brake pedal down.
6. Set the parking brake. See Electric Parking Brake 0242.
7. Press ENGINE START/STOP once to turn the ignition off. 8. Release the brake pedal.
If the vehicle cannot be pulled over,
and must be shut off while driving,
press and hold ENGINE START/
STOP for longer than two seconds,
or press twice in five seconds.
ACC/ACCESSORY (Amber
Indicator Light) : This mode allows
some electrical accessories to be
used when the engine is off.
With the ignition off, pressing the
button one time without the brake
pedal applied will place the ignition
system in ACC/ACCESSORY.
The ignition will switch from ACC/
ACCESSORY to off after
five minutes to prevent battery
rundown.
ON/RUN/START (Green Indicator
Light) : This mode is for driving and
starting. With the ignition off, and
the brake pedal applied, pressing
the button once will turn the ignition
on. Once engine cranking begins,
release the button. Engine cranking
will continue until the engine starts.
See Starting the Engine 0222.
Page 223 of 474

Chevrolet Silverado Owner Manual (GMNA-Localizing-U.S./Canada/Mexico-
1500-11698642) - 2019 - CRC - 2/20/19
222 Driving and Operating
Service Mode
This power mode is available for
service and diagnostics, and to
verify the proper operation of the
malfunction indicator lamp as may
be required for emission inspection
purposes. With the vehicle off, and
the brake pedal not applied,
pressing and holding the button for
more than five seconds will place
the vehicle in Service Mode. The
instruments and audio systems will
operate as they do when the ignition
is on, but the vehicle will not be able
to be driven. The engine will not
start in Service Mode. Press the
button again to turn the ignition off.
Starting the Engine
If the vehicle has a diesel engine,
see the Duramax diesel
supplement.
Caution
If you add electrical parts or
accessories, you could change
the way the engine operates. Any
resulting damage would not be
covered by the vehicle warranty.
SeeAdd-On Electrical Equipment
0 307.
Move the shift lever to P (Park) or
N (Neutral). To restart the engine
when the vehicle is already moving,
use N (Neutral) only.
Caution
Do not try to shift to P (Park) if the
vehicle is moving. If you do, you
could damage the transmission.
Shift to P (Park) only when the
vehicle is stopped.
Starting Procedure
1. For Key Access vehicles, turn the ignition key to START.
When the engine starts, let go
of the key.
For Keyless Access vehicles,
the RKE transmitter must be in
the vehicle. Press ENGINE
START/STOP with the brake
pedal applied. When the
engine begins cranking, let go
of the button.
The idle speed will go down as
the engine gets warm. Do not
race the engine immediately
after starting it. Operate the
engine and transmission gently
to allow the oil to warm up and
lubricate all moving parts.
When the low fuel warning light
is on and the FUEL LEVEL
LOW message is displayed in
the Driver Information Center
(DIC), hold the ignition switch
in the START position to
continue engine cranking.
Page 225 of 474

Chevrolet Silverado Owner Manual (GMNA-Localizing-U.S./Canada/Mexico-
1500-11698642) - 2019 - CRC - 2/20/19
224 Driving and Operating
.The vehicle battery has recently
been disconnected.
. Minimum vehicle speed has not
been reached since the last
Auto Stop.
. The accelerator pedal is
pressed.
. The engine or transmission is
not at the required operating
temperature.
. The outside temperature is not
in the required operating range.
. The vehicle is in any gear other
than D (Drive).
. Tow/Haul Mode or other driver
modes have been selected.
. The vehicle is on a steep hill or
grade.
. The driver door has been
opened or the driver seat belt
has been unbuckled.
. The hood has been opened.
. The Auto Stop has reached the
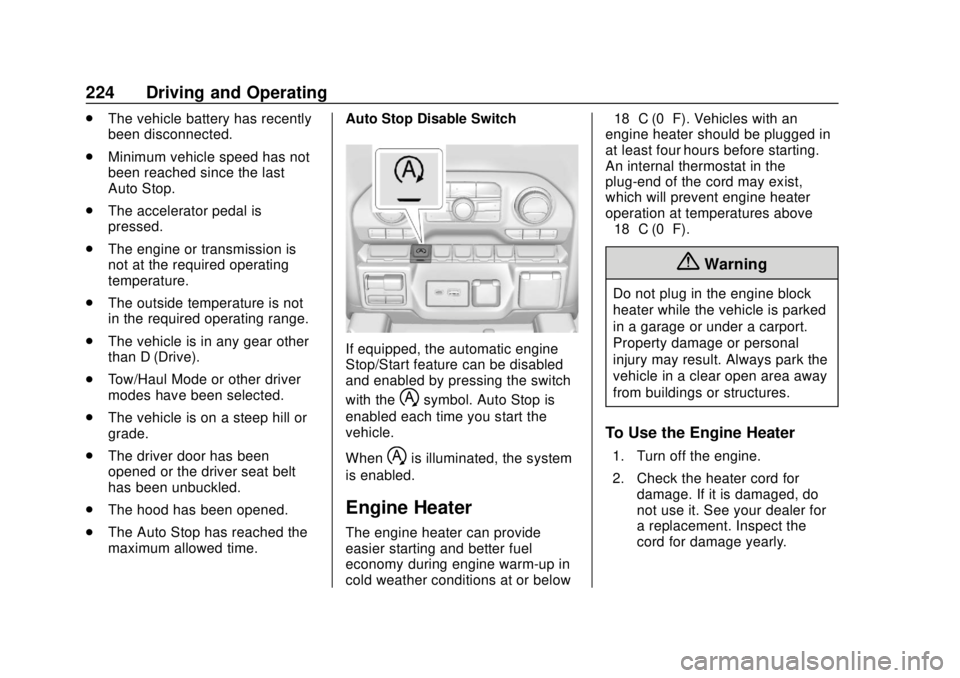
maximum allowed time. Auto Stop Disable Switch
If equipped, the automatic engine
Stop/Start feature can be disabled
and enabled by pressing the switch
with the
hsymbol. Auto Stop is
enabled each time you start the
vehicle.
When
his illuminated, the system
is enabled.
Engine Heater
The engine heater can provide
easier starting and better fuel
economy during engine warm-up in
cold weather conditions at or below −18 °C (0 °F). Vehicles with an
engine heater should be plugged in
at least four hours before starting.
An internal thermostat in the
plug-end of the cord may exist,
which will prevent engine heater
operation at temperatures above
−18 °C (0 °F).
{Warning
Do not plug in the engine block
heater while the vehicle is parked
in a garage or under a carport.
Property damage or personal
injury may result. Always park the
vehicle in a clear open area away
from buildings or structures.
To Use the Engine Heater
1. Turn off the engine.
2. Check the heater cord for
damage. If it is damaged, do
not use it. See your dealer for
a replacement. Inspect the
cord for damage yearly.
Page 233 of 474

Chevrolet Silverado Owner Manual (GMNA-Localizing-U.S./Canada/Mexico-
1500-11698642) - 2019 - CRC - 2/20/19
232 Driving and Operating
D :This position is for normal
driving. It provides the best fuel
economy. If more power is needed
for passing, press the accelerator
pedal down.
. When going less than about 55
km/h (35 mph), push the
accelerator pedal about
halfway down.
. When going about 55 km/h (35
mph) or more, push the
accelerator all the way down.
By doing this, the vehicle shifts
down to the next gear and has
more power.
Use D (Drive) and Tow/Haul Mode
when towing a trailer, carrying a
heavy load, driving on steep hills,
or driving off-road. Shift the
transmission to a lower gear if the
transmission shifts too often.
Downshifting the transmission in
slippery road conditions could result
in skidding. See “Skidding”under
Loss of Control 0201. The vehicle has a shift stabilization
feature that adjusts the transmission
shifting to the current driving
conditions in order to reduce rapid
upshifts and downshifts. This shift
stabilization feature is designed to
determine, before making an
upshift, if the engine is able to
maintain vehicle speed by analyzing
things such as vehicle speed,
throttle position, and vehicle load.
If the shift stabilization feature
determines that a current vehicle
speed cannot be maintained, the
transmission does not upshift and
instead holds the current gear.
In some cases, this could appear to
be a delayed shift, however the
transmission is operating normally.
The transmission uses adaptive
shift controls. The adaptive shift
control process continually
compares key shift parameters to
pre-programmed ideal shifts stored
in the transmission’s computer. The
transmission constantly makes
adjustments to improve vehicle
performance according to how the
vehicle is being used, such as with
a heavy load or when the temperature changes. During this
adaptive shift control process,
shifting might feel different as the
transmission determines the best
settings.
When temperatures are very cold,
the transmission's gear shifting
could be delayed providing more
stable shifts until the engine warms
up. Shifts could be more noticeable
with a cold transmission. This
difference in shifting is normal.
If equipped with the 2.7L L4 engine,
engine speeds may be increased
while driving at highway speeds
while the engine is still warming up.
L :
This position allows selection of
a range of gears appropriate for
current driving conditions.
If equipped, see “Range Selection
Mode” underManual Mode 0233.
Caution
Spinning the tires or holding the
vehicle in one place on a hill
using only the accelerator pedal
(Continued)