2019 CHEVROLET SILVERADO seats
[x] Cancel search: seatsPage 187 of 474

Chevrolet Silverado Owner Manual (GMNA-Localizing-U.S./Canada/Mexico-
1500-11698642) - 2019 - CRC - 2/20/19
186 Lighting
The exterior lamps and dome lamp
remain on for a set amount of time,
then automatically turn off.
The exterior lamps turn off
immediately by turning the exterior
lamp control off.
This feature can be changed. See
Vehicle Personalization0168.
Battery Load
Management
The vehicle has Electric Power
Management (EPM), which
estimates the battery's temperature
and state of charge. It then adjusts
the voltage for best performance
and extended life of the battery.
When the battery's state of charge
is low, the voltage is raised slightly
to quickly bring the charge back up.
When the state of charge is high,
the voltage is lowered slightly to
prevent overcharging. The voltmeter
gauge or the voltage display on the
Driver Information Center (DIC),
if equipped, may show the voltage moving up or down. This is normal.
If there is a problem, an alert will be
displayed.
The battery can be discharged at
idle if the electrical loads are very
high. This is true for all vehicles.
This is because the generator
(alternator) may not be spinning fast
enough at idle to produce all the
power that is needed for very high
electrical loads.
A high electrical load occurs when
several of the following are on, such
as: headlamps, high beams, fog
lamps, rear window defogger,
climate control fan at high speed,
heated seats, engine cooling fans,
trailer loads, and loads plugged into
accessory power outlets.
EPM works to prevent excessive
discharge of the battery. It does this
by balancing the generator's output
and the vehicle's electrical needs.
It can increase engine idle speed to
generate more power, whenever
needed. It can temporarily reduce
the power demands of some
accessories.Normally, these actions occur in
steps or levels, without being
noticeable. In rare cases at the
highest levels of corrective action,
this action may be noticeable to the
driver. If so, a DIC message might
be displayed and it is recommended
that the driver reduce the electrical
loads as much as possible.
Battery Power Protection
This feature shuts off the dome and
reading lamps, if they are left on for
more than 10 minutes after the
ignition is turned off. The cargo
lamp shuts off after 20 minutes. This
prevents the battery from
running down.
Page 195 of 474

Chevrolet Silverado Owner Manual (GMNA-Localizing-U.S./Canada/Mexico-
1500-11698642) - 2019 - CRC - 2/20/19
194 Climate Controls
Avoid using recirculation for long
periods of time in cold or damp
conditions. Using recirculation in
cold or damp conditions can result
in window fogging.
A/C :Press to turn the air
conditioning on or off. An indicator
light comes on to show that the air
conditioning is enabled. If the fan is
turned off, the air conditioner will not
run. The A/C light will stay on even
if the outside temperatures are
below freezing.
Rear Window Defogger
1REAR : If equipped, press to
turn the rear window defogger on or
off. An indicator light on the button
comes on to show that the rear
window defogger is on.
The rear window defogger only
works when the engine is running.
The defogger turns off if the ignition
is turned off or to ACC/
ACCESSORY. If equipped with heated outside
mirrors, press
1REAR to turn
them on or off. See Heated Mirrors
0 58.
Caution
Using a razor blade or sharp
object to clear the inside rear
window can damage the rear
window defogger. Repairs would
not be covered by the vehicle
warranty. Do not clear the inside
rear window with sharp objects.
Remote Start Climate Control
Operation : If equipped with remote
start, the climate control system
may run when the vehicle is started
remotely. If equipped with heated or
ventilated seats or a heated steering
wheel, these features may come on
during a remote start. See Remote
Vehicle Start 044, Heated and
Ventilated Front Seats 075, and
Heated Steering Wheel 0132.
Sensors
The solar sensor, on top of the
instrument panel near the
windshield, monitors the solar heat.
The climate control system uses the
sensor information to adjust the
temperature, fan speed,
recirculation, and air delivery mode
for best comfort.
Do not cover the sensor; otherwise
the automatic climate control system
may not work properly.
Page 196 of 474

Chevrolet Silverado Owner Manual (GMNA-Localizing-U.S./Canada/Mexico-
1500-11698642) - 2019 - CRC - 2/20/19
Climate Controls 195
Air Vents
Use the sliding knobs on the center
and side air vents to change the
direction of the airflow.
Air vents blow warm air on the side
windows in cold weather. If Floor,
Defog, or Defrost modes are
selected, a small amount of air will
come from the vents close to the
window.
To close the front a/c vents, move
the sliding knobs to the full down
position.
To close the rear a/c vents, move
the sliding knobs to the full inboard
position.
Operation Tips
.Clear away any ice, snow,
or leaves from air inlets at the
base of the windshield that could
block the flow of air into the
vehicle.
. Clear snow off the hood to
improve visibility and help
decrease moisture drawn into
the vehicle. .
Keep the path under the front
seats clear of objects to help
circulate the air inside of the
vehicle more effectively.
. Use of non-GM approved hood
deflectors can adversely affect
the performance of the system.
Check with your dealer before
adding equipment to the outside
of the vehicle.
Maintenance
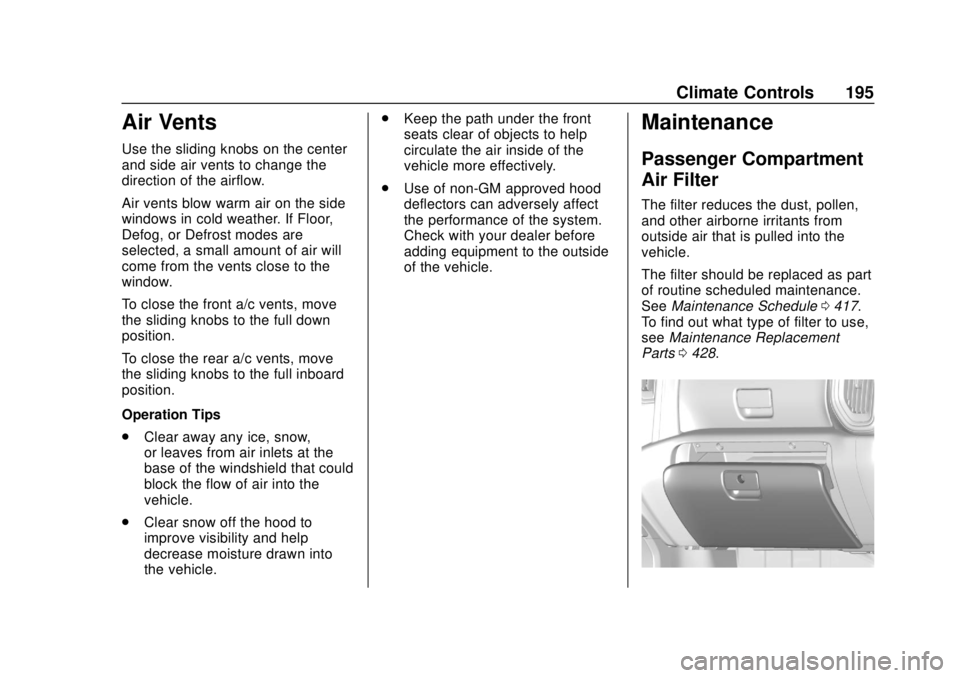
Passenger Compartment
Air Filter
The filter reduces the dust, pollen,
and other airborne irritants from
outside air that is pulled into the
vehicle.
The filter should be replaced as part
of routine scheduled maintenance.
See Maintenance Schedule 0417.
To find out what type of filter to use,
see Maintenance Replacement
Parts 0428.
Page 215 of 474

Chevrolet Silverado Owner Manual (GMNA-Localizing-U.S./Canada/Mexico-
1500-11698642) - 2019 - CRC - 2/20/19
214 Driving and Operating
{Warning
Things you put inside the
vehicle can strike and injure
people in a sudden stop or
turn, or in a crash.
.Put things in the cargo
area of the vehicle. Try to
spread the weight evenly.
.Never stack heavier
things, like suitcases,
inside the vehicle so that
some of them are above
the tops of the seats.
.Do not leave an
unsecured child restraint
in the vehicle.
.When you carry
something inside the
vehicle, secure it
whenever you can.
.Do not leave a seat
folded down unless you
need to. There is also important loading
information for off-road driving in
this manual. See
“Loading the
Vehicle for Off-Road Driving“
under Off-Road Driving 0201.
Two-Tiered Loading
Depending on the model of the
pickup, an upper load platform
can be created by positioning
three or four 5 cm (2 in) by
15 cm (6 in) wooden planks
across the width of the pickup
box. The planks must be
inserted in the pickup box
depressions.
When using this upper load
platform, be sure the load is
securely tied down to prevent it
from shifting. The load's center
of gravity should be positioned
in a zone over the rear axle. The
zone is located in the area
between the front of each wheel
well and the rear of each wheel well. The center of gravity height
must not extend above the top
of the pickup box flareboard.
Any load that extends beyond
the vehicle's taillamp area must
be properly marked according to
local laws and regulations.
Remember not to exceed the
Gross Axle Weight
Rating (GAWR) of the front or
rear axle.
Add-On Equipment
When carrying removable items,
a limit on how many people
carried inside the vehicle may
be necessary. Be sure to weigh
the vehicle before buying and
installing the new equipment.
Page 358 of 474

Chevrolet Silverado Owner Manual (GMNA-Localizing-U.S./Canada/Mexico-
1500-11698642) - 2019 - CRC - 2/20/19
Vehicle Care 357
The vehicle may not be equipped
with all of the fuses, relays, and
features shown.Fuses Usage
F1 Right doors
F2 Left doors
F3 Universal remote system
F4 –
F5 –
F6 Front blower
F8 Lumbar switch
F10 Body control module 6/Body control
module 7
F11 Seat/CLM
F12 Body control module 3/Body control
module 5
F14 Mirrors/Windows module
F17 Steering wheel controls
F18 VPM/OBS DET Fuses Usage
F19 DLIS
F20 Cooled seats
F21 NOT R/C
F22 Heated steering wheel
F23 MISC R/C
F24 Instrument panel cluster ignition/
Overhead
F25 Heating, ventilation, and air conditioning
ignition/Heating,
ventilation, and air
conditioning auxiliary
F26 USB ports/Special equipment option
retained accessory
power
F27 Accessory power outlet/retained
accessory power
F28 Accessory power outlet/Battery Fuses Usage
F30 Sensing and diagnostic module/
Parking brake
F31 Body control module 4
F32 Special equipment option/Data link
connection
F33 Body control module 8
F34 Cargo lamp
F40 CGM
F41 Infotainment 1
F42 TCP
F43 –
F44 AVM
F45 Body control module 2
F46 Heating, ventilation, and air conditioning/
Battery 1
F47 Instrument panel cluster/Battery
F48 Transmission control module
Page 360 of 474

Chevrolet Silverado Owner Manual (GMNA-Localizing-U.S./Canada/Mexico-
1500-11698642) - 2019 - CRC - 2/20/19
Vehicle Care 359
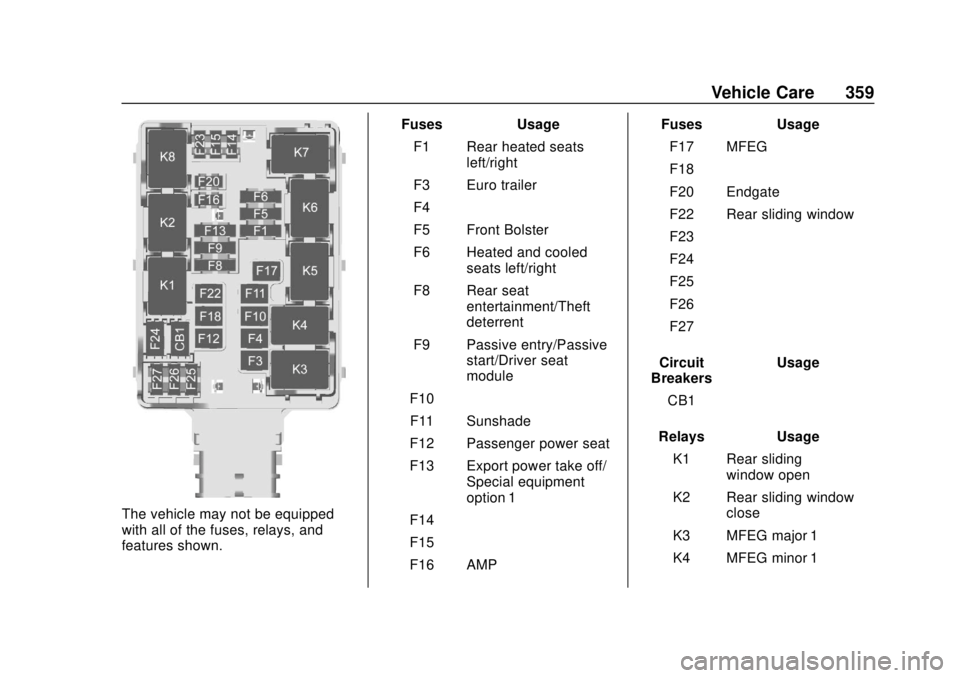
The vehicle may not be equipped
with all of the fuses, relays, and
features shown.Fuses Usage
F1 Rear heated seats left/right
F3 Euro trailer
F4 –
F5 Front Bolster
F6 Heated and cooled seats left/right
F8 Rear seat entertainment/Theft
deterrent
F9 Passive entry/Passive start/Driver seat
module
F10 –
F11 Sunshade
F12 Passenger power seat
F13 Export power take off/ Special equipment
option 1
F14 –
F15 –
F16 AMP Fuses Usage
F17 MFEG
F18 –
F20 Endgate
F22 Rear sliding window
F23 –
F24 –
F25 –
F26 –
F27 –
Circuit
Breakers Usage
CB1 –
Relays Usage K1 Rear sliding window open
K2 Rear sliding window close
K3 MFEG major 1
K4 MFEG minor 1
Page 367 of 474

Chevrolet Silverado Owner Manual (GMNA-Localizing-U.S./Canada/Mexico-
1500-11698642) - 2019 - CRC - 2/20/19
366 Vehicle Care
(2) Tire Width:The three-digit
number indicates the tire section
width in millimeters from
sidewall to sidewall.
(3) Aspect Ratio
:A two-digit
number that indicates the tire
height-to-width measurements.
For example, if the tire size
aspect ratio is 75, as shown in
item 3 of the light truck
(LT-Metric) tire illustration, it
would mean that the tire's
sidewall is 75 percent as high as
it is wide.
(4) Construction Code
:A letter
code is used to indicate the type
of ply construction in the tire.
The letter R means radial ply
construction; the letter D means
diagonal or bias ply
construction; and the letter B
means belted-bias ply
construction.
(5) Rim Diameter
:Diameter of
the wheel in inches.
(6) Load Range
:Load Range. (7) Service Description
:The
service description indicates the
load index and speed rating of a
tire. If two numbers are given as
in the example, 120/116, then
this represents the load index for
single versus dual wheel usage
(single/dual). The speed rating is
the maximum speed a tire is
certified to carry a load.
Tire Terminology and
Definitions
Air Pressure:The amount of
air inside the tire pressing
outward on each square inch of
the tire. Air pressure is
expressed in kPa (kilopascal)
or psi (pounds per square inch).
Accessory Weight
:The
combined weight of optional
accessories. Some examples of
optional accessories are
automatic transmission, power
windows, power seats, and air
conditioning. Aspect Ratio
:The relationship
of a tire's height to its width.
Belt
:A rubber coated layer of
cords between the plies and the
tread. Cords may be made from
steel or other reinforcing
materials.
Bead
:The tire bead contains
steel wires wrapped by steel
cords that hold the tire onto
the rim.
Bias Ply Tire
:A pneumatic tire
in which the plies are laid at
alternate angles less than
90 degrees to the centerline of
the tread.
Cold Tire Pressure
:The
amount of air pressure in a tire,
measured in kPa (kilopascal)
or psi (pounds per square inch)
before a tire has built up heat
from driving. See Tire Pressure
0 369.
Page 388 of 474

Chevrolet Silverado Owner Manual (GMNA-Localizing-U.S./Canada/Mexico-
1500-11698642) - 2019 - CRC - 2/20/19
Vehicle Care 387
Tire Changing
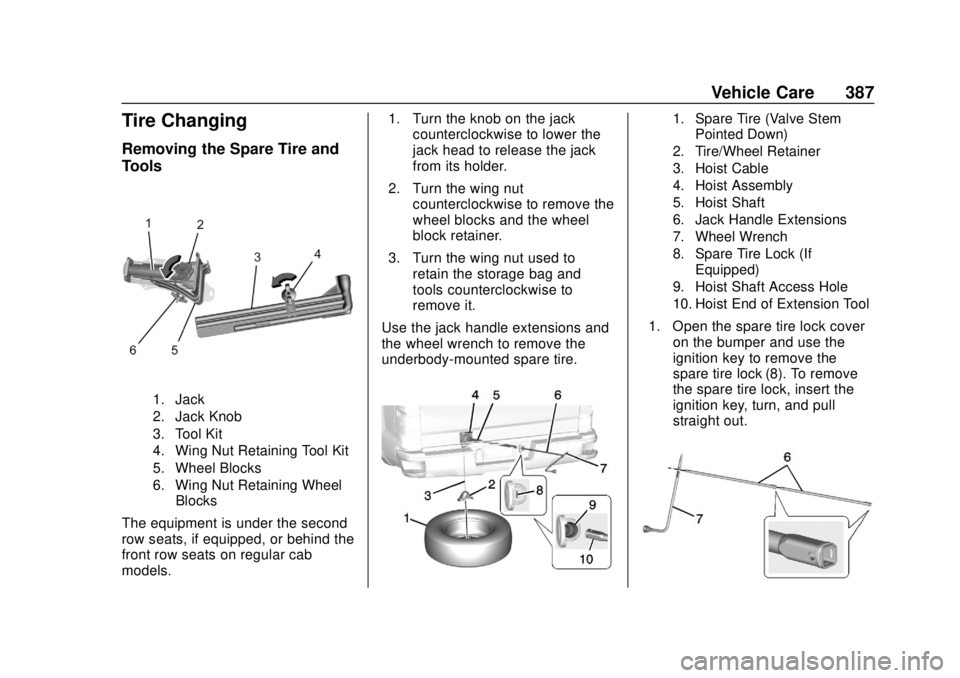
Removing the Spare Tire and
Tools
1. Jack
2. Jack Knob
3. Tool Kit
4. Wing Nut Retaining Tool Kit
5. Wheel Blocks
6. Wing Nut Retaining WheelBlocks
The equipment is under the second
row seats, if equipped, or behind the
front row seats on regular cab
models. 1. Turn the knob on the jack
counterclockwise to lower the
jack head to release the jack
from its holder.
2. Turn the wing nut counterclockwise to remove the
wheel blocks and the wheel
block retainer.
3. Turn the wing nut used to retain the storage bag and
tools counterclockwise to
remove it.
Use the jack handle extensions and
the wheel wrench to remove the
underbody-mounted spare tire.
1. Spare Tire (Valve Stem Pointed Down)
2. Tire/Wheel Retainer
3. Hoist Cable
4. Hoist Assembly
5. Hoist Shaft
6. Jack Handle Extensions
7. Wheel Wrench
8. Spare Tire Lock (If Equipped)
9. Hoist Shaft Access Hole
10. Hoist End of Extension Tool
1. Open the spare tire lock cover on the bumper and use the
ignition key to remove the
spare tire lock (8). To remove
the spare tire lock, insert the
ignition key, turn, and pull
straight out.