2019 CHEVROLET SILVERADO open hood
[x] Cancel search: open hoodPage 55 of 474

Chevrolet Silverado Owner Manual (GMNA-Localizing-U.S./Canada/Mexico-
1500-11698642) - 2019 - CRC - 2/20/19
54 Keys, Doors, and Windows
Fast Flash :Vehicle is unsecured.
A door or the hood is open.
Slow Flash : Alarm system is
armed.
Arming the Alarm System
1. Turn off the vehicle.
2. Lock the vehicle in one of two ways:
.Use the RKE transmitter.
. With a door open, press
Q
on the interior of the door.
3. After 30 seconds, the alarm system will arm and the
indicator light will begin to
slowly flash. Pressing
Qon the
RKE transmitter a second time
will bypass the 30-second
delay and immediately arm the
alarm system.
The vehicle alarm system will not
arm if the doors are locked with
the key.
If the driver door is opened without
first unlocking with the RKE
transmitter, the horn will chirp and the lights will flash to indicate
pre-alarm. If the vehicle is not
started, or the door is not unlocked
by pressing
Kon the RKE
transmitter during the 10-second
pre-alarm, the alarm will be
activated.
The alarm will also be activated if a
passenger door or the hood is
opened without first disarming the
system. When the alarm is
activated, the turn signals flash and
the horn sounds for about
30 seconds. The alarm system will
then re-arm to monitor for the next
unauthorized event.
Disarming the Alarm System
To disarm the alarm system or turn
off the alarm if it has been activated:
. Press
Kon the RKE transmitter.
. Start the vehicle.
To avoid setting off the alarm by
mistake:
. Lock the vehicle after all
occupants have exited. .
Always unlock a door with the
RKE transmitter.
Unlocking the driver door with
the key will not disarm the
system or turn off the alarm.
How to Detect a Tamper
Condition
IfKis pressed on the RKE
transmitter and the horn chirps three
times, an alarm occurred previously
while the alarm system was armed.
If the alarm has been activated, a
message will appear on the DIC.
Immobilizer
See Radio Frequency Statement
0 445.
Immobilizer Operation
Page 197 of 474

Chevrolet Silverado Owner Manual (GMNA-Localizing-U.S./Canada/Mexico-
1500-11698642) - 2019 - CRC - 2/20/19
196 Climate Controls
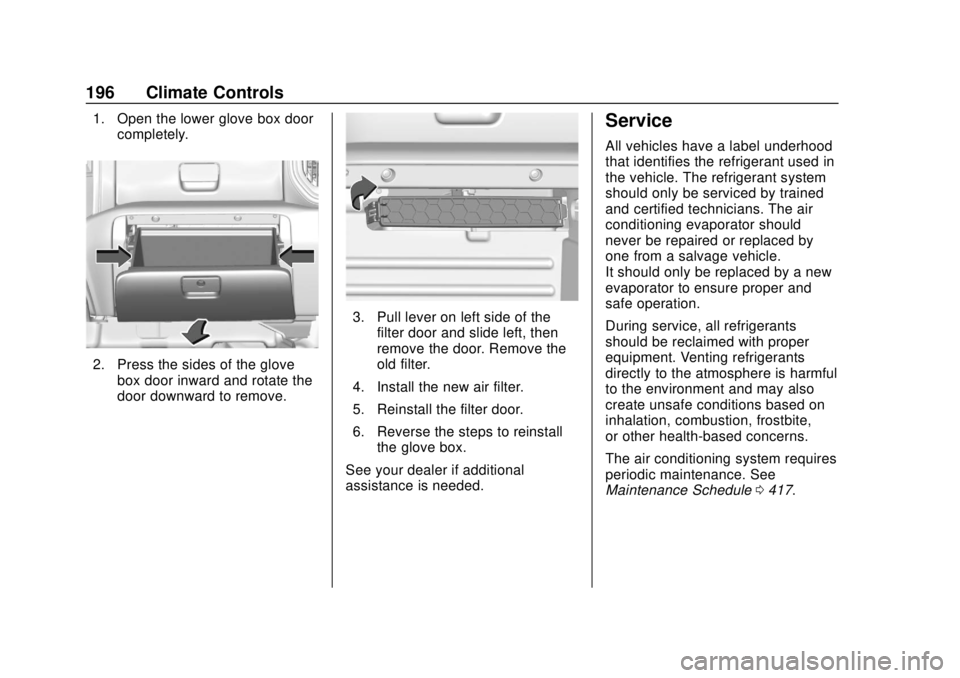
1. Open the lower glove box doorcompletely.
2. Press the sides of the glovebox door inward and rotate the
door downward to remove.
3. Pull lever on left side of the
filter door and slide left, then
remove the door. Remove the
old filter.
4. Install the new air filter.
5. Reinstall the filter door.
6. Reverse the steps to reinstall the glove box.
See your dealer if additional
assistance is needed.
Service
All vehicles have a label underhood
that identifies the refrigerant used in
the vehicle. The refrigerant system
should only be serviced by trained
and certified technicians. The air
conditioning evaporator should
never be repaired or replaced by
one from a salvage vehicle.
It should only be replaced by a new
evaporator to ensure proper and
safe operation.
During service, all refrigerants
should be reclaimed with proper
equipment. Venting refrigerants
directly to the atmosphere is harmful
to the environment and may also
create unsafe conditions based on
inhalation, combustion, frostbite,
or other health-based concerns.
The air conditioning system requires
periodic maintenance. See
Maintenance Schedule 0417.
Page 225 of 474

Chevrolet Silverado Owner Manual (GMNA-Localizing-U.S./Canada/Mexico-
1500-11698642) - 2019 - CRC - 2/20/19
224 Driving and Operating
.The vehicle battery has recently
been disconnected.
. Minimum vehicle speed has not
been reached since the last
Auto Stop.
. The accelerator pedal is
pressed.
. The engine or transmission is
not at the required operating
temperature.
. The outside temperature is not
in the required operating range.
. The vehicle is in any gear other
than D (Drive).
. Tow/Haul Mode or other driver
modes have been selected.
. The vehicle is on a steep hill or
grade.
. The driver door has been
opened or the driver seat belt
has been unbuckled.
. The hood has been opened.
. The Auto Stop has reached the
maximum allowed time. Auto Stop Disable Switch
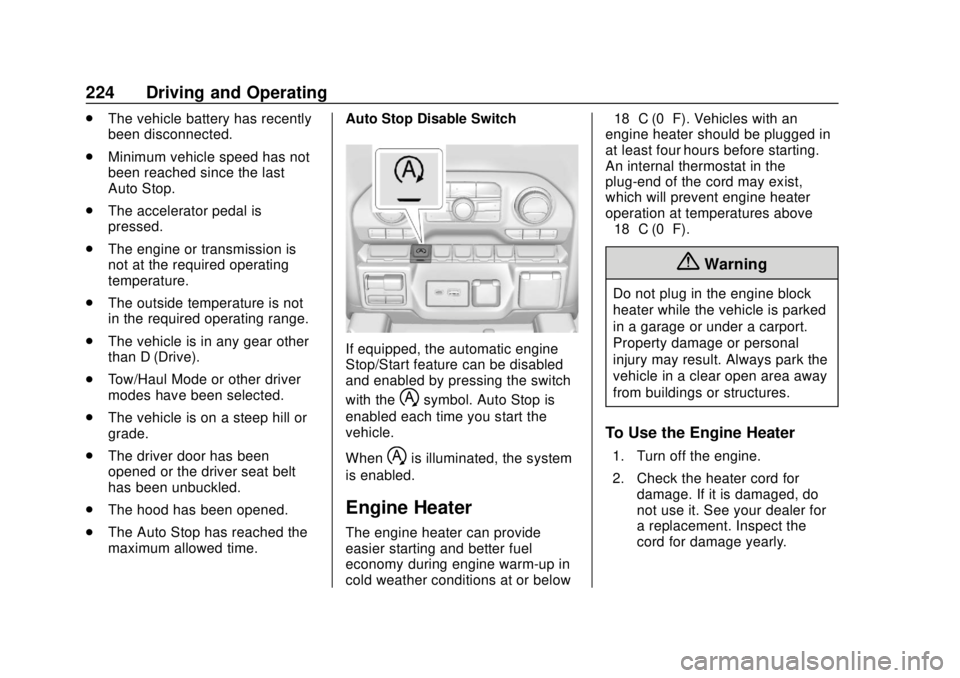
If equipped, the automatic engine
Stop/Start feature can be disabled
and enabled by pressing the switch
with the
hsymbol. Auto Stop is
enabled each time you start the
vehicle.
When
his illuminated, the system
is enabled.
Engine Heater
The engine heater can provide
easier starting and better fuel
economy during engine warm-up in
cold weather conditions at or below −18 °C (0 °F). Vehicles with an
engine heater should be plugged in
at least four hours before starting.
An internal thermostat in the
plug-end of the cord may exist,
which will prevent engine heater
operation at temperatures above
−18 °C (0 °F).
{Warning
Do not plug in the engine block
heater while the vehicle is parked
in a garage or under a carport.
Property damage or personal
injury may result. Always park the
vehicle in a clear open area away
from buildings or structures.
To Use the Engine Heater
1. Turn off the engine.
2. Check the heater cord for
damage. If it is damaged, do
not use it. See your dealer for
a replacement. Inspect the
cord for damage yearly.
Page 316 of 474

Chevrolet Silverado Owner Manual (GMNA-Localizing-U.S./Canada/Mexico-
1500-11698642) - 2019 - CRC - 2/20/19
Vehicle Care 315
Vehicle Checks
Doing Your Own
Service Work
{Warning
It can be dangerous to work on
your vehicle if you do not have
the proper knowledge, service
manual, tools, or parts. Always
follow owner’s manual procedures
and consult the service manual
for your vehicle before doing any
service work.
If doing some of your own service
work, use the proper service
manual. It tells you much more
about how to service the vehicle
than this manual can. To order the
proper service manual, see
Publication Ordering Information
0 444.
This vehicle has an airbag system.
Before attempting to do your own
service work, see Servicing the
Airbag-Equipped Vehicle 096. If equipped with remote vehicle
start, open the hood before
performing any service work to
prevent remote starting the vehicle
accidentally. See
Remote Vehicle
Start 044.
Keep a record with all parts receipts
and list the mileage and the date of
any service work performed. See
Maintenance Records 0430.
Caution
Even small amounts of
contamination can cause damage
to vehicle systems. Do not allow
contaminants to contact the fluids,
reservoir caps, or dipsticks.
Hood
{Warning
Turn the vehicle off before
opening the hood. If the vehicle is
on, the engine will start when the
hood is opened. You or others
could be injured.
{Warning
Components under the hood can
get hot from running the engine.
To help avoid the risk of burning
unprotected skin, never touch
these components until they have
cooled, and always use a glove or
towel to avoid direct skin contact.
Clear any snow from the hood
before opening.
To open the hood: 1. Pull the hood release lever with the
isymbol. It is on the
lower left side of the instrument
panel.
2. Go to the front of the vehicle and locate the secondary
release lever under the front
center of the hood. Push the
secondary hood release lever
to the right to release.
Page 317 of 474

Chevrolet Silverado Owner Manual (GMNA-Localizing-U.S./Canada/Mexico-
1500-11698642) - 2019 - CRC - 2/20/19
316 Vehicle Care
3. After you have partially liftedthe hood, the gas strut system
will automatically lift the hood
and hold it in the fully open
position.
To close the hood: 1. Before closing the hood, be sure all filler caps are on
properly, and all tools are
removed.
2. Pull the hood down until the strut system is no longer
holding up the hood.
3. Allow the hood to fall. Check to make sure the hood is latched
completely. Repeat this
process with additional force if
necessary.
{Warning
Do not drive the vehicle if the
hood is not latched completely.
The hood could open fully, block
your vision, and cause a crash.
(Continued)
Warning (Continued)
You or others could be injured.
Always close the hood completely
before driving.
The Driver Information Center (DIC)
will display a message if the hood is
not fully closed, and the vehicle is
moving. Stop and turn off the
vehicle, check the hood for
obstructions, and close the hood
again. Check to see if the message
still appears on the DIC.
Page 334 of 474

Chevrolet Silverado Owner Manual (GMNA-Localizing-U.S./Canada/Mexico-
1500-11698642) - 2019 - CRC - 2/20/19
Vehicle Care 333
The vehicle has several indicators
to warn of engine overheating.
There is a coolant temperature
gauge in the vehicle's instrument
cluster. SeeEngine Coolant
Temperature Gauge 0146.
In addition, there are ENGINE
OVERHEATED STOP ENGINE,
ENGINE OVERHEATED IDLE
ENGINE, and ENGINE POWER IS
REDUCED messages in the Driver
Information Center (DIC).
If the decision is made not to lift the
hood when this warning appears,
get service help right away. See
Roadside Assistance Program
0 439.
If the decision is made to lift the
hood, make sure the vehicle is
parked on a level surface.
2.7L L4, 4.3L V6, 5.3L V8, and 6.2L
V8 Engines
Check to see if the engine cooling
fans are running. If the engine is
overheating, the fans should be running. If they are not, do not
continue to run the engine. Have the
vehicle serviced.
If Steam is Coming from the
Engine Compartment
{Warning
Steam and scalding liquids from a
hot cooling system are under
pressure. Turning the pressure
cap, even a little, can cause them
to come out at high speed and
you could be burned. Never turn
the cap when the cooling system,
including the pressure cap, is hot.
Wait for the cooling system and
pressure cap to cool.
If No Steam is Coming from
the Engine Compartment
The ENGINE OVERHEATED STOP
ENGINE or the ENGINE
OVERHEATED IDLE ENGINE
message, along with a low coolant
condition, can indicate a serious
problem.The 2.7L L4 engine will shut down
automatically if the ENGINE
OVERHEATED STOP ENGINE
message displays.
If there is an engine overheat
warning, but no steam is seen or
heard, the problem may not be too
serious. Sometimes the engine can
get a little too hot when the vehicle:
.
Climbs a long hill on a hot day.
. Stops after high-speed driving.
. Idles for long periods in traffic.
. Tows a trailer; see Trailer Towing
0 282.
If the ENGINE OVERHEATED
STOP ENGINE or the ENGINE
OVERHEATED IDLE ENGINE
message appears with no sign of
steam, try this for a minute or so: 1. Turn the air conditioning off.
2. Turn the heater on to the highest temperature and to the
highest fan speed. Open the
windows as necessary.
Page 347 of 474

Chevrolet Silverado Owner Manual (GMNA-Localizing-U.S./Canada/Mexico-
1500-11698642) - 2019 - CRC - 2/20/19
346 Vehicle Care
Glass Replacement
If the windshield or front side glass
must be replaced, see your dealer
to determine the correct
replacement glass.
Windshield Replacement
Driver Assistance Systems
If the windshield needs to be
replaced and the vehicle is
equipped with a front camera sensor
for the Driver Assistance Systems, a
GM replacement windshield is
recommended. The replacement
windshield must be installed
according to GM specifications for
proper alignment. If it is not, these
systems may not work properly, they
may display messages, or they may
not work at all. See your dealer for
proper windshield replacement.
Gas Strut(s)
This vehicle is equipped with gas
strut(s) to provide assistance in
lifting and holding open the hood/
trunk/liftgate system in full open
position.
{Warning
If the gas struts that hold open
the hood, trunk, and/or liftgate fail,
you or others could be seriously
injured. Take the vehicle to your
dealer for service immediately.
Visually inspect the gas struts for
signs of wear, cracks, or other
damage periodically. Check to
make sure the hood/trunk/liftgate
is held open with enough force.
If struts are failing to hold the
hood/trunk/liftgate, do not
operate. Have the vehicle
serviced.
Caution
Do not apply tape or hang any
objects from gas struts. Also do
not push down or pull on gas
struts. This may cause damage to
the vehicle.
See Maintenance Schedule 0417.
Hood
Page 349 of 474

Chevrolet Silverado Owner Manual (GMNA-Localizing-U.S./Canada/Mexico-
1500-11698642) - 2019 - CRC - 2/20/19
348 Vehicle Care
LED Lighting
This vehicle has several LED lamps.
For replacement of any LED lighting
assembly, contact your dealer.
Headlamps, Front Turn
Signal, Sidemarker, and
Parking Lamps
Base Level Headlamp
Assembly
1. Sidemarker lamp
2. Low-Beam Headlamp
3. High-Beam Headlamp
4. Turn Signal/Park Lamps
Midlevel Headlamp Assembly
1. Turn Signal Lamps
Headlamp Replacement
Base Level1. Open the hood.
2. Remove the headlamp bulb cover.
3. Turn the bulb socket counterclockwise to remove it
from the headlamp assembly.
4. Unplug the electrical connector from the bulb by releasing the
clip on the connector. 5. Replace the bulb and reverse
Steps 1–4 to reinstall.
Midlevel and Uplevel
See your dealer for headlamp
replacement.
Uplevel
See your dealer for turn signal
replacement.
Turn Signal Lamp
Replacement
1. Open the hood.
2. Turn the bulb socket counterclockwise to remove it
from the headlamp assembly
and pull it straight out.
3. Remove the bulb by pulling it straight out of the bulb socket.
4. Replace the bulb and reverse Steps 1–3 to reinstall.