2019 CHEVROLET SILVERADO front bumper
[x] Cancel search: front bumperPage 98 of 474

Chevrolet Silverado Owner Manual (GMNA-Localizing-U.S./Canada/Mexico-
1500-11698642) - 2019 - CRC - 2/20/19
Seats and Restraints 97
Warning (Continued)
are close to an airbag when it
inflates. Avoid yellow connectors.
They are probably part of the
airbag system. Be sure to follow
proper service procedures, and
make sure the person performing
work for you is qualified to do so.
Adding Equipment to the
Airbag-Equipped Vehicle
Adding accessories that change the
vehicle's frame, bumper system,
height, front end, or side sheet
metal, may keep the airbag system
from working properly.
The operation of the airbag system
can also be affected by changing,
including improperly repairing or
replacing, any parts of the following:
.Airbag system, including airbag
modules, front or side impact
sensors, sensing and diagnostic
module, or airbag wiring .
Front seats, including stitching,
seams, or zippers
. Seat belts
. Steering wheel, instrument
panel, overhead console, ceiling
trim, or pillar garnish trim
. Inner door seals, including
speakers
Your dealer and the service manual
have information about the location
of the airbag modules and sensors,
sensing and diagnostic module, and
airbag wiring along with the proper
replacement procedures.
In addition, the vehicle has a
passenger sensing system for the
front outboard passenger position,
which includes sensors that are part
of the passenger seat. The
passenger sensing system may not
operate properly if the original seat
trim is replaced with non-GM
covers, upholstery, or trim; or with
GM covers, upholstery, or trim
designed for a different vehicle. Any
object, such as an aftermarket seat
heater or a comfort-enhancing pad
or device, installed under or on top of the seat fabric, could also
interfere with the operation of the
passenger sensing system. This
could either prevent proper
deployment of the passenger
airbag(s) or prevent the passenger
sensing system from properly
turning off the passenger airbag(s).
See
Passenger Sensing System
0 92.
If the vehicle has rollover roof-rail
airbags, see Different Size Tires
and Wheels 0381 for additional
important information.
If a snow plow is added to the
vehicle, the airbags should still work
properly. The airbag systems were
designed to work properly under a
wide range of conditions, including
snow plowing with vehicles that
have the optional snow plow prep
package (RPO VYU). Do not
change or defeat the snow plow's
“tripping mechanism.” If you do, it
can damage the snow plow and the
vehicle, and may cause an airbag
deployment.
Page 226 of 474

Chevrolet Silverado Owner Manual (GMNA-Localizing-U.S./Canada/Mexico-
1500-11698642) - 2019 - CRC - 2/20/19
Driving and Operating 225
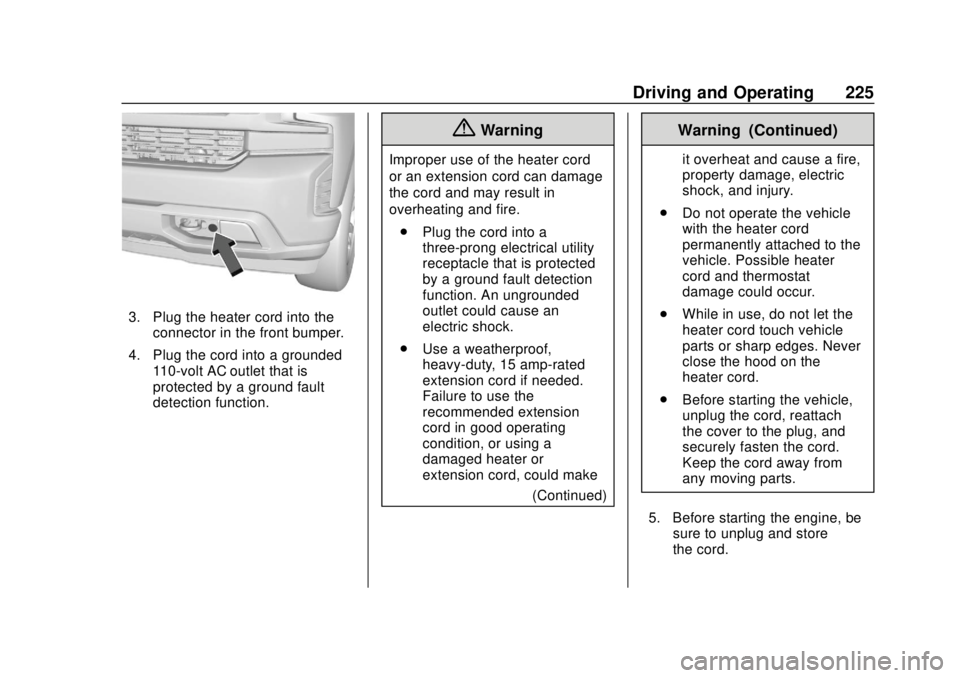
3. Plug the heater cord into theconnector in the front bumper.
4. Plug the cord into a grounded 110-volt AC outlet that is
protected by a ground fault
detection function.
{Warning
Improper use of the heater cord
or an extension cord can damage
the cord and may result in
overheating and fire.
. Plug the cord into a
three-prong electrical utility
receptacle that is protected
by a ground fault detection
function. An ungrounded
outlet could cause an
electric shock.
. Use a weatherproof,
heavy-duty, 15 amp-rated
extension cord if needed.
Failure to use the
recommended extension
cord in good operating
condition, or using a
damaged heater or
extension cord, could make
(Continued)
Warning (Continued)
it overheat and cause a fire,
property damage, electric
shock, and injury.
. Do not operate the vehicle
with the heater cord
permanently attached to the
vehicle. Possible heater
cord and thermostat
damage could occur.
. While in use, do not let the
heater cord touch vehicle
parts or sharp edges. Never
close the hood on the
heater cord.
. Before starting the vehicle,
unplug the cord, reattach
the cover to the plug, and
securely fasten the cord.
Keep the cord away from
any moving parts.
5. Before starting the engine, be sure to unplug and store
the cord.
Page 256 of 474

Chevrolet Silverado Owner Manual (GMNA-Localizing-U.S./Canada/Mexico-
1500-11698642) - 2019 - CRC - 2/20/19
Driving and Operating 255
Information Center (DIC) messages
may display when the systems are
unavailable or blocked..Front and rear bumpers and the
area below the bumpers
. Front grille and headlamps
. Front camera lens in the front
grille or near the front emblem
. Front side and rear side panels
. Outside of the windshield in front
of the rearview mirror
. Side camera lens on the bottom
of the outside mirrors
. Rear side corner bumpers
. Rear Vision Camera in the
tailgate handle
Assistance Systems for
Parking or Backing
If equipped, the Rear Vision Camera
(RVC), Surround Vision, Rear Park
Assist (RPA), Front Park Assist
(FPA), and Rear Cross Traffic Alert
(RCTA) may help the driver park or
avoid objects. Always check around
the vehicle when parking or
backing. The RVC, RPA, and Surround
Vision will not work properly if the
tailgate is down. If the tailgate is
down, do not use these systems.
Rear Vision Camera (RVC)
When the vehicle is shifted into
R (Reverse), the RVC displays an
image of the area behind the vehicle
in the infotainment display. The
previous screen displays when the
vehicle is shifted out of R (Reverse)
after a short delay. To return to the
previous screen sooner, press any
button on the infotainment system,
shift into P (Park), or, while in D
(Drive), reach a vehicle speed of
approximately 12 km/h (8 mph). The
rear vision camera is in the tailgate
handle.
Page 257 of 474

Chevrolet Silverado Owner Manual (GMNA-Localizing-U.S./Canada/Mexico-
1500-11698642) - 2019 - CRC - 2/20/19
256 Driving and Operating
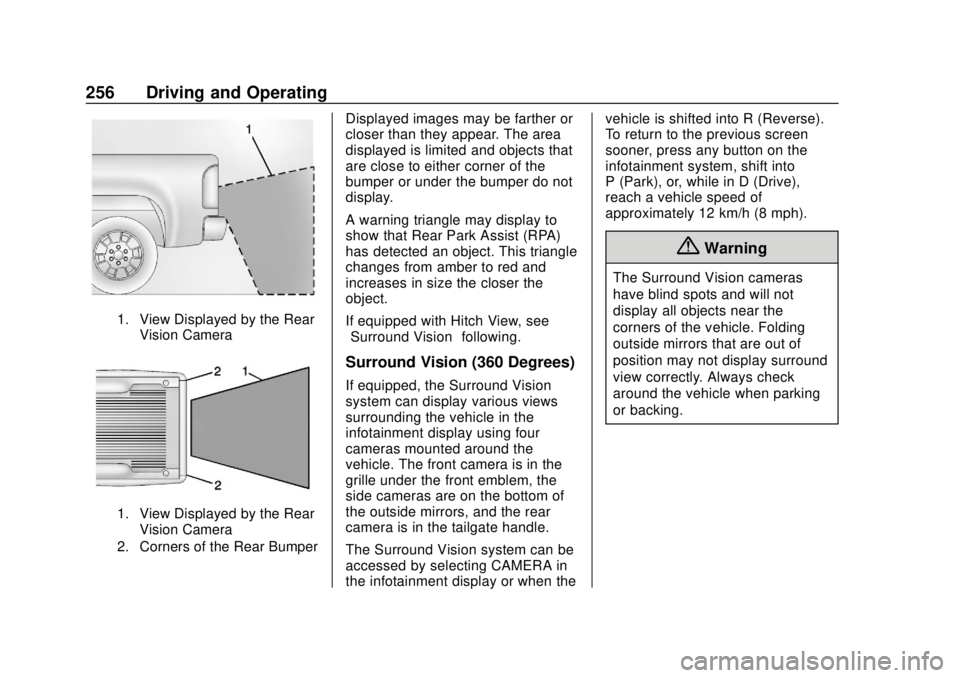
1. View Displayed by the RearVision Camera
1. View Displayed by the RearVision Camera
2. Corners of the Rear Bumper
Displayed images may be farther or
closer than they appear. The area
displayed is limited and objects that
are close to either corner of the
bumper or under the bumper do not
display.
A warning triangle may display to
show that Rear Park Assist (RPA)
has detected an object. This triangle
changes from amber to red and
increases in size the closer the
object.
If equipped with Hitch View, see
“Surround Vision” following.
Surround Vision (360 Degrees)
If equipped, the Surround Vision
system can display various views
surrounding the vehicle in the
infotainment display using four
cameras mounted around the
vehicle. The front camera is in the
grille under the front emblem, the
side cameras are on the bottom of
the outside mirrors, and the rear
camera is in the tailgate handle.
The Surround Vision system can be
accessed by selecting CAMERA in
the infotainment display or when the vehicle is shifted into R (Reverse).
To return to the previous screen
sooner, press any button on the
infotainment system, shift into
P (Park), or, while in D (Drive),
reach a vehicle speed of
approximately 12 km/h (8 mph).
{Warning
The Surround Vision cameras
have blind spots and will not
display all objects near the
corners of the vehicle. Folding
outside mirrors that are out of
position may not display surround
view correctly. Always check
around the vehicle when parking
or backing.
Page 258 of 474

Chevrolet Silverado Owner Manual (GMNA-Localizing-U.S./Canada/Mexico-
1500-11698642) - 2019 - CRC - 2/20/19
Driving and Operating 257
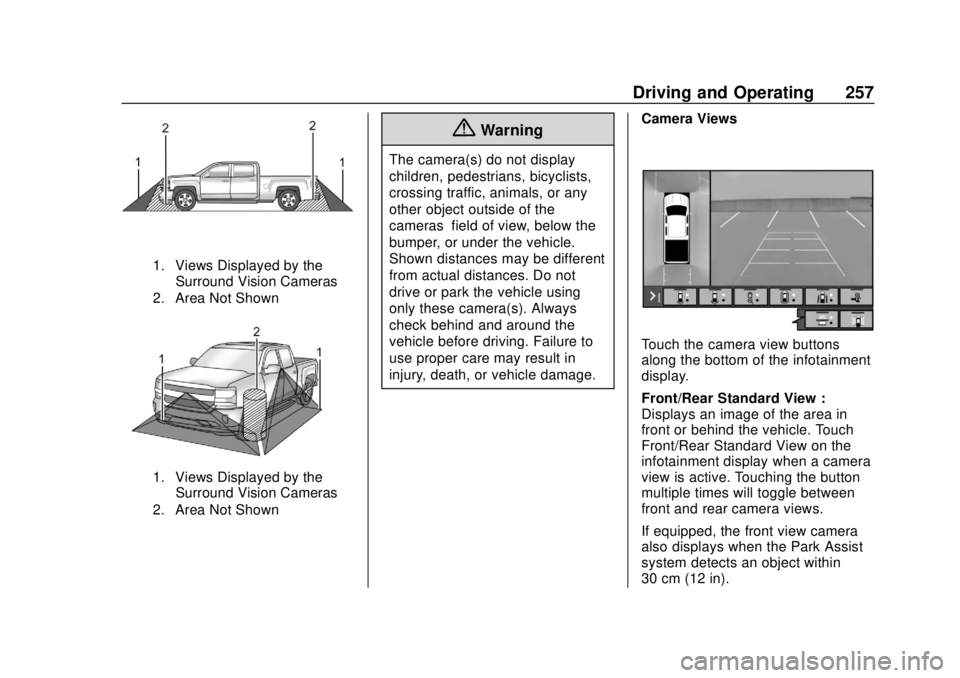
1. Views Displayed by theSurround Vision Cameras
2. Area Not Shown
1. Views Displayed by the Surround Vision Cameras
2. Area Not Shown
{Warning
The camera(s) do not display
children, pedestrians, bicyclists,
crossing traffic, animals, or any
other object outside of the
cameras’ field of view, below the
bumper, or under the vehicle.
Shown distances may be different
from actual distances. Do not
drive or park the vehicle using
only these camera(s). Always
check behind and around the
vehicle before driving. Failure to
use proper care may result in
injury, death, or vehicle damage. Camera Views
Touch the camera view buttons
along the bottom of the infotainment
display.
Front/Rear Standard View :
Displays an image of the area in
front or behind the vehicle. Touch
Front/Rear Standard View on the
infotainment display when a camera
view is active. Touching the button
multiple times will toggle between
front and rear camera views.
If equipped, the front view camera
also displays when the Park Assist
system detects an object within
30 cm (12 in).
Page 261 of 474

Chevrolet Silverado Owner Manual (GMNA-Localizing-U.S./Canada/Mexico-
1500-11698642) - 2019 - CRC - 2/20/19
260 Driving and Operating
Park Assist
With Front and Rear Park Assist, as
the vehicle moves at speeds of less
than 8 km/h (5 mph) the sensors on
the bumpers may detect objects up
to 1.2 m (4 ft) in front and 2.5 m (8 ft)
behind the vehicle within a zone
25 cm (10 in) high off the ground
and below bumper level. These
detection distances may be shorter
during warmer or humid weather.
Blocked sensors will not detect
objects and can also cause false
detections. Keep the sensors clean
of mud, dirt, snow, ice, and slush;
and clean sensors after a car wash
in freezing temperatures.
{Warning
The Park Assist system does not
detect children, pedestrians,
bicyclists, animals, or objects
located below the bumper or that
are too close or too far from the
vehicle. It is not available at
speeds greater than 8 km/h(Continued)
Warning (Continued)
(5 mph). To prevent injury, death,
or vehicle damage, even with
Park Assist, always check the
area around the vehicle and
check all mirrors before moving
forward or backing.
The instrument cluster may have a
Park Assist display with bars that
show“distance to object” and object
location information for the Front
and Rear Park Assist system. As
the object gets closer, more bars
light up and the bars change color
from yellow to amber to red. When an object is first detected in
the rear, one beep will be heard
from the rear, or both sides of the
Safety Alert Seat will pulse two
times. When an object is very close
(<0.4 m (1.5 ft) in the vehicle rear or
<0.3 m (1 ft) in the vehicle front), a
continuous beep will sound from the
rear or front depending on object
location, or both sides of the Safety
Alert Seat will pulse five times.
Beeps for FPA are higher pitched
than for RPA.
Rear Cross Traffic Alert (RCTA)
If equipped, when the vehicle is
shifted into R (Reverse), RCTA
shows a red warning triangle with a
left or right pointing arrow on the
infotainment display to warn of
traffic coming from the left or right.
This system detects objects coming
from up to 20 m (65 ft) from the left
or right side of the vehicle. When an
object is detected, either three
beeps sound from the left or right or
three Safety Alert Seat pulses occur
on the left or right side, depending
on the direction of the detected
vehicle.
Page 285 of 474

Chevrolet Silverado Owner Manual (GMNA-Localizing-U.S./Canada/Mexico-
1500-11698642) - 2019 - CRC - 2/20/19
284 Driving and Operating
The gross combined weight can
also be confirmed by weighing the
truck and trailer on a public scale.
The truck and trailer should be
loaded for the trip with passengers
and cargo.
Gross Vehicle Weight
Rating (GVWR)
For information about the vehicle's
maximum load capacity, seeVehicle
Load Limits 0210. When calculating
the GVWR with a trailer attached,
the trailer tongue weight must be
included as part of the weight the
vehicle is carrying.
Maximum Trailer Weight
The maximum trailer weight rating is
calculated assuming the tow vehicle
has a driver, a front seat passenger,
and all required trailering
equipment. This value represents
the heaviest trailer the vehicle can
tow, but it may be necessary to
reduce the trailer weight to stay
within the GCWR, GVWR, maximum
trailer tongue load, or GAWR-RR for
the vehicle.
Use the Tow Rating Guide
(my.chevrolet.com/learn) to
determine how much the trailer can
weigh, based on the vehicle model
and options.
Weights listed apply for
conventional trailers unless
otherwise noted.
The weight of the trailer, including
the trailer and all cargo in the trailer,
cannot exceed the maximum trailer
weight rating for the vehicle. The
allowable trailer weight might be
reduced by the weight of the vehicle
options, accessories, passengers, or cargo in the tow vehicle. To
determine the maximum trailer
weight rating:
1. Find the Gross Combined Weight Rating for the vehicle
as shown on the Trailering
Information Label.
2. Subtract the following: .Vehicle curb weight as
shown on the Trailering
Information Label
. Weight of the driver and
passengers
. Weight of cargo in the tow
vehicle
. Hitch hardware weight
including the draw bar, and
equalizer bars
. Weight of accessories
added to the vehicle
A step bumper trailer hitch can only
support a total trailer weight up to
2,271 kg (5,000 lb). If a trailer hitch
ball is added to the step bumper,
check the hitch ball rating to be sure
it is higher than the total trailer
weight.
Page 289 of 474

Chevrolet Silverado Owner Manual (GMNA-Localizing-U.S./Canada/Mexico-
1500-11698642) - 2019 - CRC - 2/20/19
288 Driving and Operating
Weight-Distributing Hitch and Adjustment
A weight-distributing hitch may be useful with some trailers. Use the following guidelines to determine if a
weight-distributing hitch should be used.Vehicle Series Trailer Weight Weight-Distributing Hitch
Usage Hitch Distribution
1500 Up to 3 175 kg (7,000 lb) OptionalRefer to trailer
manufacturer ’s
recommendation
1500 Over 3 175 kg (7,000 lb) Required50%
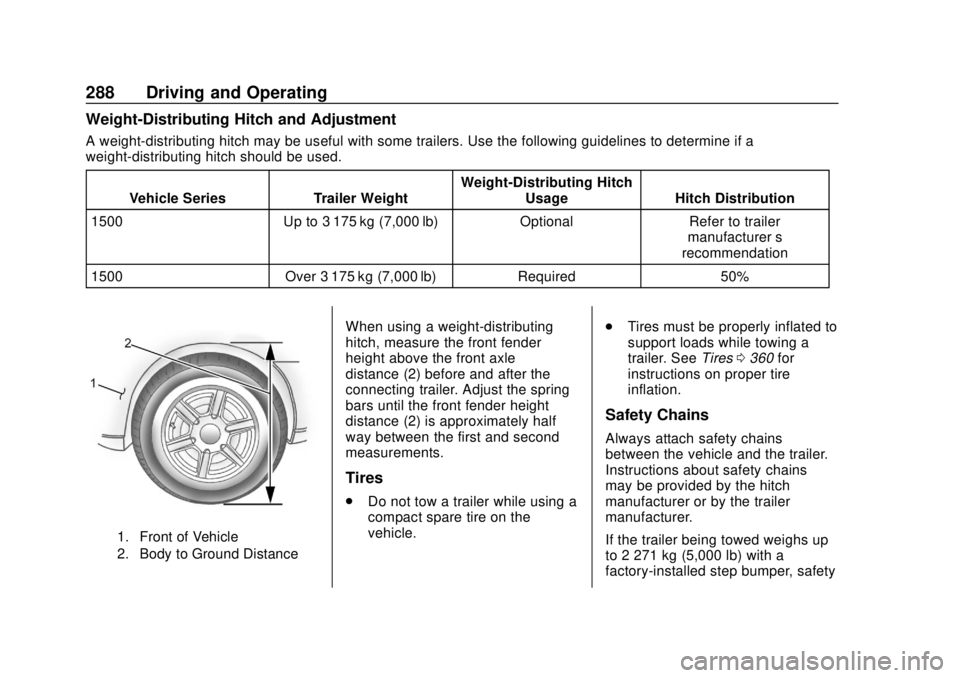
1. Front of Vehicle
2. Body to Ground Distance
When using a weight-distributing
hitch, measure the front fender
height above the front axle
distance (2) before and after the
connecting trailer. Adjust the spring
bars until the front fender height
distance (2) is approximately half
way between the first and second
measurements.
Tires
.
Do not tow a trailer while using a
compact spare tire on the
vehicle. .
Tires must be properly inflated to
support loads while towing a
trailer. See Tires0360 for
instructions on proper tire
inflation.
Safety Chains
Always attach safety chains
between the vehicle and the trailer.
Instructions about safety chains
may be provided by the hitch
manufacturer or by the trailer
manufacturer.
If the trailer being towed weighs up
to 2 271 kg (5,000 lb) with a
factory-installed step bumper, safety