2019 CHEVROLET SILVERADO 3500 spare wheel
[x] Cancel search: spare wheelPage 404 of 489
Chevrolet Silverado LD 1500 and Silverado 2500/3500 Owner Manual (GMNA-
Localizing-U.S./Canada-12162993) - 2019 - crc - 4/4/18
Vehicle Care 403
{Warning
Wheel nuts that are improperly or
incorrectly tightened can cause
the wheels to become loose or
come off. The wheel nuts should
be tightened with a torque wrench
to the proper torque specification
after replacing. Follow the torque
specification supplied by the
aftermarket manufacturer when
using accessory locking wheel
nuts. SeeCapacities and
Specifications 0446 for original
equipment wheel nut torque
specifications.
Caution
Improperly tightened wheel nuts
can lead to brake pulsation and
rotor damage. To avoid expensive
brake repairs, evenly tighten the
wheel nuts in the proper
sequence and to the proper
(Continued)
Caution (Continued)
torque specification. See
Capacities and Specifications
0446 for the wheel nut torque
specification.
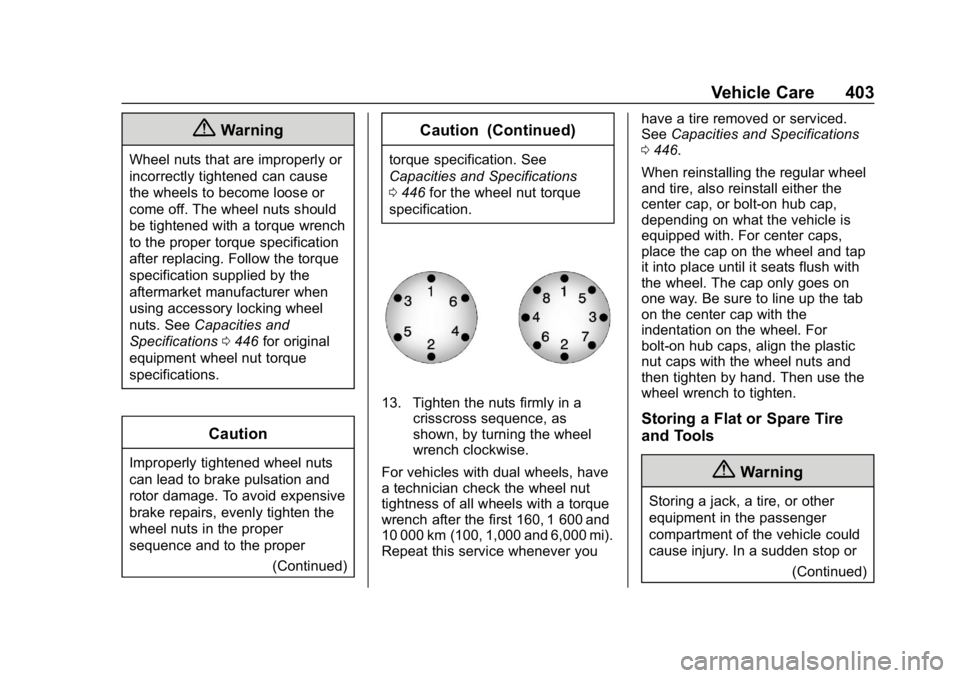
13. Tighten the nuts firmly in a crisscross sequence, as
shown, by turning the wheel
wrench clockwise.
For vehicles with dual wheels, have
a technician check the wheel nut
tightness of all wheels with a torque
wrench after the first 160, 1 600 and
10 000 km (100, 1,000 and 6,000 mi).
Repeat this service whenever you have a tire removed or serviced.
See
Capacities and Specifications
0 446.
When reinstalling the regular wheel
and tire, also reinstall either the
center cap, or bolt-on hub cap,
depending on what the vehicle is
equipped with. For center caps,
place the cap on the wheel and tap
it into place until it seats flush with
the wheel. The cap only goes on
one way. Be sure to line up the tab
on the center cap with the
indentation on the wheel. For
bolt-on hub caps, align the plastic
nut caps with the wheel nuts and
then tighten by hand. Then use the
wheel wrench to tighten.
Storing a Flat or Spare Tire
and Tools
{Warning
Storing a jack, a tire, or other
equipment in the passenger
compartment of the vehicle could
cause injury. In a sudden stop or (Continued)
Page 405 of 489
Chevrolet Silverado LD 1500 and Silverado 2500/3500 Owner Manual (GMNA-
Localizing-U.S./Canada-12162993) - 2019 - crc - 4/4/18
404 Vehicle Care
Warning (Continued)
collision, loose equipment could
strike someone. Store all these in
the proper place.
{Warning
Failure to follow these tire storage
instructions carefully could result
in personal injury or property
damage if the hoist cable fails or
if the tire comes loose. Make sure
the tire is stored securely before
driving.
Caution
Storing an aluminum wheel with a
flat tire under your vehicle for an
extended period of time or with
the valve stem pointing up can
damage the wheel. Always stow
the wheel with the valve stem(Continued)
Caution (Continued)
pointing down and have the
wheel/tire repaired as soon as
possible.
Caution
The tire hoist can be damaged if
there is no tension on the cable
when using it. To have the
necessary tension, the spare or
road tire and wheel assembly
must be installed on the tire hoist
to use it.
{Warning
An improperly stored spare tire
could come loose and cause a
crash. To avoid personal injury or
property damage, always store
the spare tire when the vehicle is
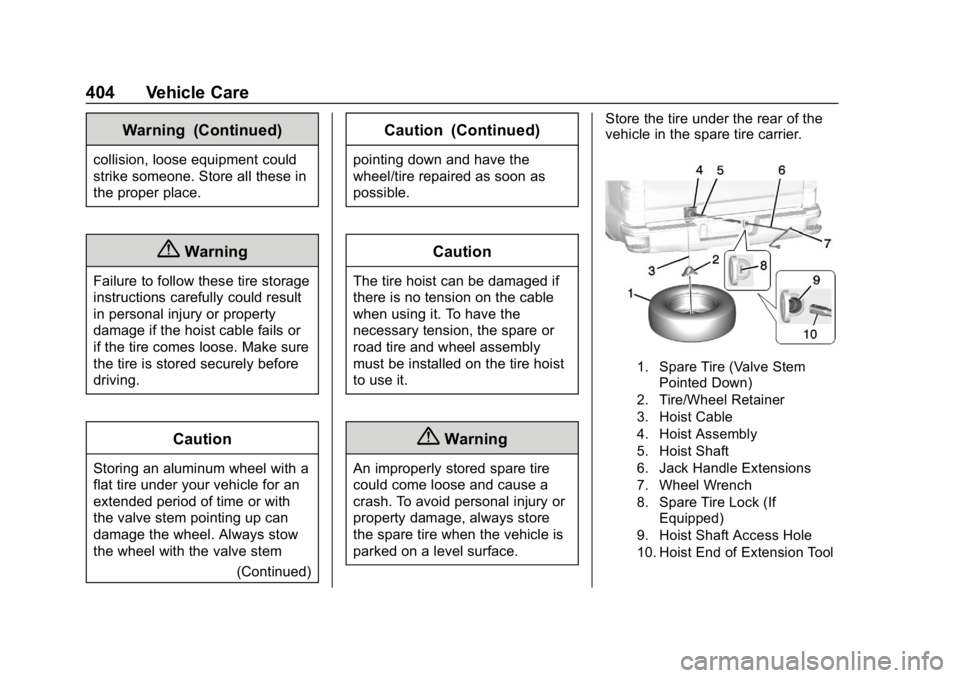
parked on a level surface. Store the tire under the rear of the
vehicle in the spare tire carrier.
1. Spare Tire (Valve Stem
Pointed Down)
2. Tire/Wheel Retainer
3. Hoist Cable
4. Hoist Assembly
5. Hoist Shaft
6. Jack Handle Extensions
7. Wheel Wrench
8. Spare Tire Lock (If Equipped)
9. Hoist Shaft Access Hole
10. Hoist End of Extension Tool
Page 406 of 489
Chevrolet Silverado LD 1500 and Silverado 2500/3500 Owner Manual (GMNA-
Localizing-U.S./Canada-12162993) - 2019 - crc - 4/4/18
Vehicle Care 405
1. Put the tire on the ground atthe rear of the vehicle with the
valve stem pointed down, and
to the rear.
2. Pull the cable and spring through the center of the
wheel. Tilt the wheel retainer
plate down and through the
center wheel.
Make sure the retainer is fully
seated across the underside of
the wheel.
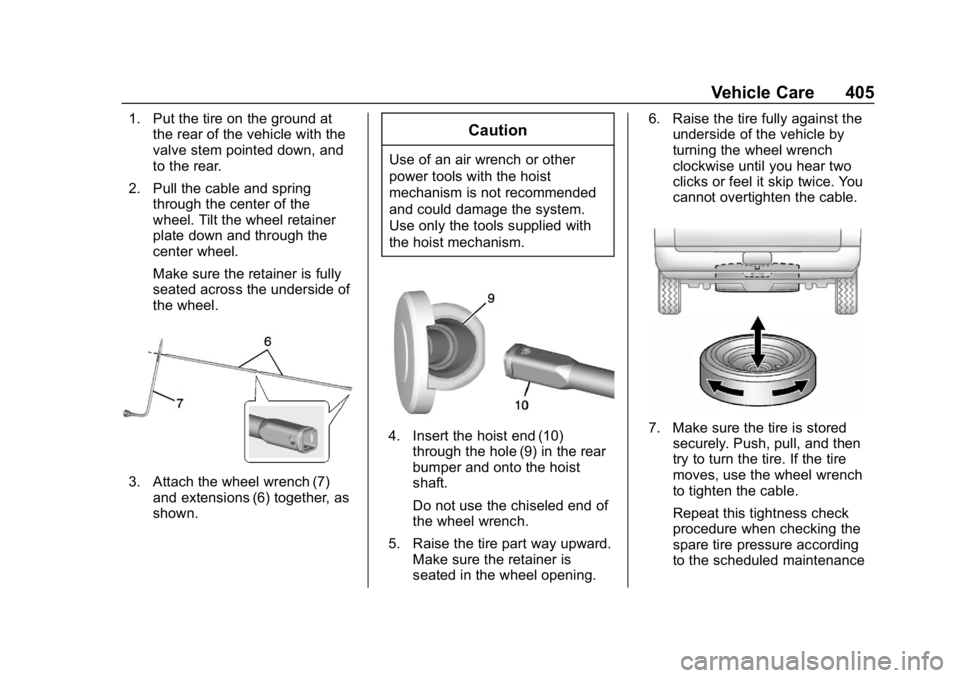
3. Attach the wheel wrench (7)
and extensions (6) together, as
shown.
Caution
Use of an air wrench or other
power tools with the hoist
mechanism is not recommended
and could damage the system.
Use only the tools supplied with
the hoist mechanism.
4. Insert the hoist end (10)through the hole (9) in the rear
bumper and onto the hoist
shaft.
Do not use the chiseled end of
the wheel wrench.
5. Raise the tire part way upward. Make sure the retainer is
seated in the wheel opening. 6. Raise the tire fully against the
underside of the vehicle by
turning the wheel wrench
clockwise until you hear two
clicks or feel it skip twice. You
cannot overtighten the cable.7. Make sure the tire is storedsecurely. Push, pull, and then
try to turn the tire. If the tire
moves, use the wheel wrench
to tighten the cable.
Repeat this tightness check
procedure when checking the
spare tire pressure according
to the scheduled maintenance
Page 407 of 489
Chevrolet Silverado LD 1500 and Silverado 2500/3500 Owner Manual (GMNA-
Localizing-U.S./Canada-12162993) - 2019 - crc - 4/4/18
406 Vehicle Care
information or any time the
spare tire is handled due to
service of other components.
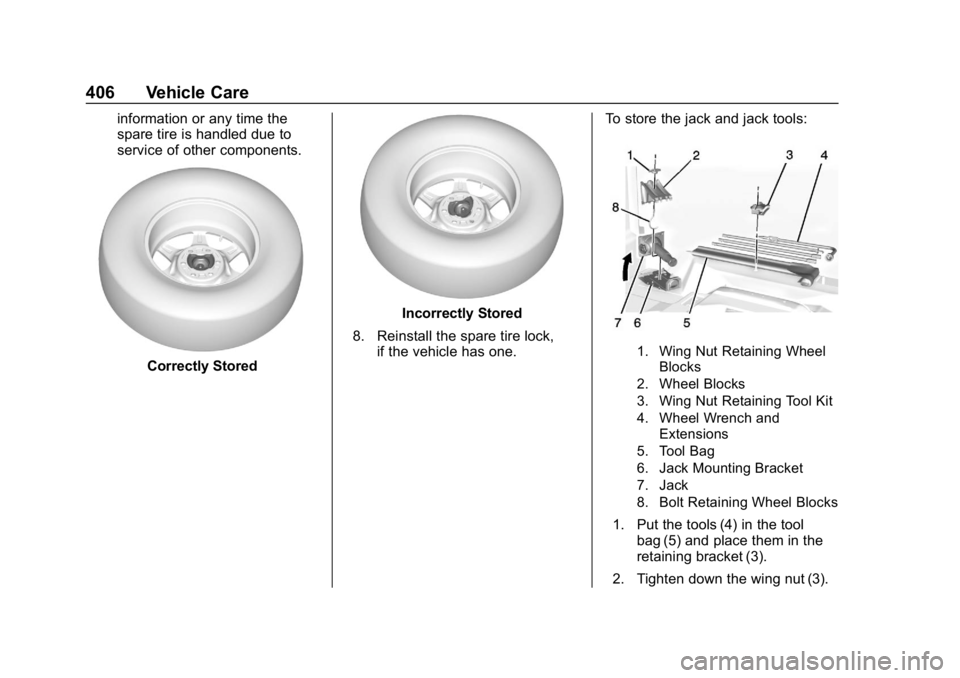
Correctly Stored
Incorrectly Stored
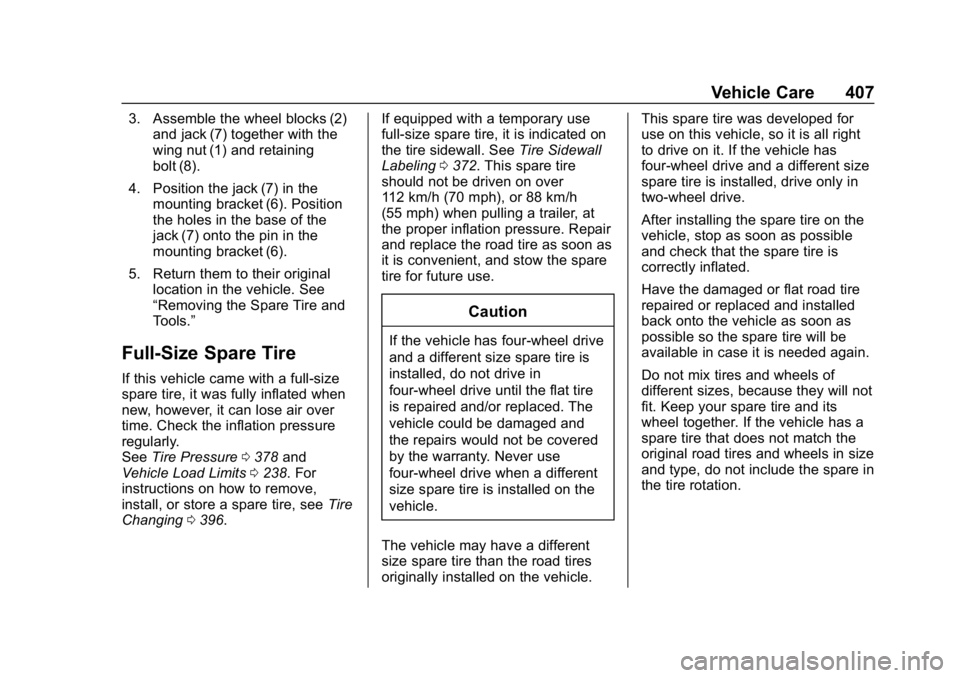
8. Reinstall the spare tire lock, if the vehicle has one. To store the jack and jack tools:
1. Wing Nut Retaining Wheel
Blocks
2. Wheel Blocks
3. Wing Nut Retaining Tool Kit
4. Wheel Wrench and Extensions
5. Tool Bag
6. Jack Mounting Bracket
7. Jack
8. Bolt Retaining Wheel Blocks
1. Put the tools (4) in the tool bag (5) and place them in the
retaining bracket (3).
2. Tighten down the wing nut (3).
Page 408 of 489
Chevrolet Silverado LD 1500 and Silverado 2500/3500 Owner Manual (GMNA-
Localizing-U.S./Canada-12162993) - 2019 - crc - 4/4/18
Vehicle Care 407
3. Assemble the wheel blocks (2)and jack (7) together with the
wing nut (1) and retaining
bolt (8).
4. Position the jack (7) in the mounting bracket (6). Position
the holes in the base of the
jack (7) onto the pin in the
mounting bracket (6).
5. Return them to their original location in the vehicle. See
“Removing the Spare Tire and
Tools.”
Full-Size Spare Tire
If this vehicle came with a full-size
spare tire, it was fully inflated when
new, however, it can lose air over
time. Check the inflation pressure
regularly.
See Tire Pressure 0378 and
Vehicle Load Limits 0238. For
instructions on how to remove,
install, or store a spare tire, see Tire
Changing 0396. If equipped with a temporary use
full-size spare tire, it is indicated on
the tire sidewall. See
Tire Sidewall
Labeling 0372. This spare tire
should not be driven on over
112 km/h (70 mph), or 88 km/h
(55 mph) when pulling a trailer, at
the proper inflation pressure. Repair
and replace the road tire as soon as
it is convenient, and stow the spare
tire for future use.
Caution
If the vehicle has four-wheel drive
and a different size spare tire is
installed, do not drive in
four-wheel drive until the flat tire
is repaired and/or replaced. The
vehicle could be damaged and
the repairs would not be covered
by the warranty. Never use
four-wheel drive when a different
size spare tire is installed on the
vehicle.
The vehicle may have a different
size spare tire than the road tires
originally installed on the vehicle. This spare tire was developed for
use on this vehicle, so it is all right
to drive on it. If the vehicle has
four-wheel drive and a different size
spare tire is installed, drive only in
two-wheel drive.
After installing the spare tire on the
vehicle, stop as soon as possible
and check that the spare tire is
correctly inflated.
Have the damaged or flat road tire
repaired or replaced and installed
back onto the vehicle as soon as
possible so the spare tire will be
available in case it is needed again.
Do not mix tires and wheels of
different sizes, because they will not
fit. Keep your spare tire and its
wheel together. If the vehicle has a
spare tire that does not match the
original road tires and wheels in size
and type, do not include the spare in
the tire rotation.
Page 433 of 489

Chevrolet Silverado LD 1500 and Silverado 2500/3500 Owner Manual (GMNA-
Localizing-U.S./Canada-12162993) - 2019 - crc - 4/4/18
432 Service and Maintenance
.Check accelerator pedal for
damage, high effort, or binding.
Replace if needed.
. Visually inspect gas strut for
signs of wear, cracks, or other
damage. Check the hold open
ability of the strut. If the hold
open is low, service the gas
strut. See Gas Strut(s) 0356.
. Inspect sunroof track and seal,
if equipped. See Sunroof053.
. Verify spare tire key lock
operation and lubricate as
needed. See Tire Changing
0 396.
. Visually inspect the spare tire to
ensure that it is tightly stowed
under the vehicle. Push, pull,
and try to turn the tire. If the
spare tire moves, tighten as
necessary. Verify that the wheel
retainer plate compression
spring is fully compressed. See
Tire Changing 0396.
Page 480 of 489

Chevrolet Silverado LD 1500 and Silverado 2500/3500 Owner Manual (GMNA-
Localizing-U.S./Canada-12162993) - 2019 - crc - 4/4/18
Index 479
Extender, Seat Belt . . . . . . . . . . . . . . 74
Exterior Cargo Lamps . . . . . . . . . . 177
Exterior Lamp Controls . . . . . . . . . 171
Exterior Lamps Off Reminder . . . 173
Exterior Lighting BatterySaver . . . . . . . . . . . . . . . . . . . . . . . . . 180
F
FanEngine . . . . . . . . . . . . . . . . . . . . . . . . 345
Fast Idle System . . . . . . . . . . . . . . . . 250
Features Memory . . . . . . . . . . . . . . . . . . . . . . . . . 13
Filter, Engine Air Cleaner . . . . . . . . . . . 338
Fixed Mast Antenna . . . . . . . . . . . . 189
Flash-to-Pass . . . . . . . . . . . . . . . . . . . 174
Flashers, Hazard Warning . . . . . . 175
Flat Tire . . . . . . . . . . . . . . . . . . . . . . . . 394 Changing . . . . . . . . . . . . . . . . . . . . . 396
FlexFuel
E85 . . . . . . . . . . . . . . . . . . . . . . . . . . . 291
Floor Console Storage . . . . . . . . . . 124
Floor Mats . . . . . . . . . . . . . . . . . . . . . . 426
Fluid Automatic
Transmission . . . . . . . . . . . 335, 337
Brakes . . . . . . . . . . . . . . . . . . . . . . . . 348 Fluid (cont'd)
Four-Wheel Drive
Transfer Case . . . . . . . . . . . . . . . 262
Power Steering . . . . . . . . . . . . . . . 345
Washer . . . . . . . . . . . . . . . . . . . . . . . 346
Fog Lamps . . . . . . . . . . . . . . . . . . . . . 176 Bulb Replacement . . . . . . . . . . . . 359
Folding Mirrors . . . . . . . . . . . . . . . . . . 47
Forward Automatic Braking . . . . . 285
Forward Collision Alert (FCA) System . . . . . . . . . . . . . . . . . 282
Four-Wheel Drive . . . . . . . . . . 262, 350
Four-Wheel-Drive Light . . . . . . . . . 150
Frequency Statement Radio . . . . . . . . . . . . . . . . . . . . . . . . . 459
Front Axle . . . . . . . . . . . . . . . . . . . . . . 350
Front Fog Lamp Light . . . . . . . . . . . . . . . . . . . . . . . . . . 153
Front Seats Adjustment . . . . . . . . . . . . . . . . . . . . . 57
Heated and Ventilated . . . . . . . . . . 63
Fuel Additives . . . . . . . . . . . . . . . . . . . . . 290
Economy Driving . . . . . . . . . . . . . . . 32
Filling a Portable Fuel
Container . . . . . . . . . . . . . . . . . . . 293
Filling the Tank . . . . . . . . . . . . . . . 291
Foreign Countries . . . . . . . . . . . . 290 Fuel (cont'd)
Gauge . . . . . . . . . . . . . . . . . . . . . . . . 139
Low Fuel Warning Light . . . . . . . 153
Management, Active . . . . . . . . . . 254
Prohibited Fuels . . . . . . . . . . . . . . 290
Recommended . . . . . . . . . . . . . . . 290
Top Tier . . . . . . . . . . . . . . . . . . . . . . 289
Full-Size Spare Tire . . . . . . . . . . . . 407
Fuses Engine Compartment FuseBlock . . . . . . . . . . . . . . . . . . . . . . . . 362
Fuses and Circuit Breakers . . . 362
Instrument Panel Fuse Block . . . . . . . . . . . . . . . . . . . 366, 367
G
Garage Door Opener . . . . . . . . . . . 167
Programming . . . . . . . . . . . . . . . . . 167
Gas Strut(s) . . . . . . . . . . . . . . . . . . . . 356
Gauges
Engine CoolantTemperature . . . . . . . . . . . . . . . . 141
Engine Oil Pressure . . . . . . . . . . 140
Fuel . . . . . . . . . . . . . . . . . . . . . . . . . . 139
Odometer . . . . . . . . . . . . . . . . . . . . . 139
Speedometer . . . . . . . . . . . . . . . . . 139
Tachometer . . . . . . . . . . . . . . . . . . . 139
Trip Odometer . . . . . . . . . . . . . . . . 139
Page 486 of 489

Chevrolet Silverado LD 1500 and Silverado 2500/3500 Owner Manual (GMNA-
Localizing-U.S./Canada-12162993) - 2019 - crc - 4/4/18
Index 485
Software Updates . . . . . . . . . . . . . . 184
Special Application Services . . . . 436
Specifications andCapacities . . . . . . . . . . . . . . . . . . . . . 446
Speedometer . . . . . . . . . . . . . . . . . . . 139
StabiliTrak OFF Light . . . . . . . . . . . . . . . . . . . . . 151
Start Assist, Hill . . . . . . . . . . . . . . . . . 272
Start Vehicle, Remote . . . . . . . . . . . 38
Starter Switch Check . . . . . . . . . . . 354
Starting the Engine . . . . . . . . . . . . . 249
Steering . . . . . . . . . . . . . . . . . . . . . . . . 228 Fluid, Power . . . . . . . . . . . . . . . . . . 345
Heated Wheel . . . . . . . . . . . . . . . . 128
Wheel Adjustment . . . . . . . . . . . . 127
Wheel Controls . . . . . . . . . . . . . . . 127
Steps Power Assist . . . . . . . . . . . . . . . . . . . 42
Stoplamps and Back-up Lamps Bulb Replacement . . . . . . . . . . . . 359
Storage Areas
Center Console . . . . . . . . . . . . . . . 123
Floor Console . . . . . . . . . . . . . . . . 124
Glove Box . . . . . . . . . . . . . . . . . . . . 122
Instrument Panel . . . . . . . . . . . . . 122
Sunglasses . . . . . . . . . . . . . . . . . . . 123
Storage Compartments . . . . . . . . . 122 Struts
Gas . . . . . . . . . . . . . . . . . . . . . . . . . . . 356
Stuck Vehicle . . . . . . . . . . . . . . . . . . . 237
Sun Visors . . . . . . . . . . . . . . . . . . . . . . . 53
Sunglass Storage . . . . . . . . . . . . . . . 123
Sunroof . . . . . . . . . . . . . . . . . . . . . . . . . . 53
Switches Airbag On-Off . . . . . . . . . . . . . . . . . . . 82
Symbols . . . . . . . . . . . . . . . . . . . . . . . . . . 3
System Forward Collision
Alert (FCA) . . . . . . . . . . . . . . . . . . 282
Infotainment . . . . . . . . . . . . . 181, 462
Noise Control . . . . . . . . . . . . . . . . . 352
Systems Driver Assistance . . . . . . . . . . . . . 279
T
Tachometer . . . . . . . . . . . . . . . . . . . . . 139
Tailgate . . . . . . . . . . . . . . . . . . . . . . . . . . 42
Taillamps . . . . . . . . . . . . . . . . . . . . . . . 359
Bulb Replacement . . . . . . . . . . . . 359
Text Telephone (TTY) Users . . . . 452
Theft-Deterrent Systems . . . . . . . . . 45 Immobilizer . . . . . . . . . . . . . . . . . . . . . 44
Throttle, Adjustable . . . . . . . . . . . . . 246
Time . . . . . . . . . . . . . . . . . . . . . . . . . . . . 130 Tires . . . . . . . . . . . . . . . . . . . . . . . . . . . . 370
All-Season . . . . . . . . . . . . . . . . . . . . 370
All-Terrain . . . . . . . . . . . . . . . . . . . . 372
Buying New Tires . . . . . . . . . . . . . 389
Chains . . . . . . . . . . . . . . . . . . . . . . . . 394
Changing . . . . . . . . . . . . . . . . . . . . . 396
Designations . . . . . . . . . . . . . . . . . 374
Different Size . . . . . . . . . . . . . . . . . 390
Full-Size Spare . . . . . . . . . . . . . . . 407
If a Tire Goes Flat . . . . . . . . . . . . 394
Inspection . . . . . . . . . . . . . . . . . . . . 385
Low Profile . . . . . . . . . . . . . . . . . . . 371
Pressure . . . . . . . . . . . . . . . . . 378, 380
Pressure Light . . . . . . . . . . . . . . . . 152
Pressure Monitor Operation . . 381
Pressure Monitor System . . . . . 380
Rotation . . . . . . . . . . . . . . . . . . . . . . 386
Sidewall Labeling . . . . . . . . . . . . . 372
Terminology and Definitions . . 376
Uniform Tire QualityGrading . . . . . . . . . . . . . . . . . . . . . 391
Wheel Alignment and Tire Balance . . . . . . . . . . . . . . . . . . . . . 392
Wheel Replacement . . . . . . . . . . 393
When It Is Time for New Tires . . . . . . . . . . . . . . . . . . . . . . . . 388
Winter . . . . . . . . . . . . . . . . . . . . . . . . 371
Top Tier Fuel . . . . . . . . . . . . . . . . . . . 289