2019 CHEVROLET SILVERADO 3500 engine
[x] Cancel search: enginePage 360 of 489
Chevrolet Silverado LD 1500 and Silverado 2500/3500 Owner Manual (GMNA-
Localizing-U.S./Canada-12162993) - 2019 - crc - 4/4/18
Vehicle Care 359
4. Turn the bulb socketcounterclockwise to remove it
from the headlamp assembly
and pull it straight out.
5. Remove the bulb by pulling it straight out of the bulb socket.
6. Install the new bulb into the bulb socket.
7. Turn the bulb socket clockwise to install it in the headlamp
assembly.
8. 2500/3500 Series vehicles only, driver side:
8.1. Reposition the auxiliary
battery (3).
8.2. Install the auxiliary battery retainer (1) and
battery retainer bolt (2).
9. If replacing a bulb on the passenger side, reinstall the
engine air cleaner.
10. Close the hood.
Fog Lamps
To replace the front fog lamp bulb: 1. Locate the fog lamp in the front
bumper.
2. Disconnect the electrical connector from the fog lamp
bulb assembly by pressing the
connector release.
3. Remove the bulb from the housing by squeezing the two
release tabs and pulling it
straight out of the assembly.
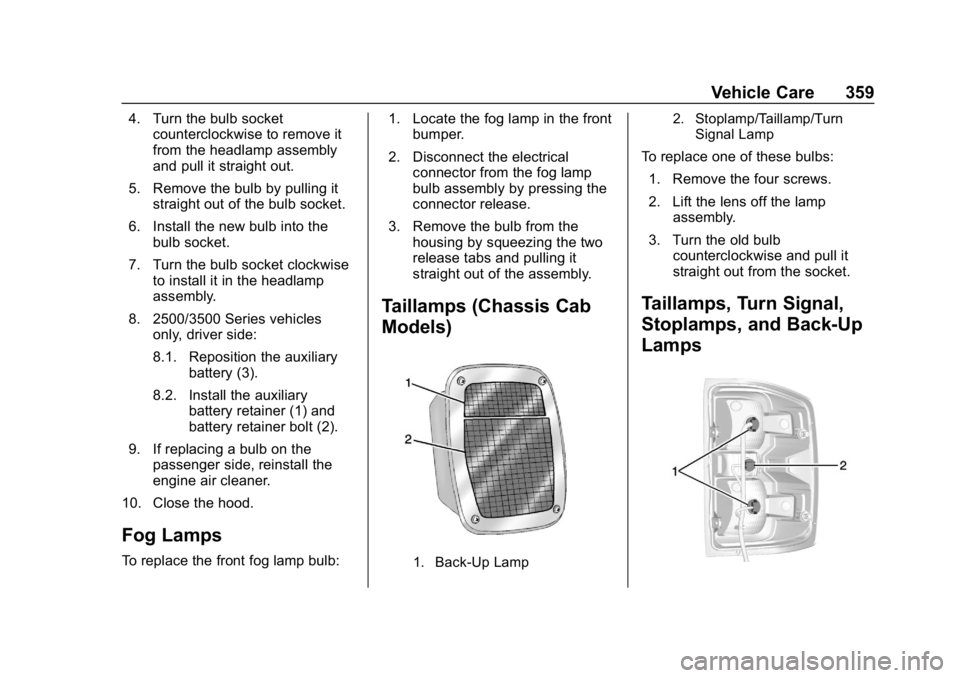
Taillamps (Chassis Cab
Models)
1. Back-Up Lamp 2. Stoplamp/Taillamp/Turn
Signal Lamp
To replace one of these bulbs:
1. Remove the four screws.
2. Lift the lens off the lamp assembly.
3. Turn the old bulb counterclockwise and pull it
straight out from the socket.
Taillamps, Turn Signal,
Stoplamps, and Back-Up
Lamps
Page 363 of 489

Chevrolet Silverado LD 1500 and Silverado 2500/3500 Owner Manual (GMNA-
Localizing-U.S./Canada-12162993) - 2019 - crc - 4/4/18
362 Vehicle Care
Windshield Wipers
If the wiper motor overheats due to
heavy snow or ice, the windshield
wipers will stop until the motor cools
and will then restart.
Although the circuit is protected
from electrical overload, overload
due to heavy snow or ice may
cause wiper linkage damage.
Always clear ice and heavy snow
from the windshield before using the
windshield wipers.
If the overload is caused by an
electrical problem and not snow or
ice, be sure to get it fixed.
Fuses and Circuit
Breakers
The wiring circuits in the vehicle are
protected from short circuits by a
combination of fuses and circuit
breakers. This greatly reduces the
chance of damage caused by
electrical problems.
{Danger
Fuses and circuit breakers are
marked with their ampere rating.
Do not exceed the
specified amperage rating when
replacing fuses and circuit
breakers. Use of an oversized
fuse or circuit breaker can result
in a vehicle fire. You and others
could be seriously injured or
killed.
To check a fuse, look at the
silver-colored band inside the fuse.
If the band is broken or melted,
replace the fuse. Be sure to replace
a bad fuse with a new one of the
identical size and rating.
Fuses of the same amperage can
be temporarily borrowed from
another fuse location, if a fuse goes
out. Replace the fuse as soon as
possible.
Engine Compartment
Fuse Block
If the vehicle has a diesel engine,
see the Duramax diesel
supplement.
The engine compartment fuse block
is in the engine compartment, on
the driver side of the vehicle.
Lift the cover to access the fuse
block.
Page 365 of 489

Chevrolet Silverado LD 1500 and Silverado 2500/3500 Owner Manual (GMNA-
Localizing-U.S./Canada-12162993) - 2019 - crc - 4/4/18
364 Vehicle Care
FusesUsage
3 Antilock brake system pump
4 Instrument panel BEC 1
5 Passenger motorized seat belt
6 4WD transfer case electronic control
7 Electric parking brake
8 Instrument panel BEC 2
9 Driver motorized seat belt
10 Rear window defogger
11 Starter
12 Cooling fan 1
13 Cooling fan 2
14 Left trailer stop/ Turn signal lamps
15 Trailer parking lamps Fuses
Usage
16 Trailer reverse lamps
17 Right trailer stop/ Turn signal lamps
18 Fuel pump
19 Integrated chassis control module
20 Electronic suspension control
module
21 Fuel pump power module
22 Upfitter 1
23 Upfitter 2
24 Front wiper
25 Antilock brake system valve
26 Upfitter 2
27 Upfitter 3
28 Right parking lamps
29 Left parking lamps Fuses
Usage
30 Upfitter 3
31 Upfitter 4
32 Upfitter 4
33 Reverse lamps
34 Engine control module/Ignition
35 Air conditioning clutch
36 Heated mirrors
37 Upfitter 1
38 Center high-mounted
stoplamp
39 Miscellaneous/ Ignition
40 Transmission/ Ignition
41 Fuel pump 2
42 Cooling fan clutch
43 Engine
44 Fuel injectors A –
odd
Page 366 of 489
Chevrolet Silverado LD 1500 and Silverado 2500/3500 Owner Manual (GMNA-
Localizing-U.S./Canada-12162993) - 2019 - crc - 4/4/18
Vehicle Care 365
FusesUsage
45 Fuel injectors B –
even
46 O2 Sensor B
47 Throttle control
48 Horn
49 Fog lamps
50 O2 Sensor A
51 Engine control module
52 Interior heater
53 Accessory power module/TPM pump
54 Front washer
55 Air conditioning/ Battery regulated
voltage control
56 Air conditioning module/
Battery pack
57 Transmission control module/
Engine control
module Fuses
Usage
58 Headlamps
74 Electric running boards
76 Fuel pump prime / MGU motor
77 Cabin pump motor
79 Vacuum pump
Relays Usage
59 Fuel pump
60 Upfitter 2
61 Upfitter 3
62 Upfitter 4
63 Trailer parking lamps
64 Run/Crank
65 Upfitter 1
66 Fuel pump 2
67 Air conditioning control
68 Starter Relays
Usage
69 Rear window defogger
70 Engine control module
71 Vacuum pump/ Cooling fan clutch
72 CKT 95
73 CKT 92
75 Fuel pump prime/ MGU motor
78 Vacuum pump switch
Page 375 of 489
Chevrolet Silverado LD 1500 and Silverado 2500/3500 Owner Manual (GMNA-
Localizing-U.S./Canada-12162993) - 2019 - crc - 4/4/18
374 Vehicle Care
code molded onto the sidewall.
GM's TPC specifications meet or
exceed all federal safety
guidelines.
(3) Dual Tire Maximum Load
:
Maximum load that can be
carried and the maximum
pressure needed to support that
load when used in a dual
configuration. For information on
recommended tire pressure see
Tire Pressure0378 and Vehicle
Load Limits 0238.
(4) DOT (Department of
Transportation)
:The
Department of Transportation
(DOT) code indicates that the
tire is in compliance with the
U.S. Department of
Transportation Motor Vehicle
Safety Standards.
DOT Tire Date of
Manufacture
:The last four
digits of the TIN indicate the tire
manufactured date. The first two
digits represent the week (01-52) and the last two digits,
the year. For example, the third
week of the year 2010 would
have a four-digit DOT date
of 0310.
(5) Tire Identification Number
(TIN)
:The letters and numbers
following the DOT code are the
Tire Identification Number (TIN).
The TIN shows the
manufacturer and plant code,
tire size, and date the tire was
manufactured. The TIN is
molded onto both sides of the
tire, although only one side may
have the date of manufacture.
(6) Tire Ply Material
:The type
of cord and number of plies in
the sidewall and under the tread.
(7) Single Tire Maximum
Load
:Maximum load that can
be carried and the maximum
pressure needed to support that
load when used as a single. For
information on recommended tire pressure see
Tire Pressure
0 378 and Vehicle Load Limits
0 238.
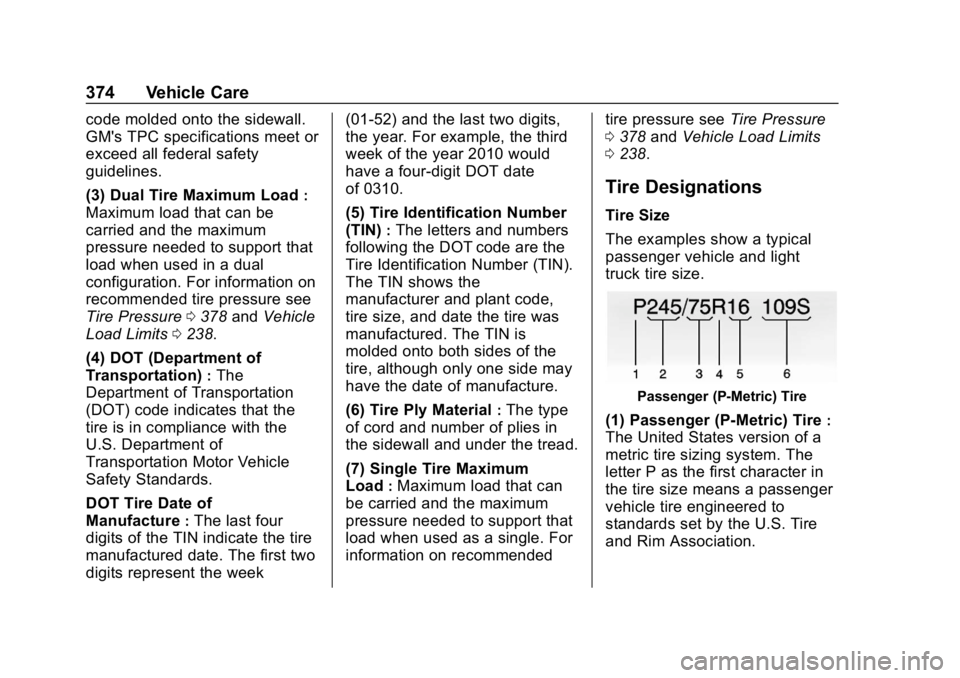
Tire Designations
Tire Size
The examples show a typical
passenger vehicle and light
truck tire size.
Passenger (P-Metric) Tire
(1) Passenger (P-Metric) Tire:
The United States version of a
metric tire sizing system. The
letter P as the first character in
the tire size means a passenger
vehicle tire engineered to
standards set by the U.S. Tire
and Rim Association.
Page 376 of 489
Chevrolet Silverado LD 1500 and Silverado 2500/3500 Owner Manual (GMNA-
Localizing-U.S./Canada-12162993) - 2019 - crc - 4/4/18
Vehicle Care 375
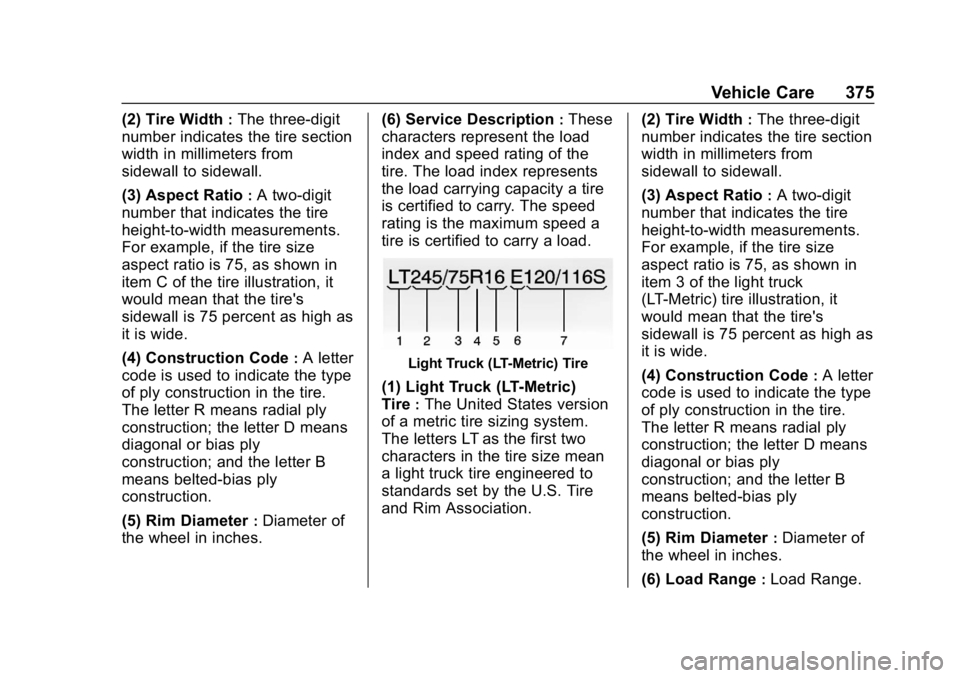
(2) Tire Width:The three-digit
number indicates the tire section
width in millimeters from
sidewall to sidewall.
(3) Aspect Ratio
:A two-digit
number that indicates the tire
height-to-width measurements.
For example, if the tire size
aspect ratio is 75, as shown in
item C of the tire illustration, it
would mean that the tire's
sidewall is 75 percent as high as
it is wide.
(4) Construction Code
:A letter
code is used to indicate the type
of ply construction in the tire.
The letter R means radial ply
construction; the letter D means
diagonal or bias ply
construction; and the letter B
means belted-bias ply
construction.
(5) Rim Diameter
:Diameter of
the wheel in inches. (6) Service Description
:These
characters represent the load
index and speed rating of the
tire. The load index represents
the load carrying capacity a tire
is certified to carry. The speed
rating is the maximum speed a
tire is certified to carry a load.
Light Truck (LT-Metric) Tire
(1) Light Truck (LT-Metric)
Tire
:The United States version
of a metric tire sizing system.
The letters LT as the first two
characters in the tire size mean
a light truck tire engineered to
standards set by the U.S. Tire
and Rim Association. (2) Tire Width
:The three-digit
number indicates the tire section
width in millimeters from
sidewall to sidewall.
(3) Aspect Ratio
:A two-digit
number that indicates the tire
height-to-width measurements.
For example, if the tire size
aspect ratio is 75, as shown in
item 3 of the light truck
(LT-Metric) tire illustration, it
would mean that the tire's
sidewall is 75 percent as high as
it is wide.
(4) Construction Code
:A letter
code is used to indicate the type
of ply construction in the tire.
The letter R means radial ply
construction; the letter D means
diagonal or bias ply
construction; and the letter B
means belted-bias ply
construction.
(5) Rim Diameter
:Diameter of
the wheel in inches.
(6) Load Range
:Load Range.
Page 397 of 489
Chevrolet Silverado LD 1500 and Silverado 2500/3500 Owner Manual (GMNA-
Localizing-U.S./Canada-12162993) - 2019 - crc - 4/4/18
396 Vehicle Care
Warning (Continued)
4. Turn off the engine and donot restart while the vehicle
is raised.
5. Do not allow passengers to remain in the vehicle.
6. Place wheel blocks, if equipped, on both sides of
the tire at the opposite
corner of the tire being
changed.
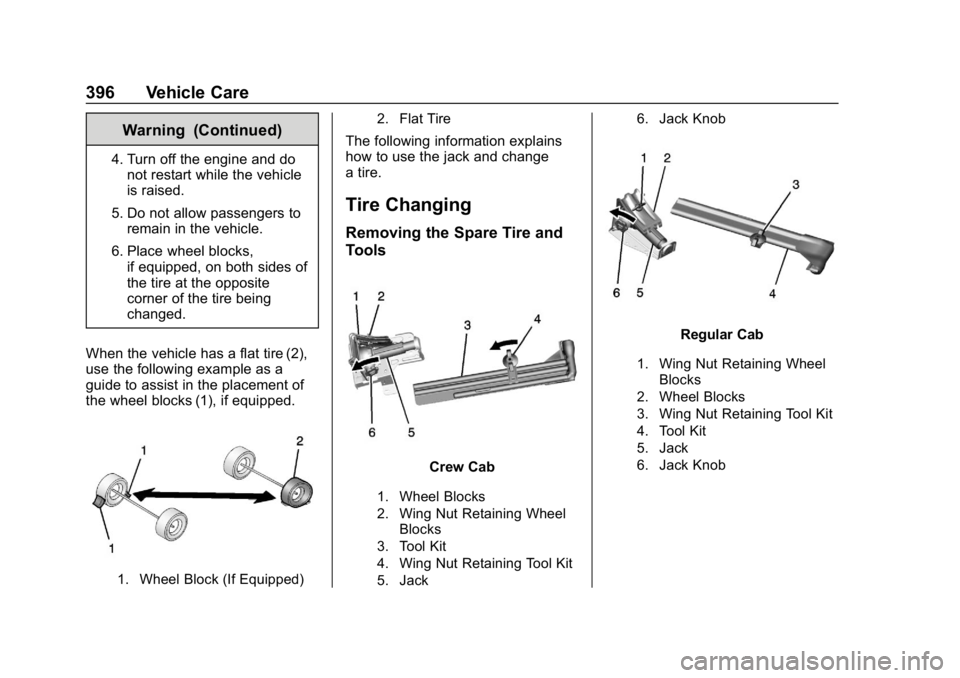
When the vehicle has a flat tire (2),
use the following example as a
guide to assist in the placement of
the wheel blocks (1), if equipped.
1. Wheel Block (If Equipped) 2. Flat Tire
The following information explains
how to use the jack and change
a tire.
Tire Changing
Removing the Spare Tire and
Tools
Crew Cab
1. Wheel Blocks
2. Wing Nut Retaining Wheel
Blocks
3. Tool Kit
4. Wing Nut Retaining Tool Kit
5. Jack 6. Jack Knob
Regular Cab
1. Wing Nut Retaining Wheel
Blocks
2. Wheel Blocks
3. Wing Nut Retaining Tool Kit
4. Tool Kit
5. Jack
6. Jack Knob
Page 409 of 489

Chevrolet Silverado LD 1500 and Silverado 2500/3500 Owner Manual (GMNA-
Localizing-U.S./Canada-12162993) - 2019 - crc - 4/4/18
408 Vehicle Care
Jump Starting
Jump Starting - North
America
For more information about the
vehicle battery, seeBattery - North
America 0349.
If the vehicle's battery (or batteries)
has run down, you may want to use
another vehicle and some jumper
cables to start your vehicle. Be sure
to use the following steps to do it
safely.
{Warning
WARNING: Battery posts,
terminals, and related
accessories contain lead and lead
compounds, chemicals known to
the State of California to cause
cancer and birth defects or other
reproductive harm. Batteries also
contain other chemicals known to
the State of California to cause
cancer. WASH HANDS AFTER
(Continued)
Warning (Continued)
HANDLING.For more information
go to www.P65Warnings.ca.gov/
passenger-vehicle.
See California Proposition
65 Warning 0325 and the back
cover.
{Warning
Batteries can hurt you. They can
be dangerous because:
. They contain acid that can
burn you.
. They contain gas that can
explode or ignite.
. They contain enough
electricity to burn you.
If you do not follow these steps
exactly, some or all of these
things can hurt you.
Caution
Ignoring these steps could result
in costly damage to the vehicle
that would not be covered by the
vehicle warranty. Trying to start
the vehicle by pushing or pulling it
will not work, and it could damage
the vehicle.
1. Check the other vehicle. It must have a 12-volt battery
with a negative ground system.
Caution
If the other vehicle does not have
a 12-volt system with a negative
ground, both vehicles can be
damaged. Only use a vehicle that
has a 12-volt system with a
negative ground for jump starting.
2. If you have a vehicle with a diesel engine with two
batteries, you should know
before you begin that,
especially in cold weather, you