2019 CHEVROLET SILVERADO 2500 tires
[x] Cancel search: tiresPage 394 of 489

Chevrolet Silverado LD 1500 and Silverado 2500/3500 Owner Manual (GMNA-
Localizing-U.S./Canada-12162993) - 2019 - crc - 4/4/18
Vehicle Care 393
Wheel Replacement
Replace any wheel that is bent,
cracked, or badly rusted or
corroded. If wheel nuts keep coming
loose, the wheel, wheel bolts and
wheel nuts should be replaced.
If the wheel leaks air, replace it.
Some aluminum wheels can be
repaired. See your dealer if any of
these conditions exist.
Your dealer will know the kind of
wheel that is needed.
Each new wheel should have the
same load-carrying capacity,
diameter, width, offset and be
mounted the same way as the one it
replaces.
Replace wheels, wheel bolts, wheel
nuts, or Tire Pressure Monitor
System (TPMS) sensors with new
GM original equipment parts.{Warning
Using the wrong replacement
wheels, wheel bolts, or wheel
nuts can be dangerous. It could
affect the braking and handling of
the vehicle. Tires can lose air,
and cause loss of control, causing
a crash. Always use the correct
wheel, wheel bolts, and wheel
nuts for replacement.
Caution
The wrong wheel can also cause
problems with bearing life, brake
cooling, speedometer or
odometer calibration, headlamp
aim, bumper height, vehicle
ground clearance, and tire or tire
chain clearance to the body and
chassis.
Whenever a wheel, wheel bolt,
or wheel nut is replaced on a dual
wheel setup, check the wheel nut
torque after 160,1 600, and 10 000 km (100,1,000, and
6,000 mi) of driving. For proper
torque, see
“Wheel Nut Torque”
under Capacities and Specifications
0 446.
See If a Tire Goes Flat 0394 for
more information.
Used Replacement Wheels
{Warning
Replacing a wheel with a used
one is dangerous. How it has
been used or how far it has been
driven may be unknown. It could
fail suddenly and cause a crash.
When replacing wheels, use a
new GM original equipment
wheel.
Page 395 of 489
Chevrolet Silverado LD 1500 and Silverado 2500/3500 Owner Manual (GMNA-
Localizing-U.S./Canada-12162993) - 2019 - crc - 4/4/18
394 Vehicle Care
Tire Chains
{Warning
If the vehicle has dual wheels or
265/65R18, P265/65R18, P275/
55R20, LT265/70R17, LT265/
70R18, LT265/60R20, LT275/
65R18, P285/50R20, 285/45R22,
or P285/45R22 size tires, do not
use tire chains. They can damage
the vehicle because there is not
enough clearance. Tire chains
used on a vehicle without the
proper amount of clearance can
cause damage to the brakes,
suspension, or other vehicle
parts. The area damaged by the
tire chains could cause you to
lose control of the vehicle and
you or others may be injured in a
crash.
Use another type of traction
device only if its manufacturer
recommends it for use on the
vehicle and tire size combination(Continued)
Warning (Continued)
and road conditions. Follow that
manufacturer's instructions. To
help avoid damage to the vehicle,
drive slowly, readjust, or remove
the device if it is contacting the
vehicle, and do not spin the
vehicle's wheels.
If you do find traction devices that
will fit, install them on the rear
tires.
Caution
If the vehicle does not have dual
wheels and has a tire size other
than 265/65R18, P265/65R18,
P275/55R20, LT265/70R17,
LT265/70R18, LT265/60R20,
LT275/65R18, P285/50R20, 285/
45R22, or P285/45R22, use tire
chains only where legal and only
when you must. Use chains that
are the proper size for the tires.(Continued)
Caution (Continued)
Install them on the tires of the
rear axle. Do not use chains on
the tires of the front axle. Tighten
them as tightly as possible with
the ends securely fastened. Drive
slowly and follow the chain
manufacturer's instructions. If you
can hear the chains contacting
the vehicle, stop and retighten
them. If the contact continues,
slow down until it stops. Driving
too fast or spinning the wheels
with chains on will damage the
vehicle.
If a Tire Goes Flat
It is unusual for a tire to blowout
while driving, especially if the tires
are maintained properly. If air goes
out of a tire, it is much more likely to
leak out slowly. But if there ever is a
blowout, here are a few tips about
what to expect and what to do:
Page 408 of 489
Chevrolet Silverado LD 1500 and Silverado 2500/3500 Owner Manual (GMNA-
Localizing-U.S./Canada-12162993) - 2019 - crc - 4/4/18
Vehicle Care 407
3. Assemble the wheel blocks (2)and jack (7) together with the
wing nut (1) and retaining
bolt (8).
4. Position the jack (7) in the mounting bracket (6). Position
the holes in the base of the
jack (7) onto the pin in the
mounting bracket (6).
5. Return them to their original location in the vehicle. See
“Removing the Spare Tire and
Tools.”
Full-Size Spare Tire
If this vehicle came with a full-size
spare tire, it was fully inflated when
new, however, it can lose air over
time. Check the inflation pressure
regularly.
See Tire Pressure 0378 and
Vehicle Load Limits 0238. For
instructions on how to remove,
install, or store a spare tire, see Tire
Changing 0396. If equipped with a temporary use
full-size spare tire, it is indicated on
the tire sidewall. See
Tire Sidewall
Labeling 0372. This spare tire
should not be driven on over
112 km/h (70 mph), or 88 km/h
(55 mph) when pulling a trailer, at
the proper inflation pressure. Repair
and replace the road tire as soon as
it is convenient, and stow the spare
tire for future use.
Caution
If the vehicle has four-wheel drive
and a different size spare tire is
installed, do not drive in
four-wheel drive until the flat tire
is repaired and/or replaced. The
vehicle could be damaged and
the repairs would not be covered
by the warranty. Never use
four-wheel drive when a different
size spare tire is installed on the
vehicle.
The vehicle may have a different
size spare tire than the road tires
originally installed on the vehicle. This spare tire was developed for
use on this vehicle, so it is all right
to drive on it. If the vehicle has
four-wheel drive and a different size
spare tire is installed, drive only in
two-wheel drive.
After installing the spare tire on the
vehicle, stop as soon as possible
and check that the spare tire is
correctly inflated.
Have the damaged or flat road tire
repaired or replaced and installed
back onto the vehicle as soon as
possible so the spare tire will be
available in case it is needed again.
Do not mix tires and wheels of
different sizes, because they will not
fit. Keep your spare tire and its
wheel together. If the vehicle has a
spare tire that does not match the
original road tires and wheels in size
and type, do not include the spare in
the tire rotation.
Page 413 of 489
Chevrolet Silverado LD 1500 and Silverado 2500/3500 Owner Manual (GMNA-
Localizing-U.S./Canada-12162993) - 2019 - crc - 4/4/18
412 Vehicle Care
Caution
If the jumper cables are
connected or removed in the
wrong order, electrical shorting
may occur and damage the
vehicle. The repairs would not be
covered by the vehicle warranty.
Always connect and remove the
jumper cables in the correct order,
making sure that the cables do
not touch each other or other
metal.
Jumper Cable Removal
Reverse the sequence exactly when
removing the jumper cables.
After starting the disabled vehicle
and removing the jumper cables,
allow it to idle for several minutes.
Towing the Vehicle
Caution
Incorrectly towing a disabled
vehicle may cause damage. The
damage would not be covered by
the vehicle warranty. Do not lash
or hook to suspension
components. Use the proper
straps around the tires to secure
the vehicle. Do not drag a locked
wheel/tire while loading the
vehicle. Do not use a sling type
lift to tow the vehicle. This could
damage the vehicle.
GM recommends a flatbed tow truck
to transport a disabled vehicle. Use
ramps to help reduce approach
angles, if necessary. A towed
vehicle should have its drive wheels
off the ground. Contact Roadside
Assistance or a professional towing
service if the disabled vehicle must
be towed.
Front Attachment Points
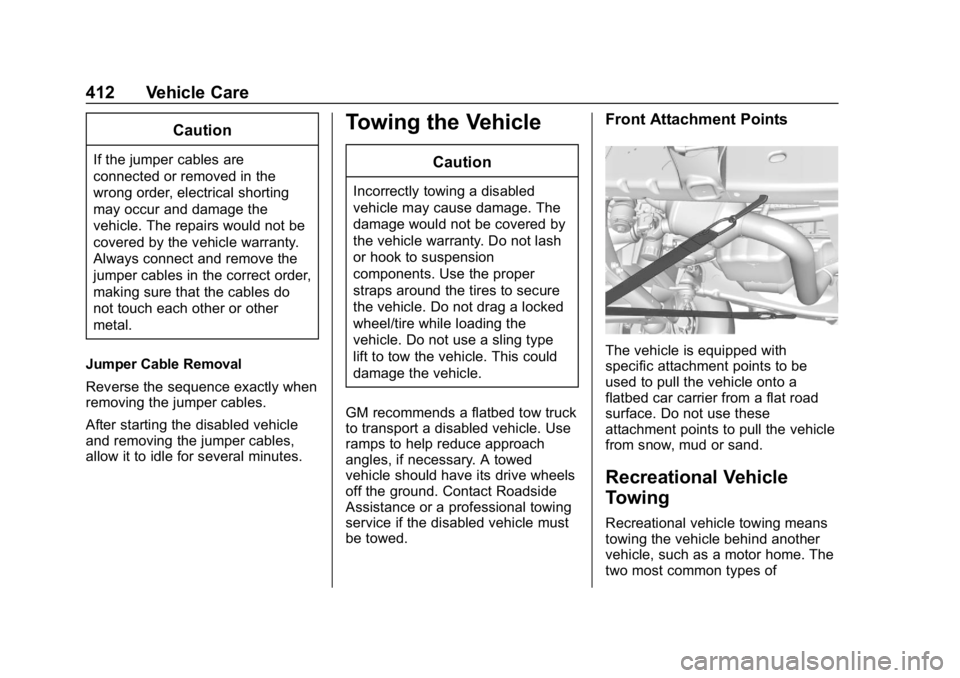
The vehicle is equipped with
specific attachment points to be
used to pull the vehicle onto a
flatbed car carrier from a flat road
surface. Do not use these
attachment points to pull the vehicle
from snow, mud or sand.
Recreational Vehicle
Towing
Recreational vehicle towing means
towing the vehicle behind another
vehicle, such as a motor home. The
two most common types of
Page 422 of 489
Chevrolet Silverado LD 1500 and Silverado 2500/3500 Owner Manual (GMNA-
Localizing-U.S./Canada-12162993) - 2019 - crc - 4/4/18
Vehicle Care 421
Caution (Continued)
non-uniform finish. Clean low
gloss stripes with soap and
water only.
Air Intakes
Clear debris from the air intakes,
between the hood and windshield,
when washing the vehicle.
Windshield and Wiper Blades
Clean the outside of the windshield
with glass cleaner.
Clean rubber blades using a lint-free
cloth or paper towel soaked with
windshield washer fluid or a mild
detergent. Wash the windshield
thoroughly when cleaning the
blades. Bugs, road grime, sap, and
a buildup of vehicle wash/wax
treatments may cause wiper
streaking.Replace the wiper blades if they are
worn or damaged. Damage can be
caused by extreme dusty
conditions, sand, salt, heat, sun,
snow, and ice.
Weatherstrips
Apply weatherstrip lubricant on
weatherstrips to make them last
longer, seal better, and not stick or
squeak. Lubricate weatherstrips
once a year. Hot, dry climates may
require more frequent application.
Black marks from rubber material on
painted surfaces can be removed by
rubbing with a clean cloth. See
Recommended Fluids and
Lubricants
0440.
Tires
Use a stiff brush with tire cleaner to
clean the tires.
Caution
Using petroleum-based tire
dressing products on the vehicle
may damage the paint finish and/
(Continued)
Caution (Continued)
or tires. When applying a tire
dressing, always wipe off any
overspray from all painted
surfaces on the vehicle.
Wheels and Wheel Trim
Use a soft, clean cloth with mild
soap and water to clean the wheels.
After rinsing thoroughly with clean
water, dry with a soft, clean towel.
A wax may then be applied.
Caution
Chrome wheels and chrome
wheel trim may be damaged if the
vehicle is not washed after driving
on roads that have been sprayed
with magnesium chloride or
calcium chloride. These are used
on roads for conditions such as
dust and ice. Always wash the
chrome with soap and water after
exposure.
Page 429 of 489
Chevrolet Silverado LD 1500 and Silverado 2500/3500 Owner Manual (GMNA-
Localizing-U.S./Canada-12162993) - 2019 - crc - 4/4/18
428 Service and Maintenance
Service and
Maintenance
General Information
General Information . . . . . . . . . . 428
Maintenance Schedule
Maintenance Schedule . . . . . . . 430
Special Application Services
Special ApplicationServices . . . . . . . . . . . . . . . . . . . . 436
Additional Maintenance
and Care
Additional Maintenanceand Care . . . . . . . . . . . . . . . . . . . . 437
Recommended Fluids,
Lubricants, and Parts
Recommended Fluids andLubricants . . . . . . . . . . . . . . . . . . . 440
Maintenance Replacement Parts . . . . . . . . . . . . . . . . . . . . . . . . 442
Maintenance Records
Maintenance Records . . . . . . . . 444
General Information
This maintenance section applies to
vehicles with a gasoline engine. For
diesel engine vehicles, see
"Maintenance Schedule" in the
Duramax diesel supplement.
Your vehicle is an important
investment. This section describes
the required maintenance for the
vehicle. Follow this schedule to help
protect against major repair
expenses resulting from neglect or
inadequate maintenance. It may
also help to maintain the value of
the vehicle if it is sold. It is the
responsibility of the owner to have
all required maintenance performed.
Your dealer has trained technicians
who can perform required
maintenance using genuine
replacement parts. They have
up-to-date tools and equipment for
fast and accurate diagnostics. Many
dealers have extended evening and
Saturday hours, courtesy
transportation, and online
scheduling to assist with service
needs. Your dealer recognizes the
importance of providing
competitively priced maintenance
and repair services. With trained
technicians, the dealer is the place
for routine maintenance such as oil
changes and tire rotations and
additional maintenance items like
tires, brakes, batteries, and wiper
blades.
Caution
Damage caused by improper
maintenance can lead to costly
repairs and may not be covered
by the vehicle warranty.
Maintenance intervals, checks,
inspections, recommended fluids,
and lubricants are important to
keep the vehicle in good working
condition.
Do not have chemical flushes that
are not approved by GM
performed on the vehicle. The
use of flushes, solvents, cleaners,
or lubricants that are not
(Continued)
Page 431 of 489
Chevrolet Silverado LD 1500 and Silverado 2500/3500 Owner Manual (GMNA-
Localizing-U.S./Canada-12162993) - 2019 - crc - 4/4/18
430 Service and Maintenance
Maintenance
Schedule
Owner Checks and Services
At Each Fuel Stop
.Check the engine oil level. See
Engine Oil 0331.
Once a Month
. Check the tire inflation
pressures, including the spare.
See Tire Pressure 0378.
. Inspect the tires for wear. See
Tire Inspection 0385.
. Check the windshield washer
fluid level. See Washer Fluid
0 346.
Engine Oil Change
When the CHANGE ENGINE OIL
SOON message displays, have the
engine oil and filter changed within
the next 1 000 km/600 mi. If driven
under the best conditions, the
engine oil life system may not
indicate the need for vehicle service
for up to a year. The engine oil and filter must be changed at least once
a year and the oil life system must
be reset. Your trained dealer
technician can perform this work.
If the engine oil life system is reset
accidentally, service the vehicle
within 5 000 km/3,000 mi since the
last service. Reset the oil life
system when the oil is changed.
See
Engine Oil Life System 0333.
Passenger Compartment Air
Filter
The passenger compartment air
filter removes dust, pollen, and
other airborne irritants from outside
air that is pulled into the vehicle.
The filter should be replaced as part
of routine scheduled maintenance.
Inspect the passenger compartment
air filter every 36 000 km/
22,500 miles or two years,
whichever comes first. Replace if
necessary. More frequent
replacement may be needed if the
vehicle is driven in areas with heavy
traffic, areas with poor air quality,
or areas with high dust levels. Replacement may also be needed if
there is a reduction in air flow,
excessive window fogging, or odors.
Power Take Off (PTO) and
Extended Idle Use
When the vehicle is used with the
PTO equipment or used in a way
that requires extended idle time,
one hour of use shall be deemed
the same as 33 miles.
See
Driver Information Center (DIC)
(Base Level) 0154 orDriver
Information Center (DIC) (Uplevel)
0 156 for hourmeter.
Air Conditioning Desiccant
(Replace Every Seven Years)
The air conditioning system requires
maintenance every seven years.
This service requires replacement of
the desiccant to help the longevity
and efficient operation of the air
conditioning system. This service
can be complex. See your dealer.
Page 432 of 489
Chevrolet Silverado LD 1500 and Silverado 2500/3500 Owner Manual (GMNA-
Localizing-U.S./Canada-12162993) - 2019 - crc - 4/4/18
Service and Maintenance 431
Tire Rotation and Required
Services Every 12 000 km/
7,500 mi
Rotate the tires, if recommended for
the vehicle, and perform the
following services. SeeTire
Rotation 0386.
. Check engine oil level and oil
life percentage. If needed,
change engine oil and filter, and
reset oil life system.
See Engine Oil 0331 and
Engine Oil Life System 0333.
. Check engine coolant level. See
Cooling System 0339.
. Check windshield washer fluid
level. See Washer Fluid 0346.
. Check tire inflation pressures,
including the spare. See Tire
Pressure 0378.
. Inspect tire wear. See Tire
Inspection 0385.
. Visually check for fluid leaks.
. Inspect engine air cleaner filter.
See Engine Air Cleaner/Filter
0 338. .
Inspect brake system. See
Exterior Care 0418.
. Visually inspect steering,
suspension, and chassis
components for damage,
including cracks or tears in the
rubber boots, loose or missing
parts, or signs of wear at least
once a year. See Exterior Care
0 418. Lubricate the suspension
and steering components at
least every other oil change.
(If equipped with grease fittings)
. Inspect power steering for
proper attachment, connections,
binding, leaks, cracks,
chafing, etc.
. Visually inspect halfshafts and
drive shafts for excessive wear,
lubricant leaks, and/or damage
including: tube dents or cracks,
constant velocity joint or
universal joint looseness,
cracked or missing boots, loose
or missing boot clamps, center
bearing excessive looseness,
loose or missing fasteners, and
axle seal leaks. .
Check restraint system
components. See Safety System
Check 074.
. Visually inspect fuel system for
damage or leaks.
. Visually inspect exhaust system
and nearby heat shields for
loose or damaged parts.
. Lubricate body components. See
Exterior Care 0418.
. Check starter switch. See Starter
Switch Check 0354.
. Check automatic transmission
shift lock control function. See
Automatic Transmission Shift
Lock Control Function Check
0354.
. Check ignition transmission lock.
See Ignition Transmission Lock
Check 0354.
. Check parking brake and
automatic transmission park
mechanism. See Park Brake and
P (Park) Mechanism Check
0 354.