2019 CHEVROLET SILVERADO 1500 LD oil
[x] Cancel search: oilPage 343 of 490
Chevrolet Silverado LD 1500 and Silverado 2500/3500 Owner Manual (GMNA-
Localizing-U.S./Canada-12162993) - 2019 - crc - 7/30/18
342 Vehicle Care
.Helps keep the proper engine
temperature.
Caution
Do not use anything other than a
mix of DEX-COOL coolant that
meets GM Standard
GMW3420 and clean, drinkable
water. Anything else can cause
damage to the engine cooling
system and the vehicle, which
would not be covered by the
vehicle warranty.
Never dispose of engine coolant by
putting it in the trash, or by pouring
it on the ground, or into sewers,
streams, or bodies of water. Have
the coolant changed by an
authorized service center, familiar
with legal requirements regarding
used coolant disposal. This will help
protect the environment and your
health.
Checking Coolant
The coolant surge tank is located in
the engine compartment on the
passenger side of the vehicle. See
Engine Compartment Overview
0 329.
The vehicle must be on a level
surface when checking the coolant
level.
5.3L V8 Shown, 6.0L V8 Similar
Check to see if coolant is visible in
the coolant surge tank. If the coolant
inside the coolant surge tank is
boiling, wait until it cools down. The
coolant level should be at or above the full cold mark. If it is not, there
may be a leak in the cooling
system.
If coolant is visible but the coolant
level is not at or above the full cold
mark, see
“How to Add Coolant to
the Coolant Surge Tank for Gasoline
Engines,” following.
How to Add Coolant to the
Coolant Surge Tank for
Gasoline Engines
If the vehicle has a diesel engine,
see“Cooling System” in the
Duramax diesel supplement for the
proper coolant fill procedure.
{Warning
Spilling coolant on hot engine
parts can burn you. Coolant
contains ethylene glycol and it will
burn if the engine parts are hot
enough.
Page 344 of 490
Chevrolet Silverado LD 1500 and Silverado 2500/3500 Owner Manual (GMNA-
Localizing-U.S./Canada-12162993) - 2019 - crc - 7/30/18
Vehicle Care 343
{Warning
Plain water, or other liquids such
as alcohol, can boil before the
proper coolant mixture will. With
plain water or the wrong mixture,
the engine could get too hot but
there would not be an overheat
warning. The engine could catch
fire and you or others could be
burned.
{Warning
Steam and scalding liquids from a
hot cooling system are under
pressure. Turning the pressure
cap, even a little, can cause them
to come out at high speed and
you could be burned. Never turn
the cap when the cooling system,
including the pressure cap, is hot.
Wait for the cooling system and
pressure cap to cool.
Caution
Failure to follow the specific
coolant fill procedure could cause
the engine to overheat and could
cause system damage. If coolant
is not visible in the surge tank,
contact your dealer.
If no coolant is visible in the surge
tank, add coolant.
Light-Duty
Coolant Surge
Tank
Pressure CapHeavy-Duty
Coolant Surge
Tank
Pressure Cap
1. Remove the coolant surge tank pressure cap when the cooling
system, including the coolant
surge tank pressure cap and
upper radiator hose, is no
longer hot. Turn the pressure cap slowly
counterclockwise about one full
turn. If a hiss is heard, wait for
that to stop. A hiss means
there is still some pressure left.
2. Keep turning the pressure cap slowly, and remove it.
3. Fill the coolant surge tank with the proper mixture to the full
cold mark.
4. With the coolant surge tank pressure cap off, start the
engine and let it run until the
engine coolant temperature
gauge indicates approximately
90 °C (195 °F).
By this time, the coolant level
inside the coolant surge tank
may be lower. If the level is
lower, add more of the proper
mixture to the coolant surge
tank until the level reaches the
full cold mark.
5. Replace the pressure cap tightly.
Page 346 of 490
Chevrolet Silverado LD 1500 and Silverado 2500/3500 Owner Manual (GMNA-
Localizing-U.S./Canada-12162993) - 2019 - crc - 7/30/18
Vehicle Care 345
If there is an engine overheat
warning, but no steam is seen or
heard, the problem may not be too
serious. Sometimes the engine can
get a little too hot when the vehicle:
.Climbs a long hill on a hot day.
. Stops after high-speed driving.
. Idles for long periods in traffic.
. Tows a trailer; see Trailer Towing
0 298.
If the ENGINE OVERHEATED
STOP ENGINE or the ENGINE
OVERHEATED IDLE ENGINE
message appears with no sign of
steam, try this for a minute or so: 1. Turn the air conditioning off.
2. Turn the heater on to the highest temperature and to the
highest fan speed. Open the
windows as necessary.
3. When it is safe to do so, pull off the road, shift to P (Park) or
N (Neutral) and let the
engine idle. If the temperature overheat gauge is
no longer in the overheat zone or an
overheat warning no longer
displays, the vehicle can be driven.
Continue to drive the vehicle slowly
for about 10 minutes. Keep a safe
vehicle distance from the vehicle in
front. If the warning does not come
back on, continue to drive normally
and have the cooling system
checked for proper fill and function.
If the warning continues, pull over,
stop, and park the vehicle
right away.
If there is still no sign of steam and
the vehicle is equipped with an
engine driven cooling fan, push
down the accelerator until the
engine speed is about twice as fast
as normal idle speed for at least
five minutes while the vehicle is
parked. If the warning is still there,
turn off the engine and get everyone
out of the vehicle until it cools down.
If there is no sign of steam, idle the
engine for five minutes while
parked. If the warning is still
displayed, turn off the engine until it
cools down.Overheated Engine
Protection
Operating Mode
If an overheated engine condition
exists and the ENGINE POWER IS
REDUCED message displays, an
overheat protection mode which
alternates firing groups of cylinders
helps to prevent engine damage. In
this mode, a loss in power and
engine performance will be noticed.
This operating mode allows the
vehicle to be driven to a safe place
in an emergency. Driving extended
distances and/or towing a trailer in
the overheat protection mode
should be avoided.
Caution
After driving in the overheated
engine protection operating
mode, the engine oil will be
severely degraded. Any repairs
performed before the engine is
cool may cause engine damage.
Allow the engine to cool before
(Continued)
Page 347 of 490
Chevrolet Silverado LD 1500 and Silverado 2500/3500 Owner Manual (GMNA-
Localizing-U.S./Canada-12162993) - 2019 - crc - 7/30/18
346 Vehicle Care
Caution (Continued)
attempting any repair. Repair the
cause of coolant loss, change the
oil, and reset the oil life system.
SeeEngine Oil 0332.
Engine Fan
If the vehicle has a clutched engine
cooling fan, when the clutch is
engaged, the fan spins faster to
provide more air to cool the engine.
In most everyday driving conditions,
the fan is spinning slower and the
clutch is not fully engaged. This
improves fuel economy and reduces
fan noise. Under heavy vehicle
loading, trailer towing, and/or high
outside temperatures, the fan speed
increases as the clutch more fully
engages, so an increase in fan
noise may be heard. This is normal
and should not be mistaken as the
transmission slipping or making
extra shifts. It is merely the cooling
system functioning properly. The fan will slow down when additional
cooling is not required and the
clutch disengages.
This fan noise may also be heard
when starting the engine. It will go
away as the fan clutch partially
disengages.
If the vehicle has electric cooling
fan(s), the fans may be heard
spinning at low speed during most
everyday driving. The fans may turn
off if no cooling is required. Under
heavy vehicle loading, trailer towing,
high outside temperatures,
or operation of the air conditioning
system, the fans may change to
high speed and an increase in fan
noise may be heard. This is normal
and indicates that the cooling
system is functioning properly. The
fans will change to low speed when
additional cooling is no longer
required.
The electric engine cooling fans
may run after the engine has been
turned. off. This is normal and no
service is required.
Power Steering Fluid
(1500 Series)
The vehicle has electric power
steering and does not use power
steering fluid.
Power Steering Fluid
(2500/3500 Series)
See
Engine Compartment Overview
0 329 for reservoir location.
When to Check Power Steering
Fluid
It is not necessary to regularly
check power steering fluid unless
there is a leak suspected in the
system or an unusual noise is
heard. A fluid loss in this system
could indicate a problem. Have the
system inspected and repaired.
Page 378 of 490
Chevrolet Silverado LD 1500 and Silverado 2500/3500 Owner Manual (GMNA-
Localizing-U.S./Canada-12162993) - 2019 - crc - 7/30/18
Vehicle Care 377
(7) Service Description:The
service description indicates the
load index and speed rating of a
tire. If two numbers are given as
in the example, 120/116, then
this represents the load index for
single versus dual wheel usage
(single/dual). The speed rating is
the maximum speed a tire is
certified to carry a load.
Tire Terminology and
Definitions
Air Pressure:The amount of
air inside the tire pressing
outward on each square inch of
the tire. Air pressure is
expressed in kPa (kilopascal)
or psi (pounds per square inch).
Accessory Weight
:The
combined weight of optional
accessories. Some examples of
optional accessories are
automatic transmission, power
windows, power seats, and air
conditioning. Aspect Ratio
:The relationship
of a tire's height to its width.
Belt
:A rubber coated layer of
cords between the plies and the
tread. Cords may be made from
steel or other reinforcing
materials.
Bead
:The tire bead contains
steel wires wrapped by steel
cords that hold the tire onto
the rim.
Bias Ply Tire
:A pneumatic tire
in which the plies are laid at
alternate angles less than
90 degrees to the centerline of
the tread.
Cold Tire Pressure
:The
amount of air pressure in a tire,
measured in kPa (kilopascal)
or psi (pounds per square inch)
before a tire has built up heat
from driving. See Tire Pressure
0 379. Curb Weight
:The weight of a
motor vehicle with standard and
optional equipment including the
maximum capacity of fuel, oil,
and coolant, but without
passengers and cargo.
DOT Markings
:A code molded
into the sidewall of a tire
signifying that the tire is in
compliance with the U.S.
Department of Transportation
(DOT) Motor Vehicle Safety
Standards. The DOT code
includes the Tire Identification
Number (TIN), an alphanumeric
designator which can also
identify the tire manufacturer,
production plant, brand, and
date of production.
GVWR
:Gross Vehicle Weight
Rating. See Vehicle Load Limits
0 238.
GAWR FRT
:Gross Axle Weight
Rating for the front axle. See
Vehicle Load Limits 0238.
Page 404 of 490
Chevrolet Silverado LD 1500 and Silverado 2500/3500 Owner Manual (GMNA-
Localizing-U.S./Canada-12162993) - 2019 - crc - 7/30/18
Vehicle Care 403
Warning (Continued)
towel can be used; however, use
a scraper or wire brush later to
remove all rust or dirt.
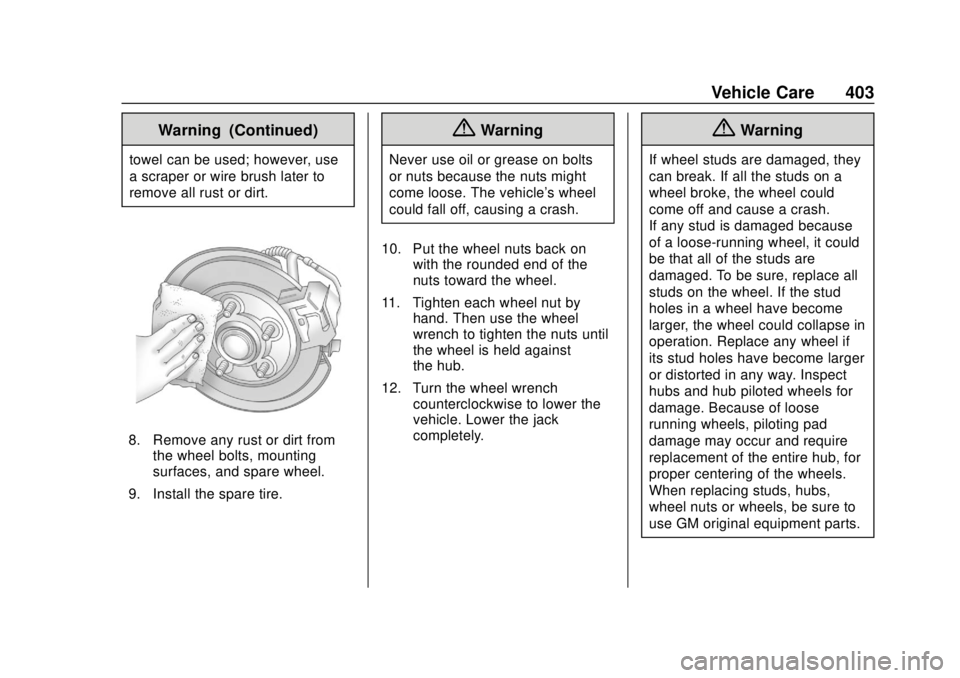
8. Remove any rust or dirt fromthe wheel bolts, mounting
surfaces, and spare wheel.
9. Install the spare tire.
{Warning
Never use oil or grease on bolts
or nuts because the nuts might
come loose. The vehicle's wheel
could fall off, causing a crash.
10. Put the wheel nuts back on with the rounded end of the
nuts toward the wheel.
11. Tighten each wheel nut by hand. Then use the wheel
wrench to tighten the nuts until
the wheel is held against
the hub.
12. Turn the wheel wrench counterclockwise to lower the
vehicle. Lower the jack
completely.
{Warning
If wheel studs are damaged, they
can break. If all the studs on a
wheel broke, the wheel could
come off and cause a crash.
If any stud is damaged because
of a loose-running wheel, it could
be that all of the studs are
damaged. To be sure, replace all
studs on the wheel. If the stud
holes in a wheel have become
larger, the wheel could collapse in
operation. Replace any wheel if
its stud holes have become larger
or distorted in any way. Inspect
hubs and hub‐piloted wheels for
damage. Because of loose
running wheels, piloting pad
damage may occur and require
replacement of the entire hub, for
proper centering of the wheels.
When replacing studs, hubs,
wheel nuts or wheels, be sure to
use GM original equipment parts.
Page 421 of 490
Chevrolet Silverado LD 1500 and Silverado 2500/3500 Owner Manual (GMNA-
Localizing-U.S./Canada-12162993) - 2019 - crc - 7/30/18
420 Vehicle Care
Dry the finish with a soft, clean
chamois or an all-cotton towel to
avoid surface scratches and water
spotting.
Finish Care
Application of aftermarket clearcoat
sealant/wax materials is not
recommended. If painted surfaces
are damaged, see your dealer to
have the damage assessed and
repaired. Foreign materials such as
calcium chloride and other salts, ice
melting agents, road oil and tar, tree
sap, bird droppings, chemicals from
industrial chimneys, etc., can
damage the vehicle's finish if they
remain on painted surfaces. Wash
the vehicle as soon as possible.
If necessary, use non-abrasive
cleaners that are marked safe for
painted surfaces to remove foreign
matter.
Occasional hand waxing or mild
polishing should be done to remove
residue from the paint finish. See
your dealer for approved cleaning
products.Do not apply waxes or polishes to
uncoated plastic, vinyl, rubber,
decals, simulated wood, or flat paint
as damage can occur.Caution
Machine compounding or
aggressive polishing on a
basecoat/clearcoat paint finish
may damage it. Use only
non-abrasive waxes and polishes
that are made for a basecoat/
clearcoat paint finish on the
vehicle.
To keep the paint finish looking new,
keep the vehicle garaged or
covered whenever possible. Protecting Exterior Bright Metal
Moldings
Caution
Failure to clean and protect the
bright metal moldings can result
in a hazy white finish or pitting.
This damage would not be
covered by the vehicle warranty.
The bright metal moldings on the
vehicle are aluminum, chrome or
stainless steel. To prevent damage
always follow these cleaning
instructions:
. Be sure the molding is cool to
the touch before applying any
cleaning solution.
. Use only approved cleaning
solutions for aluminum, chrome
or stainless steel. Some
cleaners are highly acidic or
contain alkaline substances and
can damage the moldings.
. Always dilute a concentrated
cleaner according to the
manufacturer ’s instructions.
Page 424 of 490
Chevrolet Silverado LD 1500 and Silverado 2500/3500 Owner Manual (GMNA-
Localizing-U.S./Canada-12162993) - 2019 - crc - 7/30/18
Vehicle Care 423
Caution
To avoid surface damage on
wheels and wheel trim, do not
use strong soaps, chemicals,
abrasive polishes, cleaners,
or brushes. Use only GM
approved cleaners. Do not drive
the vehicle through an automatic
car wash that uses silicone
carbide tire/wheel cleaning
brushes. Damage could occur
and the repairs would not be
covered by the vehicle warranty.
Brake System
Visually inspect brake lines and
hoses for proper hook-up, binding,
leaks, cracks, chafing, etc. Inspect
disc brake pads for wear and rotors
for surface condition. Inspect drum
brake linings/shoes for wear or
cracks. Inspect all other brake parts.
Steering, Suspension, and
Chassis Components
Visually inspect steering,
suspension, and chassis
components for damaged, loose,
or missing parts or signs of wear at
least once a year.
Inspect power steering for proper
attachment, connections, binding,
leaks, cracks, chafing, etc.
Visually check constant velocity joint
boots and axle seals for leaks.
1500 Series vehicles, at least every
other oil change lubricate the outer
tie rod ends.
2500/3500 Series vehicles, at least
every other engine oil change
lubricate the upper and lower
control arm ball joints. Control arm
ball joints on 1500 series vehicles
are maintenance-free.
2500/3500 Series vehicles equipped
with steering linkage, at least every
other engine oil change lubricate the
tie rod ball joints, idler arm pivot
shaft bearings, idler arm socket, and
pitman arm socket.
Caution
Lubrication of applicable steering/
suspension points should not be
done unless the temperature is
−12 °C (10 °F) or higher,
or damage could result.
Body Component Lubrication
Lubricate all key lock cylinders,
hood hinges, liftgate hinges, and the
steel fuel door hinge unless the
components are plastic. Applying
silicone grease on weatherstrips
with a clean cloth will make them
last longer, seal better, and not stick
or squeak.
Underbody Maintenance
At least twice a year, spring and fall,
use plain water to flush any
corrosive materials from the
underbody. Take care to thoroughly
clean any areas where mud and
other debris can collect. If equipped
with power assist steps, extend
them and then use a high pressure
wash to clean all joints and gaps.