2019 CHEVROLET SILVERADO 1500 LD child lock
[x] Cancel search: child lockPage 116 of 490
Chevrolet Silverado LD 1500 and Silverado 2500/3500 Owner Manual (GMNA-
Localizing-U.S./Canada-12162993) - 2019 - crc - 7/30/18
Seats and Restraints 115
OFF indicator in the passenger
airbag status indicator should
light and stay lit when you start
the vehicle. SeePassenger
Airbag Status Indicator 0145.
2. Put the child restraint on the seat.
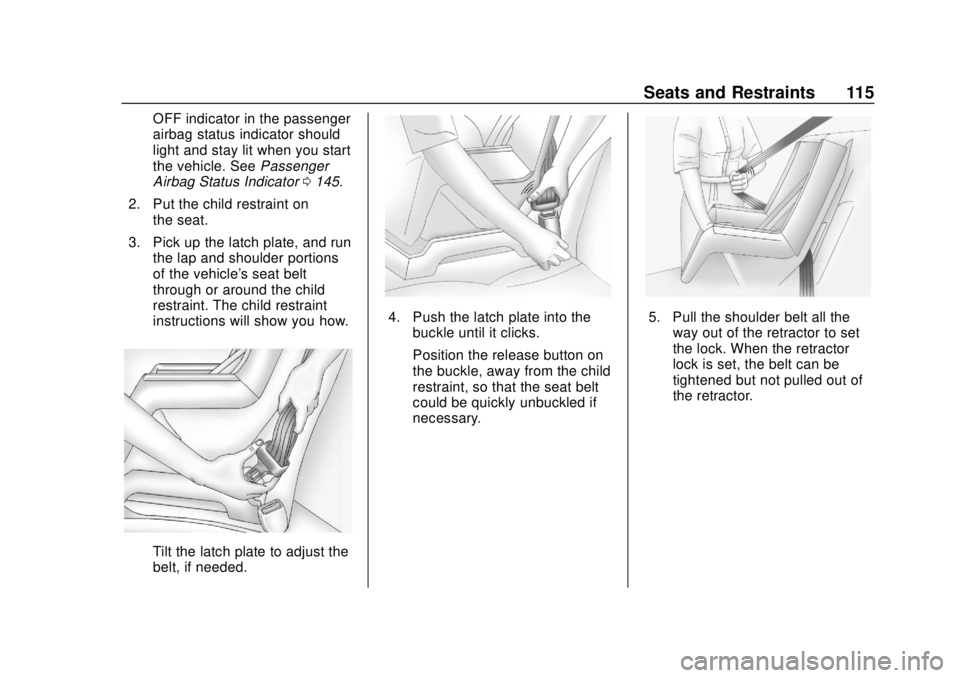
3. Pick up the latch plate, and run the lap and shoulder portions
of the vehicle's seat belt
through or around the child
restraint. The child restraint
instructions will show you how.
Tilt the latch plate to adjust the
belt, if needed.
4. Push the latch plate into the
buckle until it clicks.
Position the release button on
the buckle, away from the child
restraint, so that the seat belt
could be quickly unbuckled if
necessary.5. Pull the shoulder belt all theway out of the retractor to set
the lock. When the retractor
lock is set, the belt can be
tightened but not pulled out of
the retractor.
Page 117 of 490
Chevrolet Silverado LD 1500 and Silverado 2500/3500 Owner Manual (GMNA-
Localizing-U.S./Canada-12162993) - 2019 - crc - 7/30/18
116 Seats and Restraints
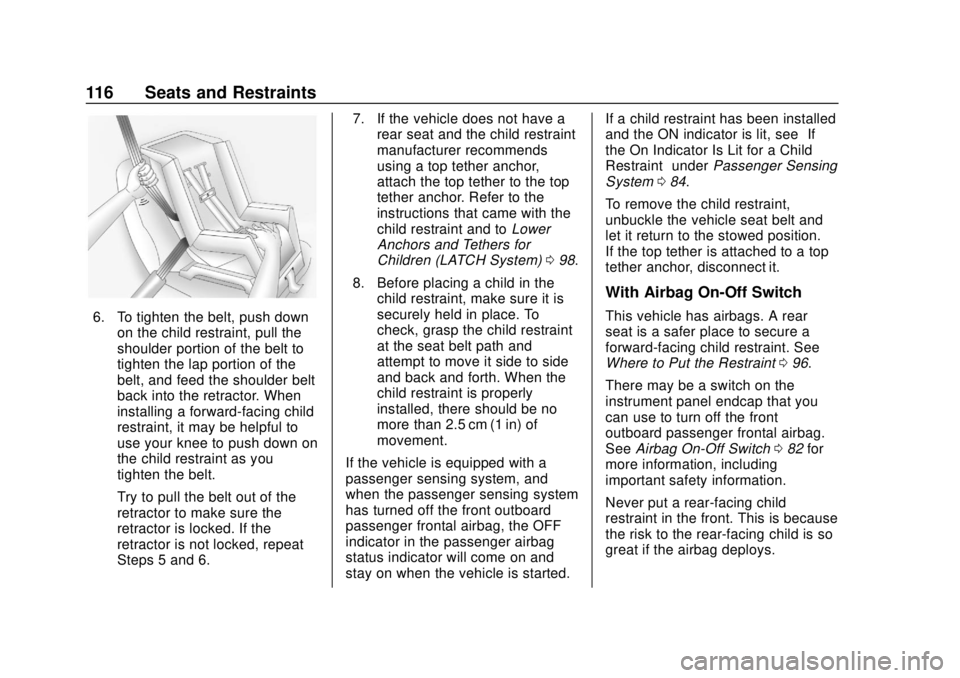
6. To tighten the belt, push downon the child restraint, pull the
shoulder portion of the belt to
tighten the lap portion of the
belt, and feed the shoulder belt
back into the retractor. When
installing a forward-facing child
restraint, it may be helpful to
use your knee to push down on
the child restraint as you
tighten the belt.
Try to pull the belt out of the
retractor to make sure the
retractor is locked. If the
retractor is not locked, repeat
Steps 5 and 6. 7. If the vehicle does not have a
rear seat and the child restraint
manufacturer recommends
using a top tether anchor,
attach the top tether to the top
tether anchor. Refer to the
instructions that came with the
child restraint and to Lower
Anchors and Tethers for
Children (LATCH System) 098.
8. Before placing a child in the child restraint, make sure it is
securely held in place. To
check, grasp the child restraint
at the seat belt path and
attempt to move it side to side
and back and forth. When the
child restraint is properly
installed, there should be no
more than 2.5 cm (1 in) of
movement.
If the vehicle is equipped with a
passenger sensing system, and
when the passenger sensing system
has turned off the front outboard
passenger frontal airbag, the OFF
indicator in the passenger airbag
status indicator will come on and
stay on when the vehicle is started. If a child restraint has been installed
and the ON indicator is lit, see
“If
the On Indicator Is Lit for a Child
Restraint” underPassenger Sensing
System 084.
To remove the child restraint,
unbuckle the vehicle seat belt and
let it return to the stowed position.
If the top tether is attached to a top
tether anchor, disconnect it.
With Airbag On-Off Switch
This vehicle has airbags. A rear
seat is a safer place to secure a
forward-facing child restraint. See
Where to Put the Restraint 096.
There may be a switch on the
instrument panel endcap that you
can use to turn off the front
outboard passenger frontal airbag.
See Airbag On-Off Switch 082 for
more information, including
important safety information.
Never put a rear-facing child
restraint in the front. This is because
the risk to the rear-facing child is so
great if the airbag deploys.
Page 119 of 490
Chevrolet Silverado LD 1500 and Silverado 2500/3500 Owner Manual (GMNA-
Localizing-U.S./Canada-12162993) - 2019 - crc - 7/30/18
118 Seats and Restraints
1. Move the seat as far back as itwill go before securing the
forward-facing child restraint.
Move the seat upward or the
seatback to an upright position,
if needed, to get a tight
installation of the child
restraint.
When the airbag off switch (if
equipped) has turned off the
front outboard passenger
frontal airbag, the OFF
indicator in the airbag off light
should light and stay lit when
you start the vehicle. See
Airbag On-Off Light 0144.
2. Put the child restraint on the seat.
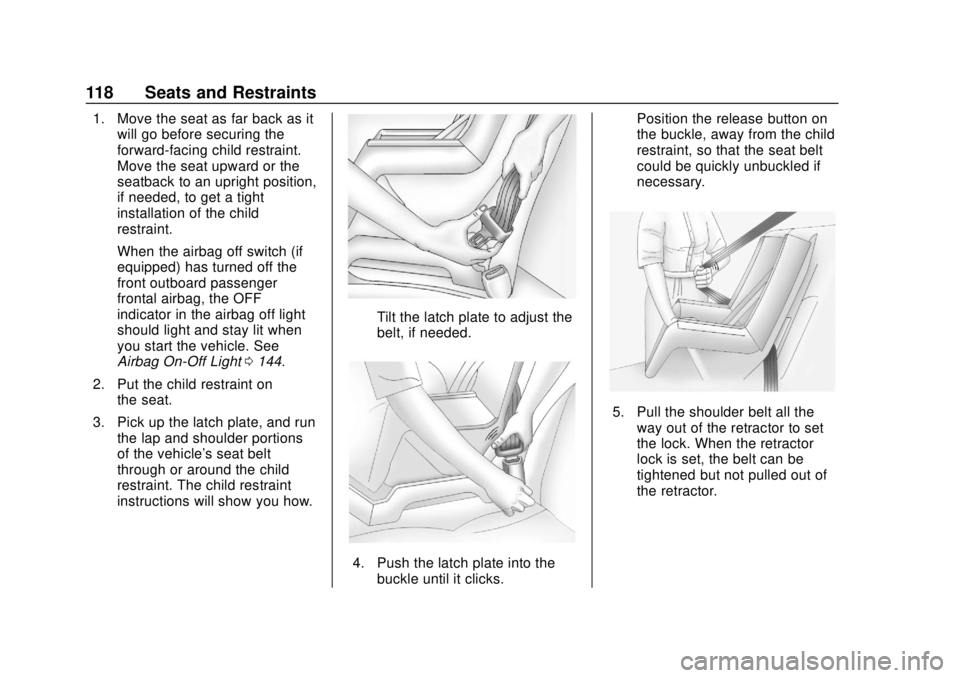
3. Pick up the latch plate, and run the lap and shoulder portions
of the vehicle's seat belt
through or around the child
restraint. The child restraint
instructions will show you how.
Tilt the latch plate to adjust the
belt, if needed.
4. Push the latch plate into the
buckle until it clicks. Position the release button on
the buckle, away from the child
restraint, so that the seat belt
could be quickly unbuckled if
necessary.
5. Pull the shoulder belt all the
way out of the retractor to set
the lock. When the retractor
lock is set, the belt can be
tightened but not pulled out of
the retractor.
Page 120 of 490
Chevrolet Silverado LD 1500 and Silverado 2500/3500 Owner Manual (GMNA-
Localizing-U.S./Canada-12162993) - 2019 - crc - 7/30/18
Seats and Restraints 119
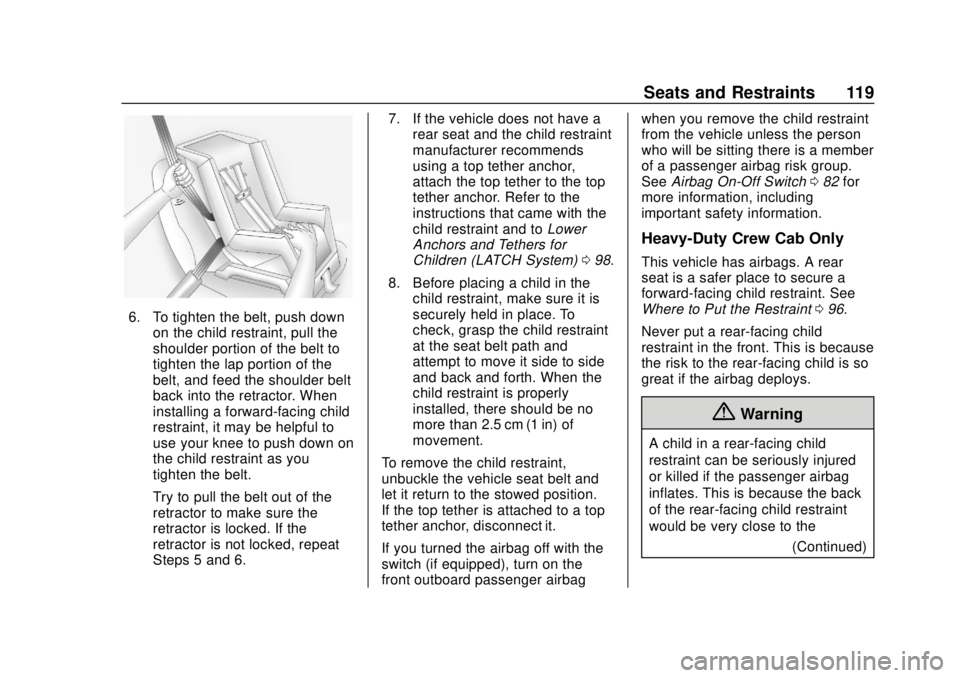
6. To tighten the belt, push downon the child restraint, pull the
shoulder portion of the belt to
tighten the lap portion of the
belt, and feed the shoulder belt
back into the retractor. When
installing a forward-facing child
restraint, it may be helpful to
use your knee to push down on
the child restraint as you
tighten the belt.
Try to pull the belt out of the
retractor to make sure the
retractor is locked. If the
retractor is not locked, repeat
Steps 5 and 6. 7. If the vehicle does not have a
rear seat and the child restraint
manufacturer recommends
using a top tether anchor,
attach the top tether to the top
tether anchor. Refer to the
instructions that came with the
child restraint and to Lower
Anchors and Tethers for
Children (LATCH System) 098.
8. Before placing a child in the child restraint, make sure it is
securely held in place. To
check, grasp the child restraint
at the seat belt path and
attempt to move it side to side
and back and forth. When the
child restraint is properly
installed, there should be no
more than 2.5 cm (1 in) of
movement.
To remove the child restraint,
unbuckle the vehicle seat belt and
let it return to the stowed position.
If the top tether is attached to a top
tether anchor, disconnect it.
If you turned the airbag off with the
switch (if equipped), turn on the
front outboard passenger airbag when you remove the child restraint
from the vehicle unless the person
who will be sitting there is a member
of a passenger airbag risk group.
See
Airbag On-Off Switch 082 for
more information, including
important safety information.
Heavy-Duty Crew Cab Only
This vehicle has airbags. A rear
seat is a safer place to secure a
forward-facing child restraint. See
Where to Put the Restraint 096.
Never put a rear-facing child
restraint in the front. This is because
the risk to the rear-facing child is so
great if the airbag deploys.
{Warning
A child in a rear-facing child
restraint can be seriously injured
or killed if the passenger airbag
inflates. This is because the back
of the rear-facing child restraint
would be very close to the (Continued)
Page 122 of 490
Chevrolet Silverado LD 1500 and Silverado 2500/3500 Owner Manual (GMNA-
Localizing-U.S./Canada-12162993) - 2019 - crc - 7/30/18
Seats and Restraints 121
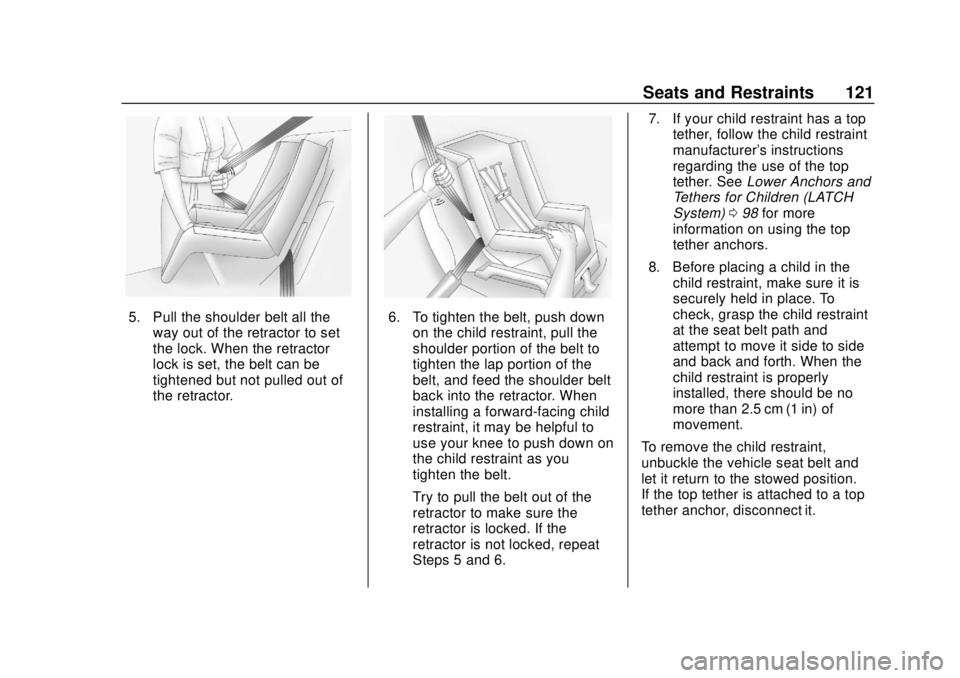
5. Pull the shoulder belt all theway out of the retractor to set
the lock. When the retractor
lock is set, the belt can be
tightened but not pulled out of
the retractor.6. To tighten the belt, push downon the child restraint, pull the
shoulder portion of the belt to
tighten the lap portion of the
belt, and feed the shoulder belt
back into the retractor. When
installing a forward-facing child
restraint, it may be helpful to
use your knee to push down on
the child restraint as you
tighten the belt.
Try to pull the belt out of the
retractor to make sure the
retractor is locked. If the
retractor is not locked, repeat
Steps 5 and 6. 7. If your child restraint has a top
tether, follow the child restraint
manufacturer's instructions
regarding the use of the top
tether. See Lower Anchors and
Tethers for Children (LATCH
System) 098 for more
information on using the top
tether anchors.
8. Before placing a child in the child restraint, make sure it is
securely held in place. To
check, grasp the child restraint
at the seat belt path and
attempt to move it side to side
and back and forth. When the
child restraint is properly
installed, there should be no
more than 2.5 cm (1 in) of
movement.
To remove the child restraint,
unbuckle the vehicle seat belt and
let it return to the stowed position.
If the top tether is attached to a top
tether anchor, disconnect it.
Page 282 of 490
Chevrolet Silverado LD 1500 and Silverado 2500/3500 Owner Manual (GMNA-
Localizing-U.S./Canada-12162993) - 2019 - crc - 7/30/18
Driving and Operating 281
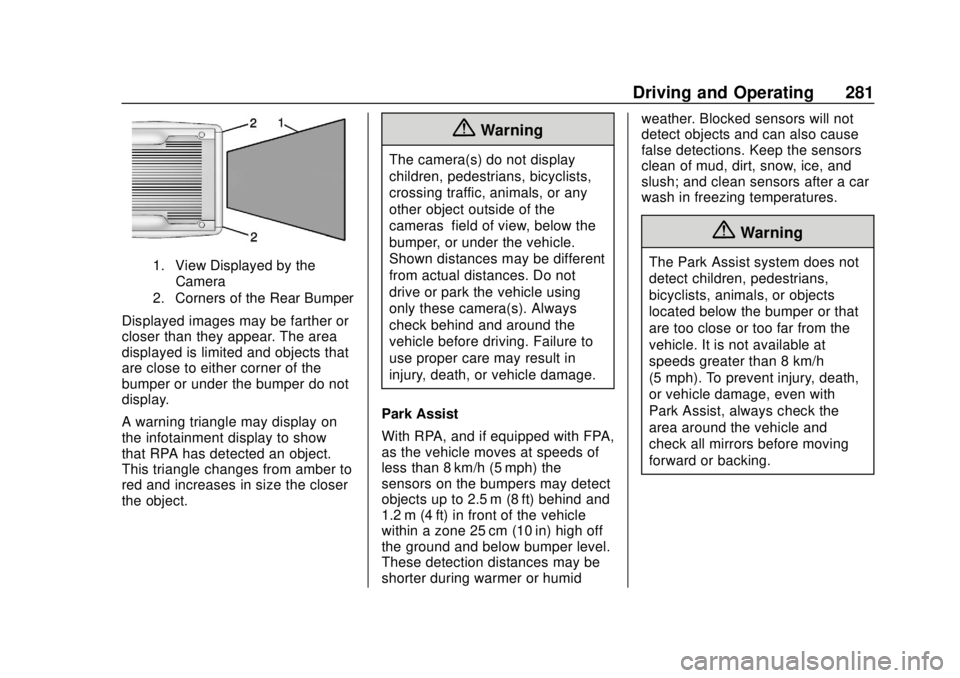
1. View Displayed by theCamera
2. Corners of the Rear Bumper
Displayed images may be farther or
closer than they appear. The area
displayed is limited and objects that
are close to either corner of the
bumper or under the bumper do not
display.
A warning triangle may display on
the infotainment display to show
that RPA has detected an object.
This triangle changes from amber to
red and increases in size the closer
the object.
{Warning
The camera(s) do not display
children, pedestrians, bicyclists,
crossing traffic, animals, or any
other object outside of the
cameras’ field of view, below the
bumper, or under the vehicle.
Shown distances may be different
from actual distances. Do not
drive or park the vehicle using
only these camera(s). Always
check behind and around the
vehicle before driving. Failure to
use proper care may result in
injury, death, or vehicle damage.
Park Assist
With RPA, and if equipped with FPA,
as the vehicle moves at speeds of
less than 8 km/h (5 mph) the
sensors on the bumpers may detect
objects up to 2.5 m (8 ft) behind and
1.2 m (4 ft) in front of the vehicle
within a zone 25 cm (10 in) high off
the ground and below bumper level.
These detection distances may be
shorter during warmer or humid weather. Blocked sensors will not
detect objects and can also cause
false detections. Keep the sensors
clean of mud, dirt, snow, ice, and
slush; and clean sensors after a car
wash in freezing temperatures.
{Warning
The Park Assist system does not
detect children, pedestrians,
bicyclists, animals, or objects
located below the bumper or that
are too close or too far from the
vehicle. It is not available at
speeds greater than 8 km/h
(5 mph). To prevent injury, death,
or vehicle damage, even with
Park Assist, always check the
area around the vehicle and
check all mirrors before moving
forward or backing.
Page 479 of 490

Chevrolet Silverado LD 1500 and Silverado 2500/3500 Owner Manual (GMNA-
Localizing-U.S./Canada-12162993) - 2019 - crc - 7/30/18
478 Index
CaliforniaPerchlorate Materials
Requirements . . . . . . . . . . . . . . . 326
California Proposition
65 Warning . . . . . . . . . .326, 350, 409, Back Cover
Canadian Vehicle Owners . . . . . . . . 2
Capacities and Specifications . . . . . . . . . . . . . . . . . 447
Carbon Monoxide
Engine Exhaust . . . . . . . . . . . . . . . 255
Tailgate . . . . . . . . . . . . . . . . . . . . . . . . . 42
Winter Driving . . . . . . . . . . . . . . . . 236
Cargo Tie-Downs . . . . . . . . . . . . . . . . . . . . 124
Caution, Danger, and Warning . . . . 3
Center Console Storage . . . . . . . . 123
Center High-Mounted Stoplamp (CHMSL) and
Cargo Lamp . . . . . . . . . . . . . . . . . . . 362
Center Seat . . . . . . . . . . . . . . . . . . . . . 57
Chains, Tire . . . . . . . . . . . . . . . . . . . . 395
Charging Wireless . . . . . . . . . . . . . . . . . . . . . . 132
Charging System Light . . . . . . . . . 146 Check
Engine Light (Malfunction
Indicator) . . . . . . . . . . . . . . . . . . . . 146
Ignition Transmission Lock . . . 355
Child Restraints Infants and Young Children . . . . . 92
Lower Anchors and Tethersfor Children . . . . . . . . . . . . . . . . . . . 98
Older Children . . . . . . . . . . . . . . . . . . 91
Securing . . . . . . . . . . . . . . . . . .110, 113
Systems . . . . . . . . . . . . . . . . . . . . . . . . 95
Circuit Breakers . . . . . . . . . . . . . . . . 363
Cleaning Exterior Care . . . . . . . . . . . . . . . . . 419
Interior Care . . . . . . . . . . . . . . . . . . 424
Climate Control
Systems . . . . . . . . . . . . . . . . . 216, 218
Air Conditioning . . . . . . . . . 216, 218
Dual Automatic . . . . . . . . . . . . . . . 219
Heating . . . . . . . . . . . . . . . . . . 216, 218
Clock . . . . . . . . . . . . . . . . . . . . . . . . . . . 129
Cluster, Instrument . . . . . . . . . . . . . 136
Collision Damage Repair . . . . . . . 457
Compartments Storage . . . . . . . . . . . . . . . . . . . . . . . 122
Compass . . . . . . . . . . . . . . . . . . . . . . . 129
Connected Services Connections . . . . . . . . . . . . . . . . . . 473 Connected Services (cont'd)
Diagnostics . . . . . . . . . . . . . . . . . . . 475
Navigation . . . . . . . . . . . . . . . . . . . . 472
Connections
Connected Services . . . . . . . . . . 473
Control Hill Descent . . . . . . . . . . . . . . . . . . 275
Traction and ElectronicStability . . . . . . . . . . . . . . . . . . . . . 273
Control Light Hill Descent . . . . . . . . . . . . . . . . . . 150
Control of a Vehicle . . . . . . . . . . . . . 227
Convex Mirrors . . . . . . . . . . . . . . . . . . 45
Coolant Engine Temperature Gauge . . 141
Cooling . . . . . . . . . . . . . . .216, 218, 219
Cooling System . . . . . . . . . . . . . . . . . 340
Courtesy Transportation Program . . . . . . . . . . . . . . . . . . . . . . . 456
Cruise Control . . . . . . . . . . . . . . . . . . 276 Light . . . . . . . . . . . . . . . . . . . . . . . . . . 154
Cupholders . . . . . . . . . . . . . . . . . . . . . 123
Customer Assistance . . . . . . . . . . . 453 Offices . . . . . . . . . . . . . . . . . . . . . . . . 452
Text Telephone (TTY)Users . . . . . . . . . . . . . . . . . . . . . . . 453
Page 482 of 490

Chevrolet Silverado LD 1500 and Silverado 2500/3500 Owner Manual (GMNA-
Localizing-U.S./Canada-12162993) - 2019 - crc - 7/30/18
Index 481
Gauges (cont'd)Voltmeter . . . . . . . . . . . . . . . . . . . . . 142
Warning Lights and
Indicators . . . . . . . . . . . . . . . . . . . 135
General Information Service and Maintenance . . . . . 429
Towing . . . . . . . . . . . . . . . . . . . . . . . . 294
Vehicle Care . . . . . . . . . . . . . . . . . . 325
Glove Box . . . . . . . . . . . . . . . . . . . . . . 122
GM Mobility Reimbursement
Program . . . . . . . . . . . . . . . . . . . . . . . 454
H
Halogen Bulbs . . . . . . . . . . . . . . . . . . 358
Hazard Warning Flashers . . . . . . . 175
Head Restraints . . . . . . . . . . . . . . . . . 56
HeadlampsAiming . . . . . . . . . . . . . . . . . . . . . . . . 358
Automatic . . . . . . . . . . . . . . . . . . . . . 174
Bulb Replacement . . . . . . . . . . . . 358
Daytime RunningLamps (DRL) . . . . . . . . . . . . . . . . 174
Flash-to-Pass . . . . . . . . . . . . . . . . . 174
Headlamps, Front Turn Signal, Sidemarker, and
Parking Lamps . . . . . . . . . . . . . . 359
High Intensity Discharge (HID) Lighting . . . . . . . . . . . . . . . 359 Headlamps (cont'd)
High-Beam On Light . . . . . . . . . . 153
High/Low Beam Changer . . . . . 173
Lamps On Reminder . . . . . . . . . 154
Heated Steering Wheel . . . . . . . . . . . . . . . 128
Heated and Ventilated Front Seats . . . . . . . . . . . . . . . . . . . . . . . . . . 63
Heated Mirrors . . . . . . . . . . . . . . . . . . . 48
Heater
Engine Coolant . . . . . . . . . . . . . . . 251
Heating . . . . . . . . . . . . . . .216, 218, 219
High-Beam On Light . . . . . . . . . . . . 153
High-Speed Operation . . . . . . . . . . 381
Hill and Mountain Roads . . . . . . . . 235
Hill Descent Control (HDC) . . . . . 275
Hill Descent Control Light . . . . . . . 150
Hill Start Assist (HSA) . . . . . . . . . . 272
Home Page . . . . . . . . . . . . . . . . . . . . . 184
Hood . . . . . . . . . . . . . . . . . . . . . . . . . . . 327
Horn . . . . . . . . . . . . . . . . . . . . . . . . . . . . 128
How to Wear Seat Belts Properly . . . . . . . . . . . . . . . . . . . . . . . . 68
HVAC . . . . . . . . . . . . . . . . .216, 218, 219
I
Idle System Fast . . . . . . . . . . . . . . . . . . . . . . . . . . 250
Ignition Positions . . . . . . . . . . . . . . . 247
Ignition Transmission Lock Check . . . . . . . . . . . . . . . . . . . . . . . . . 355
Immobilizer . . . . . . . . . . . . . . . . . . . . . . 44
Indicator Vehicle Ahead . . . . . . . . . . . . . . . . 151
Infants and Young Children,
Restraints . . . . . . . . . . . . . . . . . . . . . . 92
Information Publication Ordering . . . . . . . . . . 459
Infotainment . . . . . . . . . . . . . . . . . . . . 181
Infotainment System . . . . . . . . . . . . 463
Instrument Cluster . . . . . . . . . . . . . . 136
Instrument Panel
Storage Area . . . . . . . . . . . . . . . . . 122
Interior Rearview Mirrors . . . . . . . . . 49
Introduction . . . . . . . . . . . . . . . . . . . . . . . 2
J
Jack Auxiliary . . . . . . . . . . . . . . . . . . . . . . 195
Jump Starting - North America . . . . . . . . . . . . . . . . . . . . . . . 409