Page 368 of 490
Chevrolet Silverado LD 1500 and Silverado 2500/3500 Owner Manual (GMNA-
Localizing-U.S./Canada-12162993) - 2019 - crc - 7/30/18
Vehicle Care 367
Instrument Panel Fuse
Block (Right)
The right instrument panel fuse
block access door is on the
passenger side edge of the
instrument panel.
Pull off the cover to access the fuse
block.
The vehicle may not be equipped
with all of the fuses, relays, and
features shown.Fuses Usage
1 Accessory power outlet 3
Page 369 of 490
Chevrolet Silverado LD 1500 and Silverado 2500/3500 Owner Manual (GMNA-
Localizing-U.S./Canada-12162993) - 2019 - crc - 7/30/18
368 Vehicle Care
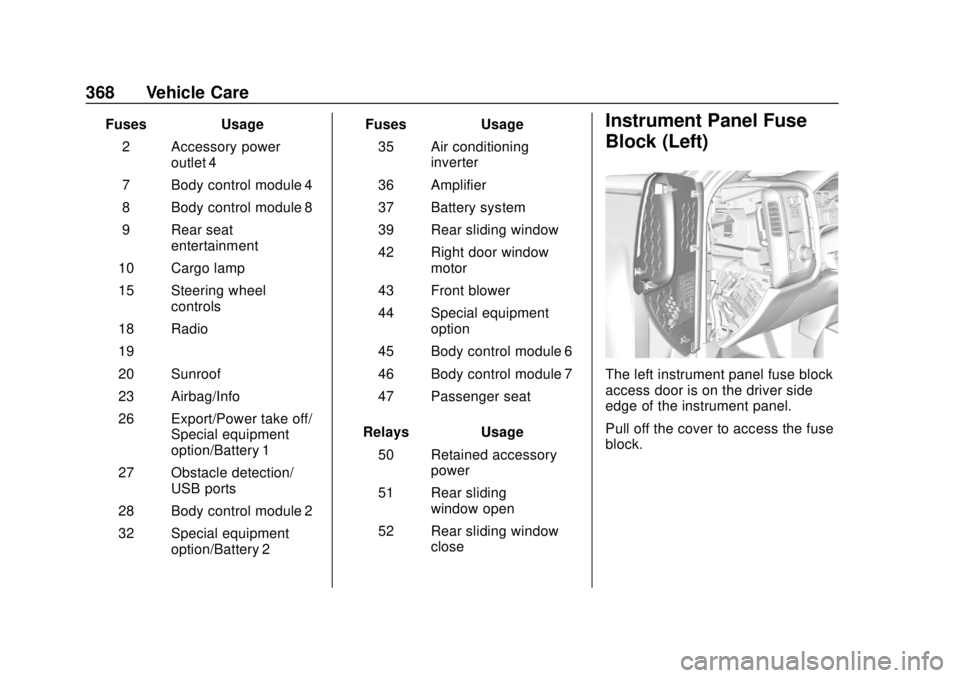
FusesUsage
2 Accessory power outlet 4
7 Body control module 4
8 Body control module 8
9 Rear seat entertainment
10 Cargo lamp
15 Steering wheel controls
18 Radio
19 –
20 Sunroof
23 Airbag/Info
26 Export/Power take off/ Special equipment
option/Battery 1
27 Obstacle detection/ USB ports
28 Body control module 2
32 Special equipment option/Battery 2 Fuses
Usage
35 Air conditioning inverter
36 Amplifier
37 Battery system
39 Rear sliding window
42 Right door window motor
43 Front blower
44 Special equipment option
45 Body control module 6
46 Body control module 7
47 Passenger seat
Relays Usage
50 Retained accessory power
51 Rear sliding window open
52 Rear sliding window closeInstrument Panel Fuse
Block (Left)
The left instrument panel fuse block
access door is on the driver side
edge of the instrument panel.
Pull off the cover to access the fuse
block.
Page 392 of 490
Chevrolet Silverado LD 1500 and Silverado 2500/3500 Owner Manual (GMNA-
Localizing-U.S./Canada-12162993) - 2019 - crc - 7/30/18
Vehicle Care 391
{Warning
Mixing tires of different sizes,
brands, or types may cause
loss of control of the vehicle,
resulting in a crash or other
vehicle damage. Use the
correct size, brand, and type
of tires on all wheels.
This vehicle may have a
different size spare than the
road tires originally installed
on the vehicle. When new, the
vehicle included a spare tire
and wheel assembly with a
similar overall diameter as the
road tires and wheels, so it is
all right to drive on it. The
spare tire was developed for
use on this vehicle and will not
affect vehicle handling.{Warning
Using bias-ply tires on the
vehicle may cause the wheel
rim flanges to develop cracks
after many miles of driving.
A tire and/or wheel could fail
suddenly and cause a crash.
Use only radial-ply tires with
the wheels on the vehicle.
Winter tires with the same speed
rating as the original equipment
tires may not be available for H,
V, W, Y and ZR speed rated
tires. Never exceed the winter
tires’ maximum speed capability
when using winter tires with a
lower speed rating.
If the vehicle tires must be
replaced with a tire that does not
have a TPC Spec number, make
sure they are the same size,
load range, speed rating, and
construction (radial) as the
original tires. Vehicles that have a tire
pressure monitoring system
could give an inaccurate
low-pressure warning if non-TPC
Spec rated tires are installed.
See
Tire Pressure Monitor
System 0381.
The Tire and Loading
Information label indicates the
original equipment tires on the
vehicle. See Vehicle Load Limits
0 238 for the label location and
more information about the Tire
and Loading Information label.
Different Size Tires and
Wheels
If wheels or tires are installed that
are a different size than the original
equipment wheels and tires, vehicle
performance, including its braking,
ride and handling characteristics,
stability, and resistance to rollover
may be affected. If the vehicle has
electronic systems such as antilock
brakes, rollover airbags, traction
control, electronic stability control,
Page 398 of 490
Chevrolet Silverado LD 1500 and Silverado 2500/3500 Owner Manual (GMNA-
Localizing-U.S./Canada-12162993) - 2019 - crc - 7/30/18
Vehicle Care 397
Warning (Continued)
4. Turn off the engine and donot restart while the vehicle
is raised.
5. Do not allow passengers to remain in the vehicle.
6. Place wheel blocks, if equipped, on both sides of
the tire at the opposite
corner of the tire being
changed.
When the vehicle has a flat tire (2),
use the following example as a
guide to assist in the placement of
the wheel blocks (1), if equipped.
1. Wheel Block (If Equipped) 2. Flat Tire
The following information explains
how to use the jack and change
a tire.
Tire Changing
Removing the Spare Tire and
Tools
Crew Cab
1. Wheel Blocks
2. Wing Nut Retaining Wheel
Blocks
3. Tool Kit
4. Wing Nut Retaining Tool Kit
5. Jack 6. Jack Knob
Regular Cab
1. Wing Nut Retaining Wheel
Blocks
2. Wheel Blocks
3. Wing Nut Retaining Tool Kit
4. Tool Kit
5. Jack
6. Jack Knob
Page 399 of 490
Chevrolet Silverado LD 1500 and Silverado 2500/3500 Owner Manual (GMNA-
Localizing-U.S./Canada-12162993) - 2019 - crc - 7/30/18
398 Vehicle Care
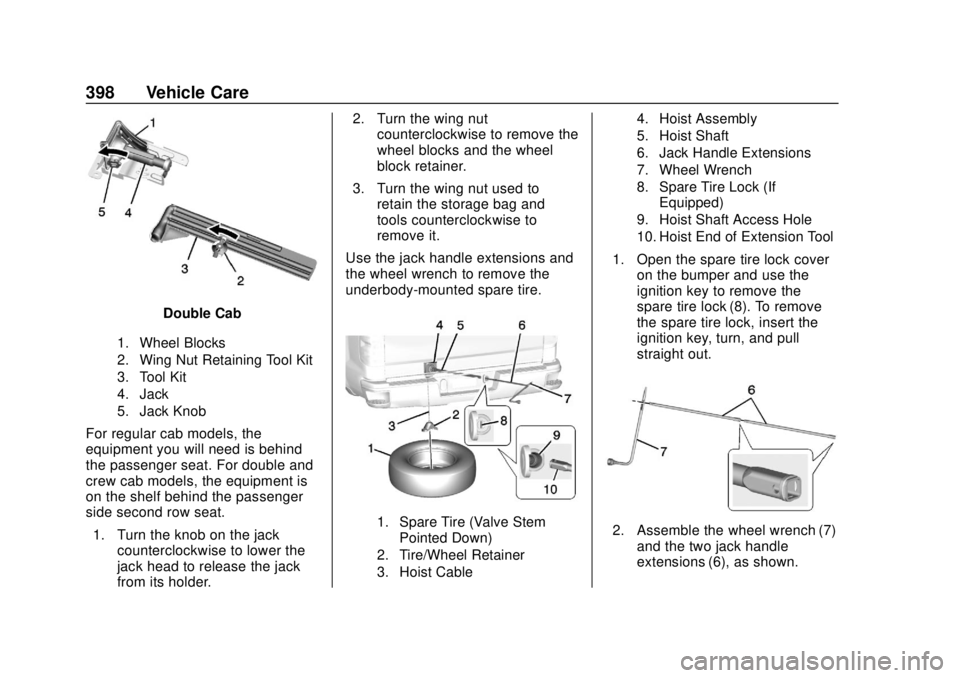
Double Cab
1. Wheel Blocks
2. Wing Nut Retaining Tool Kit
3. Tool Kit
4. Jack
5. Jack Knob
For regular cab models, the
equipment you will need is behind
the passenger seat. For double and
crew cab models, the equipment is
on the shelf behind the passenger
side second row seat.1. Turn the knob on the jack counterclockwise to lower the
jack head to release the jack
from its holder. 2. Turn the wing nut
counterclockwise to remove the
wheel blocks and the wheel
block retainer.
3. Turn the wing nut used to retain the storage bag and
tools counterclockwise to
remove it.
Use the jack handle extensions and
the wheel wrench to remove the
underbody-mounted spare tire.
1. Spare Tire (Valve Stem Pointed Down)
2. Tire/Wheel Retainer
3. Hoist Cable 4. Hoist Assembly
5. Hoist Shaft
6. Jack Handle Extensions
7. Wheel Wrench
8. Spare Tire Lock (If
Equipped)
9. Hoist Shaft Access Hole
10. Hoist End of Extension Tool
1. Open the spare tire lock cover on the bumper and use the
ignition key to remove the
spare tire lock (8). To remove
the spare tire lock, insert the
ignition key, turn, and pull
straight out.
2. Assemble the wheel wrench (7)and the two jack handle
extensions (6), as shown.
Page 400 of 490
Chevrolet Silverado LD 1500 and Silverado 2500/3500 Owner Manual (GMNA-
Localizing-U.S./Canada-12162993) - 2019 - crc - 7/30/18
Vehicle Care 399
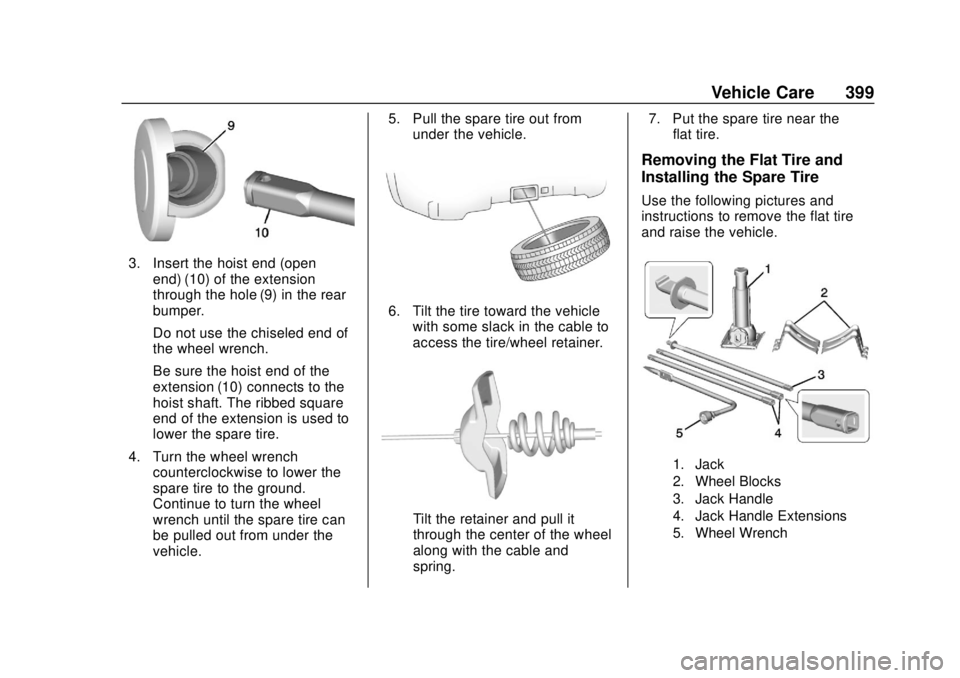
3. Insert the hoist end (openend) (10) of the extension
through the hole (9) in the rear
bumper.
Do not use the chiseled end of
the wheel wrench.
Be sure the hoist end of the
extension (10) connects to the
hoist shaft. The ribbed square
end of the extension is used to
lower the spare tire.
4. Turn the wheel wrench counterclockwise to lower the
spare tire to the ground.
Continue to turn the wheel
wrench until the spare tire can
be pulled out from under the
vehicle. 5. Pull the spare tire out from
under the vehicle.
6. Tilt the tire toward the vehiclewith some slack in the cable to
access the tire/wheel retainer.
Tilt the retainer and pull it
through the center of the wheel
along with the cable and
spring. 7. Put the spare tire near the
flat tire.
Removing the Flat Tire and
Installing the Spare Tire
Use the following pictures and
instructions to remove the flat tire
and raise the vehicle.
1. Jack
2. Wheel Blocks
3. Jack Handle
4. Jack Handle Extensions
5. Wheel Wrench
Page 401 of 490
Chevrolet Silverado LD 1500 and Silverado 2500/3500 Owner Manual (GMNA-
Localizing-U.S./Canada-12162993) - 2019 - crc - 7/30/18
400 Vehicle Care
The tools you will be using include
the jack (1), the wheel blocks (2),
the jack handle (3), the jack handle
extensions (4), and the wheel
wrench (5).1. Do a safety check before proceeding. See If a Tire Goes
Flat 0395.
2. If the vehicle has wheel nut
caps, loosen them by turning
the wheel wrench
counterclockwise. If the vehicle has a center cap
with wheel nut caps, the wheel
nut caps are designed to stay
with the center cap after they
are loosened. Remove the
entire center cap.
If the wheel has a smooth
center cap, place the chisel
end of the wheel wrench in the
slot on the wheel, and gently
pry it out.
3. Use the wheel wrench and turn
it counterclockwise to loosen
the wheel nuts. Do not remove
the wheel nuts yet.
Page 403 of 490
Chevrolet Silverado LD 1500 and Silverado 2500/3500 Owner Manual (GMNA-
Localizing-U.S./Canada-12162993) - 2019 - crc - 7/30/18
402 Vehicle Care
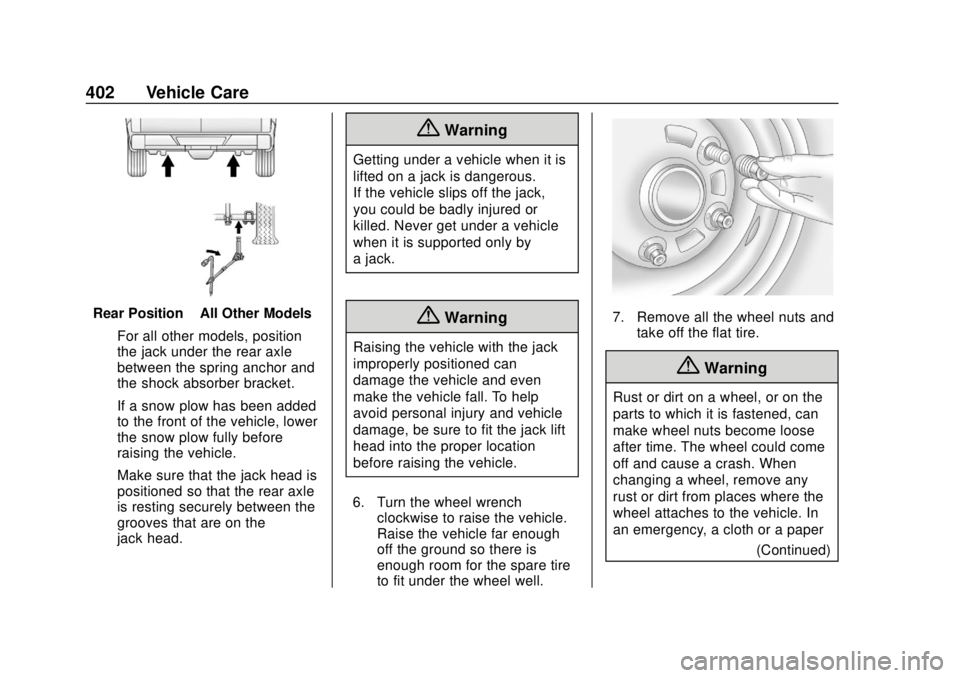
Rear Position–All Other Models
For all other models, position
the jack under the rear axle
between the spring anchor and
the shock absorber bracket.
If a snow plow has been added
to the front of the vehicle, lower
the snow plow fully before
raising the vehicle.
Make sure that the jack head is
positioned so that the rear axle
is resting securely between the
grooves that are on the
jack head.
{Warning
Getting under a vehicle when it is
lifted on a jack is dangerous.
If the vehicle slips off the jack,
you could be badly injured or
killed. Never get under a vehicle
when it is supported only by
a jack.
{Warning
Raising the vehicle with the jack
improperly positioned can
damage the vehicle and even
make the vehicle fall. To help
avoid personal injury and vehicle
damage, be sure to fit the jack lift
head into the proper location
before raising the vehicle.
6. Turn the wheel wrench clockwise to raise the vehicle.
Raise the vehicle far enough
off the ground so there is
enough room for the spare tire
to fit under the wheel well.
7. Remove all the wheel nuts andtake off the flat tire.
{Warning
Rust or dirt on a wheel, or on the
parts to which it is fastened, can
make wheel nuts become loose
after time. The wheel could come
off and cause a crash. When
changing a wheel, remove any
rust or dirt from places where the
wheel attaches to the vehicle. In
an emergency, a cloth or a paper
(Continued)