2019 CHEVROLET MALIBU ignition
[x] Cancel search: ignitionPage 7 of 382

Chevrolet Malibu Owner Manual (GMNA-Localizing-U.S./Canada/Mexico-
12461813) - 2019 - crc - 12/11/18
In Brief 7
1.Air Vents0163.
2. Turn Signal Lever. SeeTurn
and Lane-Change Signals
0151.
IntelliBeam System Button (If
Equipped). SeeExterior Lamp
Controls0147.
3.Instrument Cluster (Uplevel)
0116or
Instrument Cluster (Base
Level)0115.
Driver Information Center (DIC)
(Base Level)0134or
Driver Information Center (DIC)
(Uplevel)0137.
4.Windshield Wiper/Washer
0109.
5. Light Sensor. SeeAutomatic
Headlamp System0150.
6.Infotainment0155.
7.Climate Control Systems
0156.
Dual Automatic Climate Control
System0159(If Equipped).
8.Hazard Warning Flashers
0150.9.Power Outlets0110.
10.Traction Control/Electronic
Stability Control0192.
Assistance Systems for
Parking or Backing0205(If
Equipped).
11. Shift Lever. SeeAutomatic
Transmission0185.
12.Electric Parking Brake0189(If
Equipped).
13. USB Port. See the infotainment
manual.
14. ENGINE START/STOP Button.
SeeIgnition Positions0176.
15.Steering Wheel Controls0108.
Driver Information Center
Buttons. SeeDriver Information
Center (DIC) (Base Level)
0134or
Driver Information Center (DIC)
(Uplevel)0137.
16.Horn0108.
17.Steering Wheel Adjustment
0108(Out of View).18.Cruise Control0194.
Adaptive Cruise Control0196
(If Equipped).
Heated Steering Wheel0108
(If Equipped).
Forward Collision Alert (FCA)
System0209(If Equipped).
Lane Keep Assist (LKA)0217
(If Equipped).
19. Hood Release. SeeHood
0235.
20. Data Link Connector (Out of
View). SeeMalfunction
Indicator Lamp (Check Engine
Light)0124.
21.Parking Brake0188(If
Equipped).
22.Exterior Lamp Controls0147.
23.Instrument Panel Illumination
Control0151.
Page 10 of 382
Chevrolet Malibu Owner Manual (GMNA-Localizing-U.S./Canada/Mexico-
12461813) - 2019 - crc - 12/11/18
10 In Brief
The power windows work when the
ignition is on, in ACC/ACCESSORY,
or when Retained Accessory Power
(RAP) is active. SeeRetained
Accessory Power (RAP)0181.
Using the window switch, press to
open or pull to close the window.
The windows may be temporarily
disabled if they are used repeatedly
within a short time.
SeePower Windows049.
Seat Adjustment
Manual Front Seats
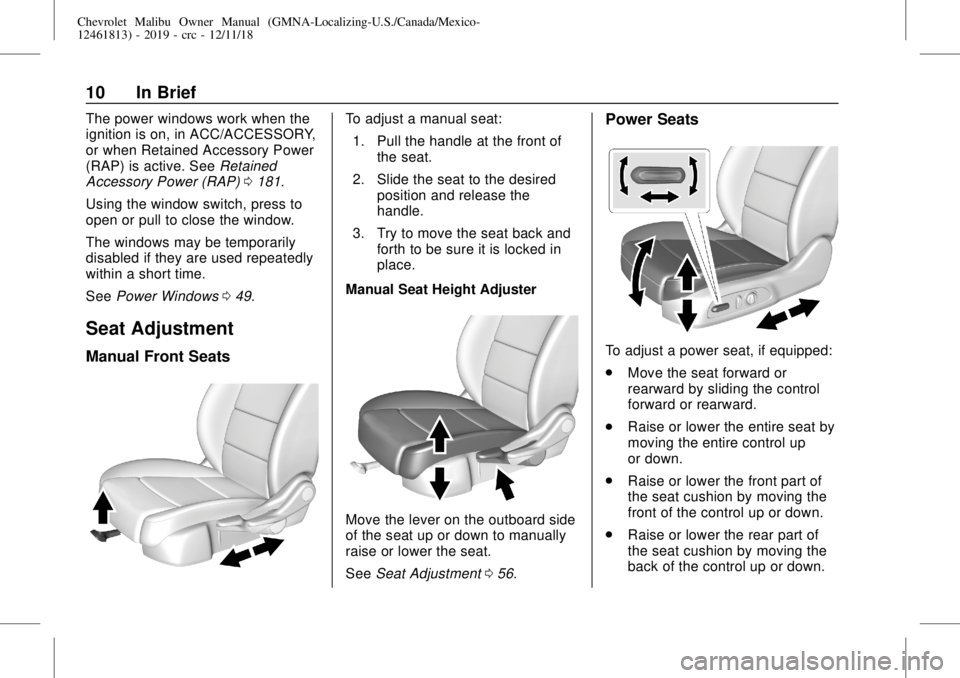
To adjust a manual seat:
1. Pull the handle at the front of
the seat.
2. Slide the seat to the desired
position and release the
handle.
3. Try to move the seat back and
forth to be sure it is locked in
place.
Manual Seat Height Adjuster
Move the lever on the outboard side
of the seat up or down to manually
raise or lower the seat.
SeeSeat Adjustment056.
Power Seats
To adjust a power seat, if equipped:
.
Move the seat forward or
rearward by sliding the control
forward or rearward.
.
Raise or lower the entire seat by
moving the entire control up
or down.
.
Raise or lower the front part of
the seat cushion by moving the
front of the control up or down.
.
Raise or lower the rear part of
the seat cushion by moving the
back of the control up or down.
Page 11 of 382
Chevrolet Malibu Owner Manual (GMNA-Localizing-U.S./Canada/Mexico-
12461813) - 2019 - crc - 12/11/18
In Brief 11
SeePower Seat Adjustment057.
Reclining Seatbacks
Manual Reclining Seatbacks
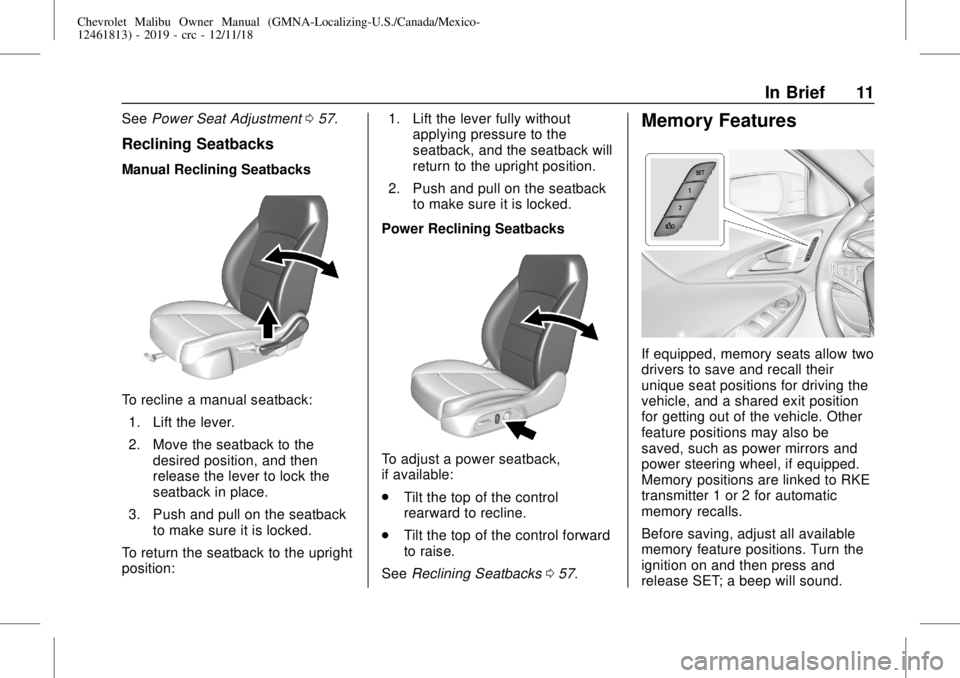
To recline a manual seatback:
1. Lift the lever.
2. Move the seatback to the
desired position, and then
release the lever to lock the
seatback in place.
3. Push and pull on the seatback
to make sure it is locked.
To return the seatback to the upright
position:1. Lift the lever fully without
applying pressure to the
seatback, and the seatback will
return to the upright position.
2. Push and pull on the seatback
to make sure it is locked.
Power Reclining Seatbacks
To adjust a power seatback,
if available:
.
Tilt the top of the control
rearward to recline.
.
Tilt the top of the control forward
to raise.
SeeReclining Seatbacks057.
Memory Features
If equipped, memory seats allow two
drivers to save and recall their
unique seat positions for driving the
vehicle, and a shared exit position
for getting out of the vehicle. Other
feature positions may also be
saved, such as power mirrors and
power steering wheel, if equipped.
Memory positions are linked to RKE
transmitter 1 or 2 for automatic
memory recalls.
Before saving, adjust all available
memory feature positions. Turn the
ignition on and then press and
release SET; a beep will sound.
Page 12 of 382
Chevrolet Malibu Owner Manual (GMNA-Localizing-U.S./Canada/Mexico-
12461813) - 2019 - crc - 12/11/18
12 In Brief
Then immediately press and hold 1,
2, or
B(Exit) until two beeps
sound. To manually recall these
positions, press and hold 1, 2, or
B
until the saved position is reached.
When Seat Entry Memory is
enabled in vehicle personalization,
positions previously saved to
memory buttons 1 and 2 are
recalled when the ignition is
changed from off to on or ACC/
ACCESSORY.
When Seat Exit Memory is enabled
in vehicle personalization, the
feature automatically recalls the
previously saved exit position when
exiting the vehicle.
Memory adjustments may not be
available upon delivery or after
service until steps in“Saving
Memory Positions”section are
performed. SeeMemory Seats059.
Second Row Seats
The rear seatbacks can be folded
down to increase cargo space.
SeeRear Seats063.
Heated and Ventilated
Seats
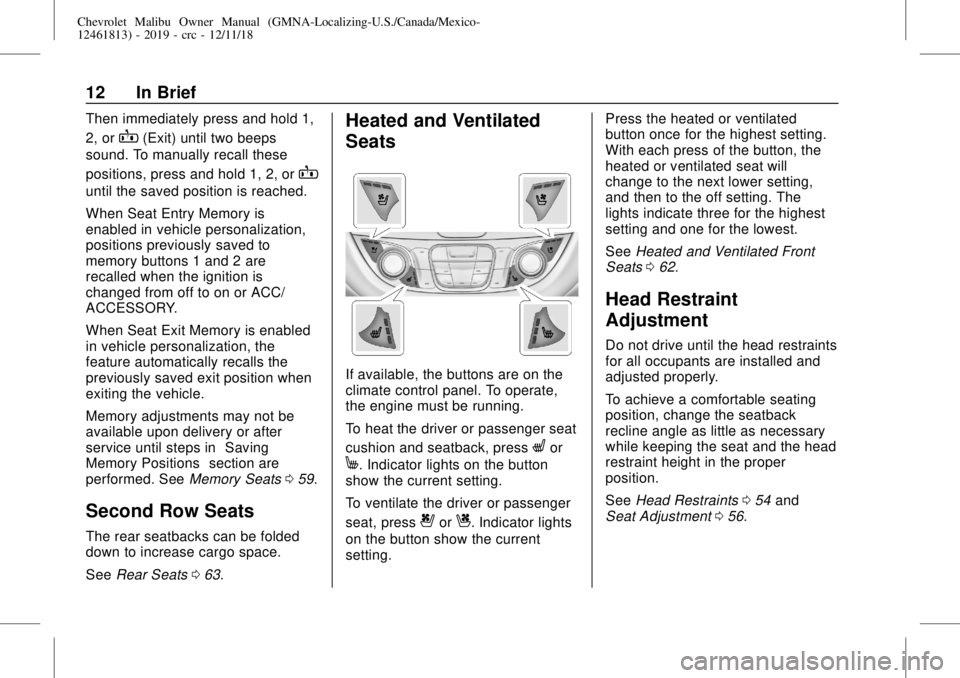
If available, the buttons are on the
climate control panel. To operate,
the engine must be running.
To heat the driver or passenger seat
cushion and seatback, press
Lor
M. Indicator lights on the button
show the current setting.
To ventilate the driver or passenger
seat, press
{orC. Indicator lights
on the button show the current
setting.Press the heated or ventilated
button once for the highest setting.
With each press of the button, the
heated or ventilated seat will
change to the next lower setting,
and then to the off setting. The
lights indicate three for the highest
setting and one for the lowest.
SeeHeated and Ventilated Front
Seats062.
Head Restraint
Adjustment
Do not drive until the head restraints
for all occupants are installed and
adjusted properly.
To achieve a comfortable seating
position, change the seatback
recline angle as little as necessary
while keeping the seat and the head
restraint height in the proper
position.
SeeHead Restraints054and
Seat Adjustment056.
Page 16 of 382
Chevrolet Malibu Owner Manual (GMNA-Localizing-U.S./Canada/Mexico-
12461813) - 2019 - crc - 12/11/18
16 In Brief
5:Turns on the headlamps
together with the parking lamps and
instrument panel lights.
See:
.
Exterior Lamp Controls0147
.
Daytime Running Lamps (DRL)
0149
Windshield Wiper/Washer
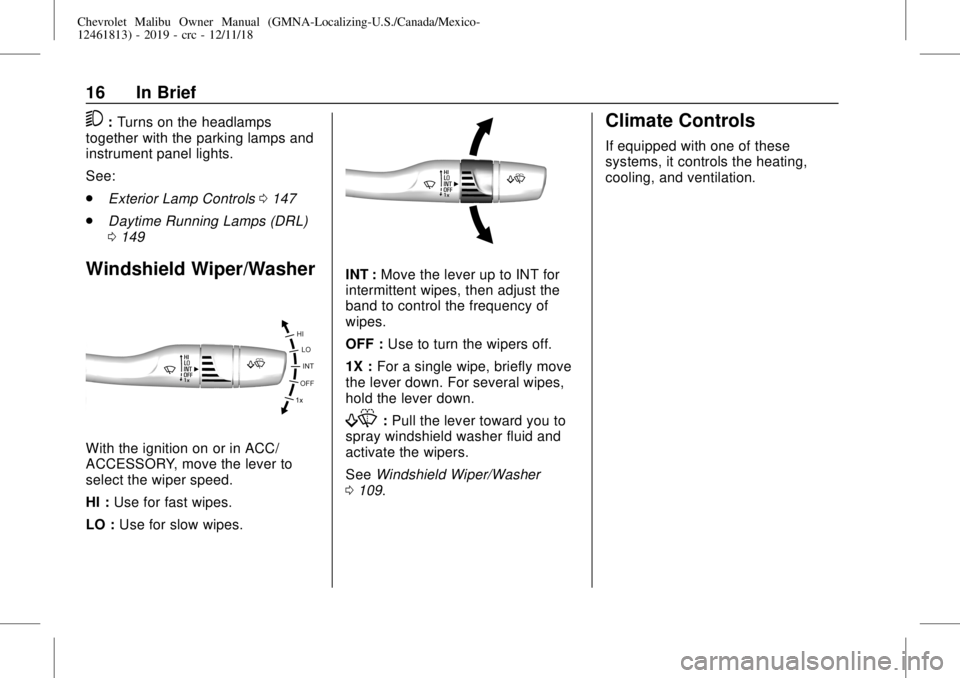
With the ignition on or in ACC/
ACCESSORY, move the lever to
select the wiper speed.
HI :Use for fast wipes.
LO :Use for slow wipes.
INT :Move the lever up to INT for
intermittent wipes, then adjust the
band to control the frequency of
wipes.
OFF :Use to turn the wipers off.
1X :For a single wipe, briefly move
the lever down. For several wipes,
hold the lever down.
f:Pull the lever toward you to
spray windshield washer fluid and
activate the wipers.
SeeWindshield Wiper/Washer
0109.
Climate Controls
If equipped with one of these
systems, it controls the heating,
cooling, and ventilation.
Page 22 of 382
Chevrolet Malibu Owner Manual (GMNA-Localizing-U.S./Canada/Mexico-
12461813) - 2019 - crc - 12/11/18
22 In Brief
SeeAssistance Systems for Parking
or Backing0205.
Park Assist
If equipped, Front and Rear Park
Assist (FRPA) uses sensors on the
front and rear bumpers to assist
with parking and avoiding objects
during low-speed parking
maneuvers. It operates at speeds
less than 8 km/h (5 mph). The
system may show a warning triangle
on the infotainment display and a
graphic on the instrument cluster to
provide the object distance. In
addition, multiple beeps may occur
if very close to an object.
SeeAssistance Systems for Parking
or Backing0205.
Automatic Parking
Assist (APA)
If equipped, the APA system helps
to search for and maneuver the
vehicle into parallel or perpendicular
parking spots using automatic
steering, DIC displays, and beeps.When the vehicle speed is below
30 km/h (18 mph), press
Oto
enable the system.
See“Automatic Parking Assist
(APA)”underAssistance Systems
for Parking or Backing0205.
Power Outlets
The accessory power outlets can be
used to plug in electrical equipment,
such as a cell phone or MP3 player.
There are two accessory power
outlets:
.
One on the center stack below
the climate control system.
.
One on the rear of the center
console.
Open the protective cover to use the
accessory power outlet.
SeePower Outlets0110.
Sunroof
If equipped, the ignition must be on
or in ACC/ACCESSORY,
or Retained Accessory Power (RAP)
must be active to operate thesunroof. SeeIgnition Positions
0176and
Retained Accessory Power (RAP)
0181.
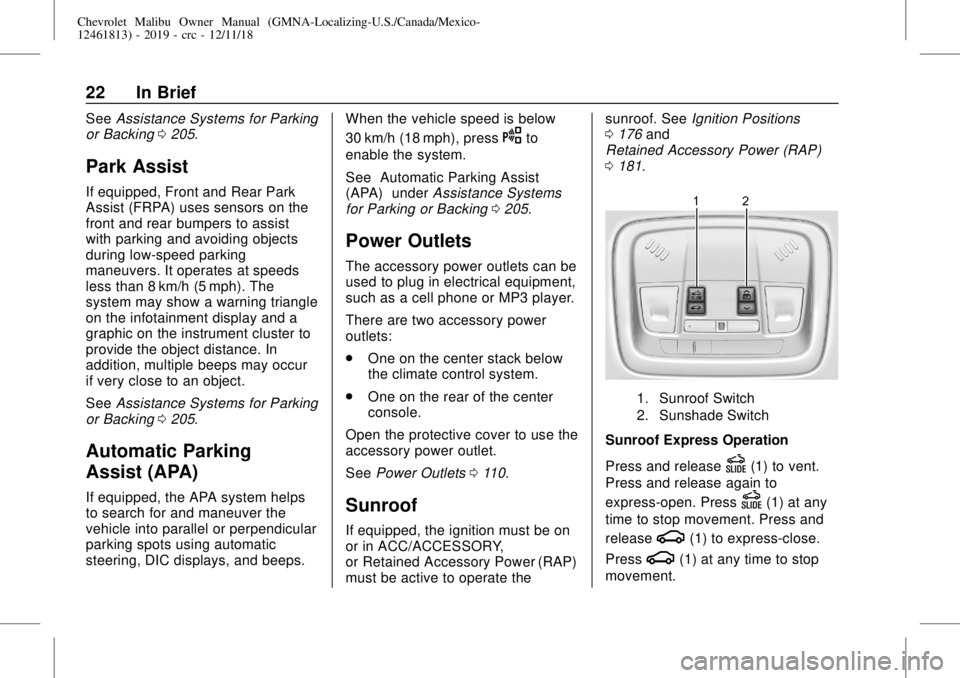
1. Sunroof Switch
2. Sunshade Switch
Sunroof Express Operation
Press and release
D(1) to vent.
Press and release again to
express-open. Press
D(1) at any
time to stop movement. Press and
release
g(1) to express-close.
Press
g(1) at any time to stop
movement.
Page 38 of 382
Chevrolet Malibu Owner Manual (GMNA-Localizing-U.S./Canada/Mexico-
12461813) - 2019 - crc - 12/11/18
38 Keys, Doors, and Windows
2. Immediately after completing
Step 1, press and hold
/for at
least four seconds or until the
turn signal lamps flash. The
turn signal lamps flashing
confirms the request to remote
start the vehicle has been
received.
When the engine starts, the parking
lamps will turn on and remain on as
long as the engine is running. The
doors will be locked and the climate
control system may come on.
The engine will continue to run for
15 minutes. After 30 seconds,
repeat the steps if a 15-minute
extension is desired. Remote start
can be extended only once.
Start the vehicle before driving.
Extending Engine Run Time
The engine run time can be
extended by another 15 minutes,
if during the first 15 minutes
Steps 1 and 2 are repeated while
the engine is still running. An
extension can be requested
30 seconds after starting. When theremote start is extended, the
second 15-minute period is added
on to the first 15 minutes for a total
of 30 minutes.
The remote start can only be
extended once.
A maximum of two remote starts,
or a single start with an extension,
is allowed between ignition cycles.
The vehicle's ignition must be
turned on and then back off before
the remote start procedure can be
used again.
Canceling a Remote Start
To cancel a remote start, do one of
the following:
.
Aim the RKE transmitter at the
vehicle and press and hold
/
until the parking lamps turn off.
.
Turn on the hazard warning
flashers.
.
Turn the vehicle on and then off.Conditions in Which Remote Start
Will Not Work
The remote vehicle start feature will
not operate if:
.
A transmitter is in the vehicle.
.
The hood is not closed.
.
The hazard warning flashers
are on.
.
The malfunction indicator lamp
is on.
.
The engine coolant temperature
is too high.
.
The oil pressure is low.
.
Two remote vehicle starts, or a
single remote start with an
extension, have already
been used.
.
The vehicle is not in P (Park).
Page 42 of 382
Chevrolet Malibu Owner Manual (GMNA-Localizing-U.S./Canada/Mexico-
12461813) - 2019 - crc - 12/11/18
42 Keys, Doors, and Windows
Delayed locking can be
programmed. SeeVehicle
Personalization0142.
Automatic Door Locks
The doors will lock automatically
when all doors are closed, the
ignition is on, and the vehicle is
shifted out of P (Park).
If a vehicle door is unlocked, and
then opened and closed, the doors
will lock either when your foot is
removed from the brake or the
vehicle speed becomes faster than
13 km/h (8 mph).
To unlock the doors:
.
Press
Kon the power door lock
switch.
.
Shift the transmission into
P (Park).
Automatic door locking cannot be
disabled. Automatic door unlocking
can be programmed. SeeVehicle
Personalization0142.
Lockout Protection
If the ignition is on or in ACC/
ACCESSORY and the power door
lock switch is pressed with the
driver door open, all the doors will
lock and only the driver door will
unlock.
If the vehicle is off and locking is
requested while a door is open,
when all doors are closed the
vehicle will check for RKE
transmitters inside. If an RKE
transmitter is detected and the
number of RKE transmitters inside
has not reduced, the driver door will
unlock and the horn will chirp three
times.
Lockout Protection can be manually
overridden with the driver door open
by pressing and holding
Qon the
power door lock switch.
Open Door Anti-Lockout
If Open Door Anti-Lockout has been
turned on and the vehicle is off, the
driver door is open, and locking is
requested, all the doors will lock and
the driver door will remain open.Press the button again to lock the
driver door. The Open Door
Anti-Lockout feature can be turned
on or off. SeeVehicle
Personalization0142.
Safety Locks
The rear door safety locks prevent
passengers from opening the rear
doors from inside the vehicle.
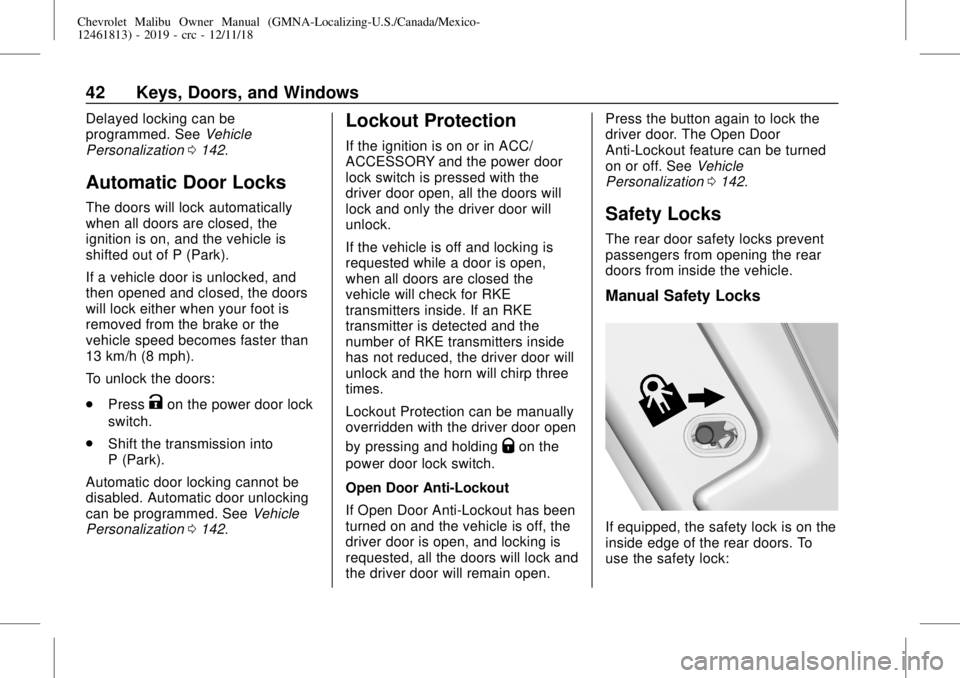
Manual Safety Locks
If equipped, the safety lock is on the
inside edge of the rear doors. To
use the safety lock: